Today is the day we all become full-stack developers. Creating a full-stack application means that we are combining the model layer, all the user views, and controller methods into a single application where the user can perform CRUD actions on data that is stored in a database managed by the application.
Being a full-stack developer also includes managing the inherit risk that comes with allowing users to submit data to the database. It is important to take all precautions available to ensure only valid, non-malicious data is added to the database.
- can apply database queries to controller methods
- can follow RESTful naming conventions
- can create a flow of information from view to database back to view
- can implement CRUD in a Rails application
- can create routes with correct parameters for RESTful conventions
- can apply strong params method to controller
- can permit appropriate params
- can apply private keyword to project methods
- CRUD
- RESTful routes
- MVP
- require
- permit
- private
- Create a new Rails app on the desktop: $
rails new rails-full-stack -d postgresql -T - $
cd rails-full-stack - Create a database: $
rails db:create - Add the git remote from GitHub Classroom
- Ensure a main branch exists
- Make an initial commit to the main branch
- Add the dependencies for RSpec:
- $
bundle add rspec-rails - $
rails generate rspec:install
- $
- Generate the model with appropriate columns and data types
- $
rails db:migrate - Generate the controller
- Begin the rails server:
$ rails server - In a browser navigate to:
http://localhost:3000
- Did you create your database?
- Did you migrate?
- Errors? Always look at the first error in the list.
- Check the top of the stack trace in your terminal for errors.
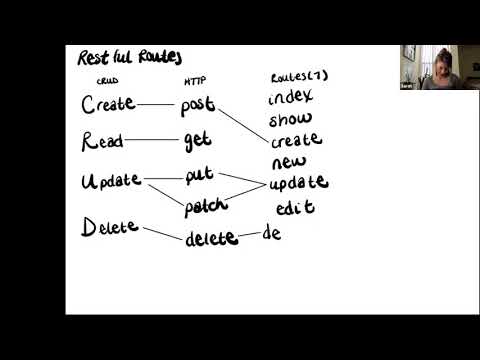
Creating a full-stack application is process of mapping out CRUD actions for a user. CRUD actions are a developer philosophy that describes the actions a user should be able to perform inside an application. CRUD actions are put into practice with RESTful routes. RESTful routes provides a mapping between HTTP verbs, controller actions, and CRUD operations in an application. Rails is a very opinionated framework that requires RESTful naming conventions be followed.
Following an organized workflow is really important in development. We first need to establish our MVP. MVP stands for minimum viable product which is an agile development philosophy where the focus is on creating only enough features as to be functional. The MVP will evolve as the app evolves. For this example, we will create the basis of an application that keeps track of a user's exercise. The MVP will allow the user to see the exercises listed in the database (index), see the details of each exercise (show), and add a new exercise to be stored by the application (create).
Prior to working through the functionality of our app, we need to generate a model and a controller using Rails generate commands. The name of the model and the name of the controller will be exactly the same and will follow the PascalCasing convention.
$ rails generate model Exercise activity:string description:string
$ rails db:migrate
$ rails generate controller Exercise
As a scaffolding step, we can add a few instances of our Exercise model to the database in Rails console.
Then we can add our RESTful routes to the application. For every step, we will be adding a controller method, a route, and a view.
The first step is to create a controller method that will access all the items from the database. In the index method, we are making an Active Record call that will save all the content from the database as an instance variable.
app/controllers/exercise_controller.rb
def index
  @exercises = Exercise.all
end
Next, we will make a route that will call the index method. Since we are returning content, the request type will be a get request.
config/routes.rb
get 'exercises' => 'exercise#index'To create the view, we will add a new file to the exercise directory called index.html.erb. The file matches the name of the controller method index. In the view we will use a combination of HTML tags and embedded Ruby to map through the Active Record array and record each value into a list.
app/views/exercise/index.html.erb
<h1>Exercise App</h1>

<ul>
  <% @exercises.each do |exercise| %>
  <li><%= exercise.activity %></li>
  <% end %>
</ul>
Show is a RESTful route that looks for one item in the database. This is done by accessing the id of the item. Inside the show method we will make an Active Record call that will find one item by id. This id will come from the url params.
app/controllers/exercise_controller.rb
def show
  @exercise = Exercise.find(params[:id])
end
Next, we will make a route that will call the show method. Because we need to extract just one item, we need the show route to expect a param. Since we are returning content, the request type will be a get request.
config/routes.rb
get 'exercises/:id' => 'exercise#show'To create the view for show, we will add a new file to the exercise directory called show.html.erb. In the view we will use a combination of HTML tags and embedded Ruby to list the attributes of the exercise.
app/views/exercise/show.html.erb
<h3><%= @exercise.activity %></h3>
<p><%= @exercise.description %></p>As developers, we want our users to be able add information to our web application that is then stored in the database.
New is a RESTful route that displays a form for the user.
app/controllers/exercise_controller.rb
def new
  @exercise = Exercise.new
end
Next, we will make a route that will take the user to a page with a form. Since we are returning content to view, the request type will be a get request.
config/routes.rb
get 'exercises/new' => 'exercise#new'To create the view for new, we will add a new file to the exercise directory called new.html.erb. In the view we will use a Ruby helper method to create form inputs. Each input will have a label and a text field for the user to enter content.
Rails offers us a very convenient method called form_with that allows us to use a series of helper methods to create form elements. Form elements are items such as text inputs, radio button, and labels. By using the form_with method we can create forms in true Ruby-like fashion. When the code renders, Rails translates it into the corresponding HTML form tags.
form_with takes a code block and passes a local variable. In this example, the variable is |form| but it can be called whatever you want as long as it clearly communicates your intent. Form helper methods are then applied to the variable form and passed a symbol of each attribute.
app/views/exercise/new.html.erb
<h3>Add a New Exercise Session</h3>
<%= form_with model: @exercise do |form| %>

  <%= form.label :activity %>
  <%= form.text_field :activity %>

  <br>
  <%= form.label :description %>
  <%= form.text_field :description %>

  <br>
  <%= form.submit 'Add Exercise' %>
<% end %>
Now we have the form, but we have not added the action of submitting data to the database. That is a separate action that will require a few additional pieces of information.
Along with validation, strong params provide control over over what information is being allowed into a database. Strong params can dictate what attributes can be created and updated by setting restrictions on the controller methods.
To implement strong params, we will create a new method in the controller that will be passed as an argument to the create and update methods.
Strong params have two methods: require and permit. The require method does exactly what you think in requiring the attributes passed in to be present in the create or update methods. The permit method allows certain items to be present but if they are not present, that is still okay. But attributes that are not listed in the strong params will not be allowed to proceed.
Private is a keyword in Ruby that restricts the scope of where a method can be called. Since strong params are only meant to be used as arguments to controller methods, we can list them as private to the controller class. That way there is no chance they can be called from somewhere else in the program.
Once the keyword private is implemented, everything below the keyword is included in its protection. So params are typically the last methods inside the controller.
Create is a RESTful route that submits user data to the database. The Active Record create action will call the strong params method. The strong params method is listed under the keyword private.
app/controllers/exercise_controller.rb
def create
  @exercise = Exercise.create(exercise_params)
end

private
def exercise_params
  params.require(:exercise).permit(:activity, :description)
end
Next, we will make a route that will call the create method. Since we are submitting content to the database, the request type will be a post request.
config/routes.rb
post 'exercises' => 'exercise#create'There is no view associated with the create method. It is only a submit action triggered by the button on the form. Instead of thinking about a view, we should think about what kind of user experience we want for our user when creating a new item. One option is to trigger a redirect to a new page after the successful creation of a new item.
Rails routes offers us a convenient way to reference routes by creating an alias using the keyword as. The index, show, and new routes can all have aliases. There is no need to create an alias for the create route as there is no page associated with the create action.
config/routes.rb
get 'exercises' => 'exercise#index', as: 'exercises'
post 'exercises' => 'exercise#create'
get 'exercises/new' => 'exercise#new', as: 'new_exercise'
get 'exercises/:id' => 'exercise#show', as: 'exercise'
These route aliases can be used in links for the view as well as redirects in the controller methods. When referencing the route alias, _path is appended to the end of the alias.
If a route requires a param the alias will also require a param gets passed.
We can create a conditional statement in the create method that will trigger a redirect if the new entry to the database is made successfully.
app/controllers/exercise_controller.rb
def create
  @exercise = Exercise.create(exercise_params)
  if @exercise.valid?
    redirect_to exercises_path
  end
end

private
def exercise_params
  params.require(:exercise).permit(:activity, :description)
endlink_to is a method that can help our user navigate through the application. link_to takes two arguments. The first argument creates the hyperlink and the second argument routes the user to the appropriate place. This is a prime place to our route aliases.
This link can take our user to the form to create a new exercise session.
app/views/exercise/index.html.erb
<p><%= link_to 'New Exercise', new_exercise_path %></p>At this point, we have successfully reached our MVP of allowing a user to see all the data in the database, see more information about one single database entry, and allowing our user to create new entries in the database.
As a developer, I have been commissioned to create a blog post application. As an MVP, I have been asked to create an application where a user can see all the blog post titles, see the content of any given blog post, and the ability to create blog posts.
Story 1: In order to interact with the blog post application, as a user of the application, I need to see a list of all blog posts.
Branch: blog-index
Acceptance Criteria
- Has a model for Blog with the following information: title and content
- Has a controller for Blog
- Has a controller action for index
- Has a route for index
- Has a view for index
- Can see all the blog post titles on the landing page of the application
Story 2: In order to interact with the blog post application, as a user of the application, I need to see the details of one blog post.
Branch: blog-show
Acceptance Criteria
- Has a controller action for show
- Has a route for show
- Has a view for show
- Can navigate from the list of all blog post titles to the view of any given blog post
- Can see all the title and content for one blog post on a page
- Can navigate back from the show page to the landing page
Story 3: In order to interact with the blog post application, as a user of the application, I need to see a form where I can fill out information for a new blog post.
Branch: blog-new
Acceptance Criteria
- Has a controller action for new
- Has a route for new
- Has a view for new
- Can navigate from the landing page to the view of the new page
- Can see a form for title and content
- Can see a submit button
- Can navigate back from the new page to the landing page
Story 4: In order to interact with the blog post application, as a user of the application, I need to create a new blog post.
Branch: blog-create
Acceptance Criteria
- Has a controller action for create
- Has a route for create
- Can fill out a form for a new blog post and click on a submit button that will trigger a create action
- Can be rerouted to the landing page when a valid blog post is created
Story 5: In order to interact with the blog post application, as a user of the application, I need to delete a new blog post.
Branch: blog-delete
Acceptance Criteria
- Has a controller action for delete
- Has a route for delete
- Can see a button on the show page to delete the blog post
- Can click on the button to perform a delete action
- Can be rerouted to the landing page when a blog post is deleted
Story 6: In order to interact with the blog post application, as a user of the application, I need to see a form where I can fill out information to edit an existing blog post.
Branch: blog-edit
Acceptance Criteria
- Has a controller action for edit
- Has a route for edit
- Has a view for edit
- Can navigate from the show page of one blog post to the view of the edit page
- Can see a form to edit title and content
- Can see a submit button
- Can navigate back from the edit page to the blog post show page
Story 7: In order to interact with the blog post application, as a user of the application, I need to update an existing blog post.
Branch: blog-update
Acceptance Criteria
- Has a controller action for update
- Has a route for update
- Can fill out a form to edit an existing blog post and click on a submit button that will trigger an update action
- Can be rerouted to the landing page when a valid blog post is updated
Story 8: In order to create a secure blog post application, as a developer of the application, I need to ensure only valid data is entered into the database.
Branch: blog-validations
Acceptance Criteria
- Ensure all blog posts have titles and content for each post (non-nil, non-blank values)
- Ensure all blog post titles are unique
- Ensure that blog post titles are at least 4 characters
- Ensure that blog post content is at least 10 characters
Story 9: In order to enjoy the blog post application, as a user of the application, I need to see pleasant styling.
Branch: blog-styles
Acceptance Criteria
- Has pleasant styles on each page of the application