2. Library Cloning
Upon receiving the oligo pool from TWIST (which typically takes ~1-2 weeks) or IDT, it is necessary to amplify the oligo pool with a small number of PCR cycles to increase the amount of DNA.
In first part of the protocol, we discussed the importance of pooling small groups of mutated sequences together; typically 3-5 genes for each primer pair. This grouping saves time in this part of the protocol, as it eliminates the need to perform a separate PCR reaction for each gene (and its 1200-1500 mutated versions).
The TWIST website includes instructions on oligo pool amplification. We recommend that you familiarize yourself with that page before proceeding.
An initial amplification of the aliquoted oligo library ensures that we have ample DNA for cloning of the library into plasmids, followed by transformation into E. coli or another organism of interest. This part of the protocol assumes that you have divided the oligo library into smaller aliquots, at a concentration of 10 nanograms per microliter. For long-term storage, these DNA libraries should kept at -80C.
When you are ready to work with the DNA, follow the TWIST guidelines to amplify the oligo library.
Remove an aliquot (we recommend 5 microliters per aliquot) of the oligo pool, and set up one 50 microliter PCR reaction per primer pair. If you have 5 primer pairs (corresponding to up to 25 gene libraries), this would be 5 PCR reactions.
For each PCR reaction:
| reagent | concentration | volume (microliters) |
|---|---|---|
| DNA (oligo pool) | 10ng/microliter | 1 |
| Q5 polymerase mix | 2x stock | 25 |
| Primer Fwd | 10 micromolar | 2.5 |
| Primer Rev | 10 micromolar | 2.5 |
| Water | N/A | 19 |
Mix these reagents carefully, while keeping everything on ice throughout the experiment. The 'Primer Fwd' and 'Primer Rev' will differ based on the 20-nucleotide sequences flanking each group within the oligo pool (e.g. Kosuri-101 is a primer set that is distinct from Kosuri-102. Most of these primer pairs are already available in the Phillips laboratory, and are stored in the -20°C freezer).
Use the following thermocycler settings with 12 cycles.
| cycles | temperature | time |
|---|---|---|
| 1 | 98°C | 30 seconds |
| 12 | 98°C | 10 seconds |
| 12 | 64°C (anneal) | 30 seconds |
| 12 | 72°C (extend) | 30 seconds |
| 1 | 72°C | 120 seconds |
| Hold | 4°C | ∞ |
For more information on primer annealing temperatures (and a very user-friendly annealing temperature calculator), visit the NEB website's Tm calculator. For more information on the thermocycler conditions for Q5 polymerase, see the NEB website.
Given the low concentration of DNA involved, even after 12 cycles of amplification, loss of material is a major concern at this stage. Therefore, we recommend that you use column-based DNA purification methods to "clean" the amplified DNA. The Zymo DNA Clean & Concentrator-5 works well for this purpose.
After performing the PCR purification according to manufacturer's protocol, NanoDrop the eluted DNA and record the concentration and purity. Store away DNA at 4°C (if you will use in the next 24 hours) or at -20°C for longer term storage.
Recall that, when ordering the oligo pool, promoters and their mutated versions were clustered into different "primer sets". When ordering 25 mutated promoters, therefore, there should be roughly 5 "groups" of genes with different primer sets. Each gene "group" must be amplified individually, using forward and reverse primers that correspond to the first 20, and last 20, nucleotides of the oligo pool.
The initial amplification step need not add barcodes. It merely serves to increase the amount of DNA for each group of mutated promoters.
After initial amplification, it is time to add barcodes to each of the gene groups. Barcoding DNA, as a process, involves adding random, unique, 20-nucleotide "barcodes" to a DNA sequence of interest. Barcodes assist in downstream sequencing, as each unique barcode is associated with one, and only one, mutated promoter sequence. By "mapping" promoters to a unique barcode, and counting the relative frequency of each barcode via next-generation sequencing (NGS), gene expression can be computed for each mutated promoter.
Genetic barcodes can be added to the oligo pool via PCR, using primers with randomly-synthesized "overhangs". During extension of DNA, these random synthesis regions of the primer are incorporated into the amplified DNA. Adding barcodes via PCR is a biased process, however, wherein some barcodes are incorporated with a higher fidelity than others. Bias is especially pronounced at higher amplification cycles, when more DNA is present in a PCR reaction. Therefore, adding barcodes should be done with care to minimize bias wherever possible.
An important step to minimize bias in barcoding DNA involves performing quantitative PCR (or qPCR) to determine the "optimal" number of cycles to amplify DNA without saturating a PCR reaction mixture. Specifically, we wish to determine the cycle number at which DNA is in exponential amplification, but has not saturated. We then use that number of cycles to perform the "real" barcoding PCR reactions. qPCR also serves as an important control because it ensures that the DNA for each group (with orthogonal primer pairs) is being amplified at relatively even levels.
There are many qPCR reaction mixtures available, which contain all of the salts, buffers, and polymerase necessary for quantitative amplification. These mixtures also contain dyes, which the qPCR machine uses to "read out" the amount of DNA present in a tube after each cycle of amplification.
In the past, our lab has used PerfeCTA SYBR Green SuperMix, Low ROX for qPCR. We used this simply because it was available in lab already, and it worked. Other qPCR reagents, such as the NEB Luna qPCR kit, may also work for this purpose.
When performing qPCR, you should use the actual primers that you will use for barcoding the oligo pools. We discuss the sequence of these "barcoding primers" in the next step of this protocol, after first outlining the qPCR process.
Our lab has an Applied Biosystems qPCR machine with MxPro software installed. To perform qPCR, set up 50 microliter reaction volumes, and also prepare a "blank" control sample (no template DNA added). Mix the following reagents on ice, preparing two reactions PER gene "set", one with 1ng of DNA, and the other with 10ng of DNA. Note that the DNA template, in the reagent list below, is the PCR product which was purified from the previous step in this protocol.
| reagent | volume (microliters) | concentration |
|---|---|---|
| PerfeCTa SYBR Green SuperMix, Low ROX (2X) | 25 | N/A |
| Forward primer | 2.5 | 10 micromolar |
| Reverse primer | 2.5 | 10 micromolar |
| Nuclease-free water | 19 | N/A |
| DNA template | 1 | 10 OR 1 ng/microliter |
The total volume for each reaction, again, is 50 microliters. There should be 2 reactions per primer pair (one with 1ng of DNA and the other with 10ng of DNA used as template). There should also be a reaction in which no DNA was added at all for each primer pair. Replace the DNA template by adding an additional microliter of water.
Set up these qPCR reactions on ice and then load them into the qPCR machine. Specify the wells and reference dye in the MxPro software. The QuantaBio qPCR kit contains a reaction buffer with magnesium chloride, dNTPs (dATP, dCTP, dGTP, dTTP), AccuStart Taq DNA Polymerase, SYBR Green I dye, and a ROX Reference Dye. Input the dye information as necessary in the MxPro software, and then run with the following thermocycler settings (NOTE: AccuStart Taq will demand different settings than, say, the polymerase in the Luna qPCR kit. In an ideal world, you would use the same polymerase for both the qPCR and barcoding PCR reactions, as there are deviations in polymerase behavior (different annealing temperatures, different thermocycler settings, and wildly different fidelities). Check the specific thermocycler settings for each polymerase that you wish to use.
| cycles | temperature | time |
|---|---|---|
| 1 | 94°C | 120 seconds |
| 30 | 94°C | 20 seconds |
| 30 | (anneal temp.) | 30 seconds |
| 30 | 72°C (extend) | 20 seconds |
| HOLD | 4°C | ∞ |
The annealing temperature should be determined (using NEB's calculator) based on the primers to be used for barcoding. Only those nucleotides in the primer that bind to the template DNA should be used to determine the annealing temperature. Do not include nucleotides which reside in the overhang sequence.
Once the qPCR has finished running, check the qPCR curves, which should resemble the curves shown in the image below, which was taken from ThermoFisher's resource on qPCR.
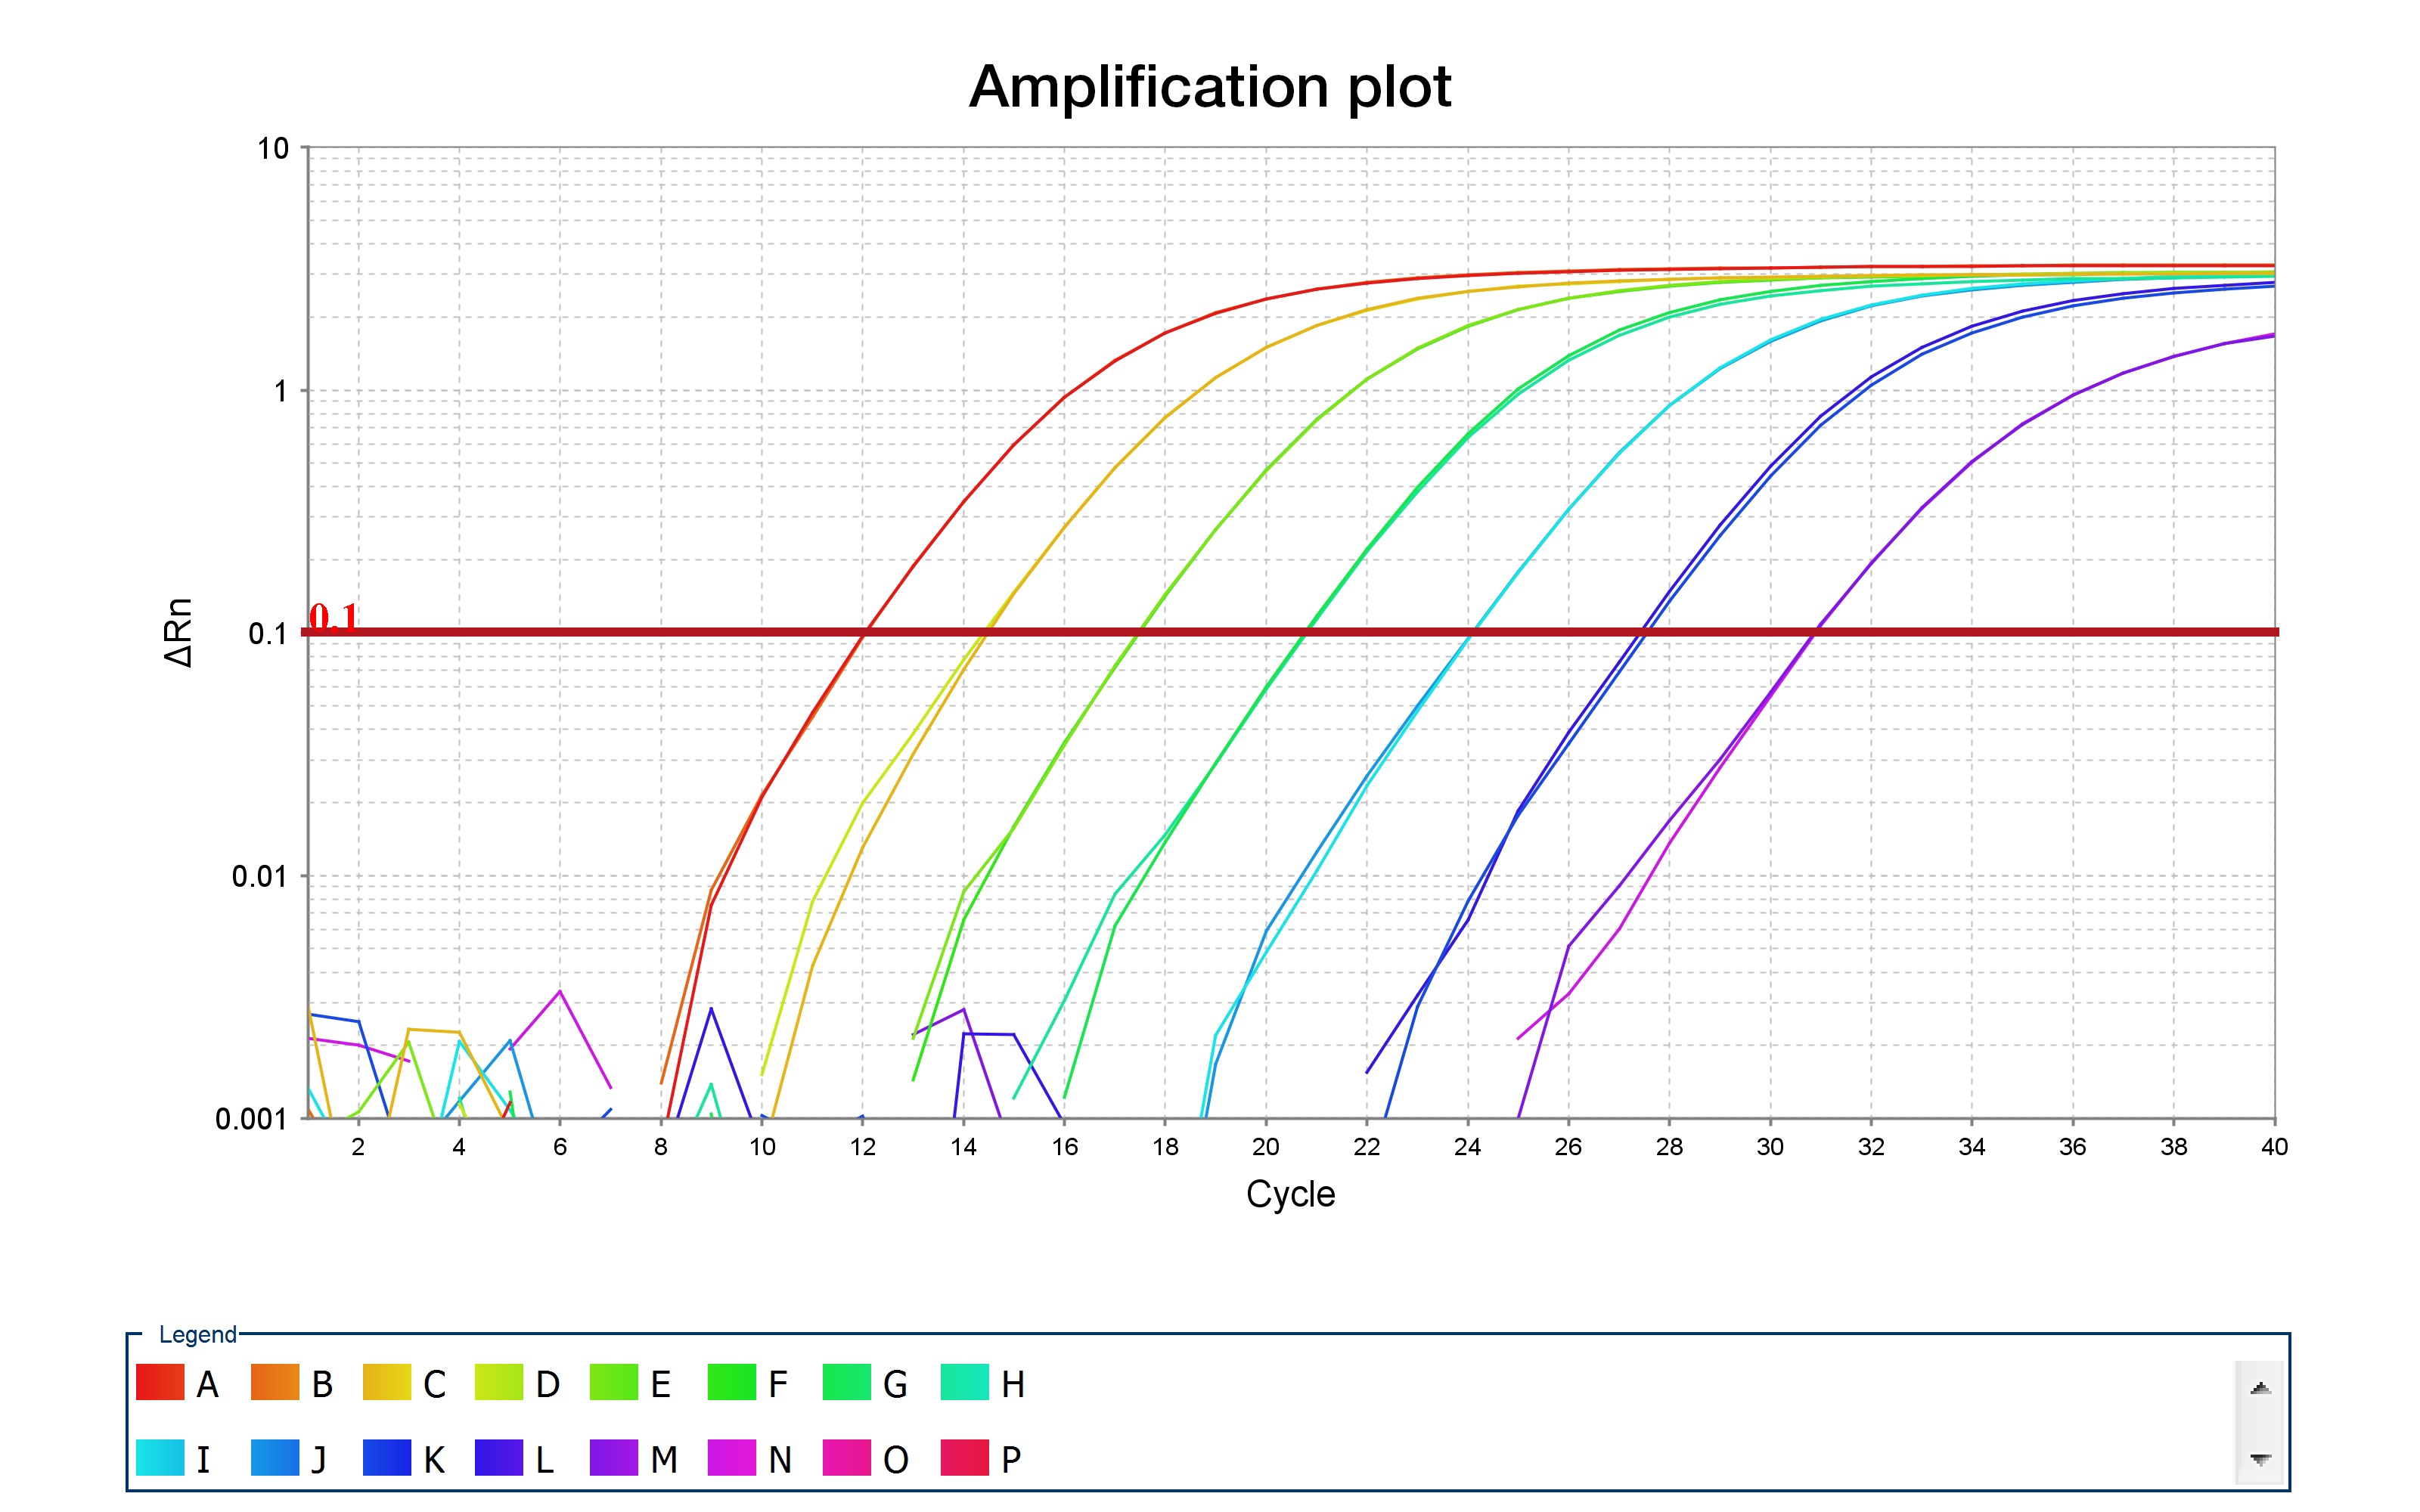
After some number of cycles (given on the x-axis), the amplification profile begins to increase until it reaches saturation. The position on the x-axis should be displaced between your samples -- "blank" samples should not amplify at all, while samples with 1ng of DNA should have an amplification curve which is delayed when compared to samples containing 10ng of DNA.
By looking at these amplification curves, it is straightforward to determine the "optimal" number of PCR cycles to use for barcoding. Choose the number of cycles that correspond to the mid-point of the curves, for each primer pair, with 10ng of DNA. As an example, consider the red curve in the amplification plot above. The midpoint of this curve corresponds to approximately 10 cycles. Thus, you should use 10 cycles when performing your barcoding PCR. This is to ensure that DNA levels do not saturate, which would bias your PCR amplifications when barcoding.
After performing qPCR, the next step is to perform the barcoding PCRs. This is done by setting up PCR reactions in precisely the same way, with the same primers, but with 2x Q5 polymerase mix rather than the 2x qPCR mix. Depending on your amplification results from the qPCR experiment, you should decide whether you'd like to use 1ng template or 10ng template; just be consistent and use the same DNA concentration across all primer sets. Program the thermocycler with the following settings:
| cycles | temperature | time |
|---|---|---|
| 1 | 98°C | 30 seconds |
| see qPCR results | 98°C | 10 seconds |
| see qPCR results | (anneal) | 30 seconds |
| see qPCR results | 72°C | 30 seconds |
| 1 | 72°C | 120 seconds |
| Hold | 4°C | ∞ |
After amplifying the oligo libraries for EACH PRIMER PAIR, perform a gel extraction by adding 10 microliters of 6x NEB DNA dye to each 50 microliter PCR reaction. Load the full volumes on a thick, 2% agarose gel. Perform electrophoresis for 45 minutes at 120V. Use a scalpel to remove the DNA band corresponding to the amplified oligo libraries. Perform a gel extraction using one of many commercially-available kits. We have previously obtained good results with the Zymoclean Gel DNA Recovery Kit.
Amplification of oligo pools must account for several considerations. First, the reverse primer in the barcoding PCR should add the 20nt, random barcode sequence. Such a primer can be ordered from IDT by inputting 'NNNNNNNNNNNNNNNNNNNN' in the desired barcode position. The reverse primer must also contain a region that overlaps and binds to the DNA template; shoot for an annealing temperature between 61°C - 64°C. The reverse primer, finally, must also include a sequence to be used for cloning into the desired plasmid later (via Golden Gate or Gibson assembly, depending on the plasmid to be used. More on this point in the next section).
The forward primer for barcode PCRs must also contain a sequence that binds to the DNA template (be sure to match the annealing temperatures for forward and reverse primers using the NEB Tm calculator). There is no need to add a barcode to via this primer. However, you must add a sequence corresponding to the other Gibson site (or a sequence that includes restriction sites, if using genome integration).
In all situations, design your primers carefully and pay close attention to the plasmid sequences on Benchling. -Plasmid Expression (pJK14) -Genome Integration (pLibAcceptorV2)
The final constructs should be designed as follows: the barcode should be inserted 110 base pairs from the 5’ end of the mRNA, followed by 45 base pairs from the targeted regulatory region, followed by 64 base pairs containing primer sites used in the construction of the plasmid, and 11 base pairs containing a three frame stop codon. Following the barcode there is an RBS and a GFP coding region. All of the sequences used in the original RegSeq study can be found in Supplementary Table 1 of the paper.
After amplifying, barcoding, and purifying the variety of oligo pools, the next step is to insert each of these library "groups" into a plasmid, which can then be cloned into E. coli. In prior Reg-Seq experiments, all oligo pools were cloned and expressed from a plasmid; they were not genome-integrated. For the purposes of this protocol, we will discuss both plasmid expression and a potential method for genome-integration.
Reg-Seq experiments have been performed by cloning oligo libraries into pJK14 plasmid (SC101 origin) via Gibson assembly. Overhang "arms" from the PCR amplicons with homology to this plasmid were used to insert the oligo pools. To use Gibson assembly for cloning PCR-amplified, barcoded oligo pools into pJK14, you should first amplify the backbone using the primer-binding sites specified on the Benchling sequence (https://benchling.com/s/seq-M9lQusDbSzsjmGihPxYr). See the pink annotations on the Benchling sequence for the Gibson sites and primer amplification binding sites. This plasmid encodes kanamycin resistance.
Perform Gibson assembly according to NEB's manufacturer instructions. Prior to electroporation, perform drop dialysis with water for at least 30 minutes. Electroporate into highly electrocompetent DH5α cells (these can be purchased from NEB), shooting for a time constant of electroporation (1800 mV) exceeding 5.0 milliseconds. If desired, one can also electroporate directly into the strain to be studied (E. coli K-12 MG1655), but it is typically a good idea to first electroporate into a highly competent strain, isolate the library again, perform routine checks (e.g. gel electrophoresis and so forth), and then transform into the final strain. This also enables one to store the isolated, cloned DNA library for future use.
In future iterations of Reg-Seq, it might be a good idea to clone promoter mutant libraries directly into the genome of E. coli. Lambda red recombination is not an efficient process, however, and thus would highly bias the library of interest. Therefore, we have previously tested other methods, especially those used by the Kosuri lab at UCLA.
In our lab, we have a plasmid called pLibAcceptorV2 (Addgene link) which can be used to genome-integrate any DNA sequences cloned onto this plasmid into a genetic locus of interest. This method requires two important steps, however:
- The accepting strain of E. coli (K-12 MG1655) must first be genomically modified, using classical recombination, by inserting a "landing pad" at the genomic position of interest. Specifically, lox sites must be inserted into the genome position of interest, which correspond to lox sites on the pLibAcceptorV2 plasmid. lox71 recombines with lox66. Note that the genomic landing pad sequences are reversed, so one must consider their positioning if concerned with the orientation of the reporter after integration.
Construct Site Sequences (Spacer in bold)
| Construct | Site | Sequence (spacer in bold) |
|---|---|---|
| pLibAcceptorV2 | lox66 | 5'- ATAACTTCGTATAGCATACATTATACGAAcggta -3' |
| pLibAcceptorV2 | _lox_m2/71 | 5'- taccgTTCGTATATGGTTTCTTATACGAAGTTAT -3' |
| Genomic Landing Pad | _lox_m2/66 (reverse orientation) | 5'- taccgTTCGTATAAGAAACCATATACGAAGTTAT -3' |
| Genomic Landing Pad | _lox_71 (reverse orientation) | 5'- ATAACTTCGTATAATGTATGCTATACGAAcggta -3' |
The landing pad sequence can be found at this Benchling link: https://benchling.com/s/seq-Kl6BOcb78yxDkgxwi2ha // It just contains constitutively active mCherry & Chloramphenicol resistance flanked by complementary loxP sites. Insert this into the genomic position of interest.
The pLibAcceptorV2 plasmid (https://benchling.com/s/seq-8ros6uaUuTsZIwPMir8m) contains an arabinose-inducible Cre-recombinase, a heat curable ori (to remove plasmid after cre-lox cassette exchange), and a selectable marker/library cloning site flanked by loxP sites. Built around the library cloning site are priming sites for sequencing as well as terminators to block outside transcriptional interference. The plasmid also has restriction sites built-in for restriction-based cloning of oligo libraries.
If you wish to perform genome-integration for oligo library cloning, you should first purify ample concentration of pLibAcceptorV2 plasmid by growing cells expressing this plasmid at 30°C for 24 hours, and then performing a maxiprep to isolate plasmid (which is very low-copy). This plasmid cannot tolerate temperatures higher than 30°C. DNA should then be concentrated using a Promega Wizard SV Gel and PCR Clean-up System. This ensures that genomic DNA, which can sometimes "bleed" through a maxiprep, is fully removed and solely plasmid remains.
A full, highly detailed protocol that walks through all of the steps for cloning and genomically-integrating a pLib-library can be found in this GitHub repository at the link here. This protocol was developed and validated by Guillaume Urtecho, a former graduate student in the Kosuri lab at UCLA.
After electroporation and recovery of the E. coli cells, the cell+LB mixture should be plated onto oversized petri dishes filled with LB + kanamycin at a concentration of 25 μg/ml. Prepare at least three plates PER oligo "pool" -- one plate with 300 microliters of undiluted recovery mixture, one plate with 30 microliters, and so forth (1:1, 1:10, 1:100 dilutions).
After 24 hours of growth at 30°C, physically scrape the plates using sterilized glass pipettes by adding 100 microliters of sterile LB to each plate, scraping the cells off the surface, resuspending them with a clean pipette, and then storing them in 10% glycerol for later use.
To grow the cell libraries, inoculate 800 million cells into 450 mL LB + kanamycin (25 μg/ml) and grow at 30°C overnight. The number of cells in each library can be determined by preparing 1:100 and 1:1000 dilutions (in sterile LB) and then measuring the OD. Use the Agilent OD600 calculator to determine how many cells are in the undiluted cell mixture. Note that an OD600 of 1.0 = 800 million cells/ml.
Reg-Seq is a powerful method, in part, because it allows one to decipher the regulatory mechanism for different promoters under variable growth conditions. Some TFs are only active in anaerobic conditions, for example, or in low glucose environments. Therefore, it is essential that one grows cell libraries in multiple environmental conditions to fully delineate why certain genes are regulated.
Cell libraries should first be grown to saturation in LB and diluted 1:10,000 into the appropriate growth media for the promoter under consideration, and grown to an optical density (OD600) of 0.3 before harvesting RNA and DNA for sequencing.
In the original RegSeq study, multiple growth conditions were tested, including differing carbon sources, such as growth in M9 with 0.5% Glucose, M9 with acetate (0.5%), M9 with arabinose (0.5%), M9 with Xylose (0.5%) and arabinose (0.5%), M9 with succinate (0.5%), M9 with fumarate (0.5%), M9 with Trehalose (0.5%), and LB. We also used several stress conditions such as heat shock, where cells were grown in M9 and were subjected to a heat shock of 42 degrees for 5 minutes before harvesting RNA. We grew in low oxygen conditions. Cells were grown in LB in a container with minimal oxygen, although some will be present as no anaerobic chamber was used. This level of oxygen stress was still sufficient to activate FNR binding, and so activated the anaerobic metabolism. We also grew cells in M9 with Glucose and 5mM sodium salycilate. Growth with zinc was preformed at a concentration of 5mM ZnCl2 and growth with iron was performed by first growing cells to an OD of 0.3 and then adding iron chloride to a concentration of 5mM and harvesting RNA after 10 minutes. Growth without cAMP was accomplished by the use of the JK10 strain which does not maintain its cAMP levels. These growth conditions were chosen so as to span a wide range of growth rates, as well as to illuminate any carbon source specific regulators.
Once cells were grown to OD 0.3, DNA and RNA must be isolated. The protocol for isolating DNA will differ, depending on whether you are using plasmid-based expression or have genome-integrated the library. In the former case, DNA can be isolated using very straightforward, off-the-shelf kits. We recommend Zymo DNA Clean&Concentrate-5 kits, as these consistently give the cleanest DNA isolations. Clean all PCR reactions with a Zymo DNA Clean and Concentrator kit, and verify libraries using an Agilent Tapestation or other method for checking the specific size of PCR amplicons prior to sequencing.
When isolating RNA using the pJK14 method, RNA should first be stabilized using Qiagen RNA Protect. Lysis of cells can be performed using lysozyme and RNA isolated using the Qiagen RNA Mini Kit. Reverse transcription should be performed using Superscript IV and a specific primer for the labeled mRNA with the sequence: 5' - GCAGGGGATAATATTGCCCA - 3'
qPCR should be preformed to check the level of DNA contamination on the isolated cDNA. One creative method to multiplex the number of growth conditions that can be sequenced at once is to add short, 4-nt barcodes to DNA and RNA isolated from each growth condition during the PCR amplification steps that add the necessary indices and adaptors for Illumina sequencing. Examples of primers which add a unique, 4nt barcode and the necessary Illumina adaptors for this purpose are shown below:
cDNA: -fwd: AATGATACGGCGACCACCGAGATCT ACACTCTTTCCCTACACG ACGCTCTTCCGATCT TCTA TATTAGGCTTCTCCTCAGCG -rev: AAGCAGAAGACGGCATACGAGATCGGT CTCGGCATTCCTGCT GAACCGCTCTTCCGATCT GACC GCAGGGGATAATATTGCCCA
DNA -fwd: AATGATACGGCGACCACCGAGATCT ACACTCTTTCCCTACACG ACGCTCTTCCGATCT ATGC TATTAGGCTTCTCCTCAGCG -rev: AAGCAGAAGACGGCATACGAGATCGGT CTCGGCATTCCTGCT GAACCGCTCTTCCGATCT GACC GCAGGGGATAATATTGCCCA
When running qPCR on cDNA samples, the objective is to show that the sample crosses the amplification threshold many cycles before a no-RT control (a sample with no DNA added). Any sample that has 5 or fewer amplification cycles of difference between sample and the no RT control should be discarded. Additionally, prior to sequencing, all amplified samples should be analyzed on a BioAnalyzer or Agilent Tapestation.
The protocol for isolating genome-integrated DNA is different. gDNA should be extracted from 5 mL cell library pellets using a Qiagen Gentra Puregene kit (#158567). All sequencing runs with pLibAcceptorV2 also requires that barcoded DNA be amplified from 1 microgram of gDNA via PCR for 14 cycles using primers GU59 and GU60. This reaction should then subsequently be cleaned using a Zymo Research DNA Clean and Concentrator kit. To add sequencing adapters and indices to the library, 1 ng of this reaction should be used as template DNA for a second PCR for 8 cycles using primers GU70 and either GU63 or GU64. Clean all PCR reactions with a Zymo DNA Clean and Concentrator kit, and verify libraries using an Agilent Tapestation or other method for checking the specific size of PCR amplicons prior to sequencing.
RNA can also be extracted from 50 mL library pellets using a Qiagen RNEasy Midi kit (#75142). Use 45 micrograms of each extract and concentrate it using a Qiagen Minelute Cleanup Kit (#74204). Barcoded cDNA should then be generated from 25 micrograms of each concentrated RNA extract using Thermo Fisher SuperScript IV (#18090010) primed with GU101. The manufacturer’s protocol should be followed, aside from extending the reaction time to 1 hour at 52 °C. The cDNA reaction can then be cleaned using a Zymo Research DNA Clean and Concentrator kit (#D40140) before amplification. Barcoded cDNA should be amplified via PCR for 13 cycles using primers GU59 and GU102. This reaction must be cleaned using a Zymo Research DNA Clean and Concentrator Kit and 1 ng of this reaction used in a second PCR for indexing and addition of flow cell adapters. The second PCR is typically 8 cycles (though the precise number of cycles should be checked via qPCR) and utilize primers GU102 and either GU61 or GU62. Every primer name listed here, and its full sequence from 5' - 3', can be found in the list of Phillips lab primers by clicking on this sentence.