Configuration
BeEF should be configured through the main configuration file : config.yaml.
PLEASE Change the username and password for the web interface.
To edit the configuration file, navigate to the BeEF directory and use your favourite text editor (vim, nano etc) to edit the config.yaml file.
Please edit the below section, found in the file:
    #Credentials to authenticate in BeEF.
    #Used by both the RESTful API and the Admin interface
    credentials:
        user:   "beef"
passwd: "something unique and complex"The web interface for hooking or for managing BeEF can be limited by subnet.
This is done in the
$beef/config.yaml
in the Interface / IP restrictions or
$beef/config.yaml.beef.restrictions.https
Access to the management interface should be restricted using the permitted_ui_subnet access control.
For example:
    restrictions:
        permitted_hooking_subnet: ["10.1.0.0/16"]
        permitted_ui_subnet: ["127.0.0.1/32"]
These access restrictions can be bypassed and should not be solely relied upon.
Ideally, BeEF should operate behind a reverse proxy which strips user-supplied proxy headers such as X-Forwarded-For. The permitted_ui_subnet should be restricted to 127.0.0.1/32 and accessed via a SSH tunnel.
While it is not possible to bypass /32 access controls, it is possible to bypass more permissive access controls, such as /24 or /16. In these instances the IP address access controls can be bypassed by supplying a valid IP address within the permitted range in the X-Forwarded-For header.
For example, permitted_ui_subnet: ["10.1.1.1/24"] could by bypassed by providing X-Forwarded-For: 10.1.1.666.
By guessing a valid IP address in the correct subnet, an unauthorized user could infer the IP addresses of targets during a campaign by attempting to identify valid IP addresses in the permitted_hooking_subnet; or gain access to the administrator interface in the event the permitted_ui_subnet is not using a /32 IP range.
The panel path should also be changed using the beef.extension.admin_ui.base_path configuration option. Note: this is security through obscurity and won't prevent attacks against the /api/ REST interface.
By default, the administration UI throttles login attempts to 1 attempt per second. This can be changed using the beef.extensions.admin_ui.login_fail_delay: 1 value in extensions/admin_ui/config.yaml.
By default, the REST API interface throttles login attempts to 1 attempt every 0.05 seconds. This can be changed using the beef.restrictions.api_attempt_delay: 0.05 value in config.yaml.
The web server can be fully configured, this is done in the config.yaml file in http:
    http:
        debug: false # Will print verbose message in BeEF console
        host: "0.0.0.0" # IP address of the web server
        port: "3000" #Port of the web server

        # If BeEF is running behind a reverse proxy or NAT
        #  set the public hostname and port here
        public: "8.7.6.5"
        public_port: "3000"

        dns: "localhost" # Address of DNS server
        hook_file: "/hook.js" # Path for hooking script
        hook_session_name: "BEEFHOOK" #Name of session
session_cookie_name: "BEEFSESSION" # Name of BeEF cookieBeEF also features rudimentary web server imitation. The root page and HTTP 404 error pages can be changed to reflect one of several popular web servers (apache, iis, nginx) using the beef.http.web_server_imitation directive.
For example:
        # Imitate a specified web server (default root page, 404 default error page, 'Server' HTTP response header)
        web_server_imitation:
            enable: true
            type: "apache" # Supported: apache, iis, nginx
            hook_404: false # inject BeEF hook in HTTP 404 responses
            hook_root: false # inject BeEF hook in the server home page
The hook_404 and hook_root directives can be enabled to inject the BeEF hook on HTTP 404 error pages and the web root page respectively. This will hook the browser of anyone examining the web server.
Extensions should be enabled in the main config.yaml:
    extension:
        requester:
            enable: true
        proxy:
            enable: true
        metasploit:
            enable: false
        social_engineering:
            enable: true
        evasion:
            enable: false
        console:
             shell:
                enable: false
The Demos extension should be disabled in production by setting enable: false in config.yaml.
To enable Metasploit you need to enable it in
beef/config.yaml.beef.extensions.metasploit
by making it true not false,
extension:
       admin_ui:
              metasploit:
                   enable: true
The Metasploit extension should be configured by modifying the [extensions/metasploit/config.yml]
$beef/extensions/metasploit/config.yaml.beef.extensions.metasploitt
(https://github.com/beefproject/beef/blob/master/extensions/metasploit/config.yaml) :
            name: 'Metasploit'
            enable: true
            host: "127.0.0.1"
            port: 55552
            user: "msf"
            pass: "<password>"
            uri: '/api'
            ssl: true
            ssl_version: 'TLS1'
            ssl_verify: true
            callback_host: "127.0.0.1"
            autopwn_url: "autopwn"
Be sure to change the password field. Authenticated access to the Metasploit RPC service can be used to execute arbitrary commands on the underlying operating system.
Most of the configuration can be left with default value, except the host and callback_host parameters which should have the IP address of the host on which Metasploit is accessible. Use the same host for the below with the User and Password information.
For enabling RPC communication, the following command should be launched in Metasploit:
load msgrpc ServerHost=127.0.0.1 User=msf Pass=<password> SSL=yThis command can be written in a file and launched with -r option to msfconsole. Usually its easier to just run it in the metasploit terminal. Have the settings (host, user, pass and ssl) the same as in the commant

Of course, IP address and password should be consistent with the previous yaml configuration file.
You can now launch BeEF by launching the beef script in the root directory :

You can also use the following options :
Usage: beef [options]
    -x, --reset                      Reset the database
    -v, --verbose                    Display debug information
    -a, --ascii_art                  Prints BeEF ascii art
    -c, --config FILE                Load a different configuration file: if it's called custom-config.yaml, git automatically ignores it.
    -p, --port PORT                  Change the default BeEF listening port
    -w, --wsport WS_PORT             Change the default BeEF WebSocket listening port
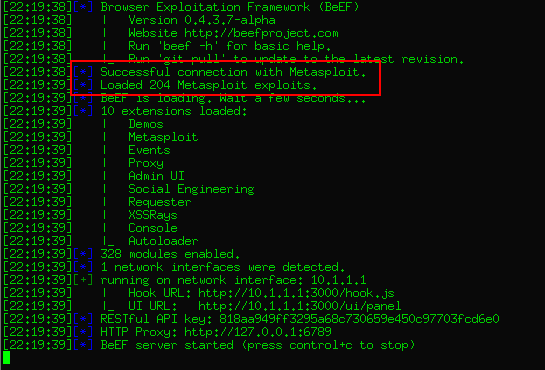
Once configured you can check that metasploit modules are loaded when launching BeEF: