Alula/ LE2 Hot-fire and Flight Vehicle Electronics Control
DAQboard.ino file commands the ESP32 that reads data from sensors and commands from the COM Board, and sends data in a package to the COM Board.
COMBoard.ino file commands the ESP32 that receives data in a package from the DAQ Board, sends commands to the DAQ Board, and sends data to MATLAB for plotting and data-saving purposes through the serial port.
liveplot.m is a MATLAB file that can receive data from the COM Board, create live plots, and save the data.
- Change the test file name according to the trial number in the liveplot.m file.
- Click "Run" to start the code, and close the plotting window to stop the code. Test data will be automatically stored in a spreadsheet under a folder called "Test_Data_yyyy-mm-dd."
- DAQ Breadboard:{0x24, 0x62, 0xAB, 0xD2, 0x85, 0xDC}
- COM Breadboard:{0xC4, 0xDD, 0x57, 0x9E, 0x91, 0x6C};
- DAQ Protoboard:
Ctrl click (Windows) or Cmd click the following links to open them in new tabs
- Arduino (https://www.arduino.cc/en/software)
- MATLAB (https://software.berkeley.edu/matlab®)
- To control the serial port, you need to install the Instrument Control Toolbox.
- (optional) An external code editing software such as Atom (https://atom.io) or Visual Studio (https://visualstudio.microsoft.com/downloads/).
- Arduino IDE and MATLAB are sufficient for all the coding
- (recommended) GitHub Desktop (https://desktop.github.com). You can pull, push, and edit files with ease. Step 3 required if you would like to download GitHub Desktop as the software requires an external editor.
CLONE USING:
git clone --recurse-submodules git@github.com:calstar/LE2.git
Please refer to https://rocketry.gitbook.io/public/tutorials/avionics/git-and-workflow for more information.
A basic workflow might go as follows:
git status
git add .
git status Note: if you see files here that are not code/hardware and should not be added (binaries, images, autosave files, etc.), STOP and fix the .gitignore
git commit -m "[Descriptive commit message of what you changed]"
git push
- Make sure you have access to this project
- Check with you administrators
- Go to the Github app, sign in, and click on the top left corner. You should see a pop-up window with an "Add" button. Select that button and choose "Clone repository."
- Search in "Filter you repositories" using the keyword "ellie-ground." Select the correct repository and click "Clone."
- If you want this cloned repository to be in a different folder, change the "Local Path."
- After you have edited and saved the file in the local repository, GitHub Desktop will detect changes and prompt you to commit. Make sure to double check your changes before committing.
- On the bottom left corner, put down a short summary that describes what you have changed, then click "Commit to main."
- In the middle of the screen (or on the top banner) you will see "Push commits to the origin remote." If you are sure that the commit is ready, click "Push origin."
- Check the project online and see if the changes have been reflected.
Getting started
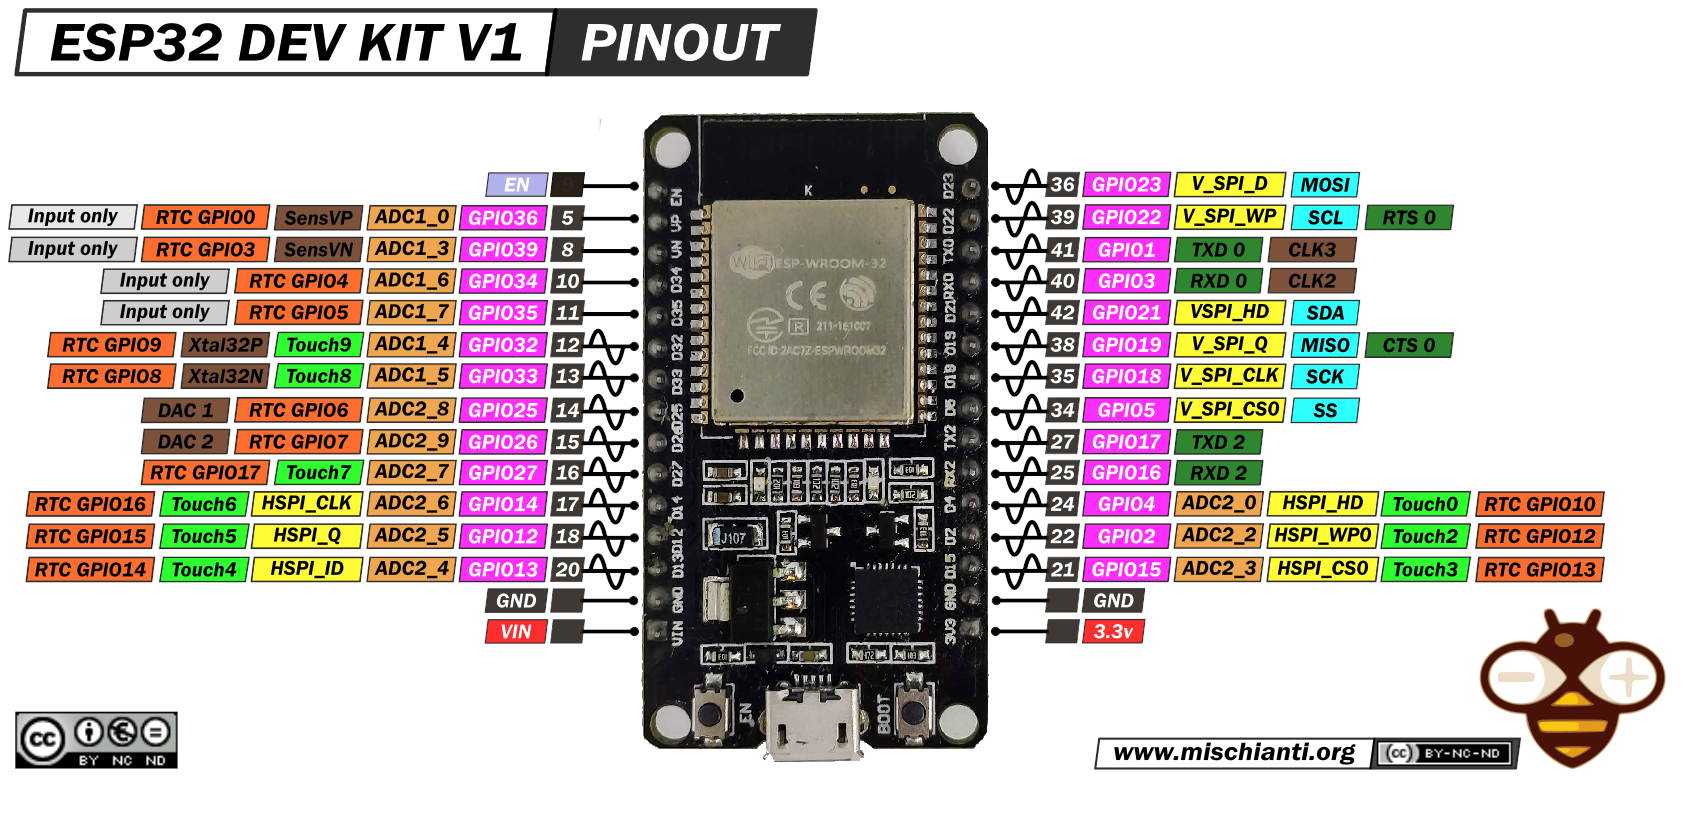
Pinout reference
ESP32-WROOM/ ESP32-Devkit-v1 (for breadboard/protoboard application - antenna does NOT stick out of board)
Red - E+
Black - E-
Green - A-
White - A+
Other possible combinations: Blue E+; Red E-; Green A-; Black A+


