Deploy Multiple AWS Databricks Workspace with CMK, Customer-managed VPC, Private Links, IP Access Lists
In this example, we created modules and root level template to deploy multiple (e.g. 10+) E2 Databricks workspaces at scale easily. Users of this template minimally should do these:
- Supply credentials (aws+databricks) and configuration variables for each workspaces
- Edit the locals block in
main.tfto decide what & how many workspaces to deploy - Run
terraform initandterraform applyto deploy 1 or more workspaces into your VPC. - Optionally, take the outputs files in
/artifactsand patch each workspace with IP Access List.
This modular design also allows customer to deploy, manage and delete individual workspace(s) easily, with minimal configuration needed. This template takes heavy reference (e.g. CMK module + Private Links) from https://github.com/andyweaves/databricks-terraform-e2e-examples from andrew.weaver@databricks.com and this repo is adapted to meet specific customer requirements.
To be added - LucidChart brewing...
.
├── iam.tf
├── instance_profile.tf
├── main.tf
├── outputs.tf
├── privatelink.tf
├── providers.tf
├── variables.tf
├── vpc.tf
├── artifacts        # stores workspaces URL and other info for next stage deployment
    ├── workspace_1_deployment.json
    ├── ...
├── modules
    ├── databricks_cmk
        ├── data.tf
        ├── main.tf
        ├── outputs.tf
        ├── providers.tf
        ├── variables.tf
    ├── mws_workspace
        ├── main.tf
        ├── variables.tf
        ├── outputs.tf
        ├── modules
            ├── mws_network
                ├── main.tf
                ├── variables.tf
                ├── outputs.tf
            ├── mws_storage
                ├── main.tf
                ├── variables.tf
                ├── outputs.tf
Step 1: Clone this repo to local, set environment variables for
awsanddatabricksproviders authentication:
export TF_VAR_databricks_account_client_id=your_account_level_spn_application_id
export TF_VAR_databricks_account_client_secret=your_account_level_spn_secret
export TF_VAR_databricks_account_id=your_databricks_account_id

export AWS_ACCESS_KEY_ID=your_aws_role_access_key_id
export AWS_SECRET_ACCESS_KEY=your_aws_role_secret_access_key
Step 2: Modify
variables.tf, for each workspace you need to write a variable block like this, all attributes are required:
variable "workspace_1_config" {
  default = {
    private_subnet_pair = { subnet1_cidr = "10.109.6.0/23", subnet2_cidr = "10.109.8.0/23" }
    workspace_name      = "test-workspace-1"
    prefix              = "ws1" // prefix decides subnets name
    region              = "ap-southeast-1"
    root_bucket_name    = "test-workspace-1-rootbucket"
    block_list          = ["58.133.93.159"]
    allow_list          = [] // if allow_list empty, all public IP not blocked by block_list are allowed
    tags = {
      "Name" = "test-workspace-1-tags",
      "Env"  = "test-ws-1" // add more tags if needed, tags will be applied on databricks subnets and root s3 bucket, but workspace objects like clusters tag needs to be defined in workspace config elsewhere
    }
  }
}
Since we are using CMK (customer managed key) for encryption on root S3 bucket and Databricks managed resources, you also need to provide an AWS IAM ARN for cmk_admin. The format will be: arn:aws:iam::123456:user/xxx. You need to create this user and assign KMS admin role to it.
Step 3: Modify
main.tf- locals block, add/remove your workspace config var inside locals, like this:
workspace_confs = {
    workspace_1 = var.workspace_1_config
    workspace_2 = var.workspace_2_config
    workspace_3 = var.workspace_3_config
}
Step 4: Check your VPC and subnet CIDR, then run
terraform initandterraform applyto deploy your workspaces; this will deploy multiple E2 workspaces into your VPC.
We are calling the module mws_workspace to create multiple workspaces by batch, you should treat this concept as a group of workspaces that share the same VPC in a region. If you want to deploy workspaces in different VPCs, you need to create multiple mws_workspace instances.
In the default setting, this template creates one VPC (with one public subnet and one private subnet for hosting VPCEs). Each incoming workspace will add 2 private subnets into this VPC. If you need to create multiple VPCs, you should copy paste the VPC configs and change accordingly, or you can wrap VPC configs into a module, we leave this to you.
At this step, your workspaces deployment and VPC networking infra should have been successfully deployed and you will have n config json files for n workspaces deployed, under /artifacts folder, to be used in another Terraform project to deploy workspace objects including IP Access List.
In this example, we used 1 VPC for all workspaces, and we used backend VPCE for Databricks clusters to communicate with control plane. All workspaces deployed into the same VPC will share one pair of VPCEs (one for relay, one for rest api), typically since VPCEs can provide considerable bandwidth, you just need one such pair of VPCEs for all workspaces in each region. For HA setup, you can build VPCEs into multiple az as well.
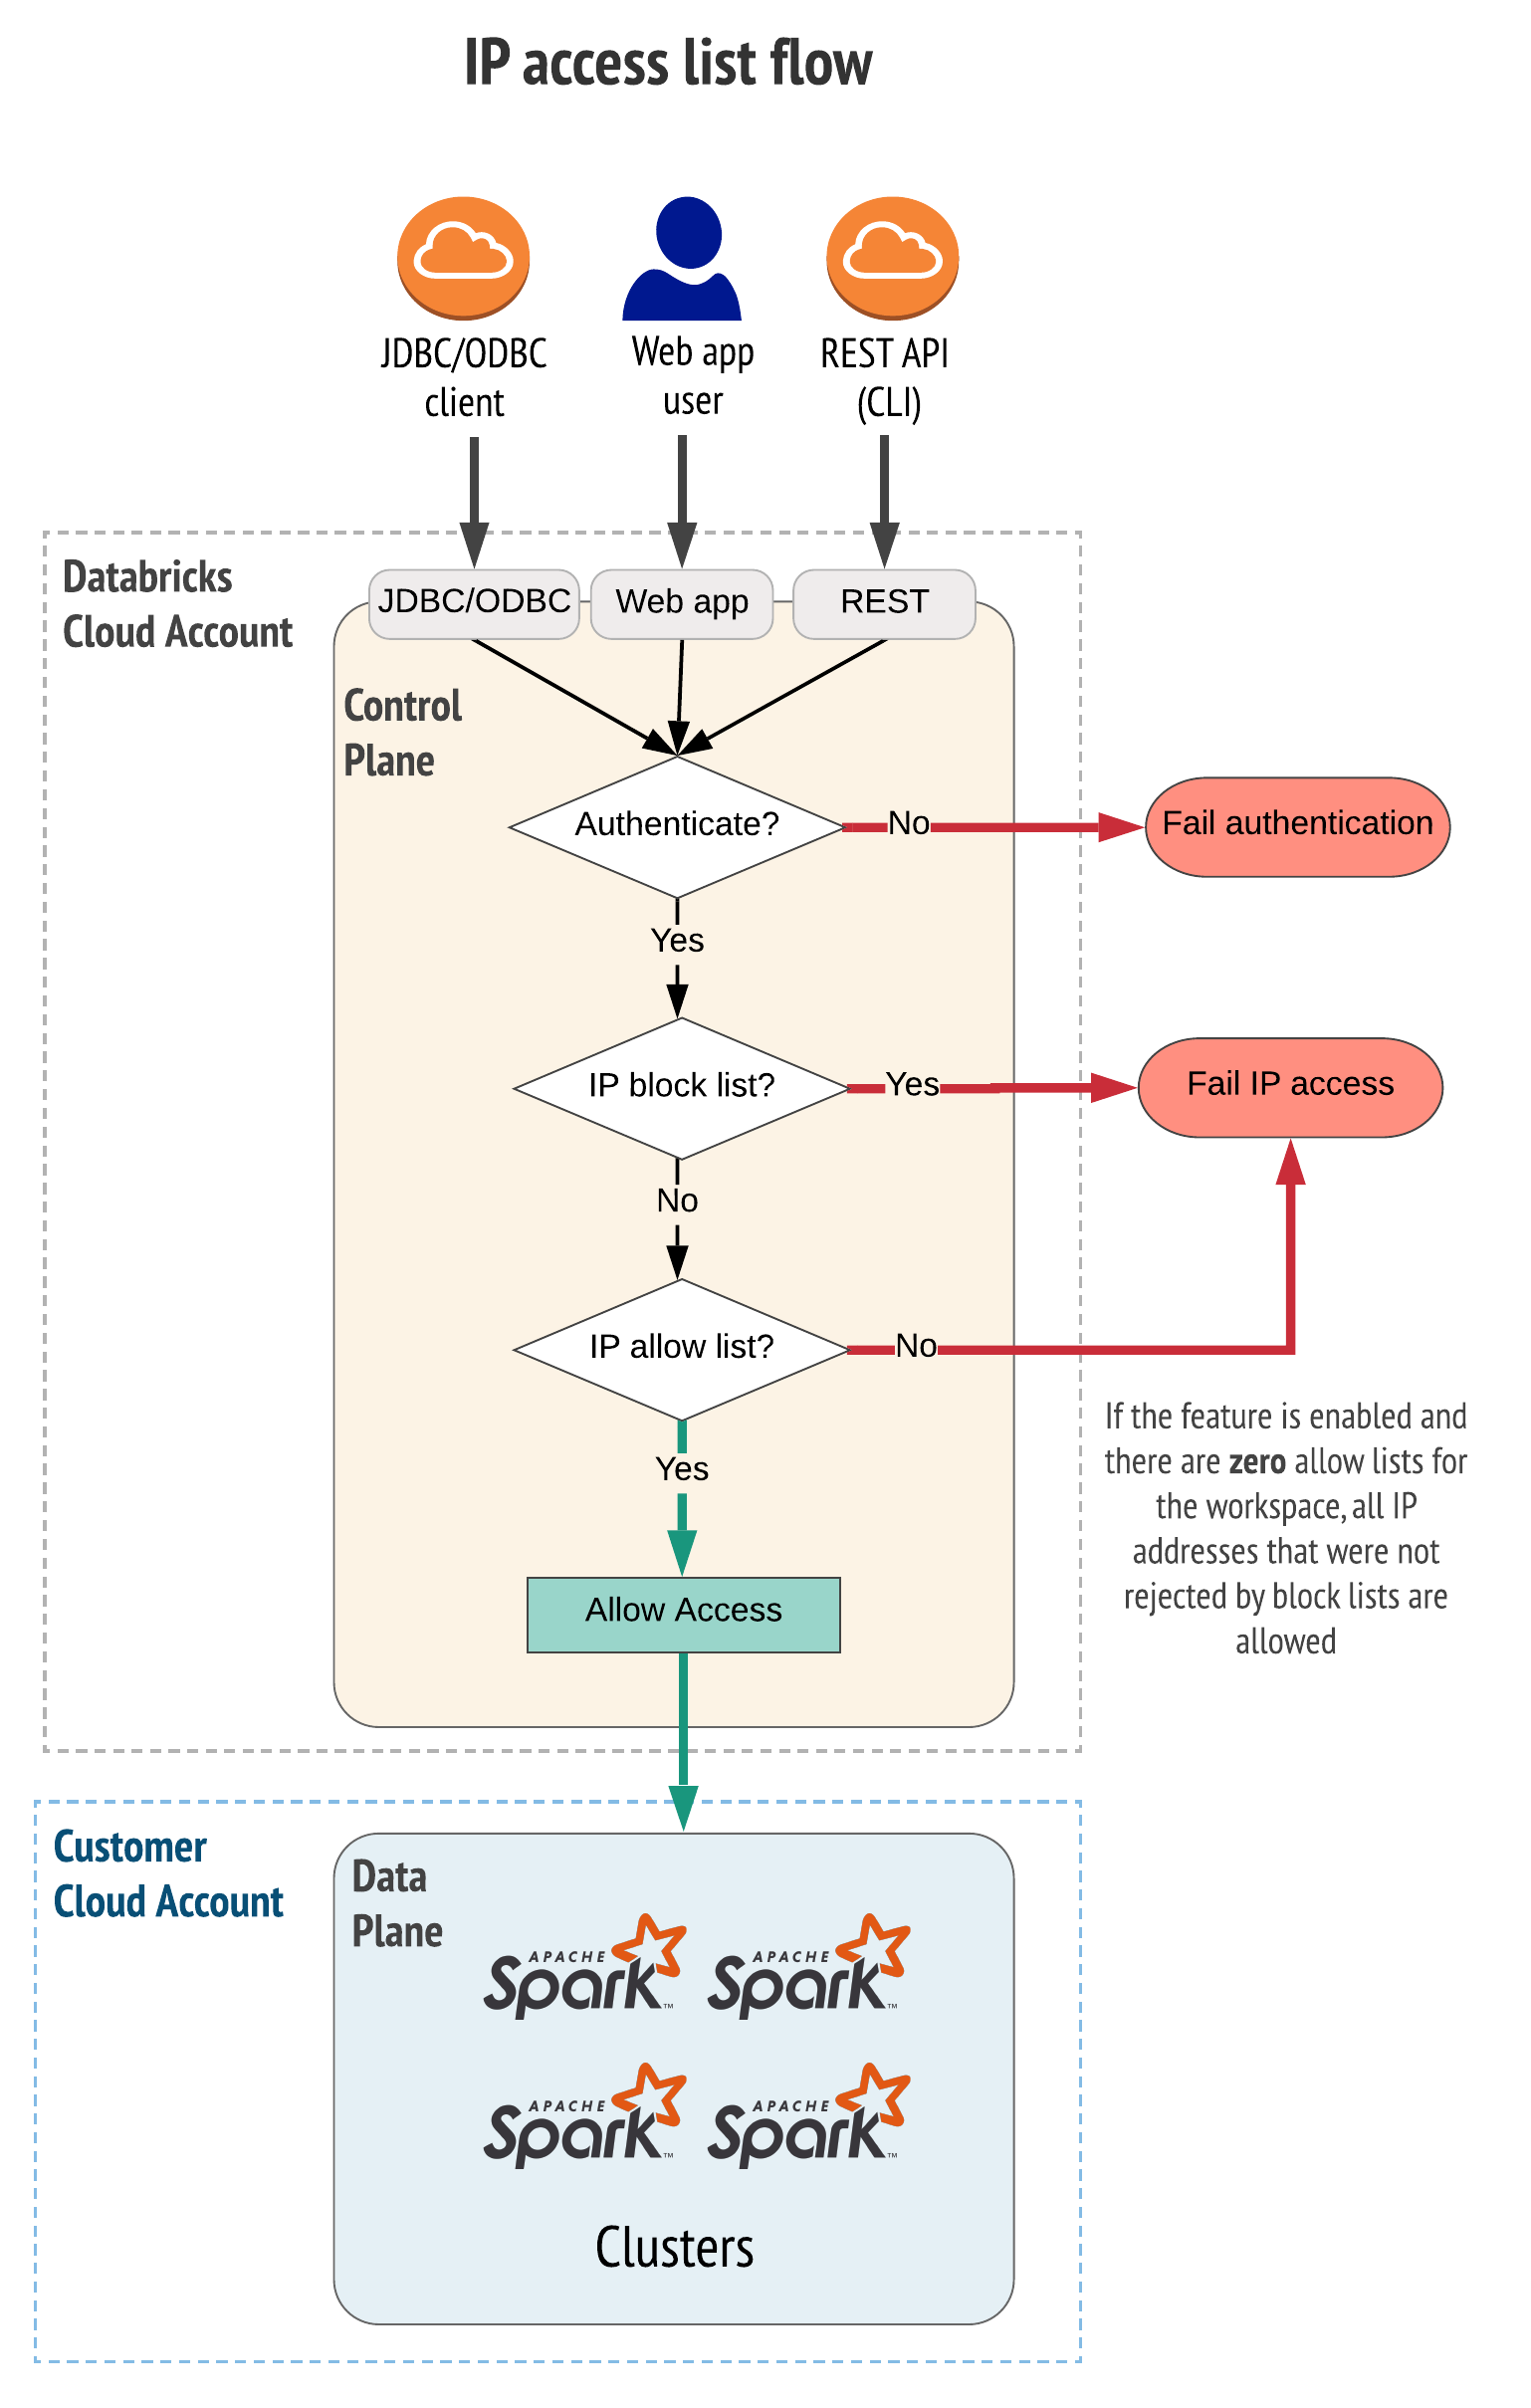
For all the workspaces in this template, we allowed access from the Internet, but we restrict access using IP access list. Each workspace can be customized with allow_list and block_list in variables block.
The process of IP access list management is separated from Terraform process of workspace deployment. This is because we want:
- To keep a clean cut between workspace deployment and workspace management.
- It is general good practice to separate workspace deployment and workspace management.
- To keep workspace objects deployment in separate terraform project, not to risk leaving orphaned resources and ruins your workspace deployment (e.g. changed provider etc).
After you have deployed your workspaces using this template (aws_databricks_modular_privatelink), you will have workspace host URLs saved as local file under /artifacts. Those files are for you to input to the next Terraform workspace management process, and to patch the workspace IP access list.
IP Access List Decision Flow
Example - blocked access from workspace: my phone is blocked to access the workspace, since the public IP was in the workspace's block list.
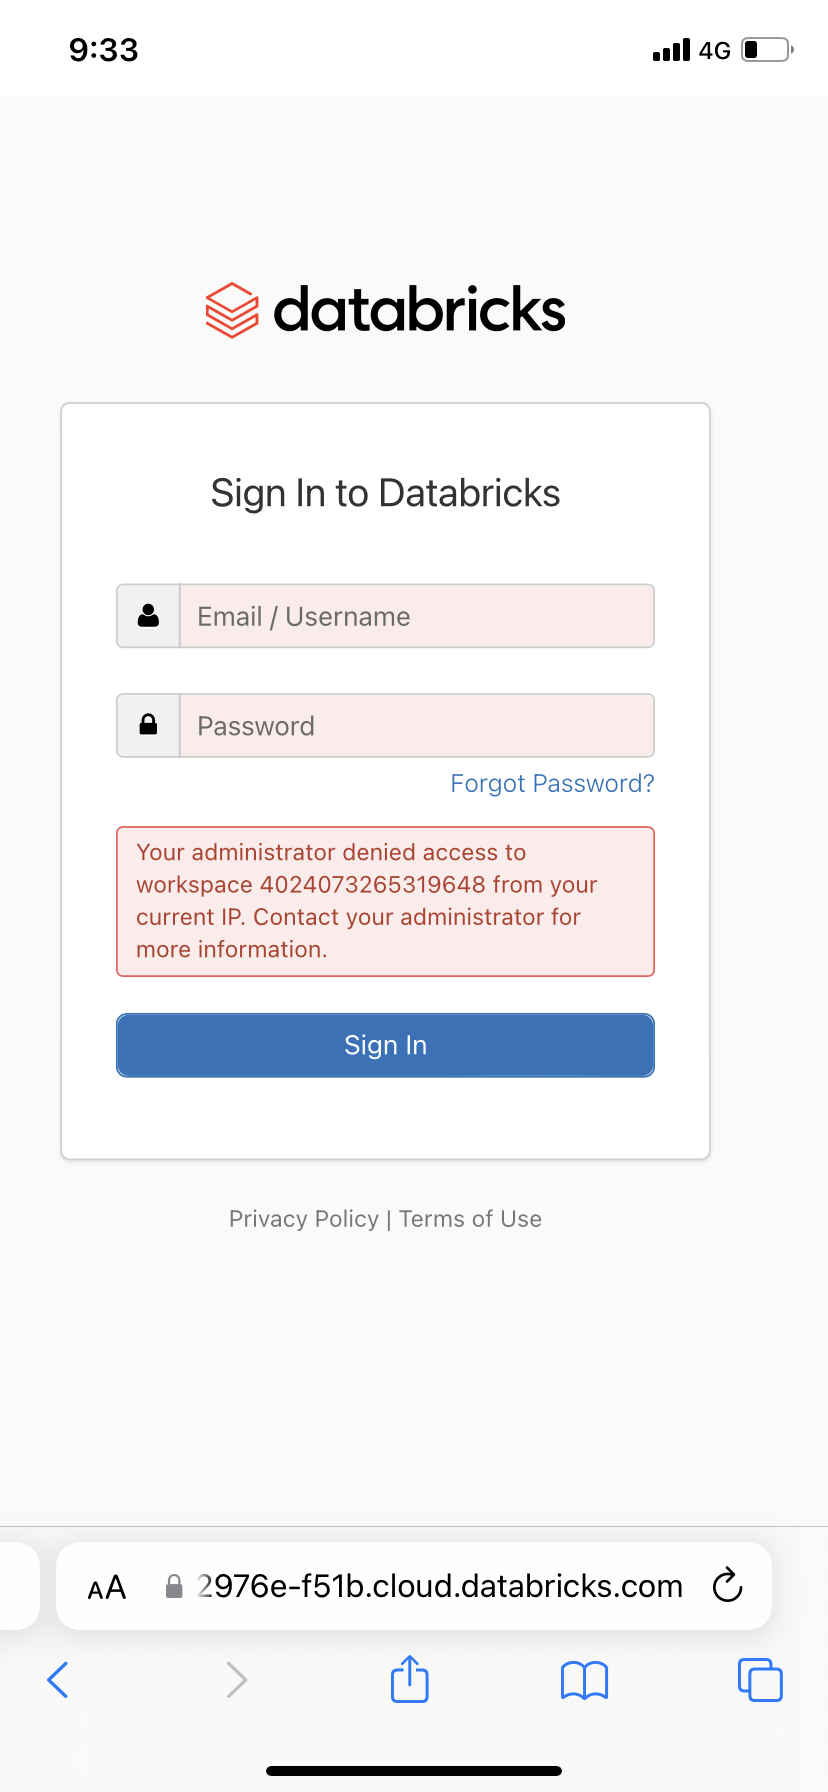
Recommended to keep IP Access List management in a separate Terraform project, to avoid orphaned resources. (Similar error below)

We added custom tagging options in variables.tf to tag your aws resources: in each workspace's config variable map, you can supply with any number of tags, and these tags will propagate down to resources related to that workspace, like root bucket s3 and the 2 subnets. Note that aws databricks itself does not support tagging, also the abstract layer of storage_configuration, and network_configuration does not support tagging. Instead, if you need to tag/enforce certain tags for clusters and pools, do it in workspace management terraform projects, (not this directory that deploys workspaces).
We recommend using remote storage, like S3, for state storage, instead of using default local backend. If you have already applied and retains state files locally, you can also configure s3 backend then apply, it will migrate local state file content into S3 bucket, then local state file will become empty. As you switch the backends, state files are migrated from A to B.
terraform {
  backend "s3" {
    # Replace this with your bucket name!
    bucket = "terraform-up-and-running-state-unique-hwang"
    key    = "global/s3/terraform.tfstate"
    region = "ap-southeast-1"
    # Replace this with your DynamoDB table name!
    dynamodb_table = "terraform-up-and-running-locks"
    encrypt        = true
  }
}
You should create the infra for remote backend in another Terraform Project, like the aws_remote_backend_infra project in this repo's root level - https://github.com/hwang-db/tf_aws_deployment/tree/main/aws_remote_backend_infra, since we want to separate the backend infra out from any databricks project infra. As shown below, you create a separate set of tf scripts and create the S3 and DynamoDB Table. Then all other tf projects can store their state files in this remote backend.

Tips: If you want to destroy your backend infra (S3+DynamoDB), since your state files of S3 and backend infra are stored in that exact S3, to avoid falling into chicken and egg problem, you need to follow these steps:
- Comment out remote backend and migrate states to local backend
- Comment out all backend resources configs, run apply to get rid of them. Or you can run destroy.
You just need to supply with each workspace's configuration in root level variables.tf, similar to the examples given.
Then you need to add the workspaces you want into locals block and run apply.
Do Not run terraform destroy or terraform destroy -target for the purpose of deleting resources. Instead, you should just remove resources from your .tf scripts and run terraform apply.
You just need to remove the workspace config from main.tf - locals block, then run terraform apply to delete the workspace. For example, to delete workspace_3, you need to remove the following lines from main.tf - locals block, it is optional to remove the same from variable block in variables.tf:
workspace_3 = var.workspace_3_configThen run terraform apply, workspace_3 will be deleted.
This template illustrates the traditional method of creating Instance Profile to grant cluster with S3 bucket access, see original official guide
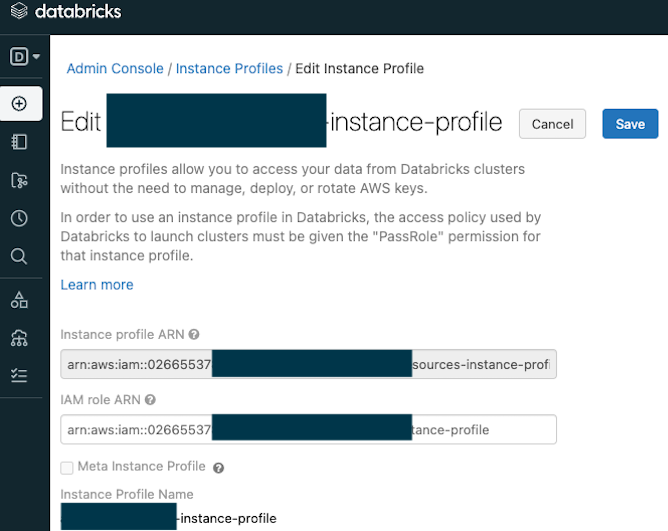
The sample script in instance_profile.tf will help you create the underlying IAM role and policies for you to create instance profile at workspace level, you will find the arn from tf output, you can then manually take the value and configure at workspace admin setting page like below:
Next you need to configure permissions for users/groups to use this instance profile to spin up clusters, and the cluster will be able to access the S3 specified in the instance profile's IAM role's policy.
Deploying instance profile to workspace is obviously a workspace configuration process, and we suggest you write the relevant tf scripts in workspace management project (such as inside aws_workspace_config), not in this workspace deployment project. The screenshot in the above step is a manual version of adding instance profile inside your workspace.
By default, the instance profile you created from the above steps is only accessible to its creator and admin group. Thus you also need to do access control (permissions) and specify who can use such instance profile to spin up clusters. See sample tf script and tutorial here: Tutorial
| Name | Version |
|---|---|
| aws | ~> 4.0 |
| Name | Version |
|---|---|
| aws | 4.32.0 |
| databricks | 1.3.1 |
| databricks.mws | 1.3.1 |
| http | 3.1.0 |
| local | 2.2.3 |
| random | 3.4.3 |
| time | 0.8.0 |
| Name | Source | Version |
|---|---|---|
| databricks_cmk | ./modules/databricks_cmk | n/a |
| workspace_collection | ./modules/mws_workspace | n/a |
| Name | Description | Type | Default | Required |
|---|---|---|---|---|
| cmk_admin | cmk | string |
"arn:aws:iam::026655378770:user/hao" |
no |
| databricks_account_id | n/a | string |
n/a | yes |
| databricks_account_password | n/a | string |
n/a | yes |
| databricks_account_client_id | n/a | string |
n/a | yes |
| privatelink_subnets_cidr | n/a | list(string) |
[ |
no |
| public_subnets_cidr | n/a | list(string) |
[ |
no |
| region | n/a | string |
"ap-southeast-1" |
no |
| relay_vpce_service | n/a | string |
"com.amazonaws.vpce.ap-southeast-1.vpce-svc-0557367c6fc1a0c5c" |
no |
| tags | n/a | map |
{} |
no |
| vpc_cidr | n/a | string |
"10.109.0.0/17" |
no |
| workspace_1_config | n/a | map |
{ |
no |
| workspace_2_config | n/a | map |
{ |
no |
| workspace_vpce_service | n/a | string |
"com.amazonaws.vpce.ap-southeast-1.vpce-svc-02535b257fc253ff4" |
no |
| Name | Description |
|---|---|
| arn | n/a |
| databricks_hosts | n/a |