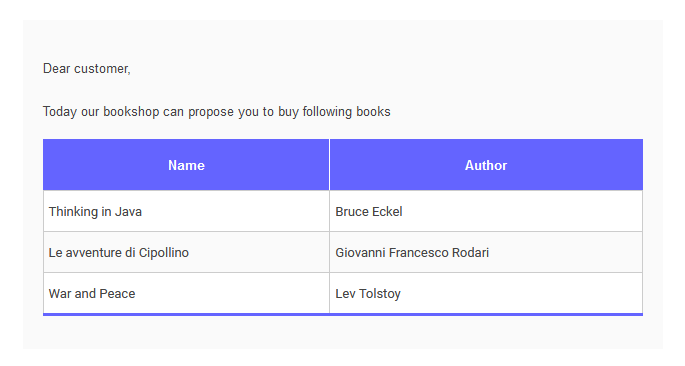
This example shows how properly to create complex email message with large body that depends on many inputs.
In such cases much more convenient to keep and edit text of the body in separate file. This can be achieved using FreeMarker templates that are supported by Email library.
books_proposition.ftl
<html>
    <head>
        <#include "/email_templates/books_proposition.css">
    </head>
    <body>
        <div class="message-body">
            <p>
              Dear customer,
            <p/>
            <p>
              Today our bookshop can propose you to buy following books
            </p>
            <table>
                <tr><th class="first">Name</th><th>Author</th></tr>
                <#list books as book>
                    <tr class="row${book_index % 2}"><td>${book.getName()}</td><td>${book.getAuthor()}</td></tr>
                </#list>
            </table>
        </div>
    </body>
</html>
For more details about possibilities of FreeMarker templates see FreeMarker Manual
It's recommended to define custom classes that extends EmailMessage class and represents specific email messages.
The custom email class can be used for collecting and preparation of all inputs necessary to generate it's content.
public class BooksPropositionEmail extends EmailMessage {

    private static final String TYPE_NAME = "books.proposition.email";
    private static final String TEMPLATE_FILE_PATH = "/email_templates/books_proposition.ftl";
    private static final String SUBJECT = "Books In Stock";

    private List<Book> books;

    // Using of @Inject annotation here allows injecting of this message directly
    // into place of using it without necessity of separate injecting of EmailSender.
    // When EmailSender is provided in constructor of EmailMessage, the message can be send using its method send().
    @Inject
    public BooksPropositionEmail(EmailSender sender) {
        super(TYPE_NAME, sender);
    }

    public BooksPropositionEmail setBooksInfo(List<Book> books) {
        this.books = books;
        return this;
    }

    @Override
    protected void beforeSend() {
        // Specifying the email subject.
        // Here can be any logic based on which the subject can be changed.
        subject(SUBJECT);

        // Path to corresponding FTL file as body.
        html(TEMPLATE_FILE_PATH);

        // Specifying of properties that are used as inputs for FTL file.
        property("books", books);
    }
}
Finally, the creating and sending of email can be done in several lines of code:
@Inject
private BooksPropositionEmail booksPropositionEmail;

public void execute() {
    ...
    List<Book> books = new Ar<>();
    books.add(new Book("Thinking in Java", "Bruce Eckel"));
    books.add(new Book("Le avventure di Cipollino", "Giovanni Francesco Rodari"));
    books.add(new Book("War and Peace", "Lev Tolstoy"));

    booksPropositionEmail.setBooksInfo(books).send();
    ...
}
See the full source of this example for more details or check following instructions to run it.
⚠️ To be able to build and run this example it's necessary to have an access to some instance of EasyRPA Control Server.
Its a fully workable process. To play around with it and run do the following:
-
Download this example using link.
-
Unpack it somewhere on local file system.
-
Specify URL to the available instance of EasyRPA Control Server in the
pom.xmlof this example:<repositories> <repository> <id>easy-rpa-repository</id> <url>[Replace with EasyRPA Control Server URL]/nexus/repository/easyrpa/</url> </repository> </repositories>
-
If necessary, change version of
easy-rpa-engine-parentin the samepom.xmlto corresponding version of EasyRPA Control Server:<parent> <groupId>eu.ibagroup</groupId> <artifactId>easy-rpa-engine-parent</artifactId> <version>[Replace with version of EasyRPA Control Server]</version> </parent>
-
Build it using
mvn clean installcommand. This command should be run within directory of this example. -
Run
main()method ofTemplateBasedMessageCreatingModuleclass.
All necessary configuration files can be found in src/main/resources directory.
apm_run.properties
| Parameter | Value |
|---|---|
outbound.email.server | The host name or IP-address of outbound email server. |
outbound.email.protocol | The name of protocol which should be used for interaction with outbound email server. |
outbound.email.secret |
The alias of secret vault entry with credentials for authentication on the outbound email server. In case of
running of this example without EasyRPA Control Server, secret vault entries can be specified in the
vault.properties file. The value of secret vault entry in this case should be a JSON string with
following structure encoded with Base64:{ "user": "sender@example.com", "password": "passphrase" }
|
email.sender.name | The name of sender that will be displayed in the field "From:" of email message. |
books.proposition.email.recipients |
The list of email addresses delimited with ; who are recipients of email message. These email
addresses displayed in the field To: of the message.Exp: user1@example.com or user1@example.com;user2@example.com;user3@example.com
|
