In this guide, you'll walk through the steps to run Oracle WebLogic Server on Azure Stack HCI AKS cluster. At a high level, this will consist of the following:
- Deploy Nested Virtualization Azure Stack HCI infrastructure, to act as your main Hyper-V host
- Deploy the AKS on Azure Stack HCI management cluster and target clusters for WebLogic workloads
- Deploy WebLogic servers on the AKS cluster - you can moderize WebLogic workload via domain on pv and model in image
- Expose WebLoigc Administration Console and applications deployed to WebLogic cluster.
- Overview
- Contents
- Architecture
- Prerequisites
- Set up AKS cluster on Azure Stack HCI
- Deploy WebLoigc Server with domain on a PV
- Deploy WebLoigc Server with model in image
- CI/CD
- Clean up resources

-
Azure Active Directory
- Have a user with Member type. The user should be granted with Application administrator. The sample will use this user to connect to Azure from HCI.
- If you are Microsoft employee, please do not use your MSFT account.
-
Azure Subscription.
- The user should have Owner role in the subscription. The user will assign a contributor role to an AAD application that Windows Admin Center creates.
-
Development environment
The sample will run shell commands in your development machine outside of the Azure VM, to deploy Oracle WebLogic Server to the AKS in HCI. You are required to work with the following tools:
- Operating System: GNU/Linux, macOS or WSL2 for Windows 10.
- Git; use
git --versionto test ifgitworks. This document was tested with version 2.17.1. - Azure CLI; use
az --versionto test ifazworks. This document was tested with version 2.9.1. - Docker for Desktop. This document was tested with
Docker version 20.10.2, build 2291f61 - kubectl; use
kubectl versionto test ifkubectlworks. This document was tested with version v1.16.3. - Helm, version 3.1 and later; use
helm versionto check thehelmversion. This document was tested with version v3.2.5.
Follow this guide to deploy your Hyper-V host. This guideline enables your to deploy the resources with two options:
In this sample, we use ARM template to create the resources with default settings:

Access the VM machine using Window Remote Desktop.
In this example, login the machine with user azureuser and password that input in the ARM deployment.
This sample will use Windows Admin Center to set up Azure connection and AKS cluster, if you prefer to use Powershell, please find steps in this guide
Now you should be able to access the VM.
Before launching Windows Admin Center, we have to set trusted sites and allowed popups for browser.
-
Set trusted sites.
To avoid connections issue in the following steps, we suggest you to enable the follow sites in trusted sites.
Search for Internet Options in the Windows Start Menu, go to the Security tab, under the Trusted Sites option, click on the sites button and add the URLs in the dialog box that opens. Please add https://login.microsoftonline.com and https://login.live.com.
-
Besides the gateway URL (link like https://akshcihost001), please also add https://login.microsoftonline.com and https://login.live.com.
-
Open Windows Admin Center and connect to Azure. As the user we are using has permission to create AAD app (it is Application administrator role in the tenant), we sugguest your to select Create New under Connect to Azure Active Directory.
-
Set up AKS cluster in CHI. Follow this document to set up AKS. Please stop before clicking Apply.
After inputing the configurations, in the Review page, you should find settings like:

Before clicking Apply, make sure the AAD application is authorized to call APIs when they are granted permissions by users/admins as part of the consent process.
Go to Azure portal, click Azure Active Directory, click your application name, e.g.
WindowsAdminCenter-https://akshcihost1213, and click API permissions. You will find API status are not authorized.Click Grant admin consent for your subscription to authorize, find the following screenshot.

After the deployment finished, the API permission status should be updated, like:

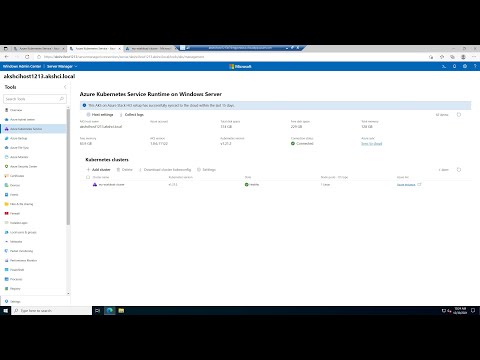
Now you can lick Apply to apply the configuration and set up AKS cluster. It takes about 20min for the deployment. After the process finishes, you should find:

-
Create target cluster. Now you have set up management cluster in your HCI environment, but you still need to create AKS cluster for WebLogic.
Follow step in Create Target Cluster to create an AKS cluster.
This sample use the following settings:

It takes about 20 min to set up target cluster.


Now, you should have Azure Arc-enabled AKS cluster, you can managed the cluster in outside of the VM machine.
Let's have a look at the Arc AKS from Azure portal, your aks name should be my-workload-cluster if you didn't change the cluster name:

While when you click Workloads, you are asked to sign in to view your Kubernetets resources.
Document Use Cluster Connect to connect to Azure Arc-enabled Kubernetes clusters introduces two options to connect the cluster.
As we need admin role to create the WebLogic operator and deploy WebLogic cluster, this sample will guide you to connect to the cluster using service account token.
Open Windows Admin Center, click the server you are working on, here is akshcihost1213.akshci.local. Click PowerShell on the left, the Tools Navigation.
After the PowerShell console launches, you are connected to the machine successfully if you find text like:
Connecting to akshcihost1213.akshci.local, Logon user AKSHCIHost1213\AzureUser
[akshcihost1213.akshci.local]: PS C:\Users\AzureUser\Documents>
Import HCI modules by running the following commands:
Import-Module AksHci
Get-Command -Module AksHci
Query cluster information:
Get-AksHciClusterOutput of this sample:
Status                : {ProvisioningState, Details}
ProvisioningState     : Deployed
KubernetesVersion     : v1.21.2
PackageVersion        : v1.21.2-kvapkg.2
NodePools             : linuxnodepool
WindowsNodeCount      : 0
LinuxNodeCount        : 3
ControlPlaneNodeCount : 1
Name                  : my-workload-cluster
To retrieve the kubeconfig file for the cluster, you'll need to run the following command:
Get-AksHciCredential -Name akshciclus001 -Confirm:$false
dir $env:USERPROFILE\.kube
Now, you can use kubectl to manage the cluster. The HCI Hyper-V host has installed kubectl, you can use it in the PowerShell console.
We need a service account to connect to the AKS cluster. Create a service account in any namespace and grant it with cluster-admin role, see this document for more information. Run the following command in the PowerShell console.
kubectl create serviceaccount admin-user
kubectl create clusterrolebinding admin-user-binding --clusterrole cluster-admin --serviceaccount default:admin-user

$SECRET_NAME=$(kubectl get serviceaccount admin-user -o jsonpath='{$.secrets[0].name}')
$RAWTOKEN=$(kubectl get secret $SECRET_NAME -o jsonpath='{$.data.token}')
$TOKEN=[Text.Encoding]::Utf8.GetString([Convert]::FromBase64String($RAWTOKEN))

echo $TOKEN
Now you have token to access the AKS cluster. Copy the token to a file, make sure the string is one line string, you may have to remove the new lines manually.
You can access the AKS cluster from Azure portal, open the Azure Arc-enabled AKS cluster, input the token to sign in the cluster.

You should be able to access the AKS resource.

With the token, we can manage the AKS cluster resource in the development machine, you are required to use a Linux machine, WSL in Windows machine, or Azure Cloud Shell.
This sample set up WebLogic cluster using WSL terminal from Windows 11 machine.
Run the shell commands to connect to AKS in the outside of the HCI host.
Install connectedk8s extension and enable the Cluster Connect the Arc-enabled Kubernetes cluster.
# Install or upgrade Azure CLI to version >= 2.16.0 and <= 2.29.0
az extension add --name connectedk8s
az extension update --name connectedk8s
Connect to AKS cluster.
CLUSTER_NAME=<my-workload-cluster>
RESOURCE_GROUP=<resource-group-name>
$TOKEN=<the-token-from-above-powershell-command>

az connectedk8s proxy -n $CLUSTER_NAME -g $RESOURCE_GROUP --token $TOKEN
You will find output like:
$ az connectedk8s proxy -n $CLUSTER_NAME -g $RESOURCE_GROUP --token $TOKEN
Proxy is listening on port 47011
Merged "my-workload-cluster" as current context in /home/bamboo/.kube/config
Start sending kubectl requests on 'my-workload-cluster' context using kubeconfig at /home/bamboo/.kube/config
Press Ctrl+C to close proxy.
Please do not close the proxy, we will deploy the WebLogic cluster in the next steps.
Now the AKS cluster is ready to deploy WebLogic workloads. The previous steps have connected the AKS cluster in your local development machine, which has git, helm, kubectl, AZ CLI installed.
You are allowed to manage the AKS resources using kubectl.
Let's test by getting the namespace, you should find the following output:
$ kubectl get ns
NAME              STATUS   AGE
azure-arc         Active   103m
default           Active   113m
kube-node-lease   Active   113m
kube-public       Active   113m
kube-system       Active   113m
Before moving forward, we still have to create storage for the domain, as we will store the domain configuration to a PV.
This sample will enable the NFS server in the Hyper-V host, the Windows Server 2022 Azure VM. Follow this guide to eable NFS server and create NFS share.
This sample use Server Manager to create NFS share in the Azure VM.
- Connect to the Azure VM with user
azureuser - Select Start, type servermanager.exe, and then select Server Manager.
- In the Quick Start, click Add roles and features.
- Installation Type: Role-based or feature-based installation.
- Server Roles: File and Storage Service -> File and iSCSI SErvice -> check Server for NFS
- Wait for the installation process finished.
Then create NFS share.
- Open Server Manager again.
- On the left, select File and Storage Services, and then select Shares.
- Select To create a file share, start the New Share Wizard.
- On the Select Profile page, select either NFS Share - Quick or NFS Share - Advanced, then select Next.
- On the Share Location page, select a server and select volume V, and select Next.
- On the Share Name page, specify a name for the new share, here is
NFSShare, and select Next. - On the Authentication page, specify all the authentication method. Enable Allow unmapped user access by UID/GID
- On the Share Permissions page, select All Machines, share permissions are Read/Write, and enable Allow root access.
- In Permissions, configure the type of access control you want the users to have, and select OK.
- On the Confirmation page, review your configuration, and select Create to create the NFS file share.

After the process finished, you should be able to find the file share from Windows Admin Center -> Files & file sharing.

Now, we can move on to create persistent volumn.
This sample installs NFS server in the same machine of HCI infrastructure. The NFS server endpoint is akshcihost1213.akshci.local.
Before attaching pv to the AKS cluster, we have enable the CSI driver in the HCI AKS cluster, for more information, see this document.
Now, you have to connect to the Hyper-V host, open the Azure VM using Remote Connect Desktop, with user azureuser.
Open PowerShell from Windows Admin Center, and run the following command:
Install-AksHciCsiNfs -clusterName my-workload-cluster
After the command finished, you should find csi-nfs pods are running in different nodes:
kubectl get pod -n kube-system

NAME                                              READY   STATUS    RESTARTS   AGE
csi-nfs-controller-68b79c85c9-dtqjf               3/3     Running   0          56s
csi-nfs-node-g8d8s                                3/3     Running   0          56s
csi-nfs-node-h88xn                                3/3     Running   0          56s
csi-nfs-node-tm2v5                                3/3     Running   0          56s
... ...
Now let's switch to your development machine.
Create storage class for NFS share with the following configurations, make sure the server endpoint is matched with your NFS server. You can find the sample config from nfs-storage-class.yaml
Pay attension to the following parameters:
| Name in YAML file | Example value | Notes |
|---|---|---|
parameters.server |
akshcihost1213.akshci.local |
NFS Server endpoint. Make sure the NSF share is accessible externally. |
parameters.share |
/NFSShare |
You are able to find the share path from the NFS share properties. |
apiVersion: storage.k8s.io/v1
kind: StorageClass
metadata:
  name: nfs-csi
provisioner: nfs.csi.akshci.com
parameters:
  server: akshcihost1213.akshci.local # NFS server endpoint
  share: /NFSShare # NFS share path
reclaimPolicy: Retain
volumeBindingMode: Immediate
mountOptions:
  - hard
  - nfsvers=4.1
Run the following command in your WSL terminal, we assume your haven't close the AKS connection proxy.
kubectl apply -f domain-on-pv/nfs-storage-class.yamlCreate persistent volumn claim using the following configurations. You can find the sample config from nfs-csi-pvc.yaml.
Make sure the storageClassName is matched with the storage class created in the last step.
kind: PersistentVolumeClaim
apiVersion: v1
metadata:
  name: wls-on-aks-in-hci
  labels:
    weblogic.domainUID: domain1
spec:
  storageClassName: nfs-csi
  accessModes:
    - ReadWriteMany
  resources:
    requests:
      storage: 5Gi
kubectl apply -f domain-on-pv/nfs-csi-pvc.yamlValidate the PVC, make sure the status is Bound!
$ kubectl get pvc
NAME                STATUS   VOLUME                                     CAPACITY   ACCESS MODES   STORAGECLASS   AGE
wls-on-aks-in-hci   Bound    pvc-244d98f4-318d-4777-b22e-4e2733493d97   5Gi        RWX            nfs-csi        107s
Now, you are able to create your WebLogic cluster with domain on the PV.
Follow this section to install the operator.
Here lists the commands, run the command on your development machine, WSL terminal, assuming the terminal still connects to AKS cluster:
helm repo add weblogic-operator https://oracle.github.io/weblogic-kubernetes-operator/charts --force-update
helm install weblogic-operator weblogic-operator/weblogic-operator --version "3.3.4"
You should find the operator pod is running in default namespace.
$ kubectl get pods
NAME                                              READY   STATUS      RESTARTS   AGE
weblogic-operator-56654bcdb7-qww7f                1/1     Running     0          25m
... ...
We will use sample scripts from WebLogic Kubernetes Operator repository to create WebLogic cluster, please clone the repository before going on.
git clone --branch v3.3.6 https://github.com/oracle/weblogic-kubernetes-operator.git
With the WebLogic operator running, you are able to deply the WebLogic domain following steps in Create WebLogic domain.
Here lists the commands:
-
Create WebLogic account secret and Oracle SSO account secret.
#create weblogic account secret, user name is weblogic, password is welcome1
cd kubernetes/samples/scripts/create-weblogic-domain-credentials
./create-weblogic-credentials.sh -u weblogic -p welcome1 -d domain1

#create Oracle SSO account secret.
export SECRET_NAME_DOCKER="wlsregcred"
cd kubernetes/samples/scripts/create-kubernetes-secrets
./create-docker-credentials-secret.sh -s ${SECRET_NAME_DOCKER} -e oracleSsoEmail@bar.com -p oracleSsoPassword -u oracleSsoEmail@bar.com
-
Create WebLogic domain
This sample uses domain1.yaml to deploy the WebLogic cluster.
cd kubernetes/samples/scripts/create-weblogic-domain/domain-home-on-pv
./create-domain.sh -i <path-to-domain1.yaml> -o ~/azure -e -v
If the script is running correctly, you should find output like:
createDomainScriptName is create-domain-job.sh
Generating /home/bamboo/azure/weblogic-domains/domain1/create-domain-job.yaml
Generating /home/bamboo/azure/weblogic-domains/domain1/delete-domain-job.yaml
Generating /home/bamboo/azure/weblogic-domains/domain1/domain.yaml
Checking to see if the secret domain1-weblogic-credentials exists in namespace default
Checking if the persistent volume claim wls-on-aks-in-hci in NameSpace default exists
The persistent volume claim wls-on-aks-in-hci already exists in NameSpace default
W1213 18:25:50.628454    6179 helpers.go:557] --dry-run is deprecated and can be replaced with --dry-run=client.
configmap/domain1-create-weblogic-sample-domain-job-cm configured
Checking the configmap domain1-create-weblogic-sample-domain-job-cm was created
'weblogic.domainUID' already has a value (domain1), and --overwrite is false
'weblogic.domainName' already has a value (domain1), and --overwrite is false
Checking if object type job with name domain1-create-weblogic-sample-domain-job exists
Deleting domain1-create-weblogic-sample-domain-job using /home/bamboo/azure/weblogic-domains/domain1/create-domain-job.yaml
job.batch "domain1-create-weblogic-sample-domain-job" deleted
Creating the domain by creating the job /home/bamboo/azure/weblogic-domains/domain1/create-domain-job.yaml
job.batch/domain1-create-weblogic-sample-domain-job created
Waiting for the job to complete...
status on iteration 1 of 30
pod domain1-create-weblogic-sample-domain-job-zmbp5 status is Completed
domain.weblogic.oracle/domain1 created

Domain domain1 was created and will be started by the WebLogic Kubernetes Operator

Administration console access is available at http://127.0.0.1:30701/console
The following files were generated:
  /home/bamboo/azure/weblogic-domains/domain1/create-domain-inputs.yaml
  /home/bamboo/azure/weblogic-domains/domain1/create-domain-job.yaml
  /home/bamboo/azure/weblogic-domains/domain1/domain.yaml

Completed
But now, you can not access the WebLogic Console as the admin server is not ready. It takes about 5min for the whole cluster is ready.
You should find the WebLogic pods status like:
$ kubectl get pod -w
NAME                                              READY   STATUS      RESTARTS   AGE
domain1-create-weblogic-sample-domain-job-zmbp5   0/1     Completed   0          50s
domain1-introspector-cnb4s                        1/1     Running     0          14s
weblogic-operator-7c6889968f-bnth5                1/1     Running     0          117s
domain1-introspector-cnb4s                        0/1     Completed   0          21s
domain1-introspector-cnb4s                        0/1     Terminating   0          22s
domain1-introspector-cnb4s                        0/1     Terminating   0          22s
domain1-admin-server                              0/1     Pending       0          0s
domain1-admin-server                              0/1     Pending       0          0s
domain1-admin-server                              0/1     ContainerCreating   0          0s
domain1-admin-server                              0/1     ContainerCreating   0          1s
domain1-admin-server                              0/1     Running             0          1s
domain1-admin-server                              1/1     Running             0          77s
domain1-managed-server1                           0/1     Pending             0          0s
domain1-managed-server1                           0/1     Pending             0          0s
domain1-managed-server1                           0/1     ContainerCreating   0          0s
domain1-managed-server1                           0/1     ContainerCreating   0          2s
domain1-managed-server1                           0/1     Running             0          53s
domain1-managed-server1                           1/1     Running             0          53s
Now, you have a running WebLogic cluster with no application deployed. You can deploy application through WebLogic Administration Console. While, currently, no one can access the WebLogic Administration Console in the outside of the AKS cluster, we have to expose it first!
This sample will expose the Administration Server and the cluster with Azure Load Balancer services.
You can create the Azure Load Balancer service to expose the Administration Server using configuration provided in lb-admin.yaml, with the following content:
apiVersion: v1
kind: Service
metadata:
  name: domain1-admin-server-external-lb
  namespace: default
spec:
  ports:
  - name: default
    port: 7001
    protocol: TCP
    targetPort: 7001
  selector:
    weblogic.domainUID: domain1
    weblogic.serverName: admin-server
  sessionAffinity: None
  type: LoadBalancer
Run the follwowing command to apply the config.
kubectl apply -f domain-on-pv/lb-admin.yamlYou can create the Azure Load Balancer service to expose the cluster using configuration provided in lb-admin.yaml, with the following content:
apiVersion: v1
kind: Service
metadata:
  name: domain1-cluster-1-external-lb
  namespace: default
spec:
  ports:
  - name: default
    port: 8001
    protocol: TCP
    targetPort: 8001
  selector:
    weblogic.domainUID: domain1
    weblogic.clusterName: cluster-1
  sessionAffinity: None
  type: LoadBalancer
Run the following command to apply the config.
kubectl apply -f domain-on-pv/lb-cluster.yamlYou can check the service with kubectl get svc command:
$ kubectl get svc
NAME                               TYPE           CLUSTER-IP       EXTERNAL-IP     PORT(S)              AGE
domain1-admin-server-external-lb   LoadBalancer   10.109.109.255   192.168.0.152   7001:32039/TCP       87s
domain1-cluster-1-external-lb      LoadBalancer   10.106.141.145   192.168.0.153   8001:30754/TCP       4s
... ...
Now you should be able to access the Administration Server from the HCI host. Open the Edge browser in your HCI machine, enter http://<admin-server-external-ip>:7001/console, here is http://192.168.0.152:7001/console, you should be able to open the login page.

But, you cannot access the URL in the outside of the HCI machine. We have to expose the Administration Server to the internet with extra steps.
- Add an inbould rule to the network security group.
Follow this guidance to add the inbound port rule. For WebLogic Server in this sample, we have to allow traffic to the Administration Server via port 7001 and to the cluster via port 8001.
Here shows the NSG rule for this sample:

- Add new NAT Static Mapping
We have to NAT the incoming traffic through to the containerized application.
Please go back to the Windows Admin Center, and open Powershell, run the following commands to create new Static NAT Mapping.
For Oracle WebLogic Server Administration Server, the value of InternalIPAddress should be the EXTERNAL-IP of domain1-admin-server-external-lb service, listed above.
Add-NetNatStaticMapping -NatName "AKSHCINAT" -Protocol TCP -ExternalIPAddress '0.0.0.0/24' -ExternalPort 7001 `
    -InternalIPAddress '192.168.0.152' -InternalPort 7001
You will get output like:
StaticMappingID               : 0
NatName                       : AKSHCINAT
Protocol                      : TCP
RemoteExternalIPAddressPrefix : 0.0.0.0/0
ExternalIPAddress             : 0.0.0.0
ExternalPort                  : 7001
InternalIPAddress             : 192.168.0.152
InternalPort                  : 7001
InternalRoutingDomainId       : {00000000-0000-0000-0000-000000000000}
Active                        : True
For Oracle WebLogic Server cluster, the value of InternalIPAddress should be the EXTERNAL-IP of domain1-cluster-1-external-lb servive, listed above.
Add-NetNatStaticMapping -NatName "AKSHCINAT" -Protocol TCP -ExternalIPAddress '0.0.0.0/24' -ExternalPort 8001 `
    -InternalIPAddress '192.168.0.153' -InternalPort 8001
Now, you are able to access the Administration Server with address http://<hci-vm-public-ip>:7001/console, you can find the public IP address of the Azure VM with steps:
- Open the resource group that deployed in Deploy Hyper-V host.
- Open the Virtual Machine resource, you should find the Public IP address in the Overview page.
Now access the the Administration Server in the outside of the VM.

Now you are able to deploy a Java EE application following steps in Deploy sample application.
After the application is active, you can access it with address http://<hci-vm-public-ip>:8001/<your-app>, address of this sample is http://20.124.197.38:8001/testwebapp

You can access WebLogic Server log from the NFS share.

This section will walk you through how to create Oracle WebLogic Server with model in image on AKS from Azure HCI.
You can find more information for running Oracle WebLogic Server on AKS with model in image in this document.
Here, you have set up AKS target clsuter in the Azure HCI infrastructure. Before deploying the WebLogic Server cluster to your AKS, we need a docker image which contains JDK, WebLogic Server, WebLogic Model files, and WebLogic Deploy Tool.
You can find detail steps in Create Docker Image.
After you finish the steps, you should have an ACR with docker image.
You have to enable Admin user in the ACR, see the following screenshot.

Set the following connection variables in your development machine, this sample uses WSL terminal:
LOGIN_SERVER=<copy-value-from-login-server>
ACR_USER=<copy-value-from-username>
ACR_PASSWORD=<copy-value-from-password>
We will use the variables to create Kubernetes secret to pull the image.
Run the following commands in your develoment machine, this sample uses WSL terminal, to install Oracle WebLogic Server Kubernetes Operator:
# create namespace
kubectl create namespace sample-weblogic-operator-ns
# create serviceaccount
kubectl create serviceaccount -n sample-weblogic-operator-ns sample-weblogic-operator-sa

# add charts repo
helm repo add weblogic-operator https://oracle.github.io/weblogic-kubernetes-operator/charts --force-update
# install wls operator
helm install weblogic-operator weblogic-operator/weblogic-operator \
        --namespace sample-weblogic-operator-ns \
        --set serviceAccount=sample-weblogic-operator-sa \
        --set "enableClusterRoleBinding=true" \
        --set "domainNamespaceSelectionStrategy=LabelSelector" \
        --set "domainNamespaceLabelSelector=weblogic-operator\=enabled" \
        --version 3.3.6 \
        --wait
You should find the operator is running:
$ kubectl get pods -n sample-weblogic-operator-ns
NAME                                 READY   STATUS    RESTARTS   AGE
weblogic-operator-744cfc8694-hljdd   1/1     Running   0          53s
We will use sample scripts from WebLogic Kubernetes Operator repository to create WebLogic cluster, please clone the repository before going on.
git clone --branch v3.3.6 https://github.com/oracle/weblogic-kubernetes-operator.gitNow, have WebLogic docker image ready in the ACR, you have installed the Oracle WebLogic Server Kubernetes Operator, you are ready to deploy the Oracle WebLogic Server cluster.
You can find the detail steps from Create WebLogic domain, here lists the commands:
# create namespace
kubectl create namespace sample-domain1-ns

# label the domain namespace so that the operator can autodetect and create WebLogic Server pods
kubectl label namespace sample-domain1-ns weblogic-operator=enabled

# create secret for WebLogic administrator credentials and label the secret
kubectl -n sample-domain1-ns create secret generic \
  sample-domain1-weblogic-credentials \
   --from-literal=username=weblogic --from-literal=password=welcome1

kubectl -n sample-domain1-ns label  secret \
  sample-domain1-weblogic-credentials \
  weblogic.domainUID=sample-domain1

# create secret the WDT runtime
kubectl -n sample-domain1-ns create secret generic \
  sample-domain1-runtime-encryption-secret \
   --from-literal=password=welcome1

kubectl -n sample-domain1-ns label  secret \
  sample-domain1-runtime-encryption-secret \
  weblogic.domainUID=sample-domain1

# Use kubernetes/samples/scripts/create-kubernetes-secrets/create-docker-credentials-secret.sh to create the secret for ACR login
export SECRET_NAME_DOCKER="regsecret"
cd weblogic-kubernetes-operator/kubernetes/samples/scripts/create-kubernetes-secrets
./create-docker-credentials-secret.sh -s ${SECRET_NAME_DOCKER} -e $ACR_USER -p $ACR_PASSWORD -u $ACR_USER -d $LOGIN_SERVER -n sample-domain1-ns
Now, we will defind the domain custom resource using a YAML file, you can find the content from domain.yaml, make sure you have repalce the image path with your ACR image path.
-
spec.image: your image path from the ACR.You can find the path from portal: Open ACR resource -> Services -> Repositories -> select your repository - > select the image you want to apply, you can find the whole path from Docker pull command. The path should consist of
<acr-login-server>/<repository-path>:<tag>.
Apply the configuration to the AKS cluster:
kubectl apply -f model-in-image/domain.yamlIf the domain is deployed successfully, you should find output like:
$ kubectl get pods -n sample-domain1-ns --watch
NAME                                READY   STATUS    RESTARTS   AGE
sample-domain1-introspector-2pfp8   1/1     Running   0          7s
sample-domain1-introspector-2pfp8   0/1     Completed   0          71s
sample-domain1-introspector-2pfp8   0/1     Terminating   0          71s
sample-domain1-introspector-2pfp8   0/1     Terminating   0          71s
sample-domain1-admin-server         0/1     Pending       0          0s
sample-domain1-admin-server         0/1     Pending       0          0s
sample-domain1-admin-server         0/1     ContainerCreating   0          0s
sample-domain1-admin-server         0/1     ContainerCreating   0          1s
sample-domain1-admin-server         0/1     Running             0          2s
sample-domain1-admin-server         1/1     Running             0          35s
sample-domain1-managed-server1      0/1     Pending             0          0s
sample-domain1-managed-server1      0/1     Pending             0          0s
sample-domain1-managed-server1      0/1     ContainerCreating   0          0s
sample-domain1-managed-server2      0/1     Pending             0          0s
sample-domain1-managed-server2      0/1     Pending             0          0s
sample-domain1-managed-server2      0/1     ContainerCreating   0          0s
sample-domain1-managed-server2      0/1     ContainerCreating   0          1s
sample-domain1-managed-server1      0/1     ContainerCreating   0          1s
sample-domain1-managed-server1      0/1     Running             0          3s
sample-domain1-managed-server1      1/1     Running             0          43s
sample-domain1-managed-server2      0/1     Running             0          44s
sample-domain1-managed-server2 1/1 Running 0 103sNow, you have set up WebLogic Server cluster in your HCI AKS cluster. To access the Administration Server and the cluster, you have to expose them. This sample will introduce two approaches to expose the workload:
-
Azure Load Balancer Service
Azure Load Balancer Service works at layer 4 that means the Service is unaware of the actual applications, and it can't make any additional routing considerations. We have introduced it in Expose WebLogic cluster via Load Balancer. If you want to expose at layer 4, you can find the configurations in lb-admin.yaml and lb-cluster.yaml.
-
Ingress controllers
Ingress controllers work at layer 7 and can use more intelligent rules to distribute application traffic. A common use of an Ingress controller is to route HTTP traffic to different applications based on the inbound URL.
We will create NGNIX ingress for WebLogic Server workloads with basic configuration. If you want customized configuration, you can find detail information from this document.
-
Use helm to create a simple NGINX ingress controller.
NAMESPACE=ingress-basic

helm repo add ingress-nginx https://kubernetes.github.io/ingress-nginx
helm repo update

helm install ingress-nginx ingress-nginx/ingress-nginx --create-namespace --namespace $NAMESPACE
After the creation finishes, run the following command to check the load balancer service:
$ kubectl --namespace ingress-basic get services -o wide -w ingress-nginx-controller
NAME                       TYPE           CLUSTER-IP      EXTERNAL-IP     PORT(S)                      AGE   SELECTOR
ingress-nginx-controller   LoadBalancer   10.99.145.107   192.168.0.152   80:30580/TCP,443:32406/TCP   73s   app.kubernetes.io/component=controller,app.kubernetes.io/instance=ingress-nginx,app.kubernetes.io/name=ingress-nginx
Please note down the extenal IP of the ingress controller, we will use it in the step 4. Here is
192.168.0.152 -
Create ingress for the WebLogic Server workload
Apply the configuration from
model-in-image/ingress-admin.yamlto create ingress for the Administration Server. Here lists the content of the file, make sure the namespace and service name are correct.apiVersion: networking.k8s.io/v1 kind: Ingress metadata: name: ingress-sample-domain1-admin-server namespace: sample-domain1-ns annotations: kubernetes.io/ingress.class: nginx spec: rules: - host: http: paths: - path: /console pathType: Prefix backend: service: name: sample-domain1-admin-server port: number: 7001
Run the command to apply the configuration:
kubectl apply -f model-in-image/ingress-admin.yaml
Apply the configuration from
model-in-image/ingress-cluster.yamlto create ingress for the cluster. Here lists the content of the file, make sure the namespace and service name are correct. The configuration rewrite the cluster root path with/applications, you can access the Java EE applications which have been deployed to the WebLogic Server cluster with URLhttp://<ip>:<port>/applications/<your-application>apiVersion: networking.k8s.io/v1 kind: Ingress metadata: name: ingress-sample-domain1-cluster-cluster-1 namespace: sample-domain1-ns annotations: kubernetes.io/ingress.class: nginx nginx.ingress.kubernetes.io/rewrite-target: /$1 spec: rules: - host: http: paths: - path: /applications(.+) pathType: Prefix backend: service: name: sample-domain1-cluster-cluster-1 port: number: 8001
Run the command to apply the configuration:
kubectl apply -f model-in-image/ingress-cluster.yaml
You should find the ingress with commands:
$ kubectl get ingress -n sample-domain1-ns
NAME                                       CLASS    HOSTS   ADDRESS         PORTS   AGE
ingress-sample-domain1-admin-server        <none>   *       192.168.0.152   80      29m
ingress-sample-domain1-cluster-cluster-1   <none>   *       192.168.0.152   80      25m
Now, you can access the Administrator server and the cluster from the Azure HCI host, like:

While, you can not access the WebLogic Server workload in the outside of the VM, we have to add new NAT Static Mapping.
-
Add an inbould rule to the network security group
You will create a rule to allow HTTP traffic to port 80 with the following config:

-
Add new NAT Static Mapping
We have to NAT the incoming traffic through to the Ingress controller.
Please go back to the Windows Admin Center, and open Powershell, run the following commands to create new Static NAT Mapping.
The vallue of
InternalIPAddressshould be the external IP of the ingress controller service that is abtained in step 1.We create the ingress using the default port 80. Let's map with external port 80 also.
Add-NetNatStaticMapping -NatName "AKSHCINAT" -Protocol TCP -ExternalIPAddress '0.0.0.0/24' -ExternalPort 80 `
  -InternalIPAddress '192.168.0.152' -InternalPort 80
You will get output like:
StaticMappingID               : 2
NatName                       : AKSHCINAT
Protocol                      : TCP
RemoteExternalIPAddressPrefix : 0.0.0.0/0
ExternalIPAddress             : 0.0.0.0
ExternalPort                  : 80
InternalIPAddress             : 192.168.0.152
InternalPort                  : 80
InternalRoutingDomainId       : {00000000-0000-0000-0000-000000000000}
Active                        : True
Now you are able to access the WebLogic Server workload with URLs:
# Administration Server
http://<vm-public-ip>:80/console
# Application in the cluster
http://<vm-public-ip>:80/applications/testwebapp
To access the Administration Server:

To access the sample application in the cluster:


You can leverage GitOps for CI/CD, see Deploy configurations using GitOps on an Azure Arc-enabled Kubernetes
Sample: GitOps sample for running Oracle WebLogic Server on Azure Kubernetes Service
Document: Use Gitops to run Oracle WebLogic Server on Azure Azure Arc-enabled Kubernetes
To clean up resource, delete the resource group you created in Set up AKS cluster on Azure Stack HCI, you may have two resource groups:
-
The one has Azure VM deployed in Deploy Hyper-V host
-
The one you create Azure Arc in Set up Azure HCI AKS cluster