For whatever function a device with an ESP8266 might have, it could be that you want the user to change some settings or parameters, such as the speed of a motor, or the color of a LED. The configuration manager provides a method to modify parameters from the browser which will be accessible from the software application. The parameters are generated from a JSON file. The configuration manager stores a struct with configuration data in the EEPROM. Structure can be changed at build time, data can be changed at runtime through the GUI which is also auto generated from the JSON.
Usage of this class is easy. See below how to define your configuration parameters. Once you have done this, these can be changed from the browser, and simply be called in the rest of your application as configManager.data.parameterName.
A more detailed example of how to use this in your code is in the examples folder.
bool begin(int numBytes = 512);This method must be called from the setup of the application. The optional argument will determine the flash size used for EEPROM. The method will attempt to restore the saved data from EEPROM. If no data is available, or if the fingerprint of the data structure has changed, the default values will be used.
void save();This method saves the configManager.data object to EEPROM. Use this if you write changes or updates directly to the RAM mirror. This method is blocking.
void saveExternal(configData *extData);This method copies an external configData object into the configManager.data RAM mirror, and uploads it to EEPROM. This method is asynchronous. The actual save command will be performed in the loop() function.
void saveRaw(uint8_t bytes[]);This method stores the input byte array into the EEPROM. This is an unsafe method, you must ensure externally that the input byte array is the correct length and structure. This method is asynchronous. The actual save command will be performed in the loop() function.
void reset();This method resets the EEPROM contents to the default values. This method is asynchronous. The actual save command will be performed in the loop() function.
void loop();Performs the save function is a save is requested. Place this in your main loop function.
void setConfigSaveCallback( std::function<void()> func );Use this function to add a callback that will be executed everytime new data is committed to EEPROM. See the configuration manager example for how to use it.
configData data;This member is the structure containing the RAM mirror of the configuration data.
You might have noticed that the API only gives a function to update the full configuration data, but with a custom page in the web interface you can still update only some variables of the configuration data. In Javascript you then need to:
- Read the binary data into an object with
bin2obj - Modify the resulting object
- Parse the modified object back to binary data with
obj2bin.
On the low level then the full block will be rewritten. The reason for this implementation is that typically nothing is gained by writing individual members. The ESP8266 has no real EEPROM. The EEPROM class will rather write the content to a flash block. Since Flash memory can only be erased in blocks you have to wipe the whole lot and rewrite it. To prevent abusing the flash by potentially looping over a save function for individual members, this function is simply not available, enforcing you to only write the entire block at once.
The configuration data is defined in the JSON file gui/js/configuration.json.
However, if you use the framework as a PlatformIO library, you need to define the filename that points to your configuration JSON file. This can be done in your platformio.ini file by adding a custom build flag:
build_flags = -DCONFIG_PATH=configuration_filename.jsonThis configuration file will be automatically copied into the library folder before each build.
Important: After you have changed the JSON file, you also need to regenerate the web interface to reflect the latest changes by enabling the REBUILD_HTML build flag, otherwise the web interface will show the old configData. Refer to this section for more details.
An example of how this file could look is shown below:
[
    {
        "name": "projectName",
        "label": "Project Name",
        "type": "char",
        "length": 32,
        "value": "Generic ESP8266 Firmware"
    },
    {
        "name": "dummyInt",
        "type": "uint16_t",
        "value": 1000
    },
    {
        "name": "dummyBool",
        "type": "bool",
        "value": true
    },
    {
        "name": "dummyFloat",
        "type": "float",
        "min": 1,
        "max": 10,
        "value": 1.2345
    },
    {
        "name": "dummyString",
        "type": "char",
        "hidden": true,
        "length": 11,
        "value": "invisible!"
    }
]
Supported data types are: bool, uint8_t, int8_t, uint16_t, int16_t, uint32_t, int32_t, float and char. The length argument is mandatory for datatype char to indicate the length of the string. Variable length strings are not supported. Also, arrays are not supported for now. Finally, the type can also be set to color. In this case the field will be shown as a color picker. Define the value of a color in your JSON file as an array with three numbers between 0 and 255 for the rgb values: "value": [255, 255, 255].
Adding the field "control": "select", will turn the item into a drop down menu, with the options defined as "options": [1, 2, 3].
Adding the field "control": "slider", will turn the itemm into a slider, the min, max and step properties will also apply to the slider. This is only valid for numeric types.
Adding the field "control": "password", will turn the item into a hidden field.
The fields below can be used for purposes of the HTML page and will have no functional impact:
{
    "type": "separator"
},
{
    "type": "header",
    "text": "Header text here"
},
{
    "type": "label",
    "text": "Label text here"
},
There are a few unique parameters:
- The configuration parameter
projectNameis unique in this framework. You can remove it, but if you use a parameter with this name, it will be shown as the header title in the web interface :). - The parameter named
languageis also unique and can be used to change the language of the web interface. Supported languages are placed in the foldergui/js/lang. Change the language code and rebuild the HTML interface to change the language. If your language is not yet supported, feel free to create a pull request for it. - The parameter named
projectVersioncan be added to the configuration file, and will add this version string to the header of the web interface, and can of course be used in your code as well.
For this example, the pre-build python script preBuildConfig.py will generate the following two files. These should be fairly self explanatory and show how the JSON file is translated into a C struct.
The configVersion is the CRC32 hash of the JSON file. This is added to the C code in order to detect if the JSON has changed compared to the content of the EEPROM, since the configVersion will also be stored in the EEPROM. This means that if a field is changed in the JSON, the application will know to reject the current content of the EEPROM since it might not be in accordance to the struct definitions it knows.
#ifndef CONFIG_H
#define CONFIG_H

struct configData
{
	char projectName[32];
	uint16_t dummyInt;
	bool dummyBool;
	float dummyFloat;
	char dummyString[11];
};

extern uint32_t configVersion;
extern const configData defaults;

#endif#include <Arduino.h>
#include "config.h"
uint32_t configVersion = 2773241707; //generated identifier to compare config with EEPROM
const configData defaults PROGMEM =
{
"Generic ESP8266 Firmware",
1000,
true,
1.2345,
"invisible!"
};The page in the web interface that is connected to the Configuration manager is shown below. The javascript generating that page will read directly from the JSON and interact with the web server API to get the currently stored values and to request to store new values.
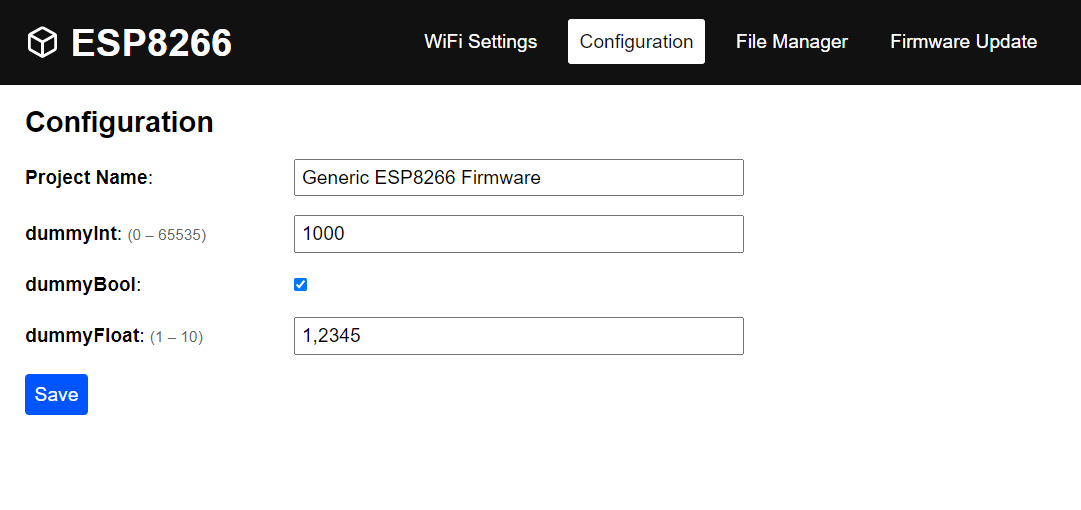
There are several configuration properties which will affect the UI of this page. None of these properties are validated server-side, they're only to adjust the web UI.
disabled: will disable the controlhidden: won't show an input controllength: sets the inputmaxlengthattribute (strings only)min/max/step: sets the corresponding input attributes (numbers only)digits: can be used to limit the number of digits shown (floats only)