A short and small helper for Toyota Kata practitioners.
Goal of this app is to be a practical vademecum/handbook for those interested in applying scientific thinking through Toyota Kata.
Thanks for being here! If you want to contribute to the project, take a look at this file. Any question, feel free to ask!
Here we are. So you want to contribute to this project? Thanks a lot!
There’s no code of conduct, yet, but if this project will grow up, something might possibly be introduced.
In project main folder, the file README.org is a useful starting point to better understand this project. Obviously, if you don’t understand it… let me know, so that we can improve it!
Anyway, for any question or request you can contact me through:
- Delta Chat with the email address marco.530@outlook.it.
- as @AAMfP on Fosstodon, a Mastodon instance.
If you’re not a software developer, and want to contribute improving this app, you’re welcome!
You don’t need the code, but if you want help translating in your native language (or fix my English, since I’m not a native speaker), add more content, suggest graphical or layout improvement or whatever contribution you can give, please open a new issue explaining the problem you’ve noticed and your proposed solution. Through the issues page you can
- notify problems (bug),
- propose improvements (enhancement),
- improve descriptions (documentation),
- ask questions (question)
and, generally speaking, contribute to improve this project.
We’re here to improve!
You can contribute with translations from English (or Italian) to your native language, whichever it is.
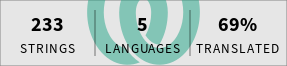
Translations are managed through the free software and platform Weblate through which you can add languages, complete and correct translations, …
If you can’t decide on how to contribute to this project, you can always choose the easier way, contributing through Liberapay:


In this way, the project might be able to grow and even be available on other platform.
If you are a software developer and want to contribute improving this app, you’re welcome!
Find the latest current LTS NodeJS
(18.17.1, as of
2023-08-11) for your system.
The correct version is specified in package.json file in main folder.
Grab the source code by cloning the repository.
Then go to this project main folder and run npm install.
You should see all the needed dependencies downloaded and installed
through NPM package manager.


The husky pre-commit hook is used to verify the coding conventions
consistency through the ts-standard package, available in the
development dependencies, so it might be needed to run the command
npm install -g ts-standard if husky won’t be able to find and run
the ts-standard command.
You also need to install REUSE helper tool (by Free Software Foundation Europe) to assist with achieving and confirming REUSE compliance. See installation instructions at reuse repository.
You might want to also run npm outdated to check possible dependencies
versions updates.
Please take note of the current status and improve the app code an content based on the OpenSSF Best Practices, without reducing the already achieved level of quality.
Set the JAVA_HOME environment variable to a Java (JDK) version at
least Java 11.
From command line launch npm start that will run Metro tool (don’t
know what it actually is, but seems something needed).
From (another) command line launch npm run android that will prepare
and launch your app, connecting to the Metro thing above.
Run npm run ios if you’re on an Apple system: I don’t have one, never
tried the app on an Apple, so if you want to do that… feel free to
try!
If you’re going to build for Android systems, go in the android folder
and run gradlew clean build for generating the APKs.
The debug mode APK will be available in
android\app\build\outputs\apk\debug folder as app-debug.apk.
The release mode APK will be available in
android\app\build\outputs\apk\release folder as app-release.apk.
I actually have no idea on how to do that, for iOS. If you find it out, let me know so that we can update this document!
The generated APK (see How to Build) shall be (self) signed to be able to install it on a real device. The uber-apk-signer tool can be used to quickly and easily sign any APK.
Once the code is completed and tested, in order to release there are a bit of steps to follow.
Preflight checklist: these are the tasks to do before creating a new release. After each step is suggested to commit and push the code on main repository.
- Update package.json with the new version number
and run
npm install. - Run
npm outdatedand possibly update old dependencies. - Verify that CHANGELOG.org contains the properly numbered section for the upcoming release, moving the related and relevant Unreleased content to such section.
- Verify that
fastlanefolder contain the properchangelogsfiles for the upcoming version code in all available languages. If needed, also updates or add relevant screenshots in all available languages. - Verify that Errors.org contains the currently known issues by adding those relevant and removing those solved. If needed, also open specific issues on the project Codeberg Issues page.
- Verify that SECURITY.org contains the currently known security issues by adding those relevant and removing those solved. If needed, also open specific issues on the project Codeberg Issues page.
- Update the
versionCodeandversionNamevalues inside theandroid.defaultConfigfield of file build.gradle. - Update the
CFBundleVersionandCFBundleShortVersionStringvalues inside the<dict>field of file Info.plist. - Verify that Architecture.org
has the latest architectural information properly updated, if needed.
Add relevant ADR documents in the
docs/architecture/decisionsfolder if needed, tracking them in the CHANGELOG.org file. - Verify REUSE compliance with
pipx run reuse lintcommand. Please note this command is also automatically launched before each commit. - Verify TS Standard
criteria through
npm run lintcommand. Please note this command is also automatically launched before each commit. - Update README.org file latest tag, where present.
- Update this file, if you need to update the release steps.
- If you’re not updating Node*, tag with the corresponding (semantic) version number. Possibly wait for previous release to be published and available on F-Droid, if any, to avoid the “override” possibility so that the newer release won’t make available the previous one.
To update the version of NodeJS (or NPM, Java and, generally, everything related to building tools used by F-Droid building system through metadata file), it’s better to prepare the version without the tag and create an MR (merge request) on a fork of the GitLab F-Droid/Data repository, with the update of the application metadata file and, only after the merge has been added, make the tag available on the code repository. This is because F-Droid independently manages releases as soon as one is available (labeled) on the repository. See https://gitlab.com/fdroid/fdroiddata/-/merge_requests/10826#note_895731121 So:
- Execute the procedure on How to release, without the last step, so without sending the tag to the repository.
- update your fork of the F-Droid/Data repository with the latest
modifications from the
upstream repository,
following
these
instructions through command line (pull mirroring seems not
available on GitLab).
Only the first time, execute
git remote add upstream https://gitlab.com/fdroid/fdroiddata.gitto add the upstream source repository to easily mirror it. Then, every time you need to update it, just run these commands:git checkout master git fetch upstream git pull upstream master git push origin master - update the app metadata file on an unprotected branch of your fork of the F-Droid/Data repository, adding a new version, with the update of the version of NodeJS, its SHA, commit number, etc. looking, for example, at the NodeJS differences between the version 6.3.0 (630) and 6.4.2 (642) on the metadata file.
- Create an MR on the original F-Droid/Data repository with this modification from the fork.
- Once the MR has been approved and integrated into the main F-Droid/Data repository, send the tag to the repository, so that F-Droid build process can locate and use it.
Same instructions stand for updating JDK, NPM or Android NDK versions.
If there’s a new translated language in the project Weblate page, after Weblate commit the new file JSON will be available in the repository.
As soon as the new language file will be available, it’s possible to import it in the i18n.ts file, as in
import {default as itIT} from './it-IT.json';
import {default as nbNO} from './nb-NO.json';
Then you have to add the new language in the available resources as
done in
const resources: Resources = {
    de: { translation: de },
    en: { translation: en },
    fr: { translation: fr },
    'it-IT': { translation: itIT },
    'nb-NO': { translation: nbNO }
}