The journey
So this project started in October 2019. I wanted something to control the heat and light for a succulent germination station I wanted to build something that would allow me to control day length seasonally. I initially started with a thermostatic bed heater with a dodgy temperature sensor and a timer for the lights. But flowers need variation in both heat and light in order to flower. A Raspberry Pi was needed to control 2 solid-state relays and read a temperature... easy... or at least I thought it was.
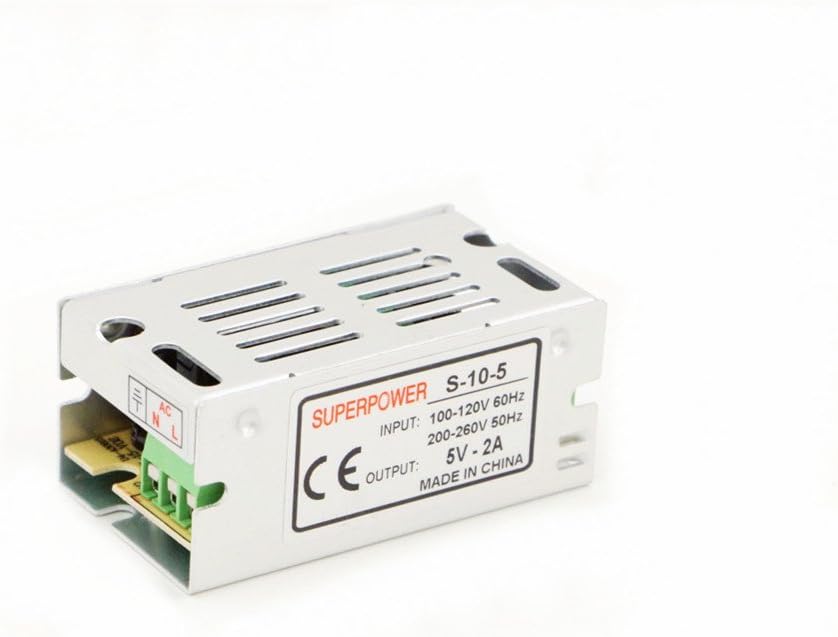
I wanted to have as few wires as possible so the unit would be compact. One mains socket in, and 2 sockets out. This meant I had to provide a power supply for the Raspberry Pi controller. I have used a step-down circuit before, but that was 12V DC down to the 5V the controller requires, this needed to go from 240V AC down to 5V DC. That was the easy part... although not as small as I wanted.
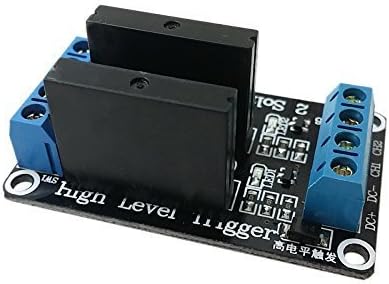
Trying to find a reliable solid-state relay (SSR) was really tricky. I'm not great at mains electric, in fact, I'm not that great at any electrical stuff but mains electric has more potential to kill or maim, and during the early stages of this project, I did test the RCD capability of my house a couple of times. The big heavy-duty ones I wanted were big and expensive unless you got a knock-off so I eventually found a lower-powered one that would run the lights and heater I already had. It was also dual-channel and easily connectable to the raspberry pi.
For temperature sensing, I initially went for the joint humidity/temperature sensor that everyone uses... The DHT11 or the slower but more accurate and longer-lasting DHT22.
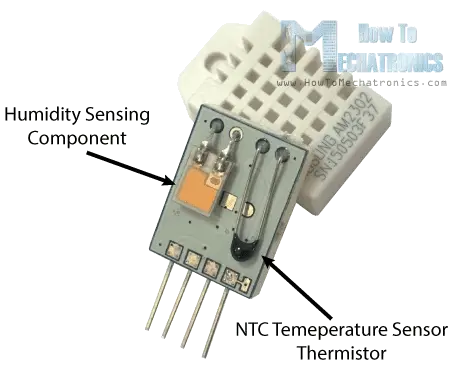
It is advertised as a fast and accurate sensor and in hindsight, it would probably have been fast enough. But another issue arose: for hydroponics, you control the temperature of the root zone, which means you control the temperature of the water in your reservoir and the DHT22 is not waterproof. Meh, who needs humidity sensing anyway so the DS18B20 it was then as it comes in a neat waterproof housing.

So the first attempt at wiring everything up after prototyping looked a bit messy, but it did work... Gotta love the gratuitous use of gaffer tape.
I built a couple of custom PCBs, one to handle the 5v side and another to do the 'hot' 240v side. This was way tidier and no excessive heat was detected (although I was only pulling about 150 watts altogether).
I took a switch at combining the hot and cold sides on the same PCB. Nothing had melted previously so as long as I kept things far enough apart all should be ok. So I now had a working prototype with a pretty PCB. I needed a case and some 3D printed parts led to this initial testbed.
Finishing off the case and it looked pretty... pretty awful.
I had hoped the exposed wiring would have been way cooler than it actually is. But making all the wires ferruled for safety meant that it took me 2 days to assemble everything, so if I wanted to offer a kit, then it would be expensive, and if I wanted to do the assembly... it would be astronomically expensive. the next iteration would just be a fully covered box. Already saddened with the lack of gaffer tape, I decided to add a really HUGE blue LED.
So the first working prototype in a box was ready for the shelves... of my succulent care station that is...
After about 8 weeks, one of the channels of my solid-state relay packed up and decided to be a bit blinky. This was not good. Luckily I was well into Version 2. I also realised that I was being too adventurous with the previous version. It's all very well having a single power cord in, and 2 sockets out in one neat box... But, it was huge, because it requires the power transformer and onboard solid-state relays. It is also severely limiting. What if you want more than just one temperature sensor, it was always the plan to have more. And what about more triggers. Version 2 was significantly smaller, but much more "wirey". Using a bigger section of the Raspberry Pi meant I could have 4 1-wire sensors, an additional CO2 sensor and control 6 trigger lines. The software to control it all would be tricky, but I'll deal with that, and the possibilities are huge. I could run 4 Deep Water Culture hydroponics buckets in a single tent. Or 4 reptile vivariums, or I can mimic the sunrise and set with 3 lights, or I can add a fogger to raise the humidity, or a dehumidifier to lower it, or air-con... As long as each appliance runs under 5 amps it will be awesome... air-con may be tricky at that. And getting it all to run off a 13 amp wall extension... Pah, details for later.
So let's get some testing going. Here is the test configuration consisting of a much smaller controller, and a single line being controlled for now. I just want to see if I can melt anything or let the magical blue smoke out at this point.
The heater was a 1,500W space heater which had a fan only option that runs at 20W, Pah. A first heat section that pulls 750W from the wall... But what about running the full 1,500W... that's nearly 7 whole Great-British amps right there. Well, it didn't blow up and the magic blue smoke stayed inside everything after running it for an hour. On the one hand that was disappointing, but on a positive note I was able to run nearly 50% over the rated load, and it peaked at 1,800W for a couple of minutes while the heating elements warmed up.
The controller seems to not be panicking at all with the stuff it's doing which is good for expanding to full size.
The power cord I was using is 0.75mm stranded 3-core rated to 6 amps. It wasn't worried either... well, not on the outside.
The part that was giving me the most concern was the Solid State Relay taking the brunt of the current. Only rated to 5 amps this was running way out of spec, and it was showing it after an hour. However, it reached 120C after about 5 minutes of running flat out and crept up to 146-148 over the remaining 55 minutes of my testing.
To be fair though, if you were in a 4'x4' tent you would be using grow lights that would rarely pull more than 600W from the wall, and even this heater would only take a minute or 2 to warm the whole tent to super-toasty on the safe setting.
Interestingly, I wondered how hot the heating element was.