IRKit device and IRKit SDK lets you control your home electronics from your iOS and Android devices. IRKit device has a Infrared LED and receiver, and a WiFi module inside. Internet connected devices can make IRKit send IR signals for you.
In Japan: amazon.co.jp
World wide shipping available: switch-science
Basically, it's a Arduino Leonardo fork with following modifications:
- added a WiFi module ( GainSpan 's WiFi module ).
- added Infrared Receiver, Infrared LED and some LEDs.
It's basically a normal Arduino sketch.
See IRKit.ino
See Case
Following Arduino pins are pulled out for you.
- D2,D3,D4,D5,D12,TXLED
- A0,A1,A2,A3
See IRKit.sch, eagle schematic file 's CN2
You can use Arduino IDE to write IRKit's firmware.
Follow this procedure (for MacOS).
-
Download, install and run Arduino IDE
-
Connect IRKit using USB Micro-B cable to Mac.
-
Navigate to Arduino IDE Menu and select Tools -> Board -> "Arduino Leonardo".
-
Navigate to Arduino IDE Menu and select Tools -> Serial Port -> "/dev/tty.usbmodemXXXX".
XXXX part should differ on your environment.
-
Download latest zip file from IRKit device tags.
-
Unzip it and open
firmware/src/IRKit/directory. -
Rename
version.templatetoversion.c.FYI. Product version is embedded here in official builds.
-
Double click
IRKit.inoin the same directory. -
Navigate to Arduino IDE Menu and click File -> Upload, to write into IRKit.
-
All Done!
@acourreges created a branch settings-led-cloud that enables you to configure:
- Status LED behaviour (you might want to turn the LED off when the device is idle?)
- Enable/Disable cloud control (you might want IRKit not to connect to Internet?)
See config.h for details.
IRKit logs what it's doing to USB serial, and you can use Arduino IDE to see it.
Follow this procedure (for MacOS).
-
Download, install and run Arduino IDE
-
Connect IRKit using USB Micro-B cable to Mac.
-
Navigate to Arduino IDE Menu and select Tools -> Serial Port -> "/dev/tty.usbmodemXXXX".
XXXX part should differ on your environment.
-
Navigate to Arduino IDE Menu and select Tools -> Serial Monitor.
-
Change new window's right-bottom settings to "No line ending" and "115200 baud", and close the window.
-
Reconnect IRKit and immediately start Serial Monitor again.
This is to collect logs as soon as IRKit startups.
-
Copy and send logs to IRKit developer, thanks!
IRKitのファームウェアは、 Arduino IDE を使って書き込むことができます。
出荷時のファームウェアバージョンによって、どのファームウェアバージョンまでアップデートできるかが変わります。
以下の手順で現在のバージョンを確認し、対応するバージョンを使用してください。
| 現在のバージョン | 対応する最新のバージョン |
|---|---|
| 1.3.3以下 | 1.3.3 |
| 1.3.4以上 | 最新 |
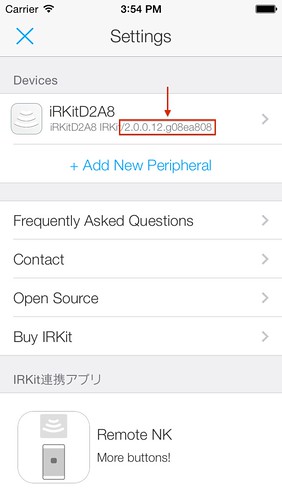
IRKitシンプルリモコン を起動し、左上のボタンから設定画面を開くと、以下の画像の赤の四角のようにファームウェアバージョンを表示します。
以下がファームウェアのアップデート方法です(MacOS編)。
-
Arduino IDE をダウンロードしてインストール後、起動します。
-
IRKitをUSB Micro-Bケーブルを使ってMacに接続します。
-
Arduino IDEのメニューから ツール -> マイコンボード -> "Arduino Leonardo" を選びます。
-
Arduino IDEのメニューから ツール -> シリアルポート -> "/dev/tty.usbmodemXXXX" を選びます。
環境によってXXXXの部分やその前後が異なる場合があります。
-
ファームウェアをダウンロードし、zipファイルを解凍します。
-
解凍したディレクトリ内にある
firmware/src/IRKit/ディレクトリを開きます。 -
同ディレクトリ内の
version.templateをversion.cにリネームします。参考) 製品版ではIRKitのバージョン情報をここに埋め込んでいます。
-
同ディレクトリ内の
GSwifi.cpp内に埋め込んであるWi-Fiアクセスポイントのパスワードを書き換えます。https://github.com/irkit/device/blob/master/firmware/src/IRKit/GSwifi.cpp#L1096
のXXXXXXXXXXを任意の文字列に書き換えてください。
参考) IRKitの出荷前に書き換えてから出荷しています。 -
同ディレクトリ内の
IRKit.inoをダブルクリックして Arduino IDE で開きます。 -
Arduino IDEのメニューから ファイル -> マイコンボードに書き込む を押してIRKitに書き込みます。
-
完了!
IRKitのマイコン ATmega32U4 はプログラムメモリを 32kB 積んでいますが、
IRKitのファームウェアでそのほぼ全てを使用しています。
ファームウェアに改造を行い、機能追加する場合には、
不必要な機能のログ出力や機能自体を削ってください。
log.hの22-26行目 辺りをコメントアウトすることで、ログ出力を止めることができます。
@acourregesのsettings-led-cloudでは、以下を変更可能にしています。
- ステータスLEDの動作 (赤外線を送受信していない時にはLEDを消灯しておきたい??)
- クラウドとの接続を有効/無効 (IRKitをインターネットに接続せずに使いたい??)
詳しくは config.h を見てください。
@shokaiのtempe_sensorブランチ、sensors_jsonブランチでは、
温度センサからの入力、アナログピンの値を読み、IRKit内蔵のWebサーバからHTTP GETで取得できるようにしています。
詳しくは IRKitのファームウェアを改造して温度センサーを追加した をご覧ください。
IRKitは、USB Micro-Bを使いパソコンまたはMacに接続すると、動作ログを取得することができます。
以下の手順でログを取得します(MacOS編)。
-
Arduino IDE をダウンロードしてインストール後、起動します。
-
IRKitをUSB Micro-Bケーブルを使ってMacに接続します。
-
Arduino IDEのメニューから ツール -> シリアルポート -> "/dev/tty.usbmodemXXXX" を選びます。
環境によってXXXXの部分やその前後が異なる場合があります。
-
Arduino IDEのメニューから ツール -> シリアルモニタ を選びます。
-
新しく開いたウィンドウの右下の設定を "改行なし" "115200baud" に変更し、一度ウィンドウを閉じます。
-
IRKitのUSB Micro-Bケーブルを外し、再度接続した直後に、上記同様に シリアルモニタ を開きます。
IRKit起動直後からのログを取得するためです。
-
ウィンドウに表示される文字列をコピーして開発者へメールしてください。ありがとうございます!
Firmware is licensed under GPLv2 or later.
See details in firmware/LICENSE.
Schematics are licensed under Creative Commons Attribution Share-Alike license.
See details in hardware/LICENSE.
Case is licensed under Creative Commons Attribution NonCommercial Share-Alike license.
See details in case/LICENSE.


