Welcome to the Universal Posting Page, or UPP in short. This is your go-to solution for seamlessly integrating idibu's powerful posting engine into your own platform. Picture it as a ready-made page equipped with all the tools necessary to smoothly incorporate idibu's posting capabilities. The best part? You only need to handle the styling aspect. With just a touch of styling and parameter mapping, you'll have the magic of posting working harmoniously within your system, and it takes just minutes to set up!
The process is simple. You make a call to the designated link, supplying the required parameters. To make things even smoother, we suggest mapping idibu parameters to your own variables.
You have the flexibility to provide parameters either through traditional HTTP GET or POST methods, both URL-encoded. However, POST is recommended due to potential character count limitations in GET. For instance, if you want to include the hash, sender ID, and job title when generating the page, here's how the URL should look:
https://ws.idibu.com/clients/upp/index.php?hash=YOUR_HASH&email=SENDER_EMAIL&jobTitle=test%20title
This simple link can initiate a nearly instant integration with minimal development effort. Once it's up and running, you can focus on refining the appearance and fine-tuning parameter mapping. Voila! Your ATS will be equipped with a fully functional multiposting system.
Here's a breakdown of the parameters at your disposal, along with their descriptions and examples of usage. Please note that parameters marked with an asterisk (*) are mandatory.
method: Specify "post" for HTTP POST; otherwise, HTTP GET is accepted.hash: Your idibu account's unique hash.partnerId: For applying custom CSS and options on posting. Reach out to us to obtain one.
senderId* - idibu account user's ID. You can use the following parameters instead to create a new user (allowNewUsers, see below) or auto-identify an existing one (findUser, see below):firstName* - sender's first namelastName* - sender's last nameemail* - sender's e-mail address
phone* - sender's phone numberwww* - sender's company www addresscountry* - sender's countrypostcode* - sender's post codecompany* - sender's company name
boards- list of board IDs to publish to, separated by semicolons (e.g. 37;151;123)jobTitle- job title (e.g. A%20test%20title)jobRef- job reference (e.g. REF123) - minimum 4 charactersstartDate- job start date in yyyy-mm-dd format with leading zeroes (e.g. 2013-06-25)category- ID of the selected category (available options listed below, e.g. 13)location- ID of the selected location (available options listed below, e.g. GB)sublocation- sublocation's name (e.g. London)sublocationId- sublocation's ID (e.g. 1024195)mapPostCode- instead of providing the ID or text value of a location, you can provide a postcode as a location source. idibu will use Google's location API to figure out the intended location based on it. By default, we will try to map to the UK postcode, but if you provide thelocationvariable (country code as listed below), the system will look for a location within the provided postcode in the specified country.hours- working hours ID (available options listed below, e.g. 1)term- job type ID (available options listed below, e.g. 2)duration- contract duration (not available iftermis set to "Permanent" (ID: 2), e.g. Two%20months)currency- salary currency's ISO-3 code (please useUSinstead ofUSDandEUinstead ofEUR; all other currencies should be valid 3-letter codes)minSalary- minimum salary (e.g. 2000)maxSalary- maximum salary (e.g. 3000)per- salary period (available options listed below, e.g. month)extraBenefits- extra benefits (e.g. premium%20health%20care)salaryDescription- optional salary text override (e.g. 2000%20pounds%20or%20more) - for most job boards, if used, this value will hide all the other salary dataappUrl- optional URL to use if one wants to apply for the jobjobDesc- job description (e.g. Here%20is%20a%20test%20description)
hideTitle- Set to true to hide the job title fieldhideRef- Set to true to hide the job reference fieldhideStartDate- Set to true to hide the job start date fieldhideAppUrl- Set to true to hide the job application URL fieldfindUser- Set to true if you want to get a user ID by their e-mail from idibufindJob- Set to true if you wish to update (repost) an existing job and fetch its field values based onjobRefenablePreview- Setting this to true triggers the preview option on step 2 of the posting process. Please use only with non-default styling.useOriginalSender- Comes together with thefindjobparameter. The system will re-use the original sender of the ad.overrideRepost- Set to true if parameters from URL have higher priority than repost data (iffindJobis set to true)allowNewUsers- set to true if you wish to create a new idibu user if an unknown email appears in the email field. True by default.
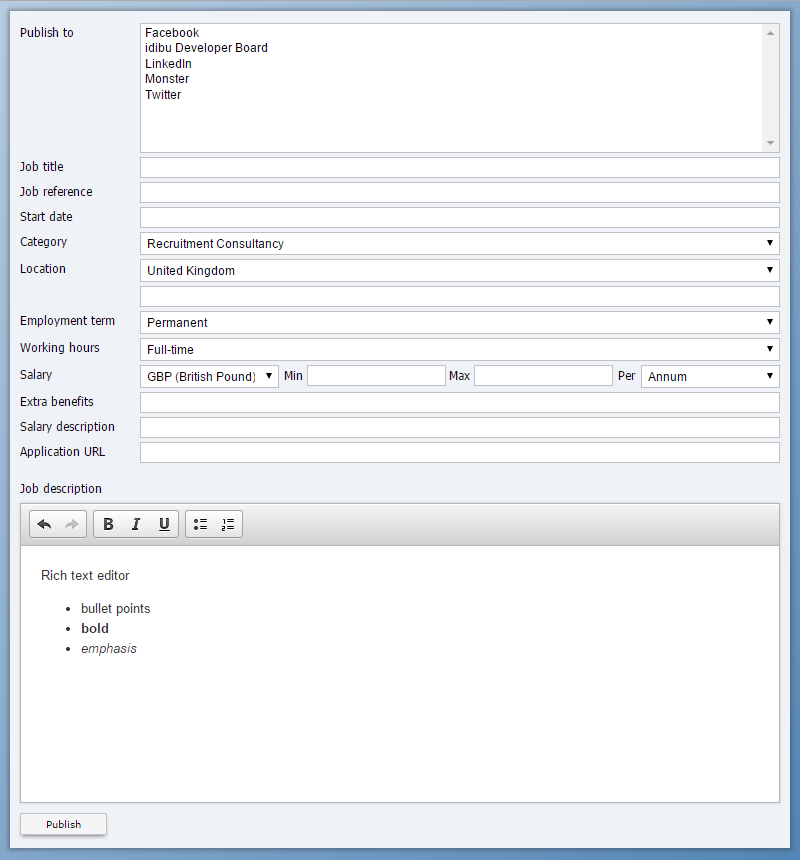
Check out the image below to visualize the kind of impact styling can have. This is a very basic example, but is also heavily adjustable using custom CSS:
Don't hesitate to reach out to us to discuss your specific requirements in detail. If you're keen on learning more about styling these pages, you can find instructions here.
Here's a simple breakdown of how to tailor your field values for different job boards:
First, you provide the core information using the UPP interface. This includes all the available parameters we mentioned earlier. If certain details haven't been automatically filled in (and possibly hidden) during page creation, users can conveniently input them within the interface.
Moving on to the second step - the Post Completion Page (again, heavily adjustable using CSS). This is where you add Extra Fields that are distinct to specific job boards. Though these fields are managed on a separate page, there's a clever shortcut. You can actually input values for them ahead of time while generating the UPP.
How to go about it: Make sure to include an extrafields parameter when calling the page. The content of this parameter will differ depending on the specific boards and fields you're dealing with. Further details about field names, types, values, and other board-specific data are available in our resources.
Here's a clear explanation of the formats you'll work with:
-
Single-Select and Text Fields:
extrafields=(numeric board id)|(field name)|(field value) -
Multi-Select Fields:
extrafields=(numeric board id)|(field name)|(field value 1),(field value 2),(Note: Always close this format with a comma, even for a single value.) -
Double-Select Fields:
extrafields=(numeric board id)|(field name),(parent value)|(child value 1) -
Double-Multi-Select Fields:
extrafields=(numeric board id)|(field name),(parent value)|(child value 1),(child value 2),(Again, close this format with a comma, even with one value.)
Suppose you're dealing with multiple fields. Each field should be separated by a non-URL encoded semicolon. For example:
extrafields=118%7CLoctest%7C08;118%7Cparam%7Cedit;118%7Creqmultisel%7C1,2,;118%7Creqdmutli,1%7C1,2,;
This translates to:
extrafields=118|Loctest|08;118|param|edit;118|reqmultisel|1,2,;118|reqdmutli,1|1,2,;
If you need to include a comma (,) within an extra field, here's what you do: Enclose the value with CDATA. For instance:
118%7Creqtest%7C%3C!%5BCDATA%5BComma%2C%20separated%2C%20text%5D%5D%3E
which translates to:
extrafields=118|reqtest|<![CDATA[Comma, separated, text]]>;
Certain fields have specific values to choose from:
- Category: Check out the Sectors.
- Location: Find the Country codes.
- Job Type: Options include
Contract(1),Permanent(2), andTemporary(4). - Working Hours: Choose from
Part-time(1) andFull-time(2). - Salary Period: Select from
Annum,Month,Week,Day, andHour.
Take charge of your ATS with a fully functional multiposting system and simplify the implementation using UPP. Offer more to your customers, boost retention, and attract new users!