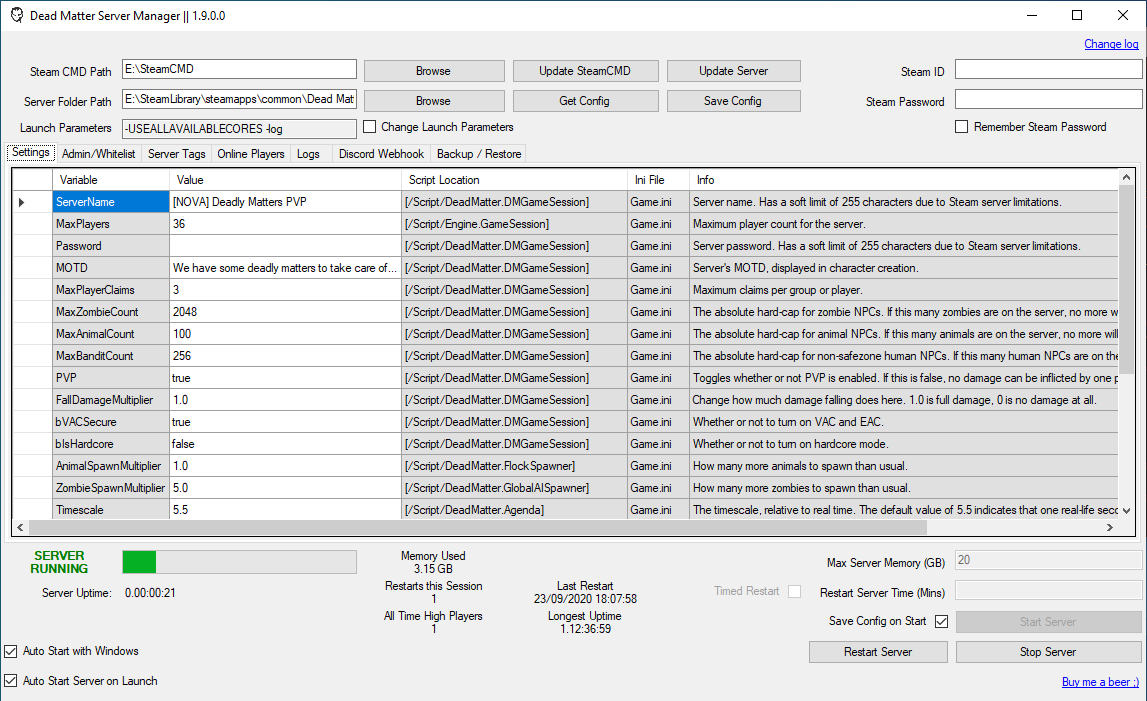
A GUI server manager for Dead Matter dedicated servers. Idea was to create a simple and clean interface for managing dedicated servers and the associated configurations without manually needing to locate and edit different ini files. The application is constantly being updated and I welcome any ideas/suggestions for improvements along with bug reports.
Due to lack of time at the moment I recommend just using batch files as per the guide provided here to run a server until I can find some time to clean up most of the unused/incorrect stuff in the current application.
- Configure server settings from within the application - no manual editing of ini files required
- Set your maximum memory limit - if the server goes above your limit the application will restart your server
- Set up timer or schedule based restarts
- Log each time your server restarts and record the previous uptimes and player counts
- Integrate with Discord web hooks to notify your community when the server is restarting
- Send email notifications via your preferred SMTP server
- Back up your data in case of corruption
- Get the world location of characters on your server
You can submit requests and/or issues here, or drop me a message on Discord @winglessraven#4334
- Installation file can be found under releases
- Grab the latest .msi file and run to install the application
- If you are greeted with a 'Windows Smart Screen' pop-up, click 'more info' and 'run anyway'. Only way for me to get rid of this pop-up is to pay a fortune to get certified
- Once the application is installed follow the 'first run steps' to get up and running
If you plan to install via SteamCMD
- Set your SteamCMD path (if you don't have it, choose a folder to install to)
- Update SteamCMD
- Set your Server Folder path (if you don't have it, choose a folder to install to)
- Enter your Steam ID and Password (these are used for getting the server files via SteamCMD and are not stored anywhere)
- Update Server
If you plan to install via Steam Client (note, currently this seems to cause less issues when running the server)
- Locate 'Dead Matter Dedicated Server' in your Steam library under Tools
- Install and run once from your library. Once the server has fully loaded, close it down
- Open up the Server Manager and point the Server Folder path to your install location
- If you already have a server configuration click Get Config to populate the settings table with your current settings
- Modify the settings as required
- Add admins/whitelist players via the Admin/Whitelist tab
- Save Config to write your changes to the server configuration files
- Enter your maximum memory for the server, when the server reaches this value it will restart. If you do not set a value the server will just run until it crashes and will automatically restart
- If you wish to restart the server on a timer, set the number of minutes you want your server to run for before restarting
- If you want to restart on a schedule, enable the option and click 'Configure Restart Schedule' to add the times you want the server to restart
- For email notifications, input your smtp server details and test. Note, some providers have an extra layer of security that could block connections.
- Enable backups to take a scheuled backup of your data (ini files and server database), configure your schedule and retention policy as required. Restore files selectively by choosing your options before clicking 'restore now'.
- Starting the server will launch a new window with the server output.
- If the server crashes for any reason the application will automatically start it again.
- If you want to stop the server, click Stop Server
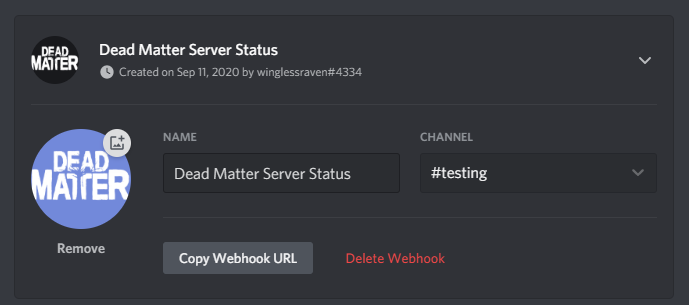
- In your Discord server, go to Server Settings -> Integrations -> Webhooks
- Create a new Webhook and call it what you want your bot to be called, e.g.
- Choose which channel you want the bot to post in
- Save your changes in Discord
- Click Copy Webhook URL
- Paste your URL into the appropriate box in the application
- Click Test Webhook and you should see the test message appear in your channel
- Configure which alerts you want to see and change the text if required


