NOTE: When you have already flashed the stick and paired devices to it, reflashing it requires to re-pair all your devices!
Flashing firmware via Arduino is implemented using the project https://github.com/wavesoft/CCLib But with minor improvements!!!
AndrewLinden described that he was able to flash CC2531 using CCLib with comments.
As described I made a fork of the CCLib library with minor changes for flashing firmware via Arduino:
- Timeouts of operations
- After opening the port (I have in Windows 7) Arduino reboots and, accordingly, does not respond to requests - made a 3 seconds pause (found somewhere in internet).
- The port speed is reduced to 9600, because at another speed leaving communication errors:
ERROR: Could not read from the serial port!
Flashing proccess:
-
Download and unpack the archive with the library https://github.com/kirovilya/CCLib.
-
Flashing Arduino sketch via Arduino IDE CCLib\Arduino\CCLib\Examples\CCLib_proxy\CCLib_proxy.ino
If flashing via esp8266 (wemos d1 mini), you need change connection (p. 5) and Pinout configuration in Arduino/CCLib/Examples/CCLib_proxy/CCLib_proxy.ino:
int CC_RST   = 5;
int CC_DC    = 4;
int CC_DD_I  = 14;
int CC_DD_O  = 12;
-
Install Python 2.7 or later (tested with python 2.7.13), if not installed
-
Install pyserial 3.0.1, if not installed
pip install -r CCLib\Python\requirements.txtorpip install pyserial==3.0.1 -
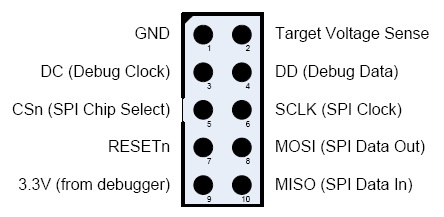
Connect the contacts as described https://github.com/kirovilya/CCLib#1-prepare-your-arduino-board But in my case, I connected completely without resistors, combined the contacts CC_DD_I and CC_DD_O together and connected to the DD pin of the DEBUG connector!
I connected only 3 specified contacts and GND. During the firmware, the stick and Arduino must be connected to the USB.
- After that, try to get information about the chip - if it works, then the connection is correct (example for COM9 port - Arduino port):
C:\Projects\CCLib\Python>python cc_info.py -p COM9
INFO: Found a CC2531 chip on COM9

Chip information:
      Chip ID : 0xb524
   Flash size : 256 Kb
    Page size : 2 Kb
    SRAM size : 8 Kb
          USB : Yes

Device information:
 IEEE Address : 00124b0014aa
           PC : 0000

Debug status:
 [ ] CHIP_ERASE_BUSY
 [ ] PCON_IDLE
 [X] CPU_HALTED
 [ ] PM_ACTIVE
 [ ] HALT_STATUS
 [ ] DEBUG_LOCKED
 [X] OSCILLATOR_STABLE
 [ ] STACK_OVERFLOW

Debug config:
 [ ] SOFT_POWER_MODE
 [ ] TIMERS_OFF
 [X] DMA_PAUSE
 [X] TIMER_SUSPEND
Another example of connection on MacOS
-
If everything is successful, download the firmware. Before we flash the firmware we need to make a modification to it. Open the
.hexfile in a text editor and remove the second last line. Now save the file. -
Start the flashing firmware (it takes a long time, about 2-3 hours):
C:\Projects\ZigBee>python cc_write_flash.py -e -p COM9 --in=CC2531ZNP-Pro-Secure_LinkKeyJoin_mod.hex
INFO: Found a CC2531 chip on COM9

Chip information:
      Chip ID : 0xb524
   Flash size : 256 Kb
    Page size : 2 Kb
    SRAM size : 8 Kb
          USB : Yes
Sections in CC2531ZNP-Pro-Secure_LinkKeyJoin_mod.hex:

 Addr.    Size
-------- -------------
 0x0000   8176 B
 0x1ff6   10 B
 0x3fff0   1 B
 0x2000   239616 B

This is going to ERASE and REPROGRAM the chip. Are you sure? <y/N>:  y

Flashing:
 - Chip erase...
 - Flashing 4 memory blocks...
 -> 0x0000 : 8176 bytes
    Progress 100%... OK
 -> 0x1ff6 : 10 bytes
    Progress 100%... OK
 -> 0x3fff0 : 1 bytes
    Progress 100%... OK
 -> 0x2000 : 239616 bytes
    Progress 100%... OK

Completed
This has only been tested with a Genuine Arudino Uno (and an Arduino Pro Micro - China clone), but is significantly faster
-
Download and unpack CCLoader firmware and tools https://github.com/RedBearLab/CCLoader
-
Download the correct firmware, this example will be using the CC2531
-
Unpack firmware and convert the hex-file to bin.
-
Under Windows: (not tested by me) objcopy.exe --gap-fill 0xFF --pad-to 0x040000 -I ihex CC2531ZNP-Prod.hex -O binary CC2531ZNP-Prod.bin Place the resulting CC2531ZNP-Prod.bin in the Windows folder of CCLoader with CCLoader.exe.
Under Linux: objcopy --gap-fill 0xFF --pad-to 0x040000 -I ihex CC2531ZNP-Prod.hex -O binary /tmp/CC2531ZNP-Prod.bin
objcopy is part of the bintools package.
-
Flash Arudino Uno with Arduino\CCLoader\CCLoader.ino, note the COM port number/device this will be used later
-
Connect pins as described to debug header
Arduino | CC Header
GND -> GND
4 -> DC (Debug Clock)
5 -> RESETn
6 -> DD (Debug Data)
If you have a 3.3V Arduino you can optionaly connect
3.3V -> Target Voltage Sense (Pin 2)
and programm the CC2531 without connecting the CC2531 to USB (in the next step).
-
Connect Arduino first, then within a couple seconds connect the CC2531 to USB power
-
Under Windows - open a command window in the Windows folder with CCLoader.exe
Under Linux you have to compile CCLoader first - so change to CCLoader/SourceCode/Linux, and run gcc main.c.
- Under Windows start the flash with
CCLoader_x86_64.exe COMNUM CC2531ZNP-Prod.bin 0
- Example: CCLoader_x86_64.exe 7 CC2531ZNP-Prod.bin 0
Under Linux start the flash with ./a.out USBDEV CC2531ZNP-Prod.bin 0
- Example ./a.out /dev/ttyACM0 CC2531ZNP-Prod.bin 0
If burning fails/gets stuck at "Request sent already! Waiting for respond..." - try again, check your wiring, try using "1" instead of "0" as the last parameter.
-
Install wiringPi, if not already installed.
-
Install flash_cc2531 :
git clone https://github.com/jmichault/flash_cc2531.git- Connect the following pins of the debug port to the GPIO port :
- pin 1 (GND) --> pin 39 (GND)
- pin 7 (reset) --> pin 35 (GPIO24, BCM19)
- pin 3 (DC) --> pin 36 (GPIO27, BCM16)
- pin 4 (DD) --> pin 38 (GPIO28, BCM20)
See above for the dispositions of pins on CC2531, and at https://pinout.xyz/ for pins on Raspberry.
A downloader cable CC2531 
Now insert the usb dongle in an USB port :
- Test by running :
cd flash_cc2531
./cc_chipid
it should return :
ID = b524.
If you see 0000 or ffff, something is wrong and you should probably check your wiring.
-
Download and extract the latest firmware CC2531ZNP-Prod.hex
-
Erase and flash the CC2531 :
./cc_erase
./cc_write CC2531ZNP-Prod.hex
It takes around 3 minutes.


