【demo演示】一键发布WindowsService项目(netcore3.0项目) #32
Labels
good first issue
Good for newcomers
Comments
Sign up for free
to join this conversation on GitHub.
Already have an account?
Sign in to comment
前提:由于是演示WindowsService项目所以得部署好agent
参考:#1
注意:Windows 服务器上 需要安装一个agent 就是 安装一个windows服务,用来处理iis的发布和windows服务的发布,可以点击上面的参考链接进行安装。
注意: 得用管理员权限部署agent 防止会出现部署到Windows 服务上权限不足问题
这里演示的是将dotnetcore 3.0 项目
1. 开始创建worker service 项目 创建新项目——》选择辅助角色服务
2. 项目创建成功之后,您会看到创建了两个类:Program和Worker。
Program.cs
Worker.cs
worker只是一个简单的类,它继承自BackgroundService ,而后者又实现IHostedService接口。

默认的worker演示,没隔1秒,循环打印运行的时间。
部署为Windows服务运行
1.在项目中添加nuget包:Microsoft.Extensions.Hosting.WindowsServices
2.然后在program.cs内部,将UseWindowsService()添加到CreateHostBuilder
3.在工程上点击右键 然后选择 AntDeploy
4.配置AntDeploy
4.1添加一个环境 名字叫 测试
4.2在 测试环境里面添加 windows服务器 这里我做测试就添加就是我本机,注意Host里面是填写格式为:ip:端口号
注意:Token不是windows服务器的密码!!!是安装agent后,agent的配置文件里面配置的Token(你自己自定义配置的)
注意:Port不是你要发布的项目的端口号!!!是安装agent后,agent的配置文件里面配置的端口号(你自己自定义配置的)
点击【Connect Test】按钮进行确认agent可以成功链接,否则会发布失败
如果【Connect Fail】失败 请查看 #10
4.3进入 WindowsService Tab界面
Sdk类型选择 netcore
ServiceName 请自己填写 不能和现有的有重复就行 我这里就填 testnetcoreservice
点击 【Deploy】按钮进行发布
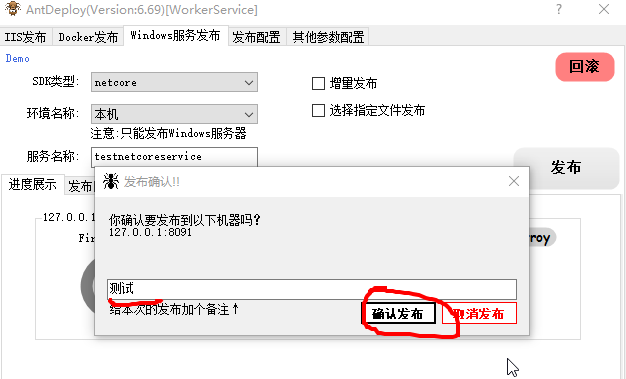
如下图所示:
因为是第一次创建,agent检测到了 会弹出了让你填:
点击提交:
发布成功:
The text was updated successfully, but these errors were encountered: