Weather app project for WeConnect
- You can access the demo app from the Expo Client you have installed on your phone by following this url: https://exp.host/@509dave16/Weather
- Or you can install the APK on your device, following the instructions here: https://docs.expo.io/distribution/building-standalone-apps/#5-test-it-on-your-device-or
- Install nvm in order to use Node 12.13.1: https://github.com/nvm-sh/nvm#installing-and-updating
nvm install v12.13.1nvm use v12.13.1npm i -g expo-clinpm i -g jestgit clone https://github.com/509dave16/weconnect-weather-app.gitcd weconnect-weather-appnpm iexpo start- Then either press
iorato open the app in an iOS Simulator or Android Emulator respectively. In addition, you can also access the local app from your iOS or Android device if you have the Expo Client installed. Just view the QR code in the terminal using your iOS device's camera app. Or by pressingScan QR Codeon the Projects tab of the Expo Client on Android.
Currently in the app since there are only 2 states on 1 screen, we have 2 snapshot tests to ensure that the correct UI structure is being displayed using a copy of return values from WeatherService->currentWeather and WeatherService-dailyForecasts.
- renders loading state correctly
- renders data correctly
To run the tests all you should have to do in repository folder is run the following command: jest. We run the jest command directly using a global npm package instead of the local one through jest-expo in an npm script, because currently there is a bug in the latest version of jest-expo package. The other alternative is running node node_modules/jest-expo/node_modules/jest/bin/jest.js but that's not quite as clean and could change at some point in the future.
- "react-native-safe-area-context": "~3.0.7" - This package was added to better handle notched devices that have not safe areas on the bottom and top of there screen.
components- Every React component resides here. If we had a more complex app, there would be subdirectories forcontainers,widgets, andscreens.config- Anything related to configuration like colors, dimensions, shared styles, env variables, etc... should go hereservices- Any integrations with services such as the backend, OpenWeather, etc... should go hereinterfaces- Folder contains all interface and enum definitions that are used throughout the code base
In general my approach to implementing the design for a screen/feature, is to work my way from the backend to the frontend. And it is the approach that I took with this project. However there are cases where it's better to go from frontend to backend such as for prototyping and feeling out use cases before settling on an API specification.
It is very easy to write data fetching logic in any part of your JS codebase using the fetch or XMLHttpRequest apis. However, in order to maximize re-usability and reduce maintenance of our OpenWeather data fetching code, I made a services folder in which I put the weather.ts service. I could have included "service" in the file name like what developers tend to do in Angular projects(i.e. weather.service.ts). But I figured that the parent folder services was enought context for understanding the concept that the file correlates to.
In this file that we have a common weatherApiRequest function that is used to communicate with the API for the weather and forecast endpoints. That way the same response handling can be applied no matter which endpoint/resource we are interacting with in the OpenWeather API. The lifecycle of the fetching process consists of the following stages: fetch, check, transform.
- fetch is where we are requesting the data and waiting for a response.
- check is for determining what the
stateof the response from the API is, which can be one of the following:ERROR,EMPTY, orSUCCESS. We include what might considered an extra state calledEMPTYto help differentiate between when the data is being fetched and when it has completed being fetched but it is empty. - transform is for deriving the appropriate data structure from the fetched resource that matches the interface that we work with in our application state. It's bit contrived considering that I didn't change to much about the original resource. But this meant to highlight how it's good to not directly depend on the exact API specification for a returned resource. Reason being that if we switch to use a different weather API other than OpenWeather our application will contain data structures and client code that is focused around using the OpenWeather API. So if we have our own interface that we transform data to then we don't have to worry as much about the API we are using changing because all we would have to do is change the transforms and endpoints used.
- The original key provided and the key that I generated for myself both give access to API usage under the Free Plan. At that time that I was implementing the project, the
onecallOpenWeather endpoing was to the best of my knowledge not available under the Free Plan. So in order to getAMandPMperiod data for each day, we derived it from theforecastendpoint by grouping the 3 hour periods by their date and then picking from each group the max and min weather by temperature which were assigned to theAMandPMperiod data respectively. It would be an improvement to transition from using theforecastendpoint to instead leveraging theonecallendpoint which hasdailydata containingmorn,day,eve, andnightactual temps and feels like temps. However it only contains oneweathercondition for the entire day. And we need theweathercondition forAMandPM. So that would be one caveat that might dissuade us from transitioning.
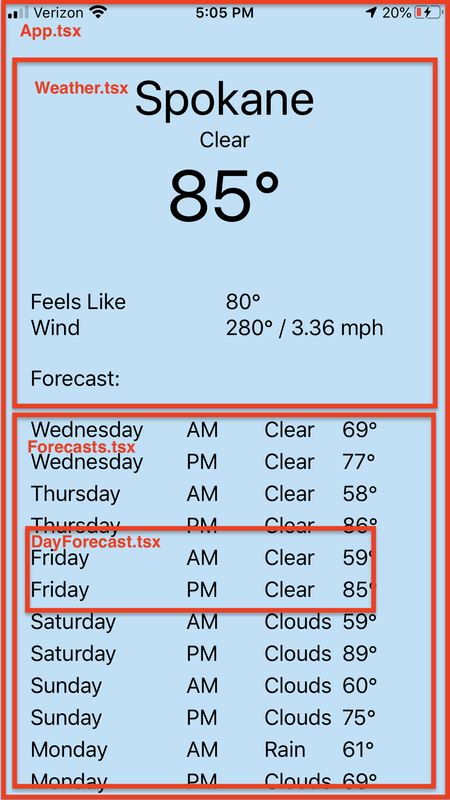
Considering that this project only consists of one screen, the UI implementation consists of the following components
App.tsx- Essentially acts as the single screen for the project. Displays current weather and daily forecasts.components/Weather.tsx- Display the current weather for the day.components/Forecasts.tsx- Displays a list of daily forecasts.components/DayForecast.tsx- Displays the AM/PM periods of weather for a day.
Below is a screenshot with the component structure outlined:
