-
Notifications
You must be signed in to change notification settings - Fork 2
System administration
In this section:
- Page restrictions with ala-auth-plugin
- Page restrictions using Apache2 and htpasswd
- Page restrictions using Ansible
- Backing up Cassandra data store
- Backing up Solr index
##Page restrictions with ala-auth-plugin##
Available to : https://github.com/AtlasOfLivingAustralia/ala-auth-plugin
(@todo : steps to configure the plugin)
##Page restrictions using Apache2 and htpasswd##
First, you have to create a file for users and passwords :
$ sudo touch /usr/local/apache/password
Then, create a password for user name_user:
$ sudo htpasswd -c /usr/local/apache/password <name_user>
Modify the Apache2 configuration file (for each page you want to have restrict access) :
<Location "/manage/gbifLoadCountry”>
AuthType Basic
AuthName "Authentication Required"
AuthUserFile "/usr/local/apache/password"
    Require valid-user
    Order allow,deny
    Allow from all
</Location>
##Page restrictions using Ansible##
(@todo : steps or link to an other wiki page)
##Backing up Cassandra data store##
Backing up Cassandra is essentially making a snapshot of occurrence store.
Cassandra comes with some command-line tools that we use for this task:
- cassandra-cli
- nodetool
###Synopsis on Cassandra occurrence store### Where indexed occurrence data is stored:
$ cd /data/cassandra/data/occ
(to provide directory description)
Connect to Cassandra and have a glimpse of stored records:
$ cassandra-cli
[default@unknown] use occ;
[default@occ] list occ limit 1;
In the last line an UUID is generated automatically by Cassandra. As long as a record is contained by the same data resource determined by druid, the UUID will be stable.
It's also possible if you want to print out a specific record:
[default@occ] get occ where uuid = 'e47e0e31-ff9c-4f31-b598-34f452cb023f';
###Making a snapshot### Assuming it's the first time we make a snapshot, this directory should be empty before we do:
$ cd /data/cassandra/data/occ/occ && ls
(By default this directory is owned by root so you will need to sudo.)
Now, make a snapshot of occ, which we store occurrence data:
$ nodetool snapshot occ
The terminal returns:
Requested creating snapshot for: occ
Snapshot directory: 1406163740504
A directory 1406163740504 is created under /data/cassandra/data/occ/occ/snapshots. If you list the files under the 1406163740504 directory, you'll notice it has the same files in /data/cassandra/data/occ/occ. 1406163740504 is where you backup occurrence store and /data/cassandra/data/occ/occ is where backed up occurrence data would be restored.
(@todo explain location when biocache sampling is running)
###Pointing to a remote Cassandra instance###
Chances are you want to use a remote Cassandra instance. To do this, update listen_address: localhost in /etc/cassandra/cassandra.yaml by replacing 'localhost' with the domain name of the remote Cassandra.
##Backing up Solr index## (@todo Synopsis)
The Solr index is stored at /data/solr/biocache/data. Looking inside the data directory you see index and tlog directories. data is the unit you want to back up.
###Making a copy of Solr index###
$ cd /data/solr/biocache
$ sudo mkdir solr-index-backup
$ sudo chown tomcat7:tomcat7 solr-index-backup
At the point, for the index and tlog inside solr-index-backup, you can copy them from /data/solr/biocache/data from localhost or a remote host. Once those contents are in place, make sure they have owner and group set as tomcat7, which is the default user/group on Ubuntu that runs Tomcat.
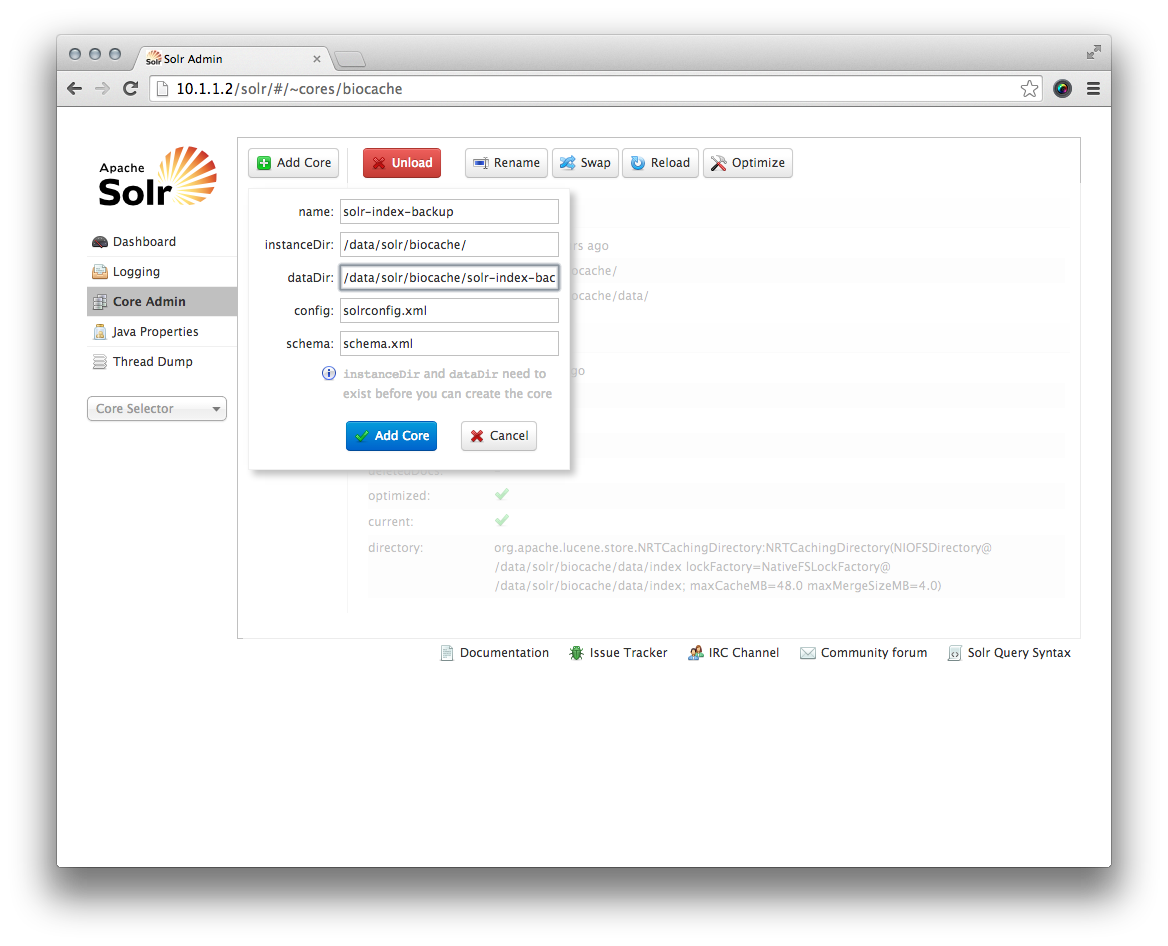
Now, you are going to create a Solr core that uses this backup and can be swapped later. To do so, navigate your browser to the Solr admin at http://10.1.1.2/solr/#/~cores/biocache and click 'Add core' and enter values as the image shows:

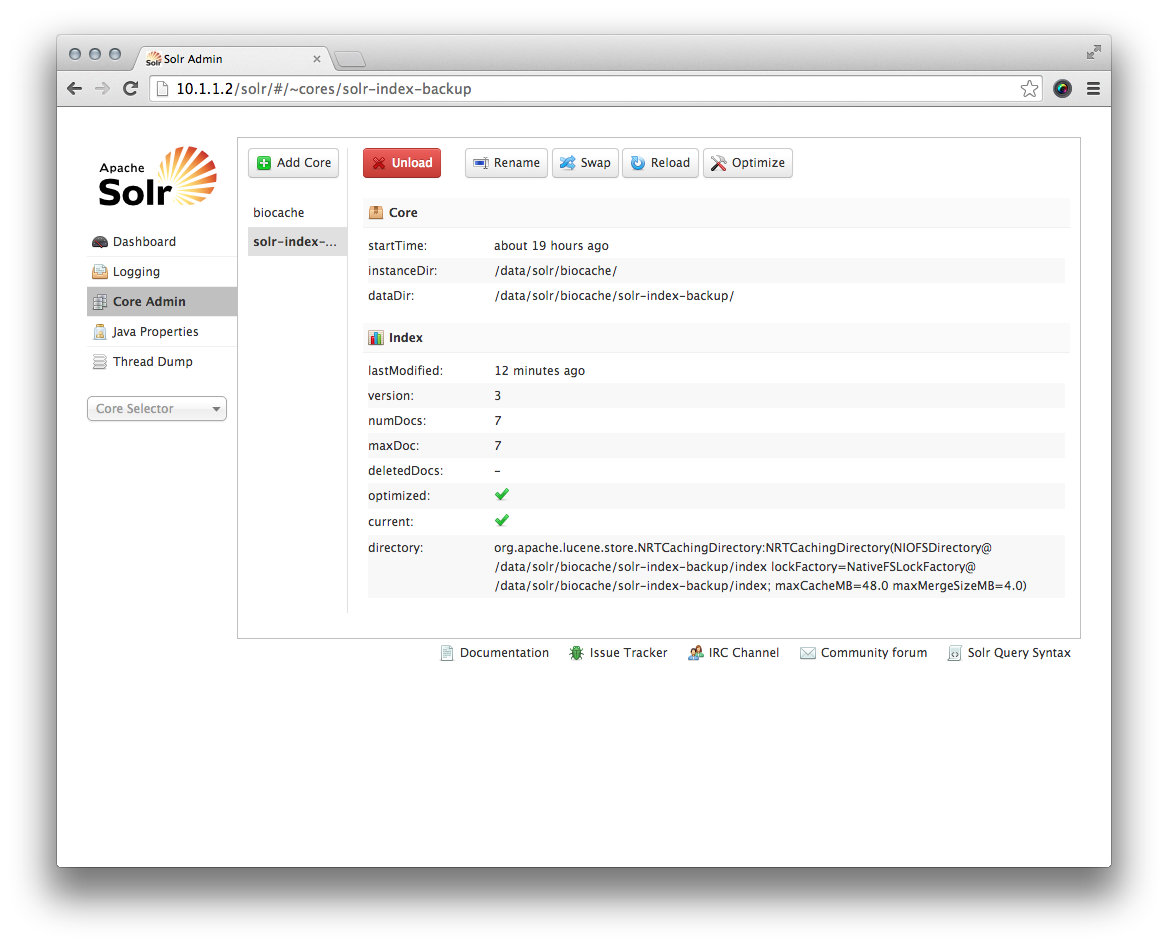
Once the new core is successfully created, click the new core and see if all details of 'Core' and 'Index' section are all the same except file directories:

When ready, you can use the 'Swap' feature to use the backup.
Index
- Wiki home
- Community
- Getting Started
- Support
- Portals in production
- ALA modules
- Demonstration portal
- Data management in ALA Architecture
- DataHub
- Customization
- Internationalization (i18n)
- Administration system
- Contribution to main project
- Study case