簡單說明如何在 ubuntu 編譯 yocto, 並在 NXP iMX8M Plus 上使用 Basler camera.
提醒 MIPI 相機接在 NXP iMX8M Plus 前需要有轉接板, 如 daA2500-60mc-IMX8-EVK.
且安裝方式為凸面朝上如圖.

- ubuntu version: 20.04
- Hard drive space: 500 gb 以上
皆下來安裝與操作皆以一般帳號即可, 不需要用到 root 權限.
在 ubuntu 執行下列指令進行相關模組安裝.
sudo apt-get upgrade
sudo apt-get install gawk wget git diffstat unzip texinfo gcc-multilib build-essential chrpath socat cpio python3 python3-pip python3-pexpect xz-utils debianutils iputils-ping python3-git python3-jinja2 libegl1-mesa libsdl1.2-dev pylint xterm curl zstd liblz4-tool
git config --global user.name "Edit your user name"
git config --global user.email "Edit your@mail.com"
cd ~
mkdir ~/bin
curl http://commondatastorage.googleapis.com/git-repo-downloads/repo > ~/bin/repo
chmod a+x ~/bin/repo
export PATH=~/bin:$PATH
因 Basler pylon 和 cameras 需要安裝 meta-basler-tools 與 meta-basler-imx8, 目前只支援到 5.15.71-2.2.0, 皆下來安裝會以前述版本進行.
- USB cameras: 需要安裝 meta-basler-tools.
- MIPI cameras: 需要安裝 meta-basler-imx, 選擇性安裝 meta-basler-tools, 但建議都裝.
cd <anywhere>
mkdir yocto-project-name
cd yocto-project-name
repo init -u https://github.com/nxp-imx/imx-manifest -b imx-linux-kirkstone -m imx-5.15.71-2.2.0.xml
repo sync
cd yocto-project-name/sources
git clone --branch kirkstone https://github.com/basler/meta-basler-tools.git
git clone --branch kirkstone-5.15.71-2.2.0 https://github.com/basler/meta-basler-imx8.git
執行指令並讀完 license agreement 後, 輸入 y 後 enter 繼續.
cd yocto-project-name
DISTRO=fsl-imx-xwayland MACHINE=imx8mpevk source imx-setup-release.sh -b buildxwayland
yocto-project-name/buildxwayland/conf/bblayers.conf 檔內加入以下參數.
BBLAYERS += "${BSPDIR}/sources/meta-basler-imx8"
BBLAYERS += "${BSPDIR}/sources/meta-basler-tools"
yocto-project-name/buildxwayland/conf/local.conf 檔內加入以下參數.
ACCEPT_BASLER_EULA = "1"
IMAGE_INSTALL:append = "packagegroup-dart-bcon-mipi"
執行前確認網路是否穩定, 建議接上有線或高速網路. 下列指令為簡易測試, 確認相機是否可控制.
cd yocto-project-name
bitbake imx-image-multimedia
cd yocto-project-name
bitbake imx-image-full
執行過程為數小時以上, 編譯成功畫面如下圖,
 且在 yocto-project-name/buildxwayland/tmp/deploy 會有資料夾 images/imx8mpevk 存在.

編譯過程比較常出現因網路問題造成 Fetcher failure 而使得編譯失敗.
 編譯失敗而中斷會顯示因那些模組失敗, 需要針對個別模組重新編譯.

bitbake gstreamer1.0 -c clean
bitbake gstreamer1.0 -c compile
 模組名字下錯時系統會提示, 但還是要自己判斷與測試是那一個名字.

若已熟悉 Windows 與 Ubuntu 檔案之間的交握方式可略過此步驟.
在 Ubuntu 內下指令, 複製 wic.zst 與 bin-flash_evk 檔至其他位置, 避免手誤刪除.
cd < anywhere >
cp --recursive yocto-project-name/buildxwayland/tmp/deploy/images/imx8mpevk/*.wic.zst ./
cp --recursive yocto-project-name/buildxwayland/tmp/deploy/images/imx8mpevk/imx-boot-*.bin-flash_evk ./
再透過其他方式將上圖檔案移動到 Windows, SCP, PSFTP, USB隨身碟.
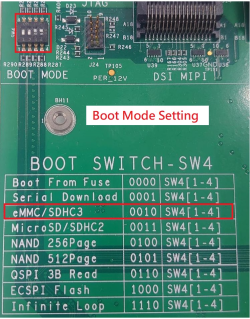
確認Boot Switch 開關撥片位置是否正確, 因要燒錄至eMMC, 斷電後調整至Serial Download 0001 .
下載 UUU.exe 並放置於與wic.zst & bin-flash_evk 檔同個路徑下
打開 PowerShell 執行指令.
cd < yocto images folder >
先將 iMX8MP 斷電後, Boot Switch 開關撥片調整至 Serial Download 0001 ,USB Type-C 接在 port 1 與電腦對接.
 iMX8MP啟動後, 輸入指令確認是否有連接成功.
.\uuu.exe -lsusb
確認連接成功後執行指令開始燒錄.
.\uuu.exe -b emmc_all imx-boot-imx8mpevk-sd.bin-flash_evk imx-image-multimedia-imx8mpevk.wic.zst
將 iMX8MP 斷電後, 移除在Port 1處的 USB Type-C 並將 Boot Switch 開關撥片調整至 eMMC 0010, 開機看到畫面後點開 terminal 輸入指令打開 pylon.
pylon
Ubuntu 透過指令解壓縮.
zstd -d imx-image-multimedia-imx8mpevk.wic.zst
Windows 則需透過 7-Zip-zstd 解壓縮.
將 wic 檔複製到 Windows, 再將 SD 卡插入電腦後, 使用 rufus 進行燒錄, 如同燒錄開機碟一樣.
【ATU Book - i.MX8系列 - OS】NXP i.MX Linux BSP 開發環境架設
【ATU Book-i.MX8系列】 UUU(Universal Update Utility)
How to set up camera Dart BCON Basler for iMX8MPlus on Embedded Linux
If you still have any questions please contact Balser Support


