Accessory Functions
requires CBA_A3 v3.2.0 or later
CBA integrates MRT Accessory Functions framework that switches player's current weapon accessories between a set of predefined class names at the press of a button. The aim of this framework is to simulate various interactive features in real-life weapon accessories that are otherwise absent in Arma 3.
Functionality works in tandem with vanilla optic switching and turning attachments on and off. All keybinds can be changed in "CBA Accessory Functions" CBA Keybinds category.
- Press the
Nextkeybind (defaultCtrl + Lfor rail items andCtrl + NumPad /for optic items) to switch attachment state to the next pre-defined state. - Press the
Previouskeybind (defaultShift + Lfor rail items andShift + NumPad /for optic items) to switch attachment state to the previous pre-defined state.
class CfgWeapons {
    class My_Attachment_Base;
    class My_Attachment_Laser: My_Attachment_Base {
        MRT_SwitchItemNextClass = "My_Attachment_IR";
        MRT_SwitchItemPrevClass = "My_Attachment_IR";
        MRT_switchItemHintText = "Laser";
    };

    class My_Attachment_IR: My_Attachment_Base {
        MRT_SwitchItemNextClass = "My_Attachment_Laser";
        MRT_SwitchItemPrevClass = "My_Attachment_Laser";
        MRT_switchItemHintText = "IR Laser";
    };
};- Set
MRT_SwitchItemNextClasswith the attachment class you want the script to switch to when pressing theNextkeybind. - Set
MRT_SwitchItemPrevClasswith the attachment class you want the script to switch to when pressing thePreviouskeybind. - Set
MRT_switchItemHintTextwith a short text string that describes the mode of operation that the class has (eg. "Laser", "Light", "Red", "Blue" etc.). This is the text that will appear in the in-game hint box when the player switches to this attachment class using the keybind. Can be left empty if you don't want or need a hint box to appear.
Above config entries will not cause a dependency on CBA or the referenced mod.
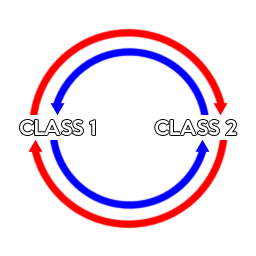
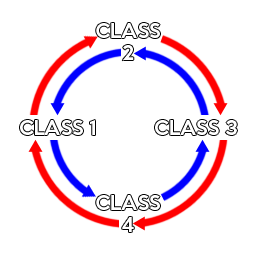
The MRT_SwitchItemNextClass and MRT_SwitchItemPrevClass parameters can be arranged in such a way to provide different control schemes depending on the number of modes that you want your interactive attachment to have. The following graphics show the recommended setup for an attachment with simple binary states (like a laser/light module or flip-over magnifier), cyclable attachment states, or linearly scaling attachment states, but more complicated control schemes can probably be mapped out if you want them.
Colours on following example arrangements indicate the
MRT_SwitchItemNextClass and
MRT_SwitchItemPrevClass relationship between classes.

Framework also provides CBA_attachmentSwitched local CBA event, for additional scripts to be ran upon switching the attachment state.
Arguments: [UNIT, CURRENT_ATTACHMENT_CLASS, SWITCHING_ATTACHMENT_CLASS, WEAPON_CLASS]
Note: You can read more about the original MRT Accessory Functions mod on BI Forums.