To use Firebase backend, follow the setup instructions below.
- Setup Firebase
- Step 1: Sign into Firebase using your Google account
- Step 2: Create a Firebase project
- Step 3: Register your app with Firebase
- Step 4: Activate Cloud Firestore
- Step 5: Set up Cloud Firestore security rules
- Step 6: Enable Google Sign-In in the Firebase console
- Step 7: Whitelist your domain
- Step 8: Create a default Storage bucket
- Step 9: Set up security rules for the default Storage bucket
- Setup Mavo application
- Demo
- Security rules examples
Step 1: Sign into Firebase using your Google account
-
In the Firebase console, click Add project, then enter a Project name.
-
(Optional) If you are creating a new project, you can edit the Project ID.
Firebase automatically assigns a unique ID to your Firebase project. To use a specific identifier, you must edit your project ID during this setup step. You cannot change your project ID later.
-
Click Continue.
-
(Optional) Set up Google Analytics for your project, then click Continue.
-
Click Create project.
Firebase automatically provisions resources for your Firebase project. When the process completes, you'll be taken to the overview page for your Firebase project in the Firebase console.
-
Click Continue.
- In the center of the Firebase console's project overview page, click the Web icon (</>) to launch the setup workflow.
If you've already added an app to your Firebase project, click Add app to display the platform options.
-
Enter your app's nickname.
This nickname is an internal, convenience identifier and is only visible to you in the Firebase console.
-
(Optional) Set up Firebase Hosting for your web app.
-
Click Register app.
-
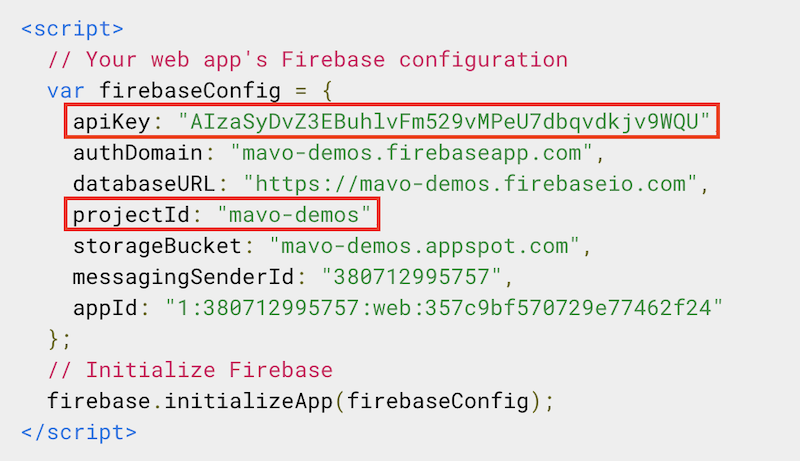
Save for later usage the two values: projectId and apiKey.
- Click Continue to console.
-
In the Firebase console, open the Database section.
-
Click Create database.
-
Review the messaging about securing your data using security rules. Choose the mode you want to start in.
-
Click Next.
-
Select a location for your Cloud Firestore data.
Note: If you aren't able to select a location, then your project already has a default resource location. It was set either during project creation or when setting up another service that requires a location setting.
Warning: After you set your project's default resource location, you cannot change it.
- Click Done.
-
In the Firebase console, open the Database section.
-
Open the Rules tab.
-
Write your rules in the online editor, then click Publish.
-
In the Firebase console, open the Authentication section.
-
On the Sign-in method tab, in the Sign-in providers section, enable the Google sign-in method.
You must specify Project support email by selecting it from the list. You can also edit the provided Project public-facing name.
- Click Save.
To use Firebase Authentication in a web app, you must whitelist the domains that the Firebase Authentication servers can redirect to after signing in a user.
By default, localhost and your Firebase project's hosting domain are whitelisted. You must whitelist the full domain names of any other of your Mavo app's hosts. Note: whitelisting a domain allows for requests from any URL and port of that domain.
-
In the Firebase console, open the Authentication section.
-
On the Settings tab, in the Authorized domains section, click Add domain.
-
Type in the name of your domain and click Add.
Cloud Storage for Firebase lets you upload and share user generated content, such as images and video, which allows you to build rich media content into your apps.
-
From the navigation pane of the Firebase console, select Storage, then click Get started.
-
Review the messaging about securing your Storage data using security rules. During development, consider setting up your rules for public access.
-
Click Next.
-
Select a location for your default Storage bucket.
Note: If you aren't able to select a location, then your project already has a default resource location. It was set either during project creation or when setting up another service that requires a location setting.
Warning: After you set your project's default resource location, you cannot change it.
- Click Done.
-
In the Firebase console, open the Storage section.
-
Open the Rules tab.
-
Write your rules in the online editor, then click Publish.
Note: In all the following examples, instead of mv-storage, you can also use other backend types: mv-source, mv-init, and mv-uploads.
Set the following attributes on the Mavo root element (the one with the mv-app attribute):
| Attribute | Value | Example |
|---|---|---|
mv-storage |
firebase://projectId(see Step 3) Note: firebase:// is mandatory. |
mv-storage="firebase://mavo-demos". |
mv-storage-key |
apiKey(see Step 3) |
mv-storage-key="AIzaSyDvZ3EBuhlvFm529vMPeU7dbqvdkjv9WQU" |
Note: The Firebase backend lets you have multiple Mavo applications in one Firebase project if they have different names. That means you can use the projectId and apiKey values numerous times.
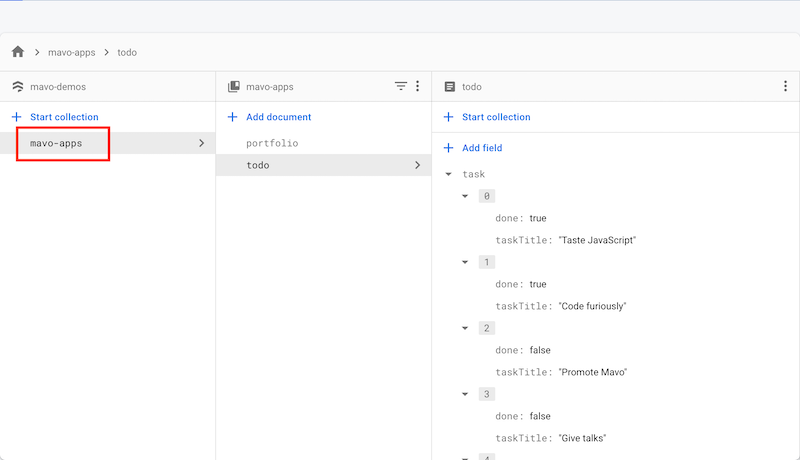
By default, the Firebase backend stores data in the mavo-apps collection in a document whose name matches the name of your Mavo app. You can change it by specifying the collection's name (and a path to it) and the corresponding document's name after the projectId. The projectId, the collection name, and the filename must be divided by a forward slash, like so: mv-storage="firebase://projectId/path/to/collection/filename". You can also leave the default filename and specify only the collection, like so: mv-storage="firebase://projectId/path/to/collection".
Note: You can specify values for either of these parameters (projectId, collection, and filename) via the mv-storage-project, mv-storage-collection, and mv-storage-filename storage attributes accordingly. See the example below.
Starting from v0.4.0, the plugin allows you to work with a collection of documents in addition to working with a single document.
You can specify which documents you want to retrieve from the collection by adding the mv-source-query attribute to the root of your app. Its value is a query you'd like the plugin to perform while retrieving the collection documents.
For example, by adding mv-source-query='where("state", "==", "CA")' to the root of your app, you'll get all the documents whose state property equals CA. The plugin will return them as a list named $items, where each item has two properties. The id property is with the corresponding file name, and the data is with the actual file data. So if you want to show the names of those documents as an unordered list, you can do it like so:
<ul mv-list="$items">
  <li mv-list-item>
    <span property="id">Document name</span>
  </li>
</ul>
You can perform complex queries (with multiple criteria) by chaining multiple where() operators with a dot. For example, mv-source-query='where("state", "==", "CA").where("population", "<", 1000000)'.
In addition to == and <, you can use other comparison operators inside where(). You can find the complete list of supported query operators in the official docs.
Warning: The where() operator inside the mv-source-query value is the operator from Firebase. It's not the same thing as the Mavo where operator.
If you need to work with the whole collection of documents and there is no need to filter some of the documents out with the where() operator, you can use the mv-source-query attribute with no value.
You can be more explicit about your intention to get all collection documents (and get more readable code 😉) by specifying mv-source-query="all".
Note: mv-source-query, mv-source-query="", and mv-source-query="all" give the same result—you'll get all the documents from the specified collection.
Warning: If you provide both mv-source-query and the name of a document (in mv-source or via the mv-source-filename attribute), the plugin will ignore the latter.
By default, the Firebase backend doesn't enable authentication (auth) and storing an end-user's files (storage) and doesn't load the corresponding JavaScript files implementing these features. You can enable either of these features or both by adding the mv-storage-options attribute to the Mavo root. For example, mv-storage-options="auth" enables authentication, mv-storage-options="storage" lets end-users upload their files, and mv-storage-options="auth storage" enables both of these features (see example below).
Note: Keep in mind that by default, if the authentication feature is on, only signed-in users can edit and save the app's data, regardless of the security rules set for your app in the Firebase console. Add all-can-edit and/or all-can-write to the mv-storage-options attribute value to override the default behavior to enable the corresponding feature.
Need to get real-time updates? Add realtime to the mv-storage-options attribute value. If there is no mv-storage-options attribute, simply add mv-storage-options="realtime" to the root of your app.
The plugin supports offline data persistence. This feature caches a copy of the data that your app is using so your app can access the data when the device is offline. When the device comes back online, the plugin synchronizes any local changes made by your app to the backend. To enable this feature, add the offline-persistence option to mv-storage-options.
Note: Please keep in mind that if you enable both the real-time updates and the offline persistence features simultaneously (i.e., you specify mv-storage-options="realtime offline-persistence" in the root of your app), that might cause some issues with real-time updates if your app is opened in more than one tab. Changes made in the app in one tab won't be pushed to the app in the inactive tab.
The files in the storage bucket are presented in a hierarchical structure, just like the file system on your local hard disk. Every app has its folder (whose name matches the Mavo app's name) for all its files. You can specify the name of that folder (including the full path) via the mv-storage-bucketname attribute, like so: mv-storage-bucketname="folderName".
By integrating the corresponding services into your app, you can let your users authenticate with Firebase using their Google, Facebook, Twitter, or GitHub accounts. To do so, add the mv-storage-providers attribute to the root of your Mavo app. Its value is a space-separated set of names of services you want to enable. For example, mv-storage-providers="google twitter github".
Note: If you use mv-storage-providers, there is no need to add mv-storage-options="auth" to the root element.
- On the Facebook for Developers site, get the App ID and an App Secret for your app.
- Enable Facebook Login:
- In the Firebase console, open the Auth section.
- On the Sign in method tab, enable the Facebook sign-in method and specify the App ID and App Secret you got from Facebook.
- Make sure your Firebase OAuth redirect URI (e.g.
mavo-demos.firebaseapp.com/__/auth/handler) is listed as one of your OAuth redirect URIs in your Facebook app's settings page on the Facebook for Developers site in the Product Settings > Facebook Login config.
- Click Save.
- In the Firebase console, open the Auth section.
- On the Sign in method tab, enable the Twitter provider.
- Add the API key and API secret from that provider's developer console to the provider configuration:
- Register your app as a developer application on Twitter and get your app's OAuth API key and API secret.
- Make sure your Firebase OAuth redirect URI (e.g.
mavo-demos.firebaseapp.com/__/auth/handler) is set as your Authorization callback URL in your app's settings page on your Twitter app's config.
- Click Save.
- In the Firebase console, open the Auth section.
- On the Sign in method tab, enable the GitHub provider.
- Add the Client ID and Client Secret from that provider's developer console to the provider configuration:
- Register your app as a developer application on GitHub and get your app's OAuth 2.0 Client ID and Client Secret.
- Make sure your Firebase OAuth redirect URI (e.g.
mavo-demos.firebaseapp.com/__/auth/handler) is set as your Authorization callback URL in your app's settings page on your GitHub app's config.
- Click Save.
Note: Authentication Using Google was described here.
The plugin provides a set of phrases you can use, change, and localize. Here is the list of ids of these phrases and their default values:
| id | Default Value |
|---|---|
firebase-enable-auth |
You might need to enable authorization in your app. To do so, add mv-storage-options="auth" to the Mavo root. Note: Instead of mv-storage, you can also use other backend types: mv-source, mv-init, and mv-uploads. |
firebase-enable-storage |
It seems your app does not support uploads. To enable uploads, add mv-storage-options="storage" to the Mavo root. Note: Instead of mv-storage, you can also use other backend types: mv-source, mv-init, and mv-uploads. |
firebase-check-security-rules |
Please check the security rules for your app. They might be inappropriately set. For details, see https://plugins.mavo.io/plugin/firebase-firestore#security-rules-examples. |
firebase-offline-persistence-unimplemented |
The current browser does not support all of the features required to enable offline persistence. This feature is supported only by Chrome, Safari, and Firefox web browsers. |
firebase-offline-persistence-failed-precondition |
Multiple tabs open, offline persistence can only be enabled in one tab at a time. |
firebase-query-syntax-error |
The query you provided is malformed. It must start with the “where()” operator. For example, “where("city", ==, "LA")”. |
firebase-query-failed |
We couldn't retrieve documents from the “{collection}” collection by performing the following query: {query}. It might be your query is malformed or contains unsupported operators. For the list of all supported query operators, see https://firebase.google.com/docs/firestore/query-data/queries#query_operators. |
| id | Default Value |
|---|---|
firebase-auth-google |
|
firebase-auth-facebook |
|
firebase-auth-twitter |
|
firebase-auth-github |
GitHub |
You can style Mavo toolbar buttons separately via classes.
| Button | Class |
|---|---|
mv-firebase-auth-google |
|
mv-firebase-auth-facebook |
|
mv-firebase-auth-twitter |
|
| GitHub | mv-firebase-auth-github |
Note: You may also find useful this selector .mv-bar.mv-ui button[class*="mv-firebase-auth"]::before to style the icon before the log-in buttons or change the icon itself.
<main
    mv-app="myAwesomeApp"
    mv-plugins="firebase-firestore"
    mv-storage="firebase://"
    mv-storage-key="AIzaSyDvZ3EBuhlvFm529vMPeU7dbqvdkjv9WQU"
    mv-storage-project="mavo-demos"
    mv-storage-collection="mavo-apps"
    mv-storage-filename="todo"
    mv-storage-options="auth">
    <header>
        <h1>My tasks</h1>
        <p>
            <strong>[count(done)]</strong> done out of
            <strong>[count(task)]</strong> total
        </p>
    </header>

    <ul>
        <li property="task" mv-multiple>
            <label>
                <input property="done" type="checkbox" />
                <span property="taskTitle">Do stuff</span>
            </label>
        </li>
        <button
            class="clear-completed mv-logged-in"
            mv-action="delete(task where done)">
            Clear Completed
        </button>
    </ul>
</main>
<style>
@font-face {
	font-family: "Marker Felt";
	src: local("Marker Felt"), url("https://cdn.jsdelivr.net/gh/DmitrySharabin/mavo-firebase-firestore/demos/todo/Marker-Felt.woff");
}

body {
	padding: 1em;
	background: url("https://cdn.jsdelivr.net/gh/DmitrySharabin/mavo-firebase-firestore/demos/todo/wood.png") #4e2e0e;
	text-align: center;
	font: 100% Helvetica Neue, sans-serif;
	color: white;
}
body * {
	margin: 0;
	padding: 0;
	font-family: inherit;
	font-size: inherit;
	line-height: inherit;
	color: inherit;
}
body a {
	text-decoration: none;
}

@-webkit-keyframes transform {
	from {
		transform: rotate(8deg);
	}
}

@keyframes transform {
	from {
		transform: rotate(8deg);
	}
}
main ul {
	position: relative;
	z-index: 1;
	display: block;
	max-width: 20em;
	padding: 2em;
	margin: 1em auto 3em;
	border-top-right-radius: 100% 2%;
	border-bottom-left-radius: 1% 100%;
	box-shadow: 2px 3px 20px black, 0 0 60px #8a4d0f inset;
	background: #fffef0;
	font-size: 120%;
	text-align: left;
}
main ul::before,
main ul::after {
	content: "";
	position: absolute;
	top: 0;
	right: 0;
	bottom: 0;
	left: 0;
	z-index: -1;
	background: inherit;
	box-shadow: inherit;
	transform: rotate(-3deg);
	-webkit-animation: transform 0.4s cubic-bezier(0.25, 0.1, 0.4, 1.5);
	animation: transform 0.4s cubic-bezier(0.25, 0.1, 0.4, 1.5);
}
main ul::after {
	transform: rotate(2deg);
}
main :checked + [property="taskTitle"] {
	font-style: italic;
	text-decoration: line-through;
	color: gray;
	mix-blend-mode: multiply;
}
main input::-webkit-input-placeholder {
	font-style: italic;
	color: #999;
	mix-blend-mode: multiply;
}
main input::-moz-placeholder {
	font-style: italic;
	color: #999;
	mix-blend-mode: multiply;
}
main button.mv-add-task {
	padding: 0.2em 0.5em;
	margin-top: 1em;
	border-radius: 0.3em;
	border: 1px solid rgba(0, 0, 0, 0.2);
	background: #85c20a
		linear-gradient(rgba(255, 255, 255, 0.3), rgba(255, 255, 255, 0));
	box-shadow: 0 1px rgba(255, 255, 255, 0.5) inset, 0 0.1em 0.2em -0.1em black;
	color: white;
	text-shadow: 0 -1px 1px rgba(0, 0, 0, 0.5);
	font-weight: bold;
	cursor: pointer;
	font-size: 120%;
}
main button.mv-add:hover {
	background-color: orange;
}
main button.mv-add:active {
	box-shadow: 0 0.1em 0.3em rgba(0, 0, 0, 0.8) inset;
	background-image: none;
}
main > header {
	display: block;
	margin: 2em 0 3em;
	text-shadow: 0 -1px 3px black;
	opacity: 0.9;
	font-size: 120%;
}
main > header > h1 {
	font-weight: 100;
	font-size: 400%;
	font-family: inherit;
	opacity: 0.6;
}
main > header > p {
	margin-top: 0.5em;
}
main .auth-controls,
main .progress {
	mix-blend-mode: multiply;
}
main .mv-item-bar.mv-ui {
	position: static;
	pointer-events: auto;
	opacity: 1 !important;
	mix-blend-mode: multiply;
	border: 0;
}

li[property="task"] {
	display: flex;
	align-items: center;
	border-bottom: 1px dashed rgba(51, 85, 153, 0.5);
	list-style: none;
	color: #013;
	font-size: 1.5rem;
}
li[property="task"].mv-deleted {
	padding: 0.3em;
}
li[property="task"] label {
	flex: 1;
	padding: 0.2em;
	margin: 0.3em 0;
	font-family: Marker Felt, Helvetica Neue, sans-serif;
}

.clear-completed {
	background: none;
	border: none;
	color: black;
	float: right;
	margin-top: 1.5em;
	text-decoration: underline;
	opacity: 0.6;
	cursor: pointer;
}
.clear-completed:hover {
	opacity: 1;
}

[mv-app]:not([mv-mode="edit"]) .clear-completed {
	display: none;
}
</style>
- Allow read/write access on all documents to any authenticated user:
rules_version = '2';
service cloud.firestore {
  match /databases/{database}/documents {
    match /{document=**} {
      allow read, write: if request.auth.uid != null;
    }
  }
}
- Allow public read/write access on all documents:
rules_version = '2';
service cloud.firestore {
  match /databases/{database}/documents {
    match /{document=**} {
      allow read, write: if true;
    }
  }
}
- Allow public read access, but only authenticated users can write:
rules_version = '2';
service cloud.firestore {
  match /databases/{database}/documents {
    match /{document=**} {
      allow read: if true
      allow write: if request.auth.uid != null;
    }
  }
}
- Only authenticated users can read or write to the bucket:
rules_version = '2';
service firebase.storage {
  match /b/{bucket}/o {
    match /{allPaths=**} {
      allow read, write: if request.auth != null;
    }
  }
}
- Anyone, even people not using the app, can read or write to the bucket:
rules_version = '2';
service firebase.storage {
  match /b/{bucket}/o {
    match /{allPaths=**} {
      allow read, write;
    }
  }
}
- Anyone, even people not using the app, can read from the bucket, only authenticated users write to the bucket:
rules_version = '2';
service firebase.storage {
  match /b/{bucket}/o {
    match /{allPaths=**} {
      allow read;
      allow write: if request.auth != null;
    }
  }
}
Suppose your Mavo app has the name myAwesomeApp. The Firebase backend stores its data in files and folders matching the app's name by default. Keep in mind that the app data is stored in the file inside the mavo-apps collection.
The corresponding security rules could look like this:
- Allow read/write access on your app's data to any authenticated user:
rules_version = '2';
service cloud.firestore {
  match /databases/{database}/documents {
    match /mavo-apps/myAwesomeApp {
      allow read, write: if request.auth.uid != null;
    }
  }
}
- Allow public read/write access on your app's data:
rules_version = '2';
service cloud.firestore {
  match /databases/{database}/documents {
    match /mavo-apps/myAwesomeApp {
      allow read, write: if true;
    }
  }
}
- Allow public read access, but only authenticated users can write:
rules_version = '2';
service cloud.firestore {
  match /databases/{database}/documents {
    match /mavo-apps/myAwesomeApp {
      allow read: if true
      allow write: if request.auth.uid != null;
    }
  }
}
- Only authenticated users can read or write to the bucket:
rules_version = '2';
service firebase.storage {
  match /b/{bucket}/o {
    match /myAwesomeApp {
        match /{allPaths=**} {
            allow read, write: if request.auth != null;
        }
    }
  }
}
- Anyone, even people not using the app, can read or write to the bucket:
rules_version = '2';
service firebase.storage {
  match /b/{bucket}/o {
    match /myAwesomeApp {
        match /{allPaths=**} {
            allow read, write;
        }
    }
  }
}
- Anyone, even people not using the app, can read from the bucket, only authenticated users write to the bucket:
rules_version = '2';
service firebase.storage {
  match /b/{bucket}/o {
    match /myAwesomeApp {
        match /{allPaths=**} {
            allow read;
            allow write: if request.auth != null;
        }
    }
  }
}
Warning: These rules are applied only to the myAwesomeApp app and its data. If you use them as is, data and files of other apps that use the same Firebase project become inaccessible. So what to do? Save some patience and wait a bit for the security rules generator app. 😉