Vision is a new framework from Apple for iOS 11 and other Apple platforms. It is the Core ML framework. CoreML is the new framework that makes it really easy to take a machine learning model and run your data through it to get predictions. The Vision framework helps you feed machine learning models that expect images. Using the Vision framework, its really easy to process a live feed from the camera and extract information from each frame using both built in and external machine learning models.
Here we're going to build a simple project of an object on the screen and then the Vision system is going to track that object. As the user moves the phone, we would expet the object to be tracked in the video frame. Also, if the object moves on its own, it should be tracked.
Its just demo practice to working object tracking. you would abstract most of Its just an easy place to get started. Ideally, you would abstract most of this code into a custom object that the view controller uses.
Also note, I am assumes you are comfortable with the basics of storyboards and view controllers.
We're going to add some lazy properties to our view controller.
They just give us access to the AVCaptureSession as well as the AVCaptureVideoPreviewLayer so the user can see the video feed on the screen.
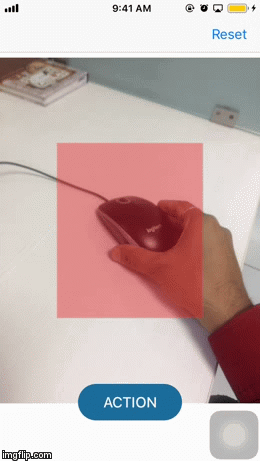
The IBOutlet here is just a view that is the same width and height of the view controller's view.
I did this so it was easy to put the Highlight view on top of the video output.
At this point, you should be able to launch the app and see camera output on the screen.
import AVFoundation
import Vision
import UIKit

class ViewController: UIViewController, AVCaptureVideoDataOutputSampleBufferDelegate {

    @IBOutlet private weak var cameraView: UIView?
    @IBOutlet private weak var lblLable: UILabel!
    @IBOutlet private weak var btnAction: UIButton!
    @IBOutlet private weak var viewCenter: UIView!
    @IBOutlet private weak var highlightView: UIView?

    private let visionSequenceHandler = VNSequenceRequestHandler()
    private lazy var cameraLayer: AVCaptureVideoPreviewLayer = AVCaptureVideoPreviewLayer(session: self.captureSession)
    private lazy var captureSession: AVCaptureSession = {
        let session = AVCaptureSession()
        session.sessionPreset = AVCaptureSession.Preset.photo
        guard
            let backCamera = AVCaptureDevice.default(.builtInWideAngleCamera, for: .video, position: .back),
            let input = try? AVCaptureDeviceInput(device: backCamera)
            else { return session }
        session.addInput(input)
        return session
    }()

    var isDetect:Bool! {
        didSet{
            self.viewCenter.layer.borderColor = isDetect ? #colorLiteral(red: 0.9529411793, green: 0.6862745285, blue: 0.1333333403, alpha: 1) : #colorLiteral(red: 0.9294117647, green: 0.1098039216, blue: 0.1411764706, alpha: 1)
            self.viewCenter.backgroundColor = isDetect ? #colorLiteral(red: 0.9529411793, green: 0.6862745285, blue: 0.1333333403, alpha: 1) : #colorLiteral(red: 0.9294117647, green: 0.1098039216, blue: 0.1411764706, alpha: 1)
        }
    }
    var isCount : Int = 0

    private var lastObservation: VNDetectedObjectObservation?
    private var startObservationTime : Date!

    override func viewDidLayoutSubviews() {
        super.viewDidLayoutSubviews()
        // make sure the layer is the correct size
        self.cameraLayer.frame = self.cameraView?.bounds ?? .zero
        self.cameraView?.layer.frame = self.cameraView?.bounds ?? .zero
        self.btnAction.layer.cornerRadius = self.btnAction.frame.height / 2
    }
In order to get video buffers from the AVCaptureSession into the vision system we need to tell the AVCaptureSession that we want to be a delegate of its video feed. In viewDidLoad: add the following code.
    override func viewDidLoad() {
        super.viewDidLoad()
        self.isDetect = false

        self.viewCenter.layer.borderWidth = 2.0

        // hide the red focus area on load
        self.highlightView?.frame = .zero

        // make the camera appear on the screen
        self.cameraView?.layer.addSublayer(self.cameraLayer)

        // register to receive buffers from the camera
        let videoOutput = AVCaptureVideoDataOutput()
        videoOutput.setSampleBufferDelegate(self, queue: DispatchQueue(label: "MyQueue"))
        self.captureSession.addOutput(videoOutput)

        // begin the session
        self.captureSession.startRunning()
}Now we're going to setSampleBufferDelegate methods. In this methods we got CVPixelBuffer and compare with last observation.
func captureOutput(_ output: AVCaptureOutput, didOutput sampleBuffer: CMSampleBuffer, from connection: AVCaptureConnection) {
        guard
            // make sure the pixel buffer can be converted
            let pixelBuffer: CVPixelBuffer = CMSampleBufferGetImageBuffer(sampleBuffer),
            // make sure that there is a previous observation we can feed into the request
            let lastObservation = self.lastObservation
            else { return }

        // create the request
        let request = VNTrackObjectRequest(detectedObjectObservation: lastObservation, completionHandler: self.handleVisionRequestUpdate)
        // set the accuracy to high
        // this is slower, but it works a lot better
        request.trackingLevel = .accurate

        // perform the request
        do {
            try self.visionSequenceHandler.perform([request], on: pixelBuffer)
            //self.startObservationTime = Date()
        } catch {
            print("Throws: \(error)")
        }
    }
Handle the vision request update with check the confidece. confidence is a number between 0 and 1 — it’s the probability the classification is correct. When using an object-detection model, you would probably look at only those objects with confidence greater than some threshold, such as 30%.
private func handleVisionRequestUpdate(_ request: VNRequest, error: Error?) {
        // Dispatch to the main queue because we are touching non-atomic, non-thread safe properties of the view controller
        DispatchQueue.main.async {
            // make sure we have an actual result
            guard let newObservation = request.results?.first as? VNDetectedObjectObservation else {
                return
            }
            self.lastObservation = newObservation

            if !(newObservation.confidence >= 0.9) { //CHAGNES IN THE FRAME
                var transformedRect = newObservation.boundingBox
                transformedRect.origin.y = 1 - transformedRect.origin.y
                let convertedRect = self.cameraLayer.layerRectConverted(fromMetadataOutputRect: transformedRect)
                print("X:\(abs(self.highlightView!.frame.origin.x - convertedRect.origin.x)):Y:\(abs(self.highlightView!.frame.origin.y - convertedRect.origin.y))")
                self.isDetect = true
                if abs(self.highlightView!.frame.origin.x - convertedRect.origin.x) > 10 || abs(self.highlightView!.frame.origin.y - convertedRect.origin.y) > 10 {
                    self.isCount += 1
                    if self.isCount != 1 {
                        let reactionTime = Date().timeIntervalSince(self.startObservationTime)
                        print("REACTION TIME: \(reactionTime)")
                        print("REACTION TIME milisecond: \(reactionTime*1000)")
                        print("New milisecond: \(reactionTime*1000)")
                        self.captureSession.stopRunning()
                        self.isDetect = false
                        DispatchQueue.main.async {
                            self.lblLable.text = "\(Int(reactionTime*1000)) ms"
                        }
                    }
                }
                self.highlightView?.frame = convertedRect
            }else{ //NOT CHANES IN THE FRAME
                print("NOT REACTION FOUND")
                self.isDetect = false
            }
        }
    }
That's all about the demo and some code explanation. Thank you for your time. Happy codding;)
- If you need help or you'd like to ask a general question, open an issue.
- If you found a bug, open an issue.
- If you have a feature request, open an issue.
- If you want to contribute, submit a pull request.

Sticker-Image is released under the MIT license. See LICENSE for details.