PKCS11 TNGTLS
This page provides a step by step guide on how to use TNGTLS pre-provisioned devices, from Microchip Trust Platform, with PKCS#11 in a linux environment.
IMPORTANT NOTICE
Linux does not support baud rate switching for I2C which means the only supported I2C clock
frequency for cryptoauth devices is 100kHz. USING ANY OTHER FREQUENCY CONFIGURATION WILL NOT WORK.

Use with other devices on the same I2C channel may be unreliable when using the following devices:
ATSH204A, ATSHA206A, ATECC508A, ATECC608A

The following devices may be used with other I2C devices on the same channel:
ATECC608B, ECC204

When automatic low power modes are enabled (all devices prefixed with AT and optional for ECC204)
the user will have to manage access to the the i2c device so operations with the cryptoauth parts
are not interrupted.

If one is not able to ensure exclusive access to the i2c device during operations with the
cryptoauth component then they should provide it with an exclusive i2c channel for reliable
operation
Clone Cryptoauthlib on Linux system
$ git clone https://github.com/MicrochipTech/cryptoauthlib.git
Build Cryptoauthlib
$ cd cryptoauthlib
$ mkdir build
$ cd build
$ cmake -DBUILD_TESTS=ON -DATCA_HAL_I2C=ON -DATCA_PKCS11=ON -DATCA_TNGTLS_SUPPORT=ON -DATCA_ATECC608A_SUPPORT=ON -DATCA_OPENSSL=ON ../
$ cmake --build .
$ sudo make install
Here -DBUILD_TESTS=ON is optional, which required to test the library. In case of TNG legacy support required, can include -DATCA_TNG_LEGACY_SUPPORT=ON For more information about cryptoauthlib configuration, check https://github.com/MicrochipTech/cryptoauthlib/wiki/Configuration
You can build and install with following command also
$ sudo cmake --build . --target install
Note: if you need to build a different configuration, you can remove cmake cache and delete the content of the build directory and you are good to re-run the commands.
To check if the i2c connection is working use the following command
$ sudo i2cdetect -y 0change the last digit with your bus number
The test application can be found under cryptoauthlib/test/
$ ./cryptoauth_testSelect a device ATECC608 and interface as i2c. You I2C bus number can be 2 or 1 depending on the hardware configuration. The TNGTLS address is 0x6A (TNGTLS)
$ 608 -i i2c 2 -a 0x6AIn Cryptoauthlib, default interface is USB HID. By providing interface, bus number and address will select proper interface and communicate with the same.
Run info command to get device revision number
$ info On successful execution of command, it will display device revision number.
Before testing the PKCS11 i) Make sure you have installed the relevant tools and software packages. Check PKCS11-Linux-Setup guide page: https://github.com/MicrochipTech/cryptoauthlib/wiki/PKCS11-Linux-Setup
ii) Make sure the configuration is properly set. The file template is available under /varlib/cryptoauthlib/slot.conf.tmpl and rename the file to 0.conf
Please note that if you select a Trust Platform device such as TFLXTLS or TNGTLS you should not define objects! Remember to set the correct bus number based on your hardware configuration
    # Set a label for this slot (optional)
    # will default to <slot>ABC so
    # 0.conf will have a default label 00ABC
    label = MCHP

    # Configure the device interface for an enabled HAL
    # hid,i2c,<address>
    # i2c,<address>,<bus>
    # spi,<select_line>,<baud>
    interface = i2c,0x6A,0

    # Configure the device type - base part number (optional)
    # device = ATECC608A-TFLXTLS
    device = ATECC608A-TNGTLS
NOTES:
- The label configuration helps referring to the device in a much easier way, by just specifying ..."pkcs11:token=MCHP;ob... or any other string you want to use.
- I2C bus id shall be added after the device address
if your pkcs#11 setup is correct now, you should be able to list your token. List your token using the following command:
$ p11tool --list-tokensOutput Example:

Getting the Public key of slot 0 using P11-Kit
$ p11tool --export-pubkey "pkcs11:token=MCHP;object=device;type=private" Decoding the key with OpenSSL canbe done piping the two commands:
$ p11tool --export-pubkey "pkcs11:token=MCHP;object=device;type=private" | openssl pkey -pubin -text -nooutOpenSSL can use directly the PCKS#11 engine. For example, the following command can be used to read the ECC public key of the given token:
$ openssl ec -engine pkcs11 -in "pkcs11:token=MCHP;object=device;type=private" -inform engine -pubin -noout -textFor creating a csr (ATECC608 stores certificates but here for simplicity we just use the file system) the following command can be used:
$ openssl req -engine pkcs11 -key "pkcs11:token=MCHP;object=device;type=private" -keyform engine -new -text -noout -sha256 -subj "/CN=0123xxxxxxxxxxxx01_ATECC" Create a message.txt file to test a sign and verify commands using OpenSSL. Use any txt editor such as vi or nano. ECDSA Sign
$ openssl dgst -sha256 -engine pkcs11 -sign "pkcs11:token=MCHP;object=device;type=private" -keyform engine -out signature.der message.txtECDSA Verify
$ openssl dgst -sha256 -engine pkcs11 -verify "pkcs11:token=MCHP;object=device;type=private" -keyform engine -signature signature.der message.txtOutput Example of sign and verify:
engine "pks11" set.
Verified OK
You can modify slightly the message and show that the verify will fail. In this case openssl output is:
engine "pks11" set.
Verification Failure
The public key of the given device can be taken from the manifest file or it can be extracted from the device usingthe following command:
$ openssl ec -engine pkcs11 -in "pkcs11:token=MCHP;object=device;type=private" -inform engine -pubin -pubout -out pub-key.pemThe public key can be read to double check from the device:
$ openssl ec -engine pkcs11 -in "pkcs11:token=MCHP;object=device;type=private" -inform engine -pubin -pubout -noout -textPublic key from saved file:
$ openssl ec -in pub-key.pem -pubin -pubout -noout -textThe pub-key.pem file can be used to verify the message on any other host using the following command:
$ openssl dgst -sha256 -verify pub-key.pem -signature signature.der message.txtMake sure you set the PKCS11 configuration properly for TNGTLS device in 0.conf file Specifically make sure you are using device = ATECC608A-TNGTLS
ECC Key pair available on slot0 can be used as described in the previous sections.
Certificates can be accessible now using p11tool
$ p11tool --list-all-certs 'pkcs11:token=MCHP;type=cert'or
$ p11tool --list-all-certs 'pkcs11:manufacturer=Microchip%20Technology%20Inc'Full certificate chain can be extracted with following command:
$ p11tool --export-chain "pkcs11:token=MCHP;object=device;type=cert"Decoding the signer certificate
$ p11tool --export-stapled 'pkcs11:token=MCHP;object=signer;type=cert' | openssl x509 -text -nooutDecoding the device certificate
$ p11tool --export-stapled 'pkcs11:token=MCHP;object=device;type=cert' | openssl x509 -text -nooutInstall trustplatform design suite https://www.microchip.com/design-centers/security-ics/trust-platform
-
Create your manifest file Run /TrustnGO/00_resource_generation/TNGTLS_manifest_file_generation.ipynb jupyter notebook
-
Upload your manifest file to AWS IoT Run /TrustnGO/05_cloud_connect/notebook/aws/TNGTLS_aws_connect.ipynb jupyter notebook
On successful aws cli configure, will provide iot endpoint address, which will be used later here.
If you don't have a Manifest file you can also provision the IoT thing and certificate manually using the IAM web interface of AWS IoT Core. This second approach is recommended only for proof of concept purposes. Uploading the Manifest file is by far more scalable.
The command suggested by AWS team is available here: https://docs.aws.amazon.com/iot/latest/developerguide/http.html#codeexample https://docs.aws.amazon.com/it_it/iot/latest/developerguide/protocols.html#protocol-port-mapping
This connection test is based on HTTPS APIs, supported by AWS IoT Core. You can use either wget or cURL to perform this test, depending on your linux setup.
Get the CA certificate for server authentication
$ wget https://www.amazontrust.com/repository/AmazonRootCA3.pemor
$ curl https://www.amazontrust.com/repository/AmazonRootCA3.pem --output AmazonRootCA3.pemTNGTLS device certificates are signed by an intermediate Signer and by a Root CA generated internally by Microchip. Different AWS users may use different devices signed by the same CA in different AWS IoT Core accounts. This scenario is supported by AWS IoT Core thanks to the Multi Account Registration feature. In order to make sure that the front-end servers of AWS route your request to Your account and properly terminate the TLS mutual handshake, you need to specify the endpoint URL using SNI. Notes about SNI can be found here: https://docs.aws.amazon.com/it_it/iot/latest/developerguide/protocols.html#protocol-port-mapping
wget handles SNI transparently in all requests, instead cURL requires to use the --resolve option. The two examples below show how you can post a message in AWS IoT Core using HTTPS APIs and TLS mutual authentication.
Make sure that the publish command is in line with the policy assigned to the thing. In this case we used a simple “open all” policy applicable for testing purposes ONLY. It's up to you to post on the allowed topic and in line with the configured topics.
To Publish message to AWS IoT Cloud using PKCS11 and wget use
# Replace iot_endpoint with actual iot endpoint address (got in previous step)
$ wget "https://<iot_endpoint>:8443/topics/test/topic?qos=1" \
--ca-cert=./AmazonRootCA3.pem \
--certificate="pkcs11:token=MCHP;object=device;type=cert" \
--private-key="pkcs11:token=MCHP;object=device;type=private" \
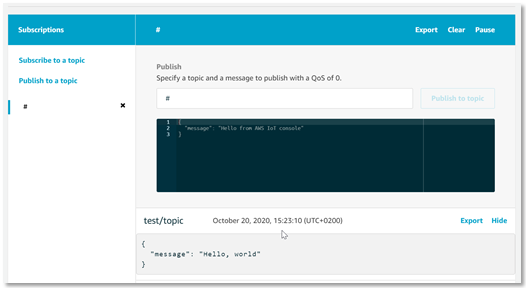
--post-data="{ \"message\": \"Hello, world\" }"To Publish message to AWS IoT Cloud using PKCS11 and cURL use
# Replace iot_endpoint with actual iot endpoint address (got in previous step)
$ curl --verbose --tlsv1.2 \
    --cacert AmazonRootCA3.pem \
    --engine pkcs11 \
    --cert "pkcs11:token=MCHP;object=device;type=cert" \
    --key "pkcs11:token=MCHP;object=device;type=private" \
    --request POST --data "{ \"message\": \"Hello, world\" }" \
    --resolve <iot_endpoint>:8443:<iot_endpoint>
    https://<iot_endpoint>:8443/topics/test/topic?qos=1
Replace <iot_endpoint> with your enpoint address.
- On AWS web console you should see: