-
Notifications
You must be signed in to change notification settings - Fork 1
mod_auth_vas4 How To
This guide will show you how to set up Internet Explorer, Firefox and the Apache HTTP server so that users in Active Directory are authenticated to resources without passwords. This guide covers the steps needed to install the Authentication Services module, how to configure the module to protect a URL and how to configure web browsers to authenticate properly.
It is assumed that the Apache web server is installed on your system. If it is not, you can use these resources to download and configure Apache on your Unix system.
For AIX platforms, you can download
- httpd and httpd-devel RPMs from the AIX Toolbox for Linux Applications
- IBM HTTP Server
For HP-UX, you can download and install Apache
For Oracle Solaris systems, please refer to
The mod_auth_vas4 module allows Apache to perform the server side of web user authentication. This module should be installed after the web server. These instructions assume you have Quest Authentication Services installed on the same server as the Apache web server runs.
SuSE linux RPM packages of mod_auth_vas4 can be downloaded from the mod_auth_vas release page, and installed with YaST at a command prompt:
#yast2 -i mod_auth_vas-ap2x-4.0.2.3.i386.rpm
Red Hat Linux packages of mod_auth_vas4 can be downloaded from the mod_auth_vas release page, and installed with RPM using the command:
# rpm -i mod_auth_vas-http2x-4.0.2.3.i386.rpm
Please note that packages of mod_auth_vas4 are not available for all platforms/apache combinations. For these platforms, please see the next section on compiling the module from source form.
For platforms where a binary package is unavailable or fails to install, you must compile the module from source.
The mod_auth_vas4 module can be compiled from source for most platforms. Start by downloading the source archive from the mod_auth_vas4 website.
You will need
- The Authentication Services developer kit, vasdev, found in the SDK directory
- Apache developer tools (often installed with the Apache web server)
- A C compiler and other basic Unix development tools
For SuSE Linux, the Apache developer tools are installed by running
# yast2 -i apache2-devel
For Red Hat Linux systems, the Apache developer tools are named httpd-devel and can be installed through the yum tool
Instructions for building the mod_auth_vas4 module:
-
Extract the source archive, using this command:
$ gunzip -c mod_auth_vas-4.0.2.3.tar.gz | tar xf -This will create a directory called mod_auth_vas-4.0.2.3.
-
Invoke the configure script:
$ cd mod_auth_vas-4.0.2.3
$ ./configure
The configure script checks that the module can be built. It should complete successfully with a line such as
config.status: creating Makefile(Any errors creating files in the test subdirectory can be ignored.)
-
Start the module compile (requires GNU make)
$ make -
Install the module (as root)
# make install APXS_ACTIVATE=-aThe APXS_ACTIVATE=-a option causes the module to be enabled by adding it into the Apache configuration file (usually /etc/apache2/httpd.conf or /etc/httpd/httpd.conf). ` In mod_auth_vas the line added will appear similar to this: LoadModule auth_vas_module /usr/lib/apache2/modules/mod_auth_vas.so
In mod_auth_vas_4 the line added will appear similar to this: LoadModule auth_vas_module4 /usr/lib/apache2/modules/mod_auth_vas4.so `
-
Create an HTTP service account and set file permissions (as root):
# sh ./setup-mod_auth_vas4 -
Restart the web server
For SuSE Linux, use one of these commands:
# /etc/init.d/apache restart
# /etc/init.d/apache2 restart
For Red Hat Linux, use
# /etc/init.d/httpd restart
At this point, you will have a web server with the mod_auth_vas module loaded, but with no specific directories being protected.
This section provides a step-by-step guide for setting up a simple protected directory. More detailed instructions are available from the mod_auth_vas4 installation guide. When complete, the web server's public directory structure will look like this:
   DocumentRoot/
       protected/
           .htaccess
           hello.html
You will need to find out where your web server's DocumentRoot directory is. This can be determined by looking for the DocumentRoot directive in the httpd.conf configuration file.
-
Create the protected directory
# cd DocumentRoot # mkdir protected # cd protected -
Create a text file called .htaccess inside the protected directory, and enter the following lines:
Set AuthType VAS4 for apache 2.4 and VAS for apache 2.2
<Files "*">
    AuthType VAS
    Require valid-user
</Files>
The valid-user directive refers to any user with an Active Directory account.
-
Create the hello.html file in the directory, and place in it a simple greeting:
Hello, world!
There will be no need to restart the web server after making these changes. The web server will need to be able to access the protected/ directory and the hello.html file. Use the chmod and/or chown commands to make sure it can.
At this point, you should have a running web server on a Authentication Services-enabled host with access to the /protected resource requiring authentication.
This section explains how to configure your Unix and Windows web browsers to use Windows Integrated Authentication to automatically authenticated to the web browser. The first section is on the Mozilla-based browsers, and the second section is on Internet Explorer.
This section assumes you have one of the Mozilla-based browsers, such as Firefox.
- Type in the URL about:config and manually change the browser's "Negotiate auth" preferences.
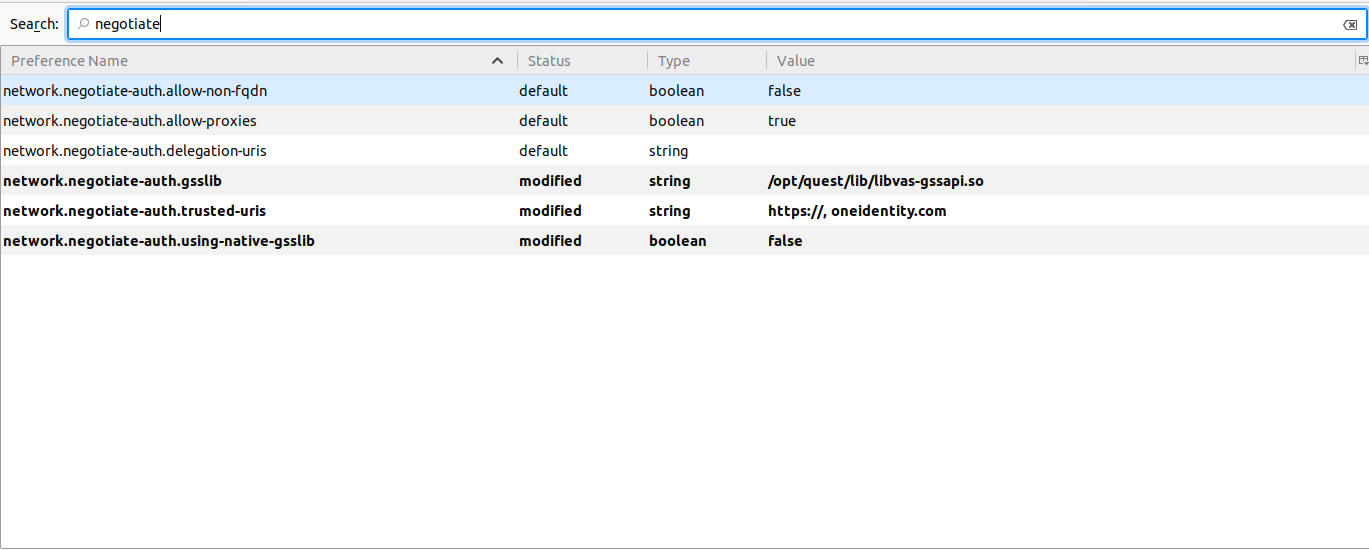
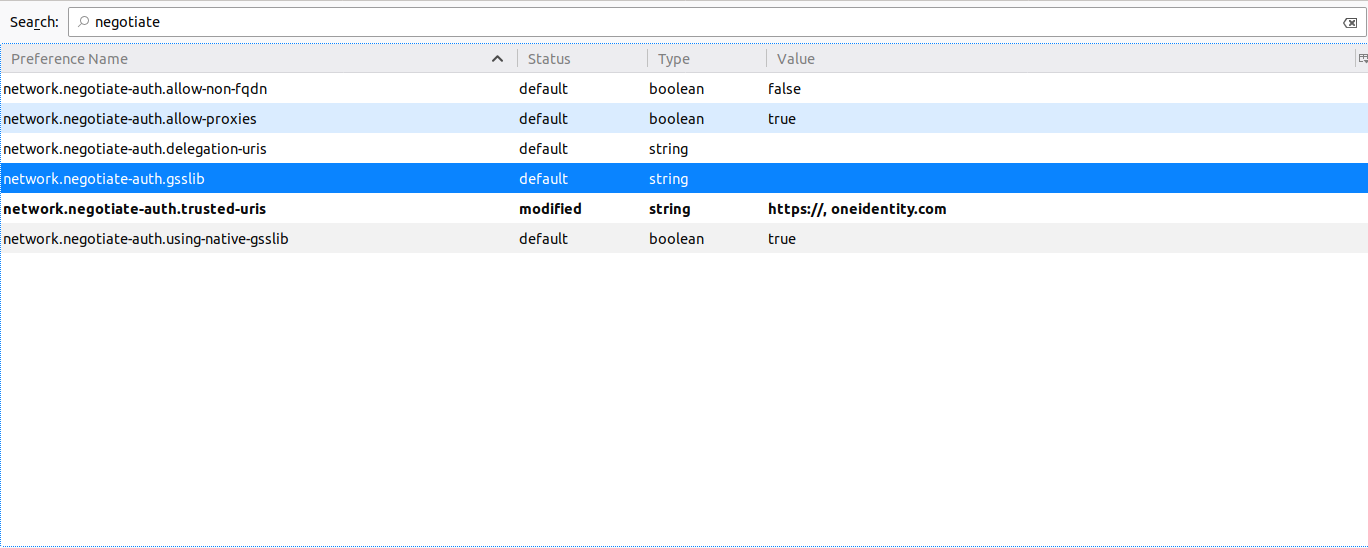
The meaning of the Mozilla preferences are as follows:
The GSSAPI library to use, not required on Windows, and generally set to /opt/quest/lib/libvas-gssapi.so (or /opt/quest/lib64/libvas-gssapi.so on x86-64 systems) on Unix/Linux.
Whether to use the browser's GSSAPI implementation. Should be disabled on Unix/Linux, and enabled (default) on Windows.
URIs to attempt GSSAPI Negotiate authentication with. Set this to a comma-separated list of sites to automatically authenticate to, for example https://, vintela.com will enable Negotiate authentication for all secure servers and all sites in the vintela.com domain. Note that the URI used to match this setting is the exact requested URI (as shown in the address bar) — not necessarily the fully-qualified hostname.
URIs to delegate credentials to. Same syntax as above.
-
Your mod_auth_vas-protected web sites should show up as being in the 'Local Intranet' zone or in the 'Trusted Sites' zone, indicated by an icon at the bottom right of the browser window when the site is being viewed.
If the browser is not treating the web server as trusted, follow these steps. Open the Internet Options control panel from Start → Settings → Control Panel → Internet Options (or Tools → Internet Options in IE). Go to the Security tab and select Trusted sites. Click the Sites button and add the hostnames (or domain names) of the web servers. The figure below shows an entire domain (vintela.com) being added. It is safe (and recommended) to untick the option labeled Require server verification (https:) for all sites in this zone.
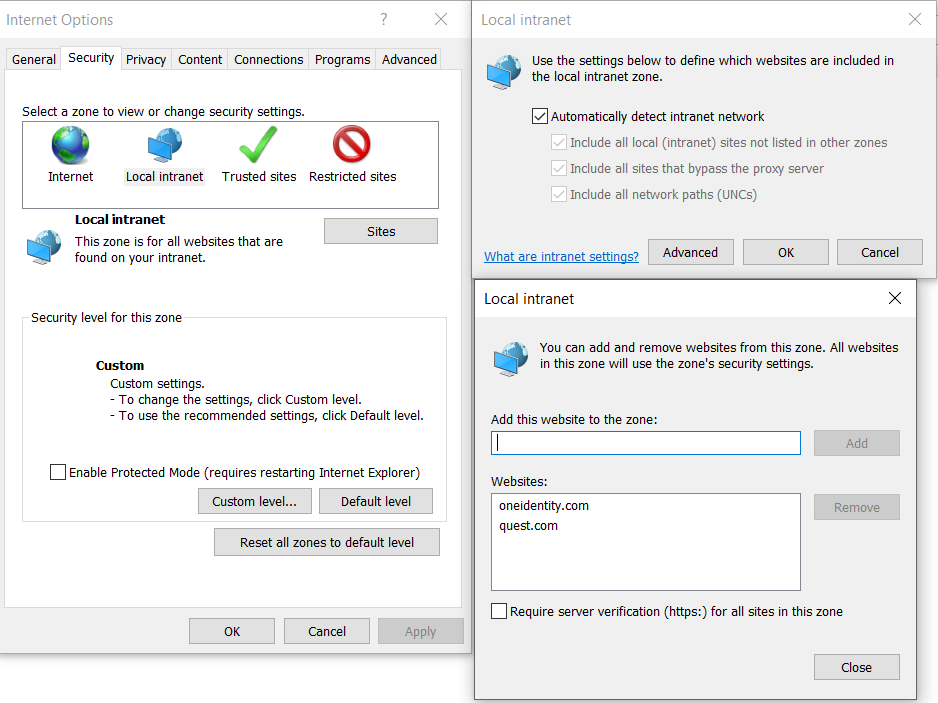
Click the Add button after entering in each name.
-
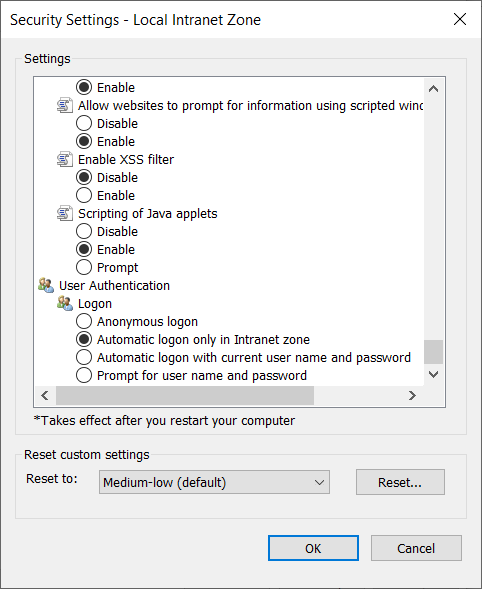
The 'Trusted Sites' zone (or the 'Local Intranet' zone) must also be configured for automatic login. This is the default, but it may have been changed.
To verify, click the Custom level... button in the Security tab and find the "Automatic logon with current username and password" option located near the end of the list.
If it is already enabled, make no changes and choose Cancel. Otherwise, enable it and click OK.
There is an option called Protected Mode. Protected Mode does not affect Negotiate authentication with mod_auth_vas.
-
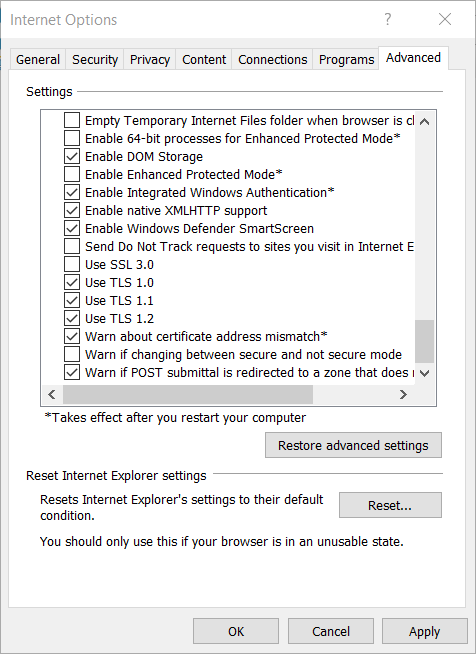
Verify that Integrated Windows Authentication is active by visiting the Advanced tab of the Internet Options panel. The checkbox is found near the very end of the list as shown in the figure below. Changing this option requires you to restart the browser (close all its windows) to take effect.
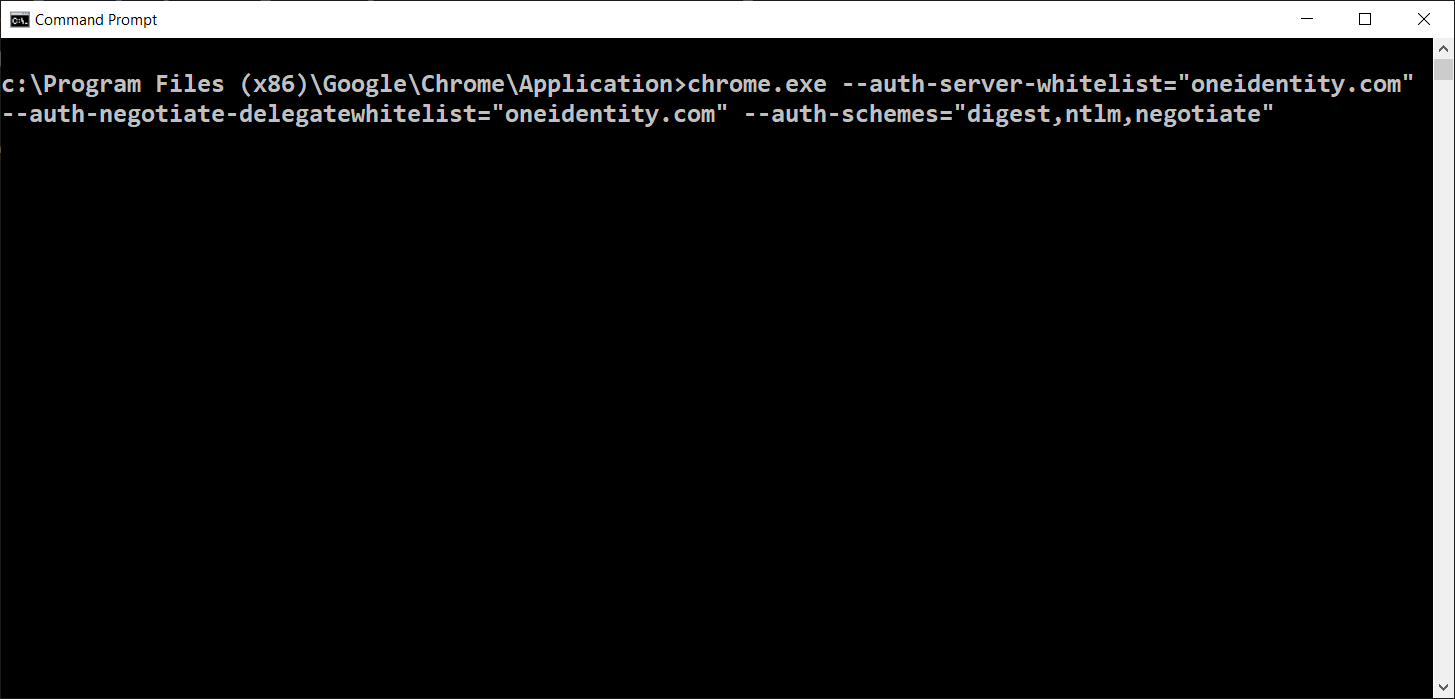
Chrome must be started with the following command line argument: --auth-server-whitelist="*.domain.com" With "domain.com" being the domain where you wish to perform single sign-on.
