-
Notifications
You must be signed in to change notification settings - Fork 5
Home
The Remote Desktop Gateway (RD Gateway) is a component of Microsoft Remote Desktop Services (RDS) platform that allows end users to connect to internal network resources securely from outside the corporate firewall.
If you are an AWS Cloud administrator managing multiple Windows workloads, the RD Gateway allows you to establish secure, encrypted connections with your Windows-based EC2 instances using RDP over HTTPS without needing a virtual private network (VPN).
The AWS QuickStart team have done a great job creating CloudFormation templates that automate the deployment of RD Gateway in various scenarios. However, they use a self-signed SSL/TLS certificate and leave it up to you to obtain a certificate signed by a universally trusted Certificate Authority.
In this post, I will show how you can use Terraform to deploy an RD Gateway and get a fee Letsencrypt SSL/TLS certificate that is universally trusted and renews by itself every 60 days.
- Amazon Web Services (AWS) account.
- Terraform 0.13 installed on your computer. Check out HasiCorp documentation on how to install Terraform.
- Registered Internet domain. Check out Dot TK Registry as they offer free .tk domains.
- Git installed on your computer. Check out the download page to get the package for your operating system.
Step 1 — Clone the terraform-rdgateway-aws repository
First things first, open a Terminal window and clone the repository
git clone https://github.com/RaduLupan/terraform-rdgateway-aws.gitIf you do not have a VPC already, here is your chance to create one using the Terraform configurations in the /vpc folder.
The main.tf configuration invokes the vpc module from Terraform Registry to deploy a VPC with the following resources:
- 2 x Public subnets in two different availability zones. The RD Gateway needs to sit on a public subnet so you can use either one of those for it later.
- 2 x Private subnets in two different availability zones. The AWS Managed Directory Service (both Microsoft AD and Simple AD) requires two subnets for the domain controllers so you can use those for that purpose later.
- 1 x Internet Gateway attached to the VPC that allows for traffic in and out of the public subnets.
- 1 x NAT Gateway sitting on one of the public subnets with an elastic IP attached allowing outgoing traffic to the Internet from both private subnets.
- 2 x Route tables one for the public subnets with the 0.0.0.0/0 route targeting the Internet Gateway and one for the private subnets with the 0.0.0.0/0 route targeting the NAT Gateway.
The following inputs are defined in the variables.tf file:
-
region: The AWS region where to deploy the VPC in. We select
us-west-2for this example. -
environment: A label for the environment that can be anything like dev, test, prod or anything else that makes sense for you. Default is
dev. -
vpc_cidr: The IP space associated with the VPC in CIDR notation. Select a private address space as per RFC1918. Default is
10.0.0.0/16but let's choose a different value for this example:172.16.0.0/16.
AWS Directory Service Simple AD
While the RD Gateway works with both Simple AD and Microsoft AD directories, the former service is not available in all regions. If you plan on creating a Simple AD directory make sure you select an AWS region that supports this service.
With the input variables established, open your favourite text editor, create a file called terraform.tfvars and save it in the vpc folder:
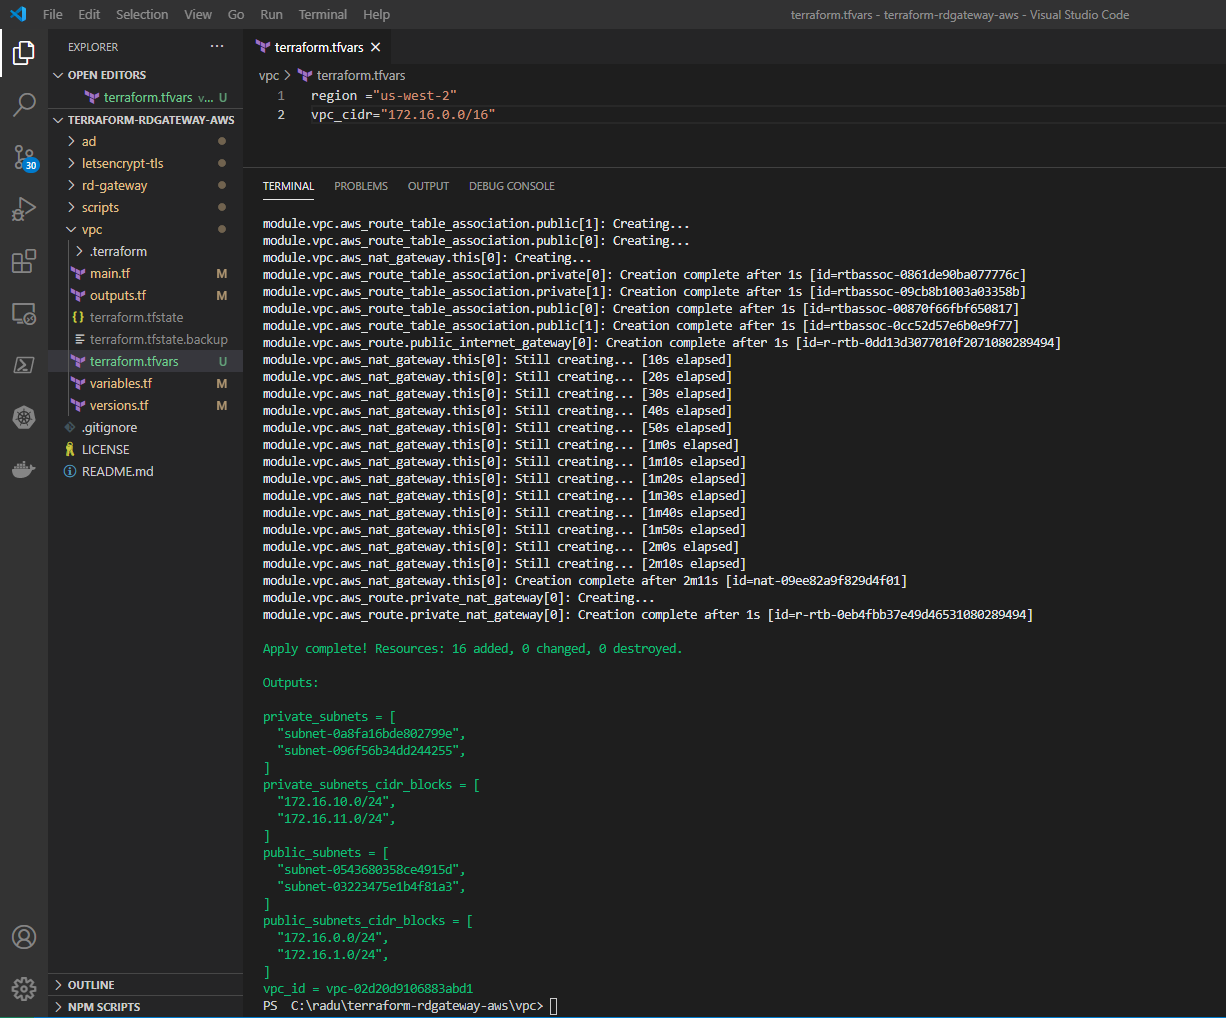
region ="us-west-2"
vpc_cidr="172.16.0.0/16"
In the vpc folder you can now proceed with initializing Terraform:
terraform initSkip the plan phase and go straight to apply:
terraform applyNote the Outputs section displaying the properties of the public and private subnets along with the VPC ID.
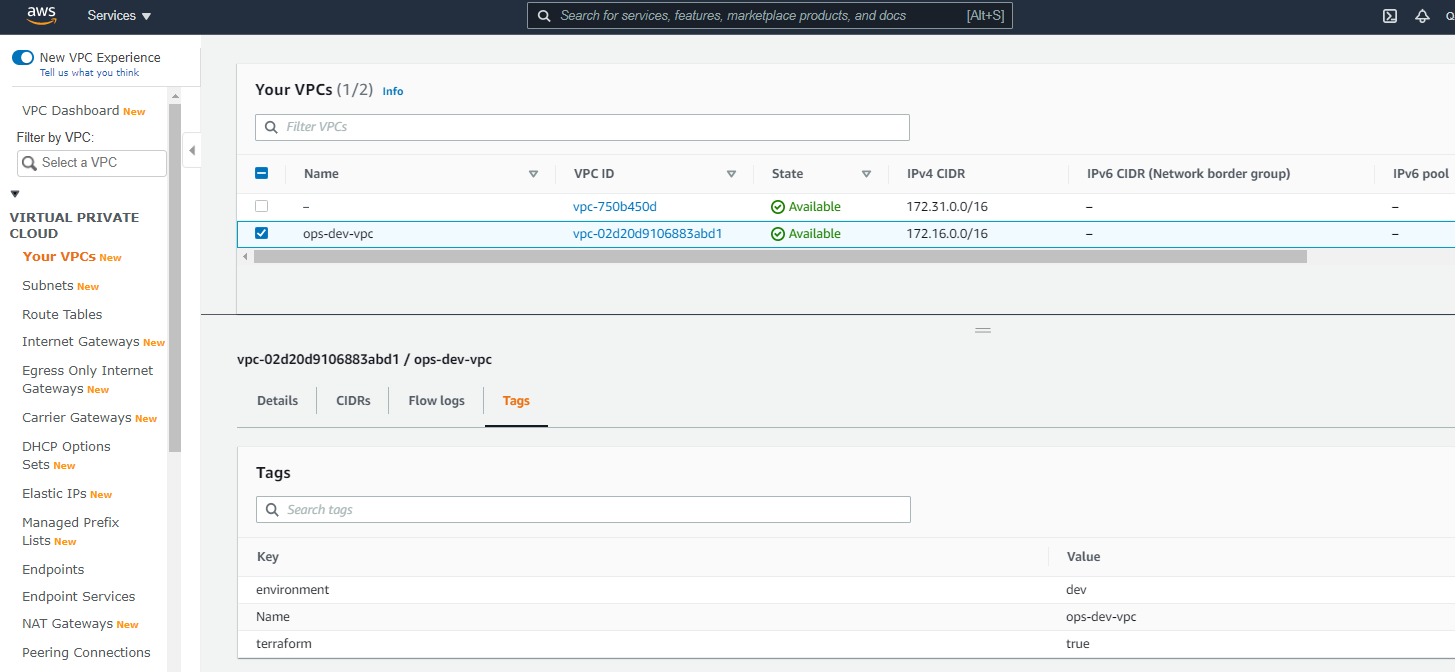
Logon to your AWS account, select the VPC service in the us-west-2 (Oregon) region and note the newly created VPC.
Your VPC is now ready and you can proceed with the next step.
If you do not have an Active Directory domain in AWS already, here is your chance to create one using the Terraform configurations in the /ad folder.
The main.tf configuration deploys an AWS managed Directory Service (either Simple AD or Microsoft AD) in the private subnets of your VPC.
The following inputs are defined in the variables.tf file:
-
region: The AWS region where your VPC is in. We select
us-west-2for this example since that's the region where the VPC was deployed in step 2. -
ad_directory_type: AD directory type selector. Valid values are
SimpleADandMicrosoftAD. We selectSimpleADfor this example since it's available in the us-west-2 region. -
ad_domain_fqdn: The fully qualified domain name of the AD domain. We select
derasys.adfor this example. - ad_admin_password: The password for the administrator (if SimpleAD directory is created) or admin account (in case of MicrosoftAD).
-
vpc_id: The ID of your VPC or the ID of the VPC created in step 2, from the
Outputssection. -
subnet_ids: Comma separated list of private subnet IDs that the domain controllers will be deployed in. List must be enclosed in square brackets i.e. ["subnet-0011","subnet-2233"]. If you do not have a VPC get the IDs of the private subnets created in step 2, from the
Outputssection.
With the input variables established, open your favourite text editor, create a file called terraform.tfvars and save it in the ad folder:
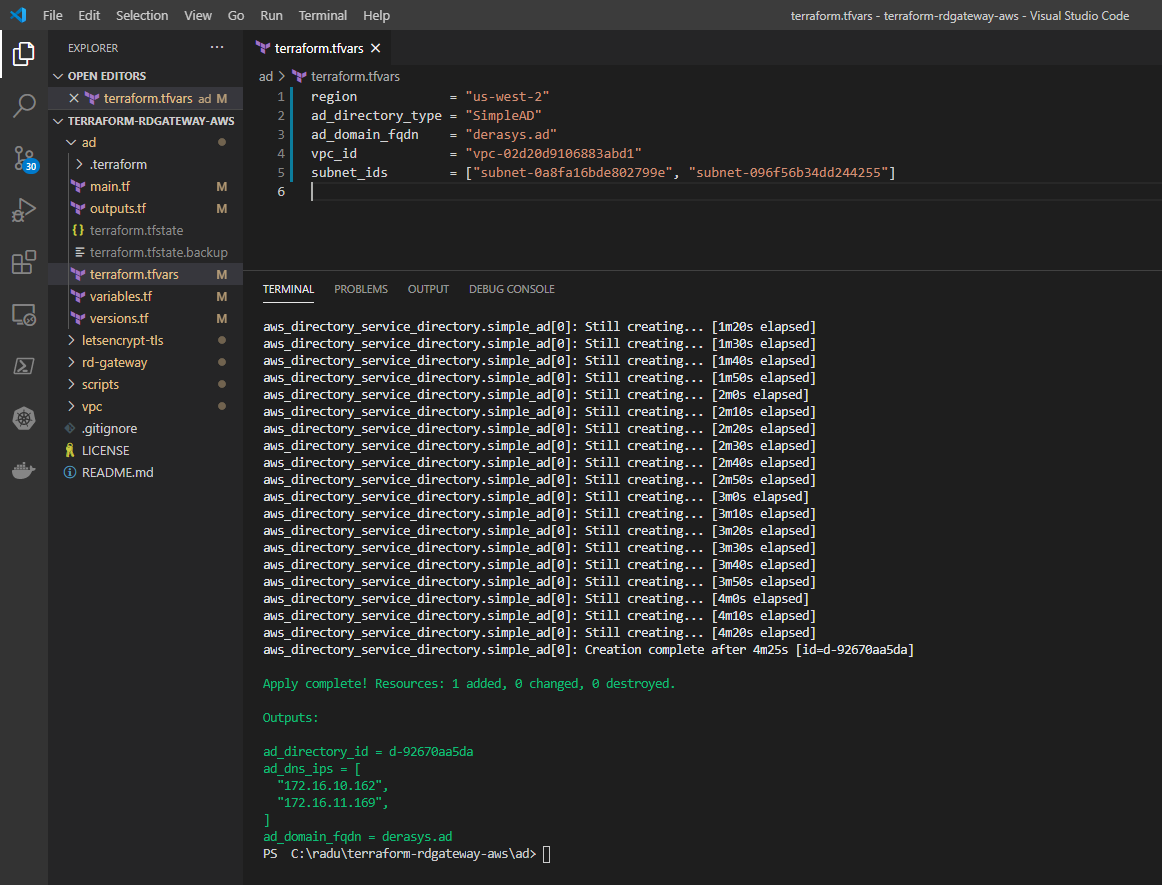
region              = "us-west-2"
ad_directory_type   = "SimpleAD"
ad_domain_fqdn      = "derasys.ad"
# ad_admin_password = "YourSuperStrongPassword"
vpc_id              = "vpc-02d20d9106883abd1"
subnet_ids          = ["subnet-0a8fa16bde802799e", "subnet-096f56b34dd244255"]
Passwords in Terraform
Note that the ad_admin_password variable row is commented out with the '#' character. You do NOT have to feed all your variable values in the terraform.tfvars file. You could also create environment variables or pass the values when prompted or enter them at command line in the plan or apply phase. See this HashiCorp Learn tutorial for more on this topic.
No matter how you feed your sensitive data it WILL land in the Terraform state file in clear text! It is critically important to use a backend that supports encryption at rest such as AWS S3 or Terraform Cloud.
In the ad folder you can now proceed with initializing Terraform:
terraform initSkip the plan phase and go straight to apply:
terraform applyNote the Outputs section displaying the properties of the SimpleAD directory: directory ID, the IPs of the DNS servers and the fully qualified domain name.
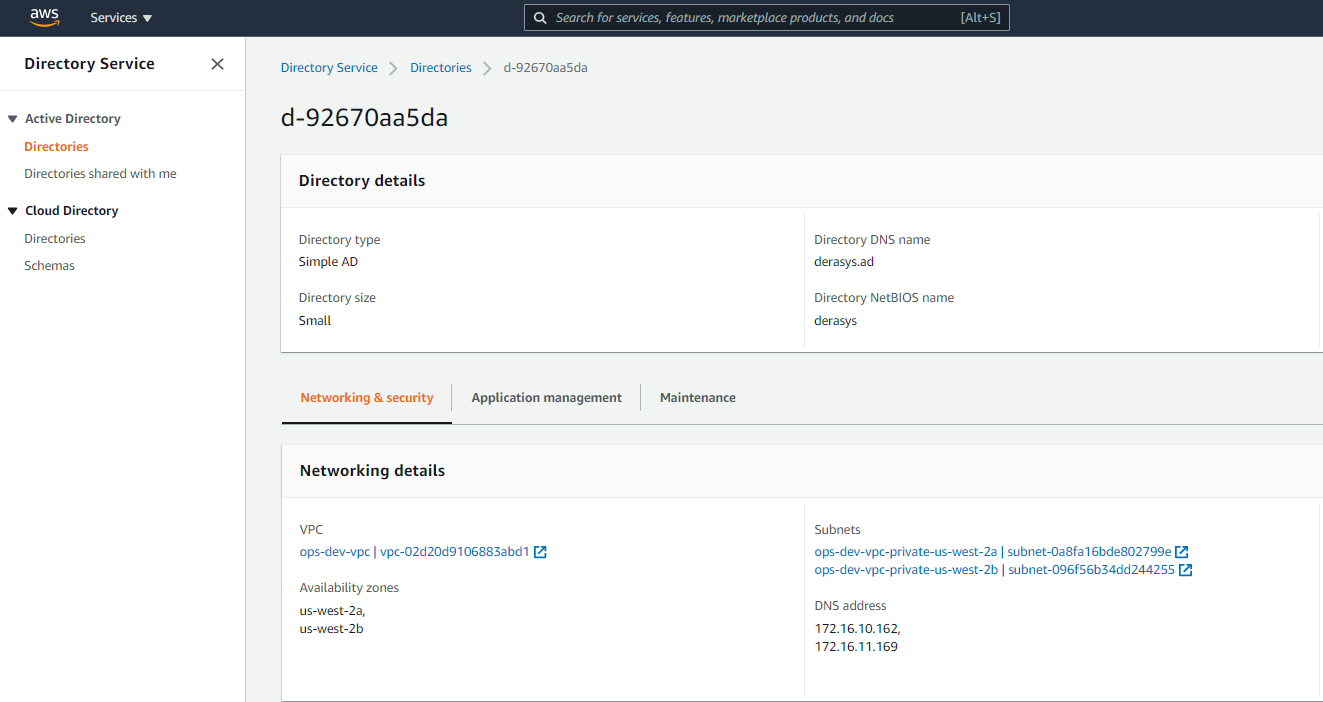
Logon to your AWS account, select the Directory service in the us-west-2 (Oregon) region and note the newly created SimpleAD directory.
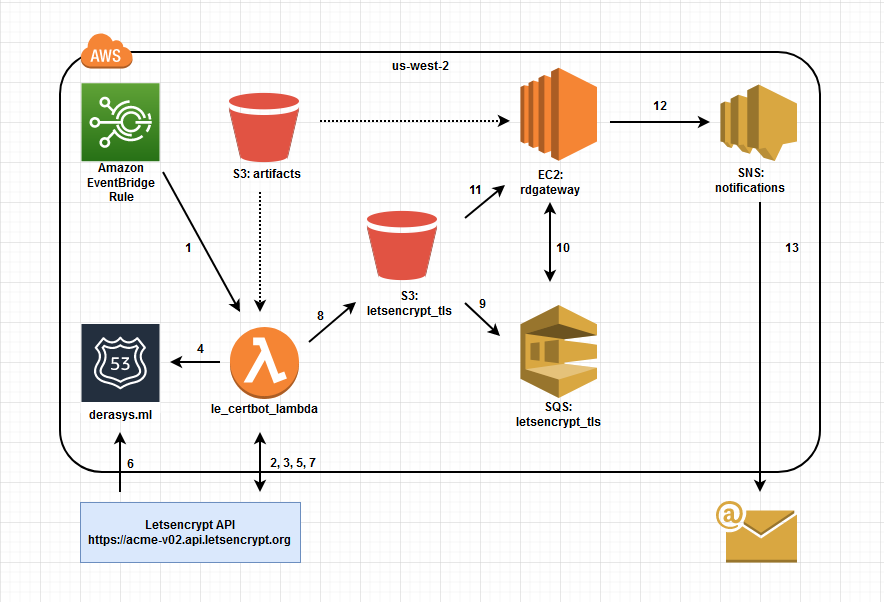
Here we deploy the components required for obtaining a free TLS certificate from Letsencrypt. The high level description of the workflow illustrated in the diagram is below:
- Every 60 days an Amazon EventBridge rule triggers the Lambda function that runs the certbot.
- The certbot Lambda contacts the Letsencrypt API, and requests a TLS certificate.
- The Letsencrypt API issues a challenge, asking for a certain TXT record to be created in the
derasys.mlDNS domain. - The certbot Lambda resolves the challenge by creating the required TXT record in Route 53.
- The certbot Lambda notifies the Letsencrypt API that the challenge is complete.
- The Letsencrypt API verifies that the TXT record is in place.
- The Letsencrypt API issues the certificate and the certbot Lambda downloads the PEM files on its temporary storage.
- The certbot Lambda delivers the PEM files to an S3 bucket.
- Upon receiving the PEM files, the S3 bucket notifies an SQS queue. There are 5 messages sent to the SQS queue, containing the URL for each file received.
- The RD Gateway instance that you will deploy in the next step has a daily scheduled task that polls messages from the SQS queue, extracts the PEM file URLs and then deletes the messages from the SQS queue.
- With the PEM file URLs obtained in step 10, the RD Gateway instance now downloads the PEM files from the S3 bucket, converts the public certificate and the private key in to a PFX file and installs the certificate on the RD Gateway server.
- The RD Gateway instance sends notification to SNS topic indicating that the TLS certificate has been renewed.
- The SNS subscribers receive an email.
The Letsencrypt certificate is valid for 90 days and a new one will be obtained in 60 days when the certbot Lambda function is scheduled to run again.
The Terraform configurations are found in the /letsencrypt-tls folder.
The following inputs are defined in the variables.tf file:
- region: The AWS region where the resources will be deployed in. We select us-west-2 for this example since that's the region where the VPC was deployed in step 2 but technically you can deploy the TLS layer in any other region.
-
route53_public_zone: The name of the public Route 53 zone (domain name) that Letsencrypt certificates are issued for. The certbot Lambda function is given permissions to create records in this zone in response to the Letsencrypt API challenge. I select my domain
derasys.mlfor this example. -
certbot_zip: The name of the certbot zip artifact to use. This is the core of this layer, that makes magic happen. I have borrowed the certbot-lambda code from kingsoftgames back in December 2018 and have been using this solution ever since at work to keep our RD Gateway TLS certificates for ever green! At the time of this writing - January 2021 - the only certbot version confirmed to be working with this solution is 0.27.1. We will select
certbot-0.27.1.zipfor this example. -
environment: A label for the environment that can be anything like dev, test, prod or anything else that makes sense for you. Default is
dev. -
s3_prefix: The prefix to use for the name of the S3 bucket that will hold the certbot-lambda code. The name will have to be unique but you can define a prefix that makes sense to you. It defaults to
letsencrypt-certbot-lambda. -
subdomain_name: If you use a subdomain for your RD Gateway, i.e. rdgateway.ops.example.com then this value would be
ops. If you actually use rdgateway.example.com then leave this variable to its default null value as in this example. - email: The email address Letsencrypt will send notifications to ahead of the certificate expiry date.
- windows_target: Boolean variable set to true if the TLS certificate will be installed on a Windows machine. This is the case with the RD Gateway so we will leave the default value for this example.
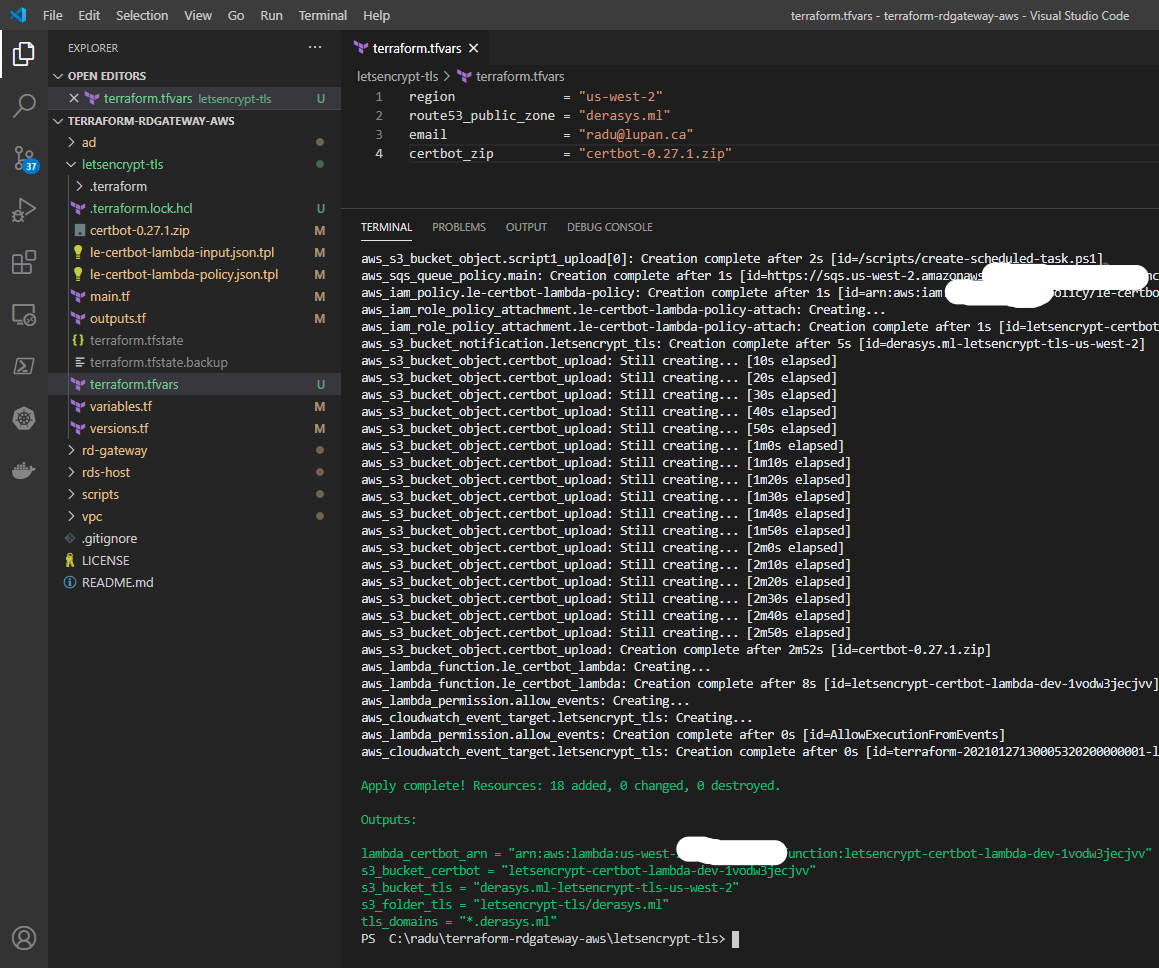
With the input variables established, open your favourite text editor, create a file called terraform.tfvars and save it in the letsencrypt-tls folder:
region              = "us-west-2"
route53_public_zone = "derasys.ml"
email               = "radu@lupan.ca"
certbot_zip         = "certbot-0.27.1.zip"
In the letsencrypt-tls folder you can now proceed with initializing Terraform:
terraform initSkip the plan phase and go straight to apply:
terraform applyNote the Outputs section displaying some properties of the resources created:
-
lambda_certbot_arn: The Amazon Resouce Number (ARN) for the certbot Lambda function. -
s3_bucket_certbot: The name of the S3 bucket that holds the artifacts -> the certbot code that the Lambda function will use and the scripts that the RD Gateway instance will download and run. -
s3_bucket_tls: The name of the S3 bucket that will receive the PEM files that constitute the TLS certificate. -
s3_folder_tls: The name of the folder in the S3 bucket that will hold the PEM files that constitute the TLS certificate. -
tls_domains: The domains the TLS certificate is issued for.
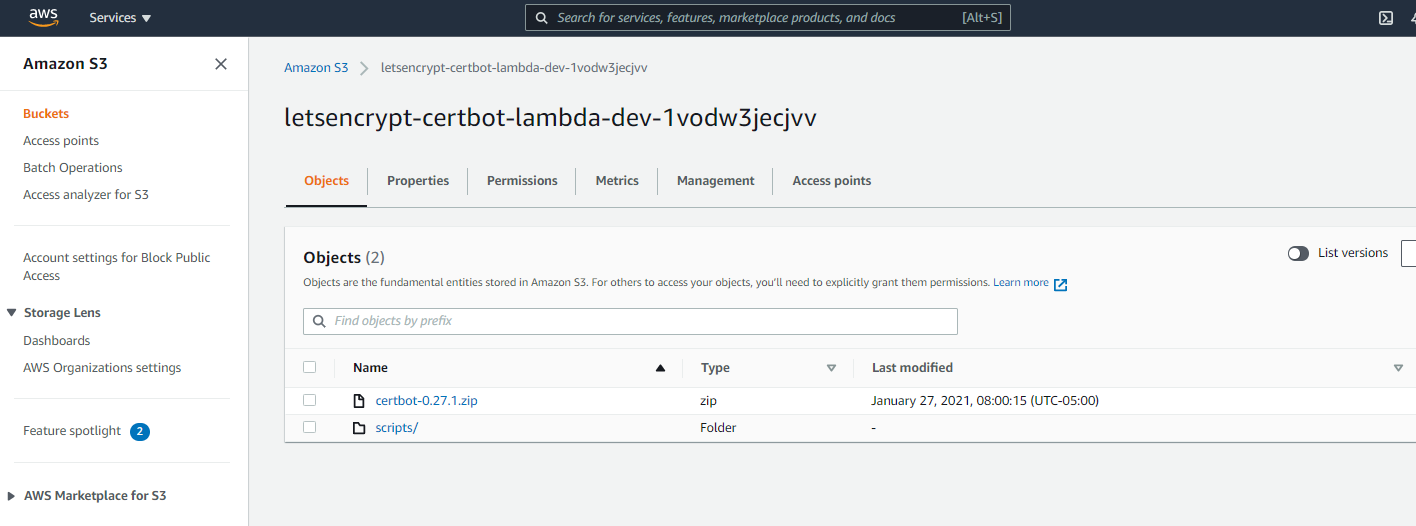
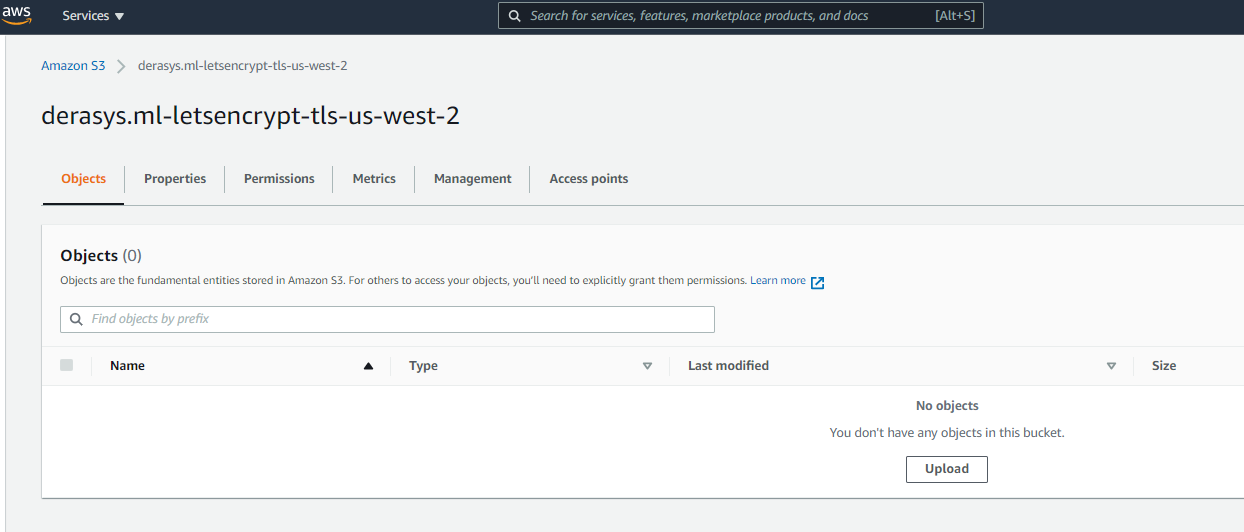
Let's check out the resources created. Logon to your AWS account, select the S3 service and note the newly created S3 buckets in the us-west-2 region:
- letsencrypt-certbot-lambda-dev-1vodw3jecjvv (the last 12 characters in the name are random so it will be different for your deployment) contains the artifacts, the certbot-0.27.1.zip and the scripts folder where all the PowerShell scripts required for bootstrapping the RD Gateway instance are located.
- derasys.ml-letsencrypt-tls-us-west-2 is now empty but once the certbot Lambda function gets triggered the certificate PEM files will be delivered here. Examine the Properties tab of this bucket and note that the default server-side encryption and versioning are enabled and also event notifications target an SQS queue when any object is created in the bucket. And lastly under the Management tab not the ExpireOldVersionsAfter30Days lifecycle rule that deletes previous versions after 30 days.
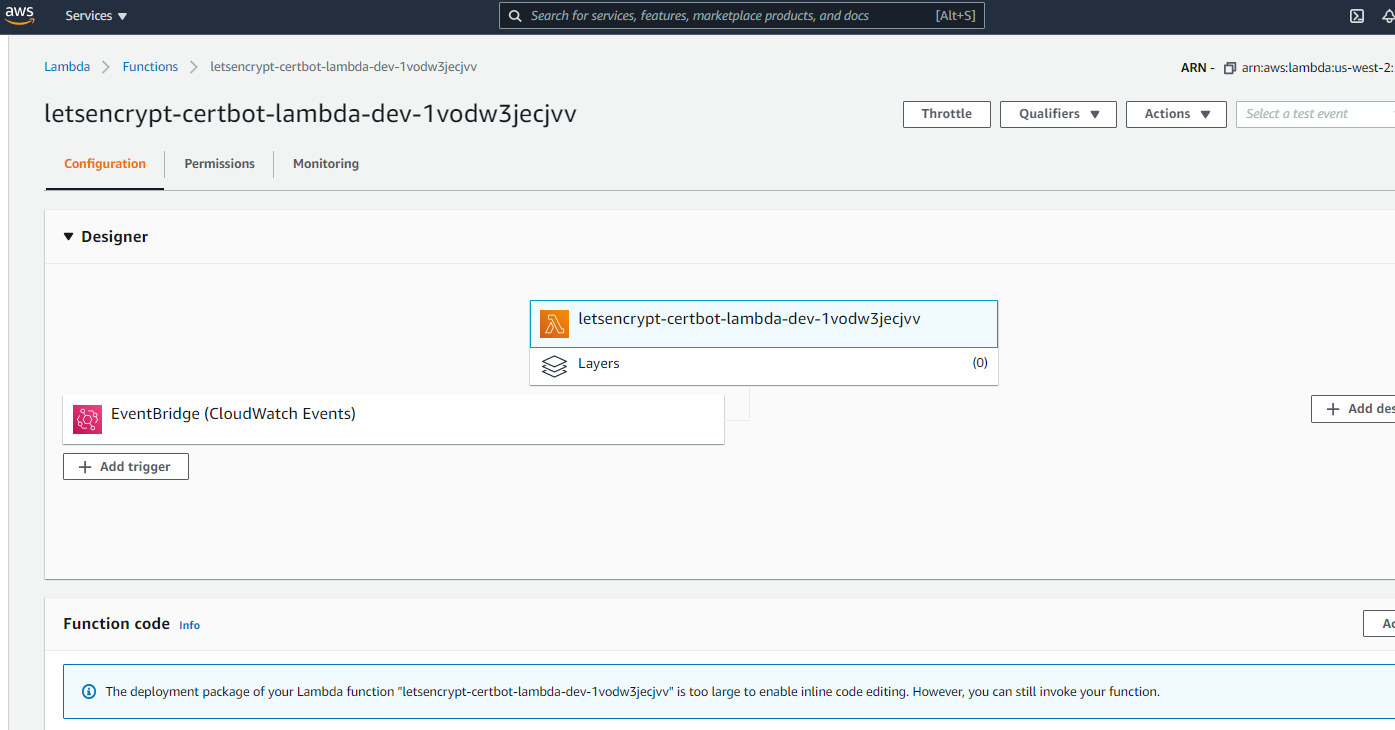
In the AWS console select the Lambda service and lookup the function whose name starts with letsencrypt-certbot-. Check out its properties, a few of which are illustrated in the image below: note the EventBridge trigger and the Function code section, the code for this function is fed from the S3 bucket letsencrypt-certbot-lambda-dev-1vodw3jecjvv we just looked at.
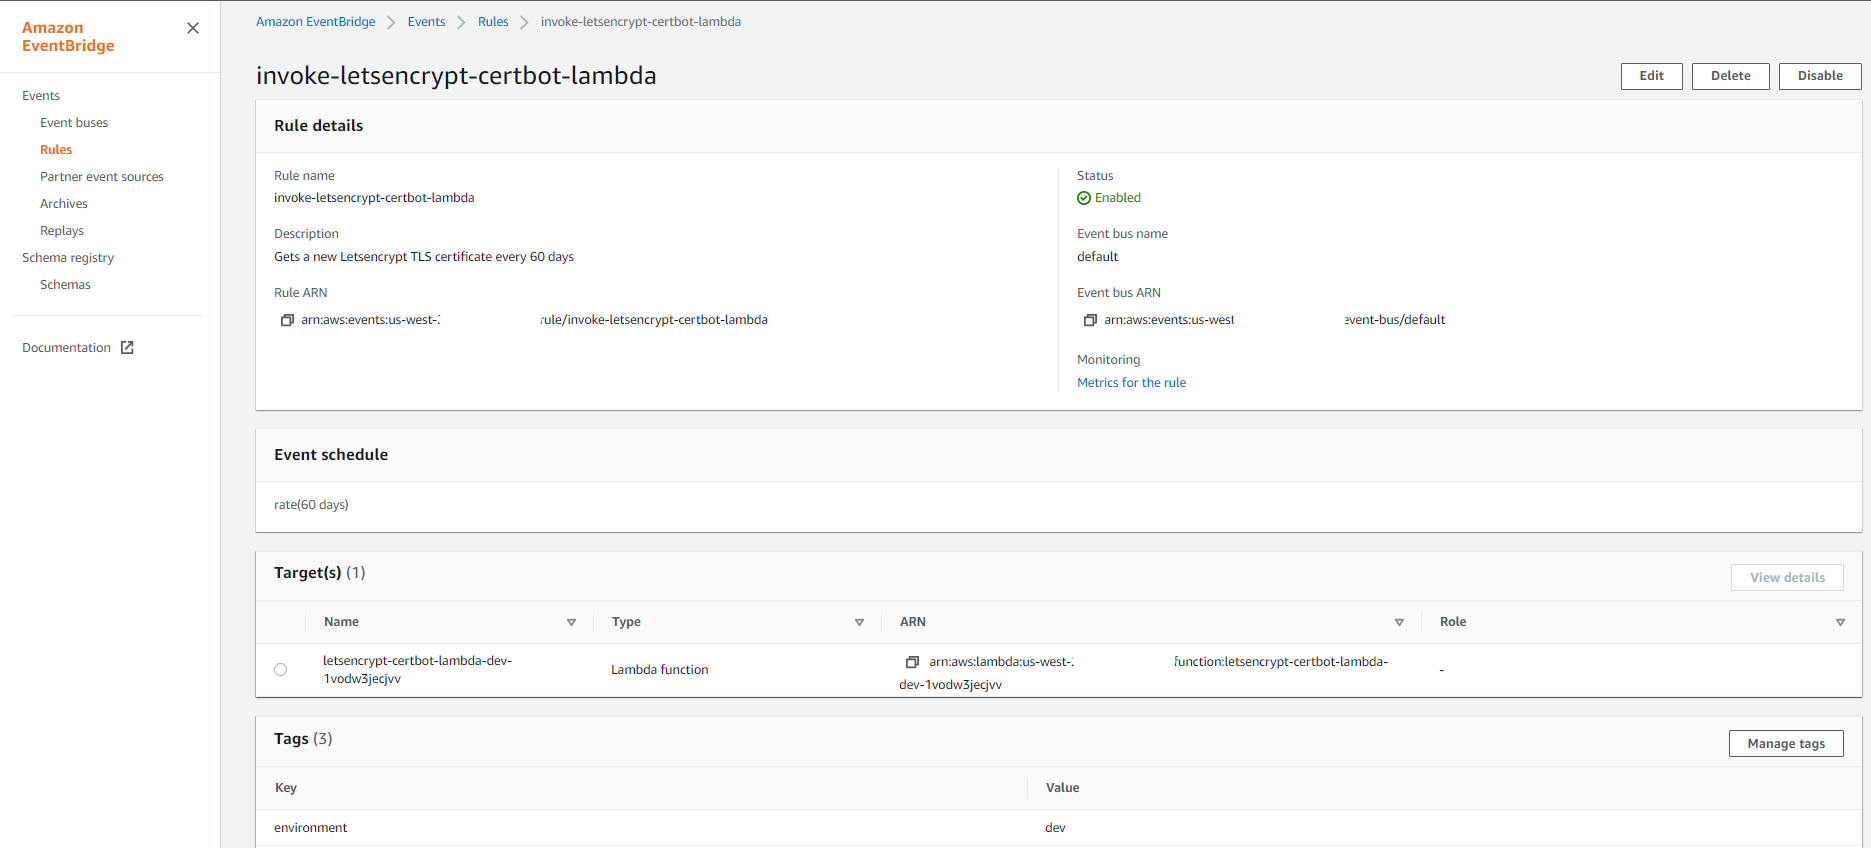
Go to the EventBridge service in the us-west-2 region and select the invoke-letsencrypt-certbot-lambda rule. Note it has the certbot Lambda function as target and it is scheduled to run every 60 days.
You can force the rule to run by clicking on the Disable button and once disabled click the Enable button. This will trigger the certbot Lambda function and a new certificate will be delivered to the S3 bucket in a minute or so. Trigger the rule, wait a couple of minutes and head over to S3 service to take a look at the destination bucket.
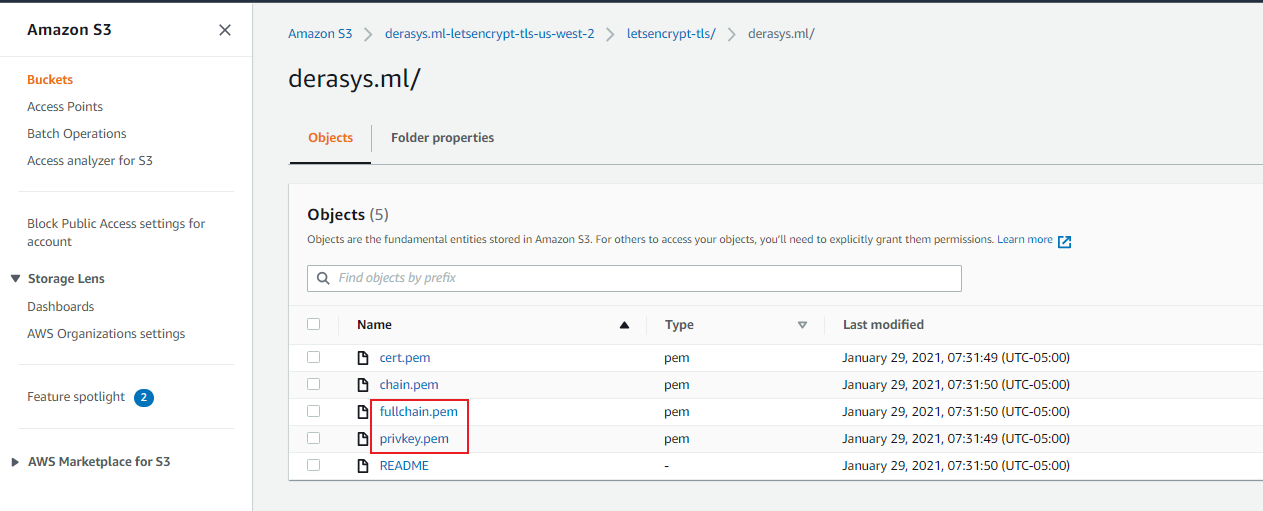
As you see in the image above, there are 4 PEM files and one README file that landed in the letsencrypt-tls/derasys.ml folder:
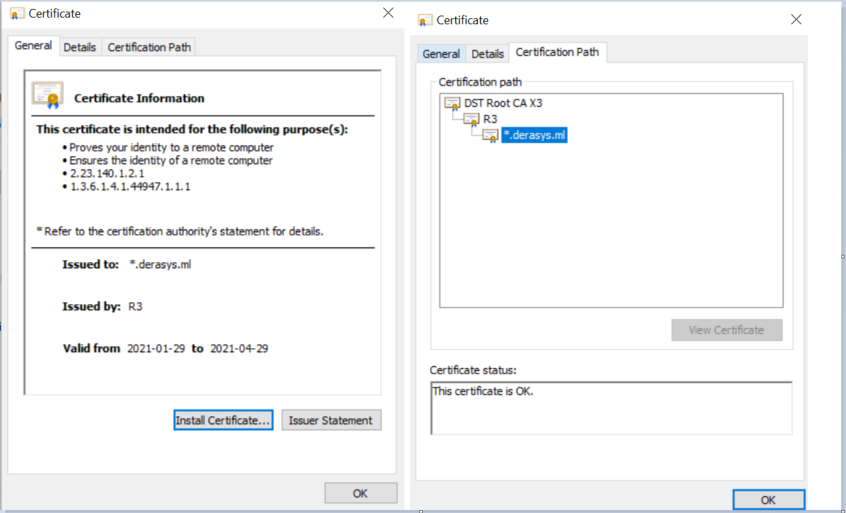
- cert.pem - This is the public certificate signed by Let's Encrypt's root Certificate Authority. You can download this file and if you rename its extension to .crt you can double-click on it in Windows and view it.
- chain.pem - The intermediate certificate.
- fullchain.pem - This is the cert.pem and chain.pem merged together with the certificate being on top and the intermediate certificate on the bottom. You can open this file in a text editor and note that it consists of two blocks delimited by -----BEGIN CERTIFICATE----- and -----END CERTIFICATE----- markers. The block on top represents the cert.pem file and the bottom block represents the chain.pem file.
- privkey.pem - This is the private key. The RD Gateway instance you will deploy next will download the private key along with the fullchain.pem file from this S3 bucket, convert them in to a PFX format using OpenSSL and install it on the RD Gateway server.
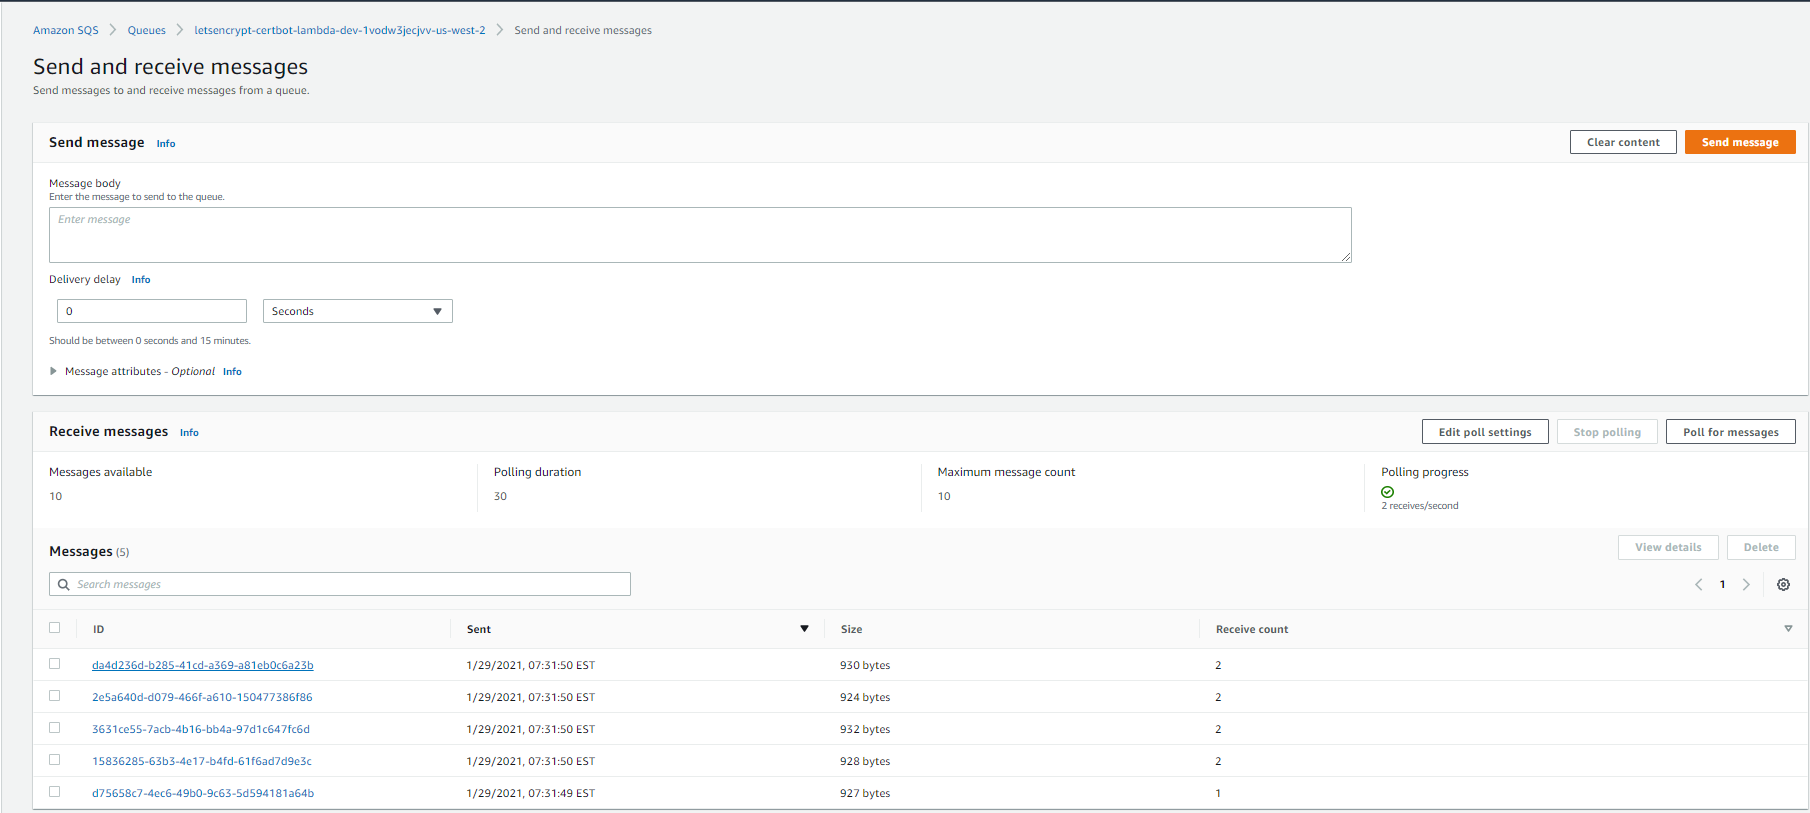
Go to the SQS service in the us-west-2 region and lookup the queue whose name starts with letsencrypt-certbot-. Click on the Send and receive messages button and then Poll for messages button. You will notice the 5 messages corresponding to the five files received by the derasys.ml-letsencrypt-tls-us-west-2 S3 bucket.
The messages are JSON documents, in the example listed below you can see that the s3 -> object key contains the path in the S3 bucket where the fullchain.pem file lives: letsencrypt-tls/derasys.ml/fullchain.pem.
{
  "Records": [
    {
      "eventVersion": "2.1",
      "eventSource": "aws:s3",
      "awsRegion": "us-west-2",
      "eventTime": "2021-01-29T12:31:42.984Z",
      "eventName": "ObjectCreated:Put",
      "userIdentity": {
        "principalId": "AWS:AROAXK3V46CWMLENZK5RC:letsencrypt-certbot-lambda-dev-1vodw3jecjvv"
      },
      "requestParameters": {
        "sourceIPAddress": "44.234.38.118"
      },
      "responseElements": {
        "x-amz-request-id": "B3DDABED66C71A1A",
        "x-amz-id-2": "nAQarq/3yNfulNXhPR4kF7c6MISU+a8i+2XrIoYM1X7Cg8giG3Yk2zcEPBMTbdaE9odYA6FxsF/uocvZip5HgvSEzrA9y4vz"
      },
      "s3": {
        "s3SchemaVersion": "1.0",
        "configurationId": "tf-s3-queue-20210127130014034200000002",
        "bucket": {
          "name": "derasys.ml-letsencrypt-tls-us-west-2",
          "ownerIdentity": {
            "principalId": "A1FMMISH2CJU1M"
          },
          "arn": "arn:aws:s3:::derasys.ml-letsencrypt-tls-us-west-2"
        },
        "object": {
          "key": "letsencrypt-tls/derasys.ml/fullchain.pem",
          "size": 3420,
          "eTag": "0ac05d37469dc0512c07d6f46c94a024",
          "versionId": "5C5dy50AT8ZgIrccrCqyz61RQGUPgbzp",
          "sequencer": "00601400354542C26B"
        }
      }
    }
  ]
}
Here we deploy the RD Gateway instance and wire it to the SQS queue so that it gets notified when a new certificate is available for download in the S3 bucket.
The Terraform configurations are found in the /rd-gateway folder.
The main.tf configuration deploys the following resources:
- 1 x EC2 instance running Windows Server with the RDS Gateway role installed. You can specify your own AMI ID or let Terraform use the latest Windows Server 2019 AMI from the SSM parameter store.
- 1 x IAM role that allows the EC2 instance to retrieve messages from SQS queues, download objects from S3 buckets, and send notifications to SNS topics. The IAM policy associated with the role is defined in the ec2-role-policy.json.tpl JSON template.
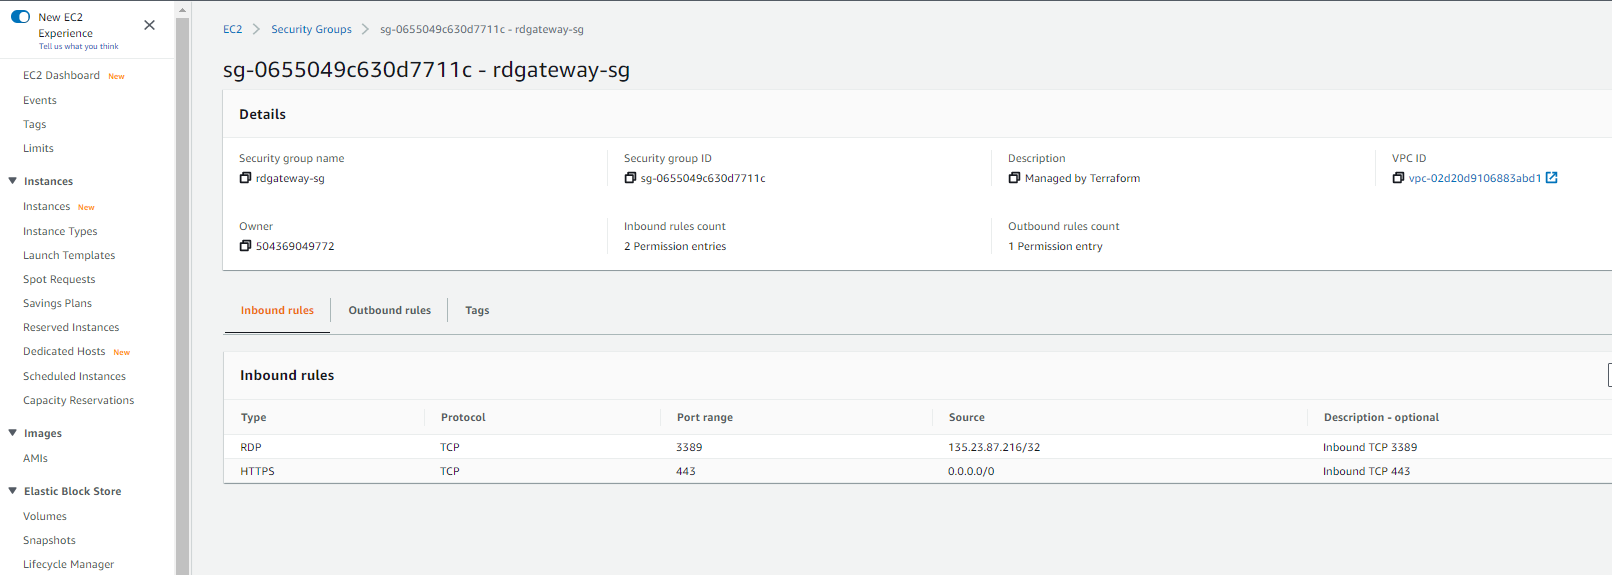
- 1 x Security group attached to the RD Gateway instance that allows ingress traffic on port 443 from anywhere and 3389 from specific IP only. Port 443 is required by the RDP over HTTPS connections. The RDP port 3389 does not need to be open all the time, we need it open in order to examine the RD Gateway and I recommend you specify your own IP for this purpose.
- 1 x SSM document that allows for the RD Gateway instance to join the AD domain (if an AD domain is specified). If no AD domain is specified the RD Gateway will not be domain-joined. The SSM document is defined in the ssm-document.json.tpl JSON template.
- 1 x Elastic IP associated with the RD Gateway instance.
- 1 x A Record in a Route 53 public zone pointing to the elastic IP of the RD Gateway.
- 1 x SNS topic for notifications if none specified.
- 1 x CloudWatch alarm monitoring for
StatusCheckFailed_Systemmetric and with an associated action of EC2 recovery. Should a host issue deem your RD Gateway unresponsive AWS will recover your instance automatically by stopping it and starting it on a new host. I strongly recommend enabling auto-recovery for all production EC2 instances that support it, it's a life saver!
The following inputs are defined in the variables.tf file:
-
region: The AWS region where the RD Gateway will be deployed in. We select
us-west-2for this example. -
key_name: The name of a key pair that allows to decrypt the initial password for the local administrator account. Use your own key pair, I select
test-radu-oregonfor this example. -
public_subnet_id: The ID of a public subnet in the VPC where the RD Gateway will be deployed. We select one public subnet in the VPC created on Step 2 for this example:
subnet-0543680358ce4915d. -
s3_bucket: The name of the S3 bucket that contains the scripts to be installed on the EC2 instance during the bootstrap process. We select
letsencrypt-certbot-lambda-dev-d7jyfrjakraefor this example as the scripts are located in the scripts folder on this bucket. -
s3_bucket_tls: The name of the bucket that the certbot Lambda function deposits the TLS certificates in. We select
derasys.ml-letsencrypt-tls-us-west-2for this example. -
s3_folder_tls: The name of the S3 folder where the TLS certificates are deposited by the certbot Lambda. This value is
letsencrypt-tlshard-coded in the letsencrypt-tls layer. -
sqs_url: The URL of the SQS queue that receives notifications from S3 when new certificates arrive. Required for the RD Gateway to poll that queue and retrieve messages from. We select
https://sqs.us-west-2.amazonaws.com/<AWS_ACCOUNT>/letsencrypt-certbot-lambda-dev-d7jyfrjakrae-us-west-2for this example. -
environment: A label for the environment that can be anything like dev, test, prod or anything else that makes sense for you. Default is
dev. - rdgw_instance_type: The EC2 instance type for the RD Gateway. Default is ```t3.small``.
-
rdgw_allowed_cidr: The allowed IP range for RDP access to the RD Gateway in CIDR. Defaults to null which means that RDP ingress traffic will be allowed from anywhere (0.0.0.0/0). I recommend you specify your own IP, I selected my own IP for this example,
135.23.87.216/32. -
rdgw_name: The name of the RD Gateway instance. Defaults to
rdgatewaybut if you override it make sure it's DNS-compliant since it will be part of your RD Gateway's DNS name. We leave the default value for this example which means that the RD Gateway's hostname will berdgateway.derasys.ml. -
route53_public_zone: The name of the public Route 53 zone (domain name) that will hold the A record for the RD Gateway instance. We select
derasys.mlfor this example, make sure you use your own Route 53 domain. -
scripts: The scripts in the S3 bucket to be downloaded on the EC2 instance. This is a map of keys representing the relative paths of the scripts uploaded in the S3 bucket letsencrypt-certbot-lambda-dev-1vodw3jecjvv in step 4. The RD Gateway instance will download those PowerShell scripts during bootstrapping process, save them in the C:\scripts folder, run the
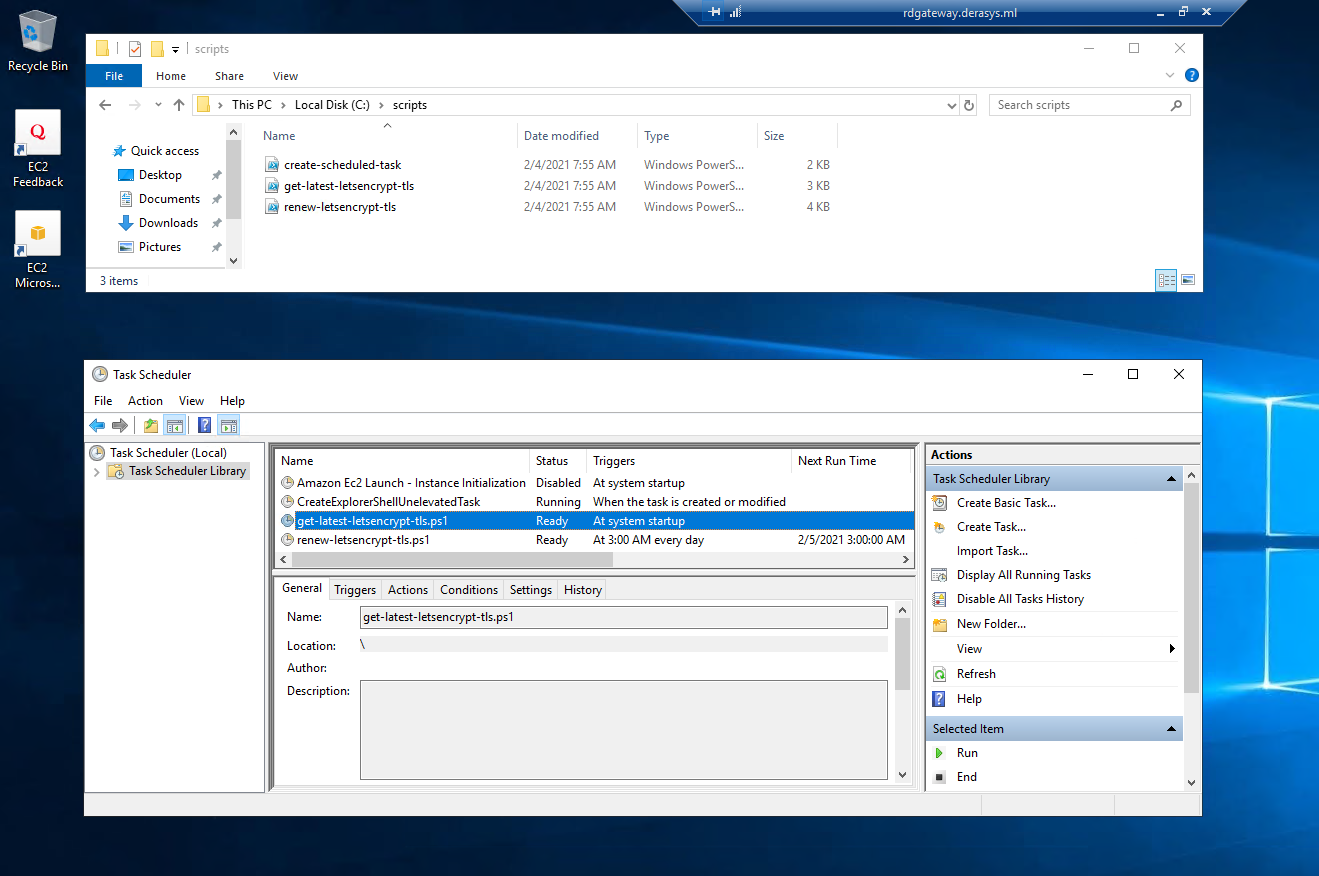
create-scheduled-task.ps1script a couple of times to create two scheduled tasks. The first task runs therenew-letsencrypt-tls.ps1script daily polling the SQS queue looking for messages that would indicate there is a new certificate available in the S3 bucket. This task allows for an RD Gateway that is always on to ensure that it receives a new certificate every 60 days. The second task runs theget-latest-letsencrypt-tls.ps1script when the instance starts up. This allows for an RD Gateway that shuts down off hours (and therefore might miss the new certificate notification) to ensure it downloads the latest certificate from S3 bucket where it is kept fresh by the certbot Lambda. We leave the default value for this example. -
ad_directory_id: The ID of the AD domain. Defaults to null which means that the RD Gateway will not be joined to a domain. This works fine but you have to authenticate twice when you RDP into the private instance through the RD Gateway. We select
d-92670aa5dafor this example to override the default. -
ad_dns_ips: The IPs of the DNS servers for the AD domain. Defaults to null. If you left the ad_directory_id null this value will not matter so you can also leave it null. We select
["172.16.10.162", "172.16.11.169"]for this example. -
ad_domain_fqdn: The fully qualified domain name of the AD domain. Defaults to null. If you left the ad_directory_id null this value will not matter so you can also leave it null. We select
derasys.adfor this example. - sns_arn: The ARN of an SNS topic to receive notifications of TLS certificate renewal and instance recovery. Defaults to null. If you have your own SNS topic that you want to use for this purpose feed the SNS ARN here, otherwise if left null new SNS topic will be created.
With the input variables established, open your favourite text editor, create a file called terraform.tfvars and save it in the letsencrypt-tls folder:
region              = "us-west-2"
key_name            = "test-radu-oregon"
ad_dns_ips          = ["172.16.10.162", "172.16.11.169"]
ad_directory_id     = "d-92670aa5da"
ad_domain_fqdn      = "derasys.ad"
public_subnet_id    = "subnet-0543680358ce4915d"
rdgw_allowed_cidr   = "135.23.87.216/32"
route53_public_zone = "derasys.ml"
s3_bucket           = "letsencrypt-certbot-lambda-dev-1vodw3jecjvv"
s3_bucket_tls       = "derasys.ml-letsencrypt-tls-us-west-2"
s3_folder_tls       = "letsencrypt-tls/derasys.ml"
sqs_url             = "https://sqs.us-west-2.amazonaws.com/<AWS_ACCOUNT>/letsencrypt-certbot-lambda-dev-d7jyfrjakrae-us-west-2"
In the rd-gateway folder you can now proceed with initializing Terraform:
terraform initSkip the plan phase and go straight to apply:
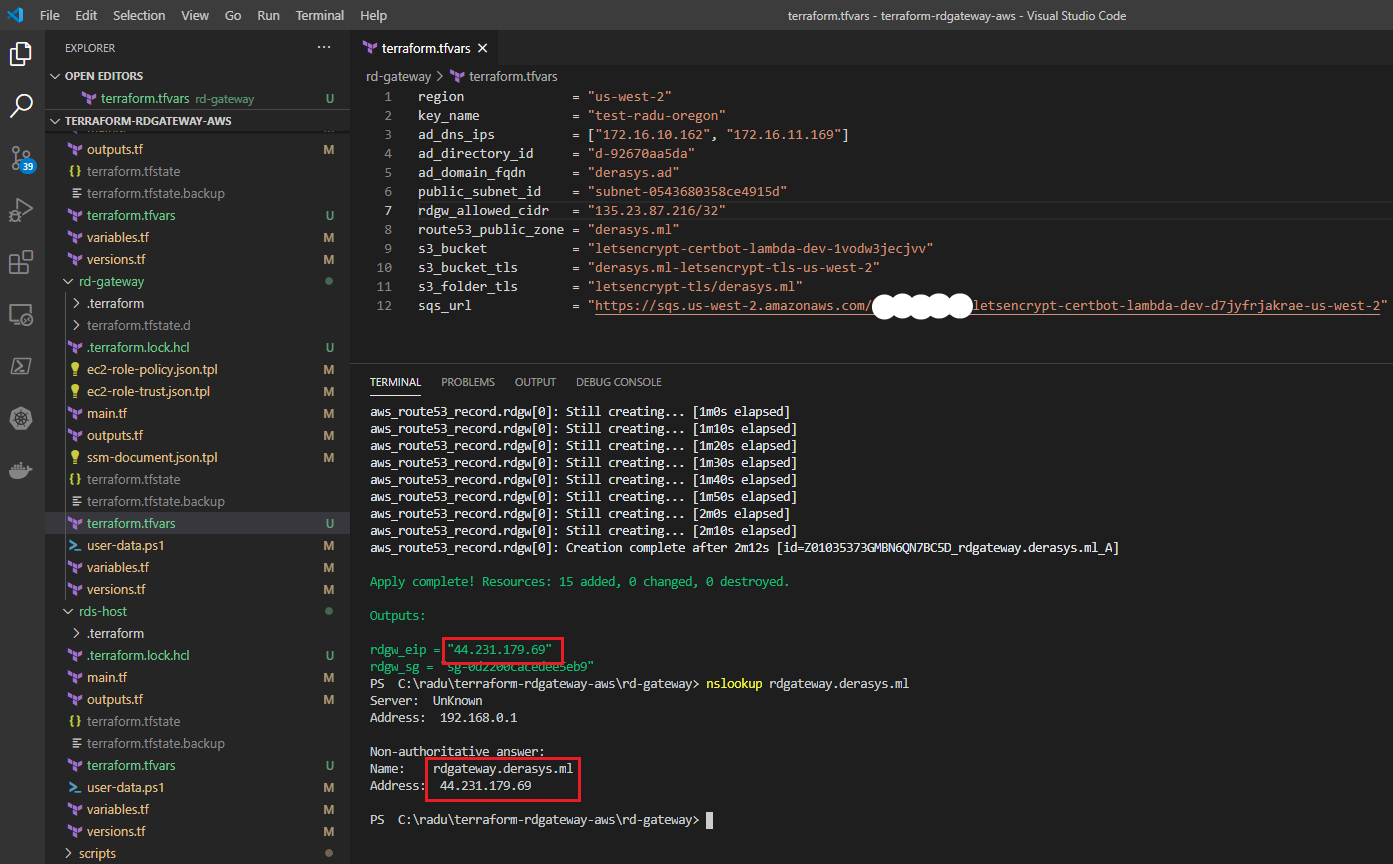
terraform applyIn the Outputs section note the value of the elastic IP of the RD Gateway, rdgw_eip and the nslookup check confirming that an A record pointing to this IP has been created. Also, record the ID of the security group associated with the RD Gateway, rdgw_sg as it will become the allowed source for RDP traffic for the private instances that you are going to access through the RD Gateway.
Go check the RD Gateway instance in the AWS EC2 console and note that the ingress rules in its security group allow for HTTPS from anywhere, 0.0.0.0/0 and RDP from your public IP only.
Let's connect to the RD Gateway now. If you followed the example here and specified an ad_directory_id above then your RD Gateway will be joined to that domain and you can use domain administrator credentials when you RDP into the instance. If you left the ad_directory_id to its default null value then your RD Gateway will not be domain-joined and you need to decrypt the local administrator password using your private key.
Please allow the RD Gateway instance to finish setup, join the domain and reboot
It may take about 30 minutes for RD Gateway to finish setup, join the AD domain and reboot. During this time if you try to RDP into it with domain credentials you will not be able to since the domain join is done last.
Note that the PowerSheLL scripts were downloaded in the C:\scripts folder and in Windows Task Scheduler the task get-latest-letsencrypt-tls.ps1 that triggers at system startup was already run when the instance rebooted to join the domain. If your RD Gateway is not domain-joined you can reboot it now or simply run the get-latest-letsencrypt-tls.ps1 task to install the TLS certificate on the RD Gateway server.
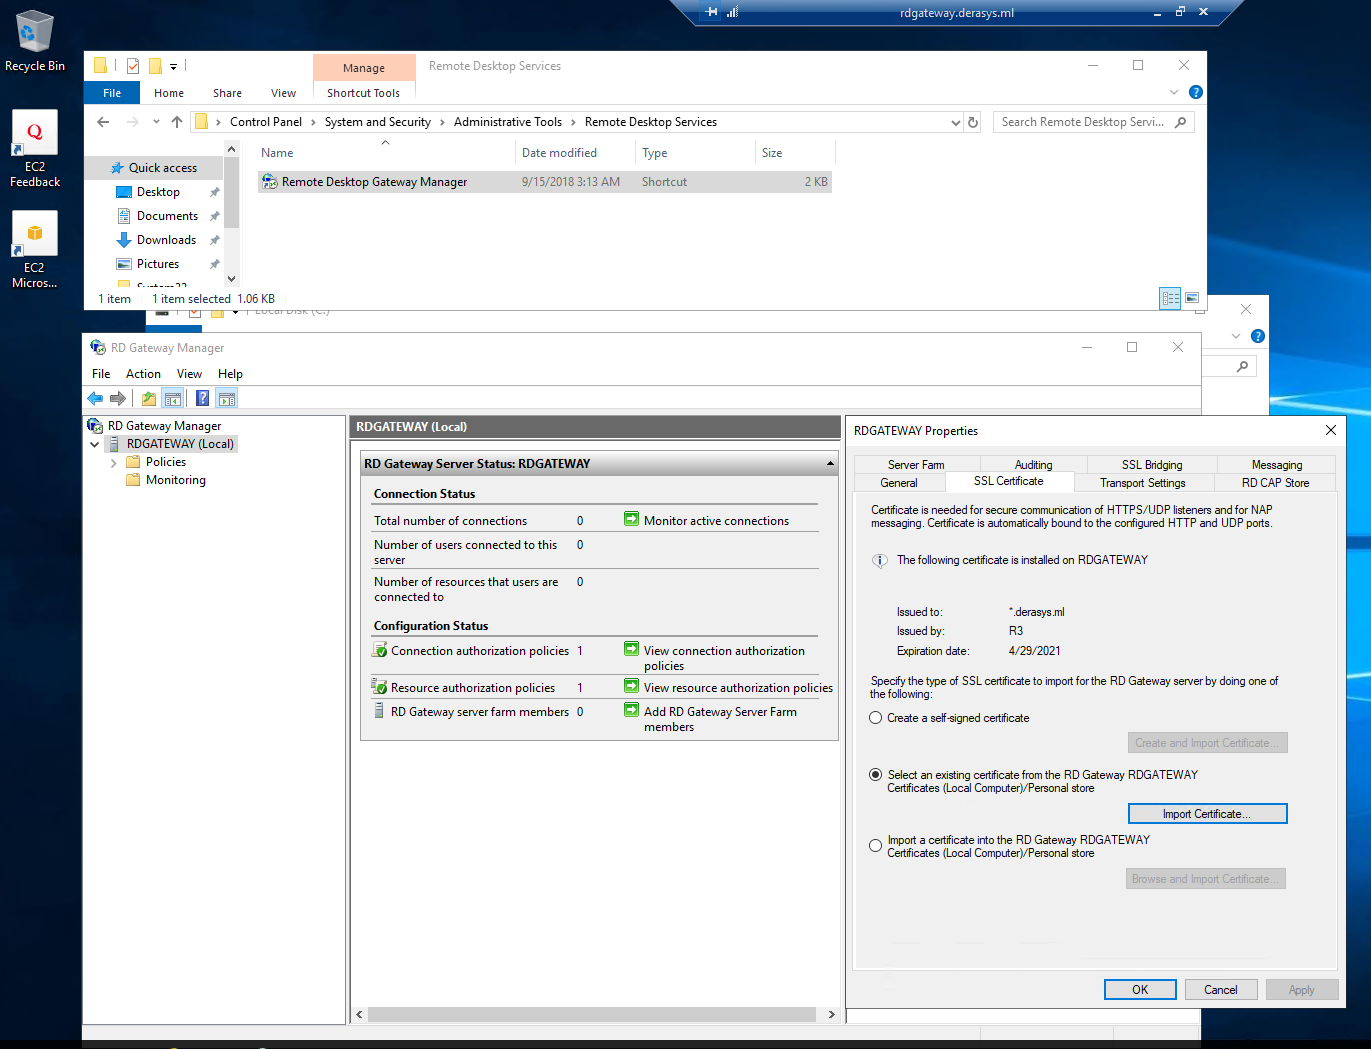
Go check the Remote Desktop Gateway Manager console, you will find it under Administrative Tools -> Remote Desktop Services and in the Properties of the RDGATEWAY server note that the SSL Certificate tab shows that the Let's Encrypt certificate is installed.
If your RD Gateway is meant to run 24 x 7, then the renew-letsecnrypt-tls.ps1 task that polls the SQS queue daily will get a new certificate every 60 days. If your RD Gateway reboots or gets turned on after having been off for some time, then the get-latest-letsencrypt-tls.ps1 task runs at start up and gets the latest certificate from the S3 bucket. That way had the TLS certificate expired while the RD Gateway was off, it would always get a valid certificate immediately upon start up.
Your RD Gateway is now ready to receive connections! Next, we will deploy an EC2 instance in a private subnet, join it to the Active Directory domain and RDP into it from outside through the RD Gateway.
Here we deploy an EC2 instance in a private subnet, join it to our Active Directory domain derasys.ad, and install the RDS-RD-Server role to make it a Remote Desktop Session Host (RDSH). Then as a bonus we are going to install Microsoft 365 Apps using the Office Deployment Tool and turn on Shared Computer Activation.
The Terraform configurations are found in the /rds-host folder.
The following inputs are defined in the variables.tf file:
-
region: The AWS region where the RD Gateway will be deployed in. We select
us-west-2for this example. -
key_name: The name of a key pair that allows to decrypt the initial password for the local administrator account. Use your own key pair, I select
test-radu-oregonfor this example. -
private_subnet_id: The ID of a private subnet in the VPC where the RDSH instance will be deployed. We select one private subnet in the VPC created on Step 2 for this example:
subnet-0a8fa16bde802799e. -
ad_directory_id: The ID of the AD domain that the RDSH instance will be joined to. We select
d-92670aa5dafor this example. -
ad_dns_ips: The IPs of the DNS servers for the AD domain. We select
["172.16.10.162", "172.16.11.169"]for this example. -
ad_domain_fqdn: The fully qualified domain name of the AD domain. We select
derasys.adfor this example. -
environment: A label for the environment that can be anything like dev, test, prod or anything else that makes sense for you. Default is
dev. - rdsh_instance_type: The EC2 instance type for the RDSH instance. Default is ```t3.small``.
-
ami_id: The ID of an Amazon Machine Image (AMI) to use for the RDSH instance. Default is null which means that the latest Windows Server 2019 AMI for the region will be used. We select
ami-0831fe8c0427acf5bfor this example. -
rdgw_sg: The ID of the security group attached to the RD Gateway instance. If you did not record this value from the
Outputssection in step 5, you can get it from the EC2 console by checking the properties of the RD Gateway. We selectsg-048d5faef16b763cbfor this example. -
download_url: The URL for the Office Deployment Tool Click-to-Run installer. If you are not interested in installing Microsoft 365 Apps (Word, Excel, Outlook, etc.) using the Office Deployment Tool to enable Shared Computer Activation you can leave this value at its default. I select
https://download.microsoft.com/download/2/7/A/27AF1BE6-DD20-4CB4-B154-EBAB8A7D4A7E/officedeploymenttool_13530-20376.exefor this example.
With the input variables set as above, open your favourite text editor, create a file called terraform.tfvars and save it in the rds-host folder:
region            = "us-west-2"
key_name          = "test-radu-oregon"
private_subnet_id = "subnet-0a8fa16bde802799e"
ad_dns_ips        = ["172.16.10.162", "172.16.11.169"]
ad_directory_id   = "d-92670aa5da"
ad_domain_fqdn    = "derasys.ad"
rdgw_sg           = "sg-048d5faef16b763cb"
ami_id            = "ami-0831fe8c0427acf5b"
download_url      = "https://download.microsoft.com/download/2/7/A/27AF1BE6-DD20-4CB4-B154-EBAB8A7D4A7E/officedeploymenttool_13530-20376.exe"
In the rds-host folder you can now proceed with initializing Terraform:
terraform initSkip the plan phase and go straight to apply:
terraform applyI will let you verify in the EC2 console that the newly deployed RDSH instance does not have a public IP and the only ingress traffic allowed by its security group is TCP 3389 (RDP) from the security group attached to the RD Gateway instance.
All pieces are finally in place for us to connect to the RDSH instance through the RD Gateway!
The instructions that follow are for Windows. For Mac OS you can get the Microsoft Remote Desktop app for example and configure it to use the RD Gateway as per this Microsoft document.
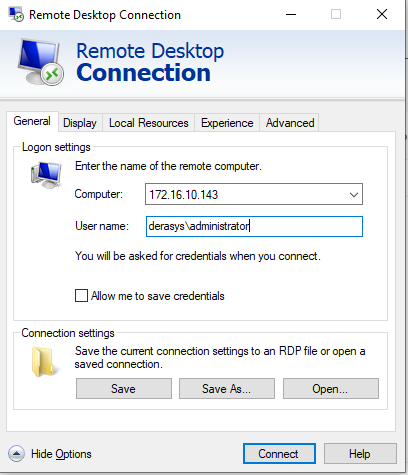
- Click on Start, type in mstsc and launch the Remote Desktop Connection app.
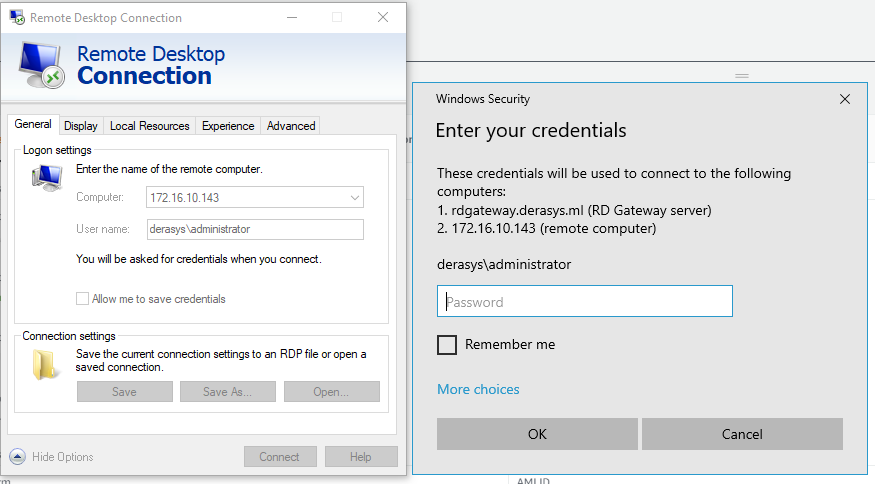
- Click on the Show Options arrow to expand expand it. In the Computer field type in the private IP of the RDSH instance. In the User name field type in the name of a domain admin user, I use
derasys\administratorfor this example.
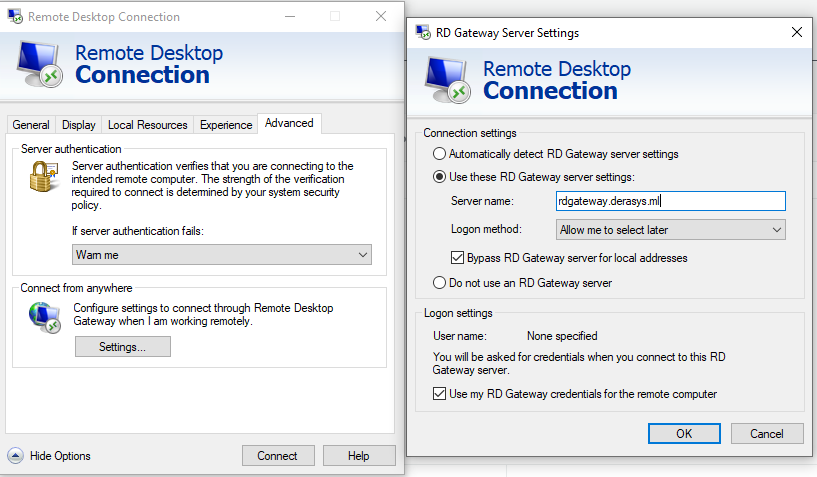
- Click on the Advanced tab, click the Settings button, select the Use these RD Gateway server settings option type in the DNS name of your RD Gateway, in this example that's
rdgateway.derasys.ml. If your RD Gateway is joined to the same AD domain as the RDSH instance check the Use my RD Gateway credentials for the remote computer box. Click OK.
- Click on the General tab and click Connect button. Type in your password when prompted and click OK.
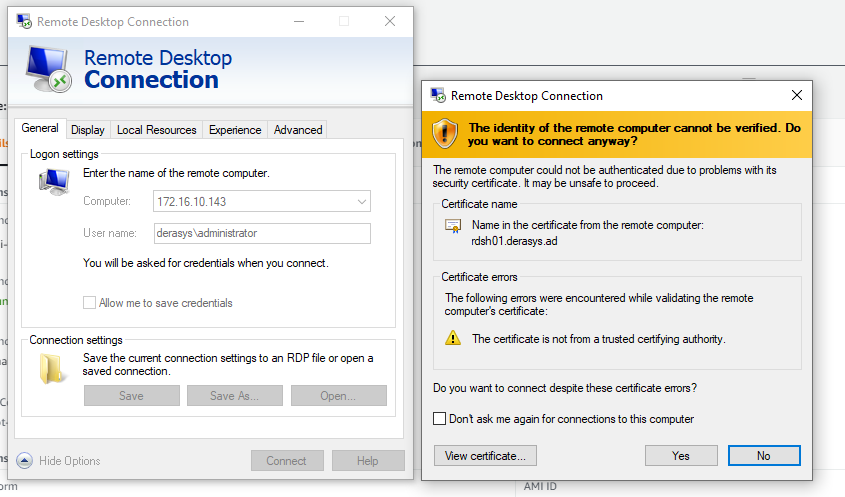
- Click Yes on the certificate warning and you are in!
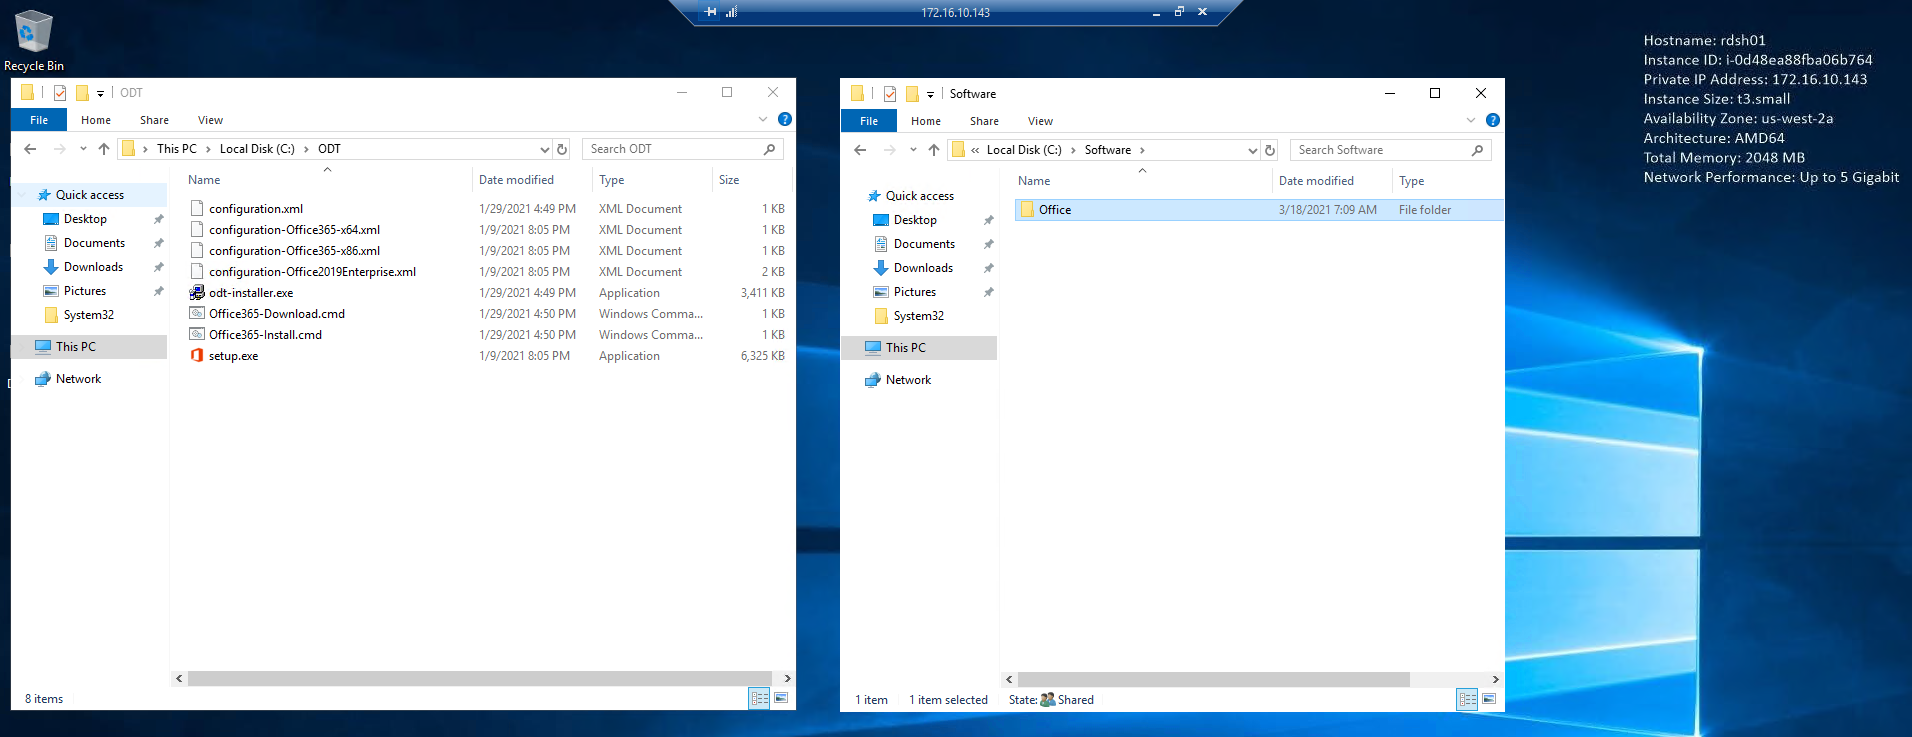
Now for the bonus part promissed at the begining of this section, let's take a look at the Office Deployment Tool (ODT). If you set the download_url variable as indicated in the terraform.tfvars file above then the ODT gets downloaded in the C:\ODT folder along with some XML sample configuration files. The main XML file is configuration.xml listed below:
<Configuration>
<Add SourcePath="\\localhost\Software\" OfficeClientEdition="32" >
<Product ID="O365ProPlusRetail">
<Language ID="en-us" />
<ExcludeApp ID="Teams" />
</Product>
</Add>

<!-- <Updates Enabled="TRUE" UpdatePath="\\Server\Share\" /> -->

<Display Level="None" AcceptEULA="TRUE" />
<Property Name="SharedComputerLicensing" Value="1" />

<!-- <Logging Path="%temp%" /> -->

<!-- <Property Name="AUTOACTIVATE" Value="1" /> -->

</Configuration>
The SourcePath key in the configuration.xml file points to a share on the RDSH instance that was created by the user-data.ps1 PowerShell script during the bootstrap process.
Note that the SharedComputerLicensing is set to 1 enabling Shared Computer Activation which is the preffered configuration if you want to deploy Microsoft 365 Apps on a Remote Desktop Session Host server.
Also in the C:\ODT folder there are two batch files:
-
Office365-Download.cmdinvokes the ODT with the/downloadoption which will download the bits into the C:\Software folder. -
Office365-Install.cmdinvokes the ODT with the/configureoption which will actually install the Microsoft 365 Apps as specified in theconfiguration.xmlfile.
If you run the Office365-Download.cmd script it will download Office in a few minutes and you can then follow up with running the Office365-Install.cmd script.
Once the Microsoft 365 Apps are installed, launch Word or Excel and sign in with an Office 365 account that has at least a Microsoft 365 Business Premium license assigned.
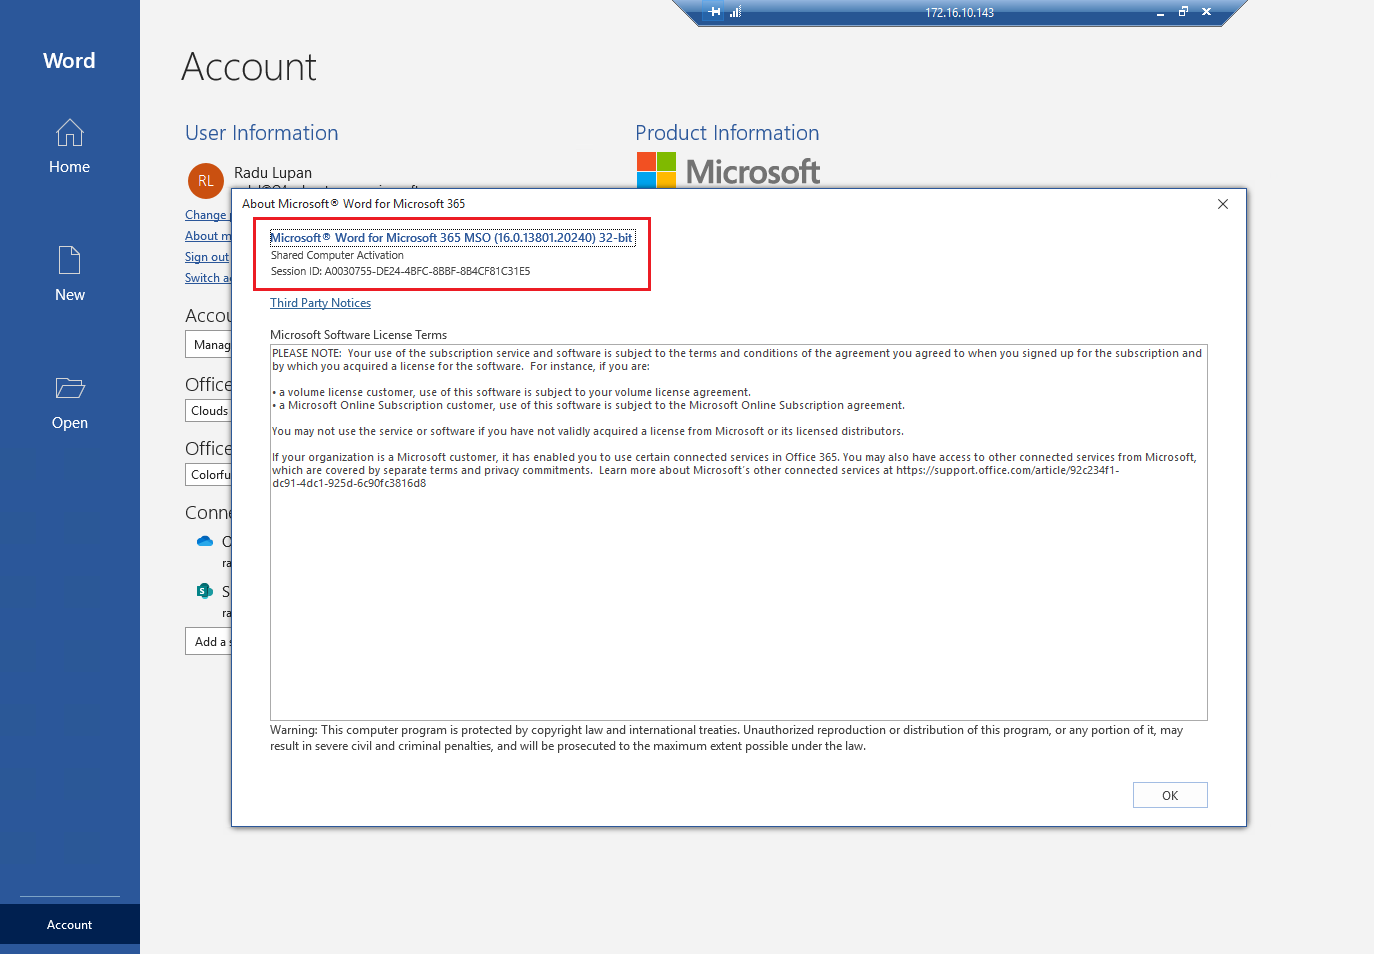
Verify that the Shared Computer Activation succedeed: in Word go to Account -> About Word
In this tutorial, I have showed how to deploy an Remote Desktop Gateway in AWS with an auto-renewing TLS certificate. I implemented this solution at work in December 2018 and it has been working flawlessly ever since. We have a dozen or so RD Gateways in both pre-production and production environments and they have all been receiving their TLS certificates regularly never missing a beat for more than 2 years now.
The core component is the certbot Lambda function that deposits the TLS certificate in the S3 bucket (see Step 4 for details) and that can be deployed and used independently! The TLS certificate is in PEM format and nothing prevents you from installing it on a Linux instance running nginx via a cron job for example.
Finally, I would like to thank kingsoftgames for the certbot-lambda implementation and to Google for revealing that link!
I hope this solution will help somebody else out there as it helped me. If you are considering implementing it and have any questions or concerns, feel free to contact me.
Thank you for your time.
Radu Lupan
