Added templates that support multiple packages #684
Conversation
I have had this question come up in tickets and community posts so I figured that we should add it to the docs so the users know which templates allow for multiple packages.
PreviewsSee contents[block:embed] How to create a new PaywallSelect an OfferingFirst, click on Paywalls in the Products and pricing section of the Project you’re working on. 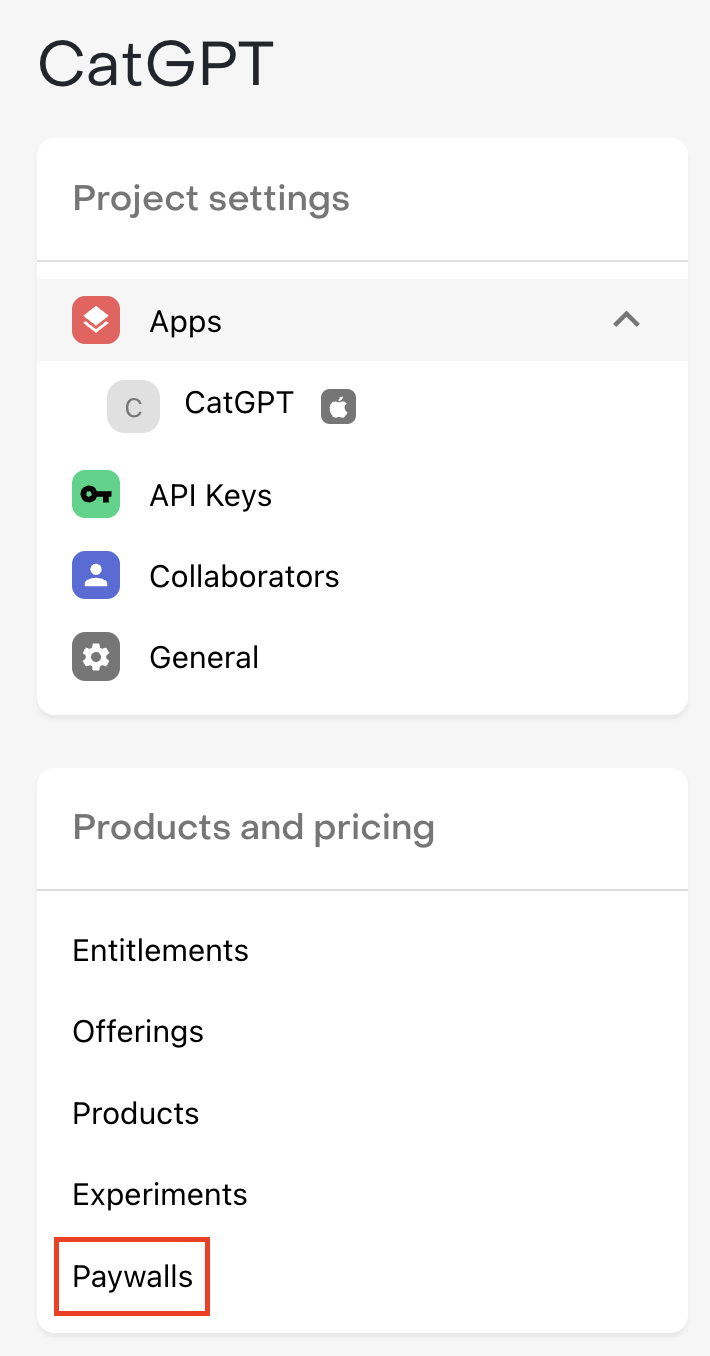
Then, click + Add paywall next to the Offering that you want to create a Paywall for. 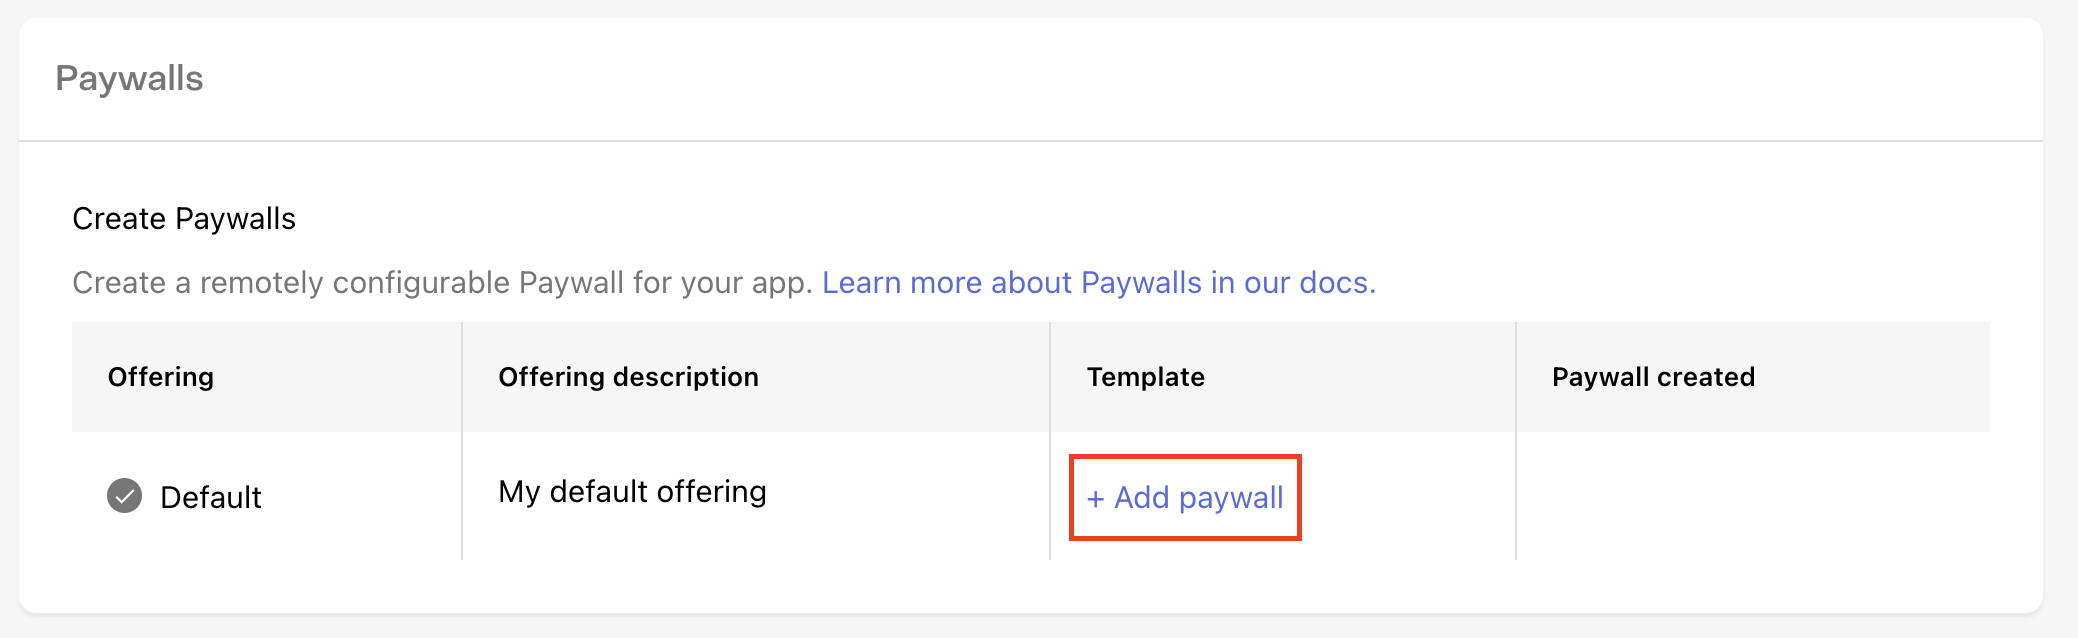
Select a templateThe first thing to do when creating a new Paywall is to select the template you’ll use as the starting point. Templates may support different package setups, content layouts, image sizes, and much more; so we recommend browsing each template to pick the one that’s best suited for what you’re looking to accomplish with your paywall. For example, if you’re trying to draw contrast between a few different packages you’re offering, try the #2 - Sphynx template. Or, if you want to try your own version of the Blinkist Free Trial Paywall start with the #3 - Leopard template. If you need to showcase multiple packages, consider using the following templates:
How to configure your PaywallOnce you’ve selected a template, you can configure any of its properties on the right side of the screen and see the change previewed immediately. PackagesPackages represent the individual products you want to serve a customer on your Paywall. You don’t necessarily need to display every package that’s available in your Offering, and some templates may only support displaying one or a limited number of packages, so be sure to choose a template that reflects the options you want to offer your customers. For templates that support multiple packages, you should select packages in the order that you’d like them to display. Then, you can separately choose which package should be preselected for your customers by default.
StringsHow you describe your product has a huge impact on how likely a customer is to subscribe to it. Every descriptive string on our Paywall templates is fully configurable so you have control over exactly how you pitch your product.
VariablesFor some Paywall strings you may want to set values based on the package that’s being displayed instead of hardcoding a single value, such as when quoting a price, or describing the duration of an Introductory Offer. To make this easier and ensure accuracy, we recommend using Variables for these values that are package-specific. For example, to show a CTA like “Try 7 Days Free & Subscribe”, you should instead use the {{ sub_offer_duration }} variable, and enter “Try {{ sub_offer_duration }} Free & Subscribe” to ensure the string is accurate for any product you use, even if you make changes to the nature of the offer in the future. We support the following variables:
Previewing PaywallsClick the Show preview values checkbox to see your Paywall with example preview values instead of the raw variables. The paywall preview is generated using our example data. Please note that you may observe placeholder values from the example values in the table above, such as product names or prices in the preview of your newly created paywall. To obtain a more accurate preview, we recommend running your application on your physical device or in the simulator, as this will present details more closely aligned with your actual product information. Intro offer eligibilityRevenueCat Paywalls automatically check for Introductory Offer eligibility, and therefore for applicable fields like the Call to action and Offer details you can enter distinct strings based on the nature of the offer. For example, you may want to highlight the length of your free trial for a customer who is eligible for that Introductory Offer. Uploading imagesUse the Select a file button for the applicable image to upload your own to use for your Paywall. We’ll center and scale the image to fit, regardless of its aspect ratio, so we recommend using source images that are appropriate for the area of the template they cover. We support .jpg, jpeg, and .png files up to 5MB. ColorsUse your own hex codes, select a custom color, or use our color picker to select background and text colors for each element that reflect your app’s branding.
LocalizationRevenueCat Paywalls come with built-in support for localization. This will allow you to customize your paywall content for all the languages that your app supports. Locales can be added to your paywall through the 'Localization' dropdown. [block:image] Each paywall template may differ in the localized values that you will need to provide. The options that most templates have are:
Since RevenueCatUI allows for dynamic text with Variables, all the output of variables will automatically localized. This includes period lengths like "Annual", "Monthly" and "Weekly" being localized to "Anual", "Mensual", and "Semanalmente". Price per period like "$6.99/mo" and "$53.99/yr" will also be localized to "$6.99/m." and "$53.99/año". Other paywall components like "Restore purchases", "Terms of Service", and "Privacy Policy" will also automatically be localized. Supported localesWe currently support all 39 locales that are supported on App Store Connect.
See contentsWhat is RevenueCat?RevenueCat provides a backend and a wrapper around StoreKit and Google Play Billing to make implementing in-app purchases and subscriptions easy. With our SDK, you can build and manage your app business on any platform without having to maintain IAP infrastructure. You can read more about how RevenueCat fits into your app or you can sign up free to start building. InstallationWe provide 2 ways to install our SDK: via Unity Package Manager (UPM) in the OpenUPM registry, or as a Option 1 (recommended): Install using OpenUPM
[block:callout] [block:callout] Configure a Main Gradle TemplateGo to Project -> Build Settings -> Player Settings -> Android tab -> Publishing Settings, and check "Custom Base Gradle Template", then close that window. 
Go to Assets -> External Dependency Manager -> Android Resolver -> Settings, then check "Patch mainTemplate.gradle" 

Option 2: Import the Purchases Unity packageDownload the latest version of Purchases.unitypackage. Import the downloaded unitypackage to your Unity project. Make sure the [block:callout] Configure a Main Gradle TemplateGo to Project -> Build Settings -> Player Settings -> Android tab -> Publishing Settings, and check "Custom Base Gradle Template", then close that window.
Go to Assets -> External Dependency Manager -> Android Resolver -> Settings, then check "Patch mainTemplate.gradle"
Create a GameObject with the Purchases behaviorThe Purchases package will include a MonoBehavior called Purchases. This will be your access point to RevenueCat from inside Unity. It should be instantiated once and kept as a singleton. You can use properties to configure your API Key, app user ID (if you have one), and product identifiers you want to fetch. Link StoreKit (iOS only)
Subclass Purchases.Listener MonoBehaviorThe Purchases behavior takes one additional parameter, a GameObject with a Purchases.Listener component. This will be where you handle purchase events, and updated subscriber information from RevenueCat. Here is a simple example: using System;
using System.Collections.Generic;
using UnityEngine;
public class PurchasesListener : Purchases.UpdatedCustomerInfoListener
{
public override void CustomerInfoReceived(Purchases.CustomerInfo customerInfo)
{
// display new CustomerInfo
}
private void Start()
{
var purchases = GetComponent<Purchases>();
purchases.SetDebugLogsEnabled(true);
purchases.GetOfferings((offerings, error) =>
{
if (error != null)
{
// show error
}
else
{
// show offering
}
});
}
public void BeginPurchase(Purchases.Package package)
{
var purchases = GetComponent<Purchases>();
purchases.PurchasePackage(package, (productIdentifier, customerInfo, userCancelled, error) =>
{
if (!userCancelled)
{
if (error != null)
{
// show error
}
else
{
// show updated Customer Info
}
}
else
{
// user cancelled, don't show an error
}
});
}
void RestoreClicked()
{
var purchases = GetComponent<Purchases>();
purchases.RestorePurchases((customerInfo, error) =>
{
if (error != null)
{
// show error
}
else
{
// show updated Customer Info
}
});
}
}Unity EditorRunning the Purchases SDK is unsupported in the Unity Editor at this time, and may result in Proguard rulesIf you have enabled Minify in Unity, make sure to add these custom rules to your Installation with Unity IAP side by side[block:callout] Purchases Unity 5.0.0+side by side with Unity IAP 4.8.0 This version is only compatible with version 4.8.0 and above of Unity IAP which are the ones that include BillingClient 5. To install download If using RevenueCat alongside Unity IAP 2.2.0+ or other plugin that includes the Android BillingClient library you will be getting an error when compiling that warns about some BillingClient classes being duplicated. The easiest way to remove the error would be to tell Gradle to not include the billingclient library that Unity IAP is already including. In order to do that, make sure you have Modify the dependencies {
...
// ** ADD THIS **
configurations.all {
exclude group: 'com.android.billingclient', module: 'billing'
}
}Perform a clean up of the resolved dependencies using the Also make sure to perform a resolve, so External Dependency Manager adds the right dependencies to the generated [block:callout] Troubleshooting "ClassNotFoundException" errors at Runtime in AndroidWhen exporting your project to Android, in the Build Settings window, make sure you uncheck the Installing old versions of the pluginPurchases Unity 4.2.0+side by side with Unity IAP 4.4.0 < 4.8.0 Download Purchases Unity 4.0.0 and 4.1.0side by side with Unity IAP 3.3.0 < 4.4.0 Download Next Steps
|


This is just to let users know which templates they might want to consider using right off the bat if they plan to use multiple packages.
Motivation / Description
I have had this question come up in tickets and community posts so I figured that we should add it to the docs so the users know which templates allow for multiple packages.
Changes introduced
Added list of current templates that support this