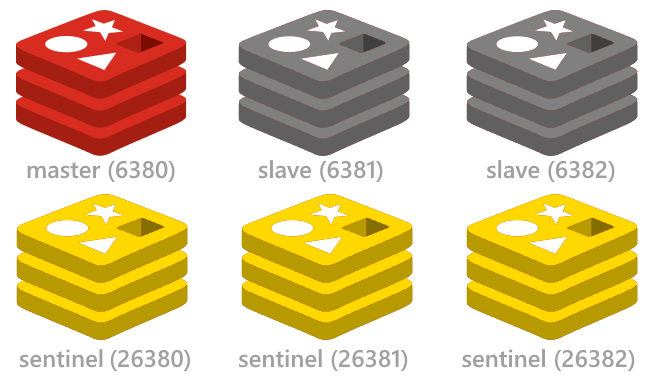
This repository contains the necessary configuration and redis binaries to quickly setup the Basic Sentinel configuration on Linux, OSX or Windows servers. The default configuration supports spawning multiple redis processes which can conveniently all be run on a single server using the included start-all/stop-all scripts (ideal for development environments mimicking their production Sentinel environments).
To run the included Sentinel configuration, clone this repo on the server you want to run it on:
git clone https://github.com/ServiceStack/redis-config.git
Then run the scripts for the target Operating System. This repository includes the latest stable pre-built binaries for OSX and MSOpen Tech's latest builds for Windows port of Redis in the /bin folder. Due to Linux binaries being less portable, the Linux bash scripts assumes an existing install of redis is available in your $PATH.
Start 1x Master, 2x Slaves and 3x Sentinel redis-servers:
cd redis-config\sentinel3\windows
start-all.cmd
Shutdown started instances:
stop-all.cmd
Start 1x Master, 2x Slaves and 3x Sentinel redis-servers:
cd redis-config\sentinel3\osx
./start-all.sh
Shutdown started instances:
./stop-all.sh
Start 1x Master, 2x Slaves and 3x Sentinel redis-servers:
cd redis-config\sentinel3\linux
./start-all.sh
Shutdown started instances:
./stop-all.sh
The bash scripts for OSX and Linux require execute permission which can be enabled with:
chmod a=rx start-all.sh
chmod a=rx stop-all.sh
After spawning multiple redis-server instances the start-all script will pause for a key press. Wait a few seconds before hitting return until you see +slave and +sentinel log entries in the Sentinel's console output. These entries show the sentinels successfully auto-detecting and registering the different redis instances.
Hitting return will ask the first 2 Sentinel servers for info of the current master and slaves. If everything's configured and working correctly it will show info on each server.
To capture the active roles of the different redis instances, redis will rewrite the redis.conf and sentinel.conf files. You can reset it back to the original configuration by discarding all changes in your cloned git repository which git lets us do with:
$ git reset --hard head
The goal of this project is to specify the minimal amount of info required to create a working Sentinel configuration. Anything not specified falls back to use the original redis.conf defaults shipped with the latest stable distribution of Redis.
The configurations are logically split into separate /server-{port} directories to match the redis and sentinel instances to run on each server. They use layered config so they're easily customizable and can be started independently with the included per-server start/stop scripts.
We'll take a close look at how one of the slaves are configured to see how it fits together. For this example we'll walk through the configurations for OSX located at /sentine3/osx:
/osx
  /server-6380
  /server-6381     #Config for Slave node
    redis.conf     #Config for Slave instance on port 6381
    sentinel.conf  #Config for Sentinel instance on port 26381
  /server-6382

redis.conf         #Default redis.conf shipped in latest Redis Stable
From the directory structure above we see there's a separate configuration for the master (6380) and its slaves (6381,6382) instances. We've started from port 6380 so this could also be run along-side an existing redis intance on 6379 if needed.
The configuration for this slave is contained in redis.conf which is just:
# Relative to ./sentinel3/osx
include redis.conf

port 6381
dir ./server-6381/state
slaveof 127.0.0.1 6380
The include directive lets us easily inherit the default /redis.conf allowing us to only provide non-default configuration specific to this slave. In this case it will run on port 6381, persist any RDB snapshots in ./server-6381/state directory and run as a replicated slave to the master instance running on 127.0.0.1 6380:
The configuration for the Sentinel indicates it should run on port 26381 and monitor the master at 127.0.0.1 6380 that belongs to the mymaster group and requires a quorum of 2 sentinels to reach consensus before any action can be taken:
# Relative to ./sentinel3/osx

port 26381
dir ./server-6381/state
sentinel monitor mymaster 127.0.0.1 6380 2
This configuration assumes all redis instances are running locally on 127.0.0.1. If you're instead running it on a remote server that you want anyone in your network to be able to access, you'll need to either change the IP Address in the *.conf to use the servers Network IP or alternatively you can leave the defaults but you'll need to map any loopback IP's to its Network IP in the Redis Client library.
This can be configured in the C# ServiceStack.Redis RedisSentinel client using the IpAddressMap Dictionary.
E.g. if the remote servers Network IP is 10.0.0.9, it can be configured with:
var sentinel = new RedisSentinel(new[]{ "10.0.0.9:26380" }) {
    IpAddressMap = {
        {"127.0.0.1", "10.0.0.9"},
    }
};
container.Register<IRedisClientsManager>(c => sentinel.Start());
The IpAddressMap is used to transparently map any returned local 127.0.0.1 IP Address to the 10.0.0.9 Network IP that any other computer on the same network can connect to.
The RedisSentinel client also just needs to be configured with a single Sentinel IP which it uses to automatically resolve the IP Addresses of the remaining Sentinels.
With the efficiency and headroom provided from a single redis-server instance, we expect this minimal Sentinel configuration required to achieve high-availability will be the most popular configuration used for Sentinel, which this repository focuses on.
From the redis Sentinel docs this setup consists of 1x redis master and 2x redis slaves instances with a Redis Sentinel monitoring each redis instance:
            +----------+
            | M1:6380  |
            | S1:26380 |
            +----------+
                 |
 +----------+    |    +----------+
 | R2:6381  |----+----| R3:6382  |
 | S2:26381 |         | S3:26382 |
 +----------+         +----------+
 Configuration: quorum = 2
The above diagram also shows the ports for each of the master, slave and sentinel instances.
This setup enables a "highly-available" configuration which can survive a single redis-server or redis-sentinel instance or entire server failing.
If any of the slave servers fail it's business as usual with just one less replicated slave. This would still cause temporary disruption for any read-only clients that were connected to the failed slave. Redis clients following the recommended client strategy automatically recovers by asking one of the Sentinels for the next available address to connect to, resuming operations with one of the available instances.
It's more disruptive when the master server fails since that's where most of the clients are going to be connected to, who'll only be able to resume until the remaining 2 Sentinels both agree (quorum=2) the master is objectively down and begins the process of failing over promoting one of the replicated slaves to master. Since replication to slaves is asynchronous there's a small window for loss of writes to master that weren't replicated in time before it failed.
There's a greater potential for loss if there's instead a network split, cutting off the master server from the remaining sentinel servers, i.e:
         +----+
         | M1 |
         | S1 | <- C1 (writes will be lost)
         +----+
            |
            /
            /
+------+    |    +----+
| [M2] |----+----| R3 |
| S2   |         | S3 |
+------+         +----+
In this case the master continues to process redis commands but won't be able to successfully replicate them to any of its slaves. If the network split was long enough to cause the other 2 Sentinels to presume the master had failed and promoted one of the slaves to master, by the time the master rejoins the network it assumes the role as slave and ends up losing all the writes it processed before the network split.
This loss can be mitigated by configuring the master to stop accepting writes unless it has successfully replicated to a minimum number of slaves specified in the min-slaves-to-write and min-slaves-max-lag tolerance options. Consult the Redis Sentinel docs for more info.
Google Cloud - Click to Deploy Redis
The easiest Cloud Service we've found that can instantly setup a multi node Redis Sentinel Configuration as described above is using Google Cloud's click to deploy Redis feature available from the Google Cloud Console under Deploy & Manage:
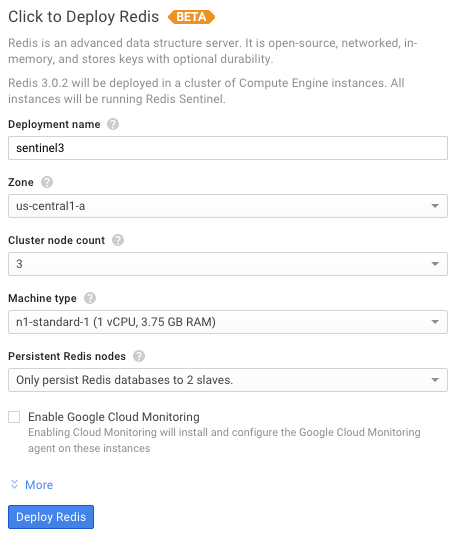
Clicking Deploy button will let you configure the type, size and location where you want to deploy the Redis VM's:
Clicking Deploy Redis with a 3 Cluster node count will deploy 3 Linux VM instances containing:
- A master (read/write) Redis instance (port 6379)
- Two replicated slaves (read-only) Redis instances with data persistence (port 6379)
- Redis Sentinel running in each instance (port 26379)
After it's finished deploying you'll see the instance names and External IP's for each of the VM instances:
It also includes a handy link to be able SSH directly into any of the instances from a browser. Whilst unnecessary since the deployed configuration is immediately ready for use, it still provides a convenient way to quickly explore the different configurations of each of the VM's.
After its deployed you can get to a summary of all running VM's under Compute > Compute Engine > VM instances which provides a real-time graph monitoring the CPU usage of all the VM's:
Clicking on any of the instances lets you drill-down to see more info like the Internal IP of the instance used in its internal network:
Another way to access this info is via the great command-line support available in Google Cloud SDK which after you've authenticated and set the project you want to target will let you see all running instances with:
gcloud compute instances list
Which returns the summary info of all running VM instances in that project, e.g:
Something to keep in mind are that the Redis Sentinels are configured to monitor and report the redis instances internal IP's. Whilst this is ideal when accessing the redis instances from within the same internal network (e.g. from other deployed VM's), it will be an issue if you're connecting to the External IP from an external network (e.g. from your developer workstation) as the IP's returned from the Sentinels are the Internal IP's.
One solution would be to configure a virtual network so the Internal Network IP's are routed to the Google Cloud VM's. A less invasive solution would be to instead have those Internal IP's mapped to their equivalent External IP's.
This is available in the C# ServiceStack.Redis Client by specifying an Internal -> External IP mapping when initializing a RedisSentinel:
var sentinel = new RedisSentinel(SentinelHosts, "master")
{
    IpAddressMap =
    {
        {"10.240.9.29", "104.197.142.253"},
        {"10.240.32.159", "104.197.132.102"},
        {"10.240.170.236", "104.197.118.169"},
    }
};

container.Register<IRedisClientsManager>(c => sentinel.Start());
Now when the Connection Manager asks the Sentinel for the IP of an available instance, the returned Internal IP gets transparently mapped to its equivalent External IP which the RedisClient can connect to.


