
- What does it do and what does it need to fulfill?
- Functionality of Project
- User Experience
- Technology Used
- Database
- Features
- Testing
- Deployment
- Credits
![]()
This Milestone project creation is the culmination of learning and study from all modules of the Full Stack Developer Course, culminating in the creation of this Full Stack Framework Django project. This Application will allow an admin to store and manipulate data records and also allow users to create, read, update, delete & purchase memberships for this newly create local barbell club called, PHP Barbell.

The application uses Django 3 to encourage rapid development, by following a model-template-view architecture pattern. The project uses Separation of Concern amongst the applications to utilise the Django Framework effectively.
Alongside using Django, sqlite was used in the Project's inception phase as a test database for local testing. Sqlite is self-contained highly reliable, SQL database engine that features all the normal relational database management. Once I was ready I switched to using PostGreSQL (aka Postgres), for my Development Database to ensure that any data entered was visible in my deployed application. Postgres is open source and boosts a fully technical and easy to use Object relational database management system.
Using Django and the above Database methods an administrator for the application (in this case the owner of PHP Barbell), has complete access to a completely custom styled Admin dashboard where they can Create, Read, Update and Delete records in the each proposing application model if appropriate. For example: The owner access the admin dashboard to update staff records, which is a totally separate and completely custom Django application made specifically for this purpose.
The project is version controlled via Git & Github and is deployed via Heroku. All environment variables & secret variables are stored in an env.py file which is then held in a git ignored file to ensure project integrity is held to a high secure present day and project requirements standard.
Please ensure when testing payments in this application to use the Stripe test card numbers available here. Throughout development of the application the card number used by myself and my Peers was:
- Card number: 4242424242424242 (16-digit Card number)
- CVV: Any 3 digit combination.
- Dates: Any future date.
Generic (Guest/Public) User:
- As a Generic User, I want to be able to view the site on any device I may have, (mobile/tablet/desktop).
- As a Generic User, I want to have the ability to register to the site.
- As a Generic User, I want to have the ability to research the business and anything associated with same through the application.
- As a Generic User, I want to have the ability to view the established Accessibility Statement & Privacy Policy if any.
- As a Generic User, I want to be able to view available Membership prices.
- As a Generic User, I want to be able to get in contact with the business owner through the website.
- As a Generic User, I want to have the ability to see the established social accounts coupled with the business, eg: Facebook, Instagram etc.
- As a Generic User, I want to have information available as to the directions of the business site.
Registers (Logged in) User:
- As a Registered User, I want to have the ability to Login to the site via my registered details.
- As a Registered User, I want to be able to view the Community Forum posts and interact and comment on same.
- As a Registered User, I want to have the ability to search through the Forum to find specific categorised Posts.
- As a Registered User, I want to be able to Create, Edit and Delete my own Forum Posts for discussion amongst the Community.
- As a Registered User, I want to have the ability to review membership options and but one.
- As a Registered User, I want to be able to view my Cart and any items I currently have awaiting payment in my Cart.
- As a Registered User, I want to be able to items currently added to my Cart.
- As a Registered User, I want to have the ability to Logout of the application.
Application Owner/Administrator User:
- As a Site Administrator, I want to be able to login to an administration panel.
- As a Site Administrator, I want to have the ability to update site content, such as Forum Posts, User details, Staff & Membership packages etc etc.
- As the Owner, I want to ensure any user navigating to my site has a positive User experience between content and responsive design to theming.
- As the Owner, I want to show any user navigating to my site the facilities, services & pricing available.
- As the Owner, I to showcase the new premises location on a map embedded into one of the public pages.
Developer:
- As a Developer, I want to demonstrate my growing abilities as a budding Full Stack Software developer during my time on the CI course.
- As a Developer, I want a project that I can proudly showcase to potential employers via my Github Repository.
- As a Developer, I want to create a project that is fully scalable and can be expanded upon as I continue to grow as a developer.
I rather enjoy learning new ways to style my projects and I feel more and more that Front End Development and Design is my calling in this profession. Earlier this year I saw an article on the rising trend of Neumorphism in the industry and I was hooked. I knew from then that I was going to try and utilise this methodology in my final project as it really brings an application to life.
It is a by-product of recent trendsetting Skeumorphism which takes a material polish approach to creating good user experience. For example, using symbolism to portray an act or action, eg: the recycle bin icon or making a particular element's background have a textile styling that would be familiar to a User. But Neumorphism uses imaginary light sources and their respective highlights & shadowing from same to make the elements on show look as if they are still part of the background from which they are almost protruding or sinking into. It's nickname in the industry today is Soft UI.
For this project, I imagined a light source installed in the top left corner of the webpage. This allowed me to visualise where the light would hit on these elements causing highlights and shadows. Then using the css property of box-shadow to impact the element based on the above to create the shadows & highlights necessary. This css property uses horizontal & vertical offsetting along with blur and spread and finally the color of the shadow itself to produce the desired effect.
By using rounded edges on the components, eg: cards, and removing conventional borders entirely it allowed for some very creative visuals, almost as if it were one seamless plastic moulding being rendered for the user.
As an example of putting all of the above to use the following is the Login Form card with Neumorphism styles in place:

The project has a main font of Roboto Condensed which is used for primary texts and headers, and a secondary font of Lato, both of which greatly complement each other throughout the site.
“Sans-Serif” is used as the default backup font in cases where these fonts have difficulty loading. "Roboto Condensed" consists of a dual nature, sporting a mechanical skeleton and character form is largely geometric, and at the same time featuring friendly and open curves. This allows for a more natural reading Rhythm more commonly found with humanist and serif fonts. This made it a clear choice in terms of primary font as the website ideology is that of natural form and geometric positioning.
"Lato" is the secondary font used to compliment the primary font. Again, this typeface is of the serif family, contains classical proportions (particularly in upper case), but holds a strong structure providing stability and seriousness. It reads well alongside "Roboto Condensed" and ultimately was a great fit with the overall theme of the application.
This project was actually inspired by a friend of mine and his new venture as a local gym, that gym is called Precision, Health & Performance and they specialise in doing exactly what the name says. There is already a commercial website in place and the color scheme for it is monotone in nature with color only added via images noted throughout the site. The guys at PHP were kind enough and offered me their commercially built website as my project medium. I noticed that although it was incredibly intricate and quite simple and pleasing on the eye it needed something to just separate the monotone coloring. The theme of the site was light to begin with. It stayed this particular theme until very recently. As you can see from the the next few images, it had a soft UI neumorphism incorporated trend and it's color scheme incorporated these colors (or shade variants of same):
Original Light Theme of Application Example:
#efeeee- Primary color#323232- Secondary color#432344- Tertiary color#ffc03d- Supplementary color#ff2525- Supplementary color 2
After attempting to implement a darkmode switch for this project, I had put in some amount of time creating the dark theme in a differing CSS file. The darkmode plan didn't work out, and is parked as a future feature for now, but after the darkmode theme got such a positive response from my Peers in Slack and from my test audience the color scheme was switched to that permanently.
#323232- Primary color#432344- Secondary color#ffc03d- Tertiary color#efeeee- Supplementary color#ec9e9e- Supplementary color 2
The primary color of
#323232 was used to denote key componentry used in the application such as the Navbar & Footer. It's almost charcoal grey color emulates the color of the knurling found in many modern barbells and it ultimately was only a hue percentage off the logo dominate color that it became the obvious choice. It is also the default background for the entire application. It allowed for a greater Neumorphism effect to be implemented over the light theme and ultimately really showed off this Modern design Trend and the presence of the Brand itself.
The secondary color of
#432344 is used throughout the site as Primary call to actions, such as the Login/Register buttons, Create Posts/Comment buttons etc and change hue and directional gradient when hovered & pressed. It is the introduction of some monochromatic coloring on elements in the website as multiple hues of lightening or darkening tints are used to create the animations and the gradients.
The Tertiary color of
#ffc03d and again monochromatic techniques are used for animating the navigational elements in the navbar & footer partial components on hover, and also providing a bright contrast on some of the custom horizontal block dividers. It is used to show the user via highlight the current page being viewed in the navbar. And provides the background hover effect to denote the clickable action on a Forum Post or Membership Plan.
The first Supplementary color of
#efeeee is used as the default font color and is easy on the eye for the user against the background Primary color above.
The second Supplementary color of
#ec9e9e is used as a visual indicator for the user detailing warnings/error messages such as the Stripe errors, or permanent Call to actions such as deleting a Post or Clearing the Cart. This hue of the color red was used to improve the contrast ratio against the dark theme of the site allowing greater User Experience to take place.
The logo was provided by Dean Roche, the owner of PHP as a complimentary gesture to help and aid me in the development of this site and the content within. Without this asset, I would of spent a lengthy period of time creating a logo to my liking. the logo itself was not only used as the Branding image in the Navbar but also used as a Horizontal Visual Page Break and is rendered on every template to ensure consistency throughout the application.
![]()
The applications geometrical aspects feature aesthetically modern components such as rounded edges and Neumorphism styling. Plenty of whitespace was used to allow the user to flick to important context and features much easier with little strain provoked in their eyes.
A rule of symmetrical grouping was used horizontally and the rule of thirds was implemented vertically on most pages where content would allow. For example, most pages feature a descriptive context for the user, a branding logo as separation but also to invoke that brand in the user's mind-eye when remembering from reference and the actual content necessary for that page.
Form inputs were kept label-less to keep with the Neumorphism trend and all form inputs use a placeholder as form label to still direct the user as to the information that the field requires and maintaining the centrally aligned component Geometry found throughout the application.
Wireframing for this project began with Pen and paper as all my projects tend to start, but ultimately Wireframes were created using Balsamiq. Each page or view of the application was rendered as a wireframe in both Small and Medium-Large viewports to show the difference between the aesthetics and showing how the elements per page would react to differing viewport sizes. Each element planned out in this stage has made it into the physical build of the application with not much deviation occurring from the original wireframe plans.
-
Base Template:
The base.html parent template contained all the default components for each child template to inherit from. All links were provided to third party icon providers, frameworks, stylesheets and script links. The navbar & footer partial components were created in their own html files and inserted into the base.html via the Jinja
includestatement to ensure separation of concern could occur for ease of scalability of the application elements.The navbar partial template component contains all primary relevant navigation throughout the site. The navbar uses Bootstrap and the jQuery & Popper.js library to ensure it stays respsonsive and collapses into a toggler on medium screen sizes or less thus ensuring Mobile first design. The navigational items change depending on whether a user is logged in or not to ensure that the flow of the application is upheld. Each
nav-itemof the navbar highlights when the user navigates to a specific page, this is actually achieved through the view method of each template by passing theactiveclass into the context of the render via an expression tag in the navbar, see example code;{{ membership_page }}passed into the class attribute actually renders asactivewhen the view is in focus to the user:<li class="nav-item {{ membership_page }}"> <a class="nav-link" aria-label="Membership" href="{% url 'membership' %}">Membership</a> </li>
The footer partial template component contains supplementary information pertaining to the website such as Privacy policy, Accessibility & Socials, and some information about myself as the Developer and it's intended use and purpose for
educational purposes.Where appropriate,
blockstatements were used for the Page titles, the main inheritance portion in the body and finally for any bespoke scripts that needed to be loaded on specific pages.{% block content %} {& endblock %}Base Template Wireframes


-
Home (Index) Page:
The home (Index) page is our primary landing page and has two call to actions based on whether a User is logged in or not. If they are not logged in the two call to actions are to Register/Login. This is essential to our users as we want to ensure high numbers of first time visitors register for the site and that all recurring registered users have multiple places to login from.
If the user is already logged in the content of the call to action cards change to reflect the logged in status. This time around notifying the user of the Forum and Membership pages. This change was implemented after the wireframes were created due to a defensive design issue where it was unnecessary to show a user registration/login if they already have logged in, and as such does not appear in the wireframes.
The home page also contains the
_alerts.htmlpartial to deliver success messaging to the User on Registration, Login & Logout aswell as any error messages to be displayed to the user when attempting to access restricted content as an example.The home page contains a custom javascript element in the form of the Hero image typewriter animation. This custom js function was separated into it's own javascript file and then it was injected via the jinja statement block tags added in the
base.htmltemplate to ensure that this file only runs when the index template is rendered.Home (Index) Template Wireframes


-
About Page:
The About page features information regarding the Barbell club. The coaches section is rendered directly from the coaches app and model. The owner/administrator of the website has the ability to add/edit or remove coach/staff information, which will appear in this section for users to see.
This page also hosts a carousel to showcase the Facility and the Facility being used by members of the Gym. This is a staple integration of marketing techniques as it shows the facility in use. The Carousel code is referenced from the Bootstrap Framework and using custom CSS ensures that the images held within and displayed in the component maintain there aspect ratio proportionally throughout the applications responsive behaviour from mobile devices and up. A snippet of the css is shown here:
.carousel img {
    object-fit: contain;
    margin: 1rem 0;
    height: 400px;
    min-width: 100%;
    max-width: none;
}
As well as the carousel to promote the Facility, I wanted to implement an interactive map to display to the user how easy it was to find the premises and how central it was to the City. Using Leaflet.js it was quite easy to embed a map into the
about.htmltemplate, which was suggested to me by Tim Nelson, who during his time as Interactive Frontend Lead in Slack had done an extensive set of documentation on using the JavaScript Library as well as providing an example project to reference again. The documentation and example site can be found Here. Using Leaflet.js over Google Maps considerably reduced my work time in implementing the function, including but not restricted to not having to set an API key to set up the map itself and using a bespoke map tile provider in the form of ArcGIS. The map is responsive thanks to Bootstrap's utilisation of the Grid and a custom map marker was added in keeping with the Brand of the application and business. This custom js code was separated into it's own javascript file ensuring separation of concern and then it was injected via the jinja statement block tags added in thebase.htmltemplate to ensure that this file only runs when the about template is rendered.About Template Wireframes


-
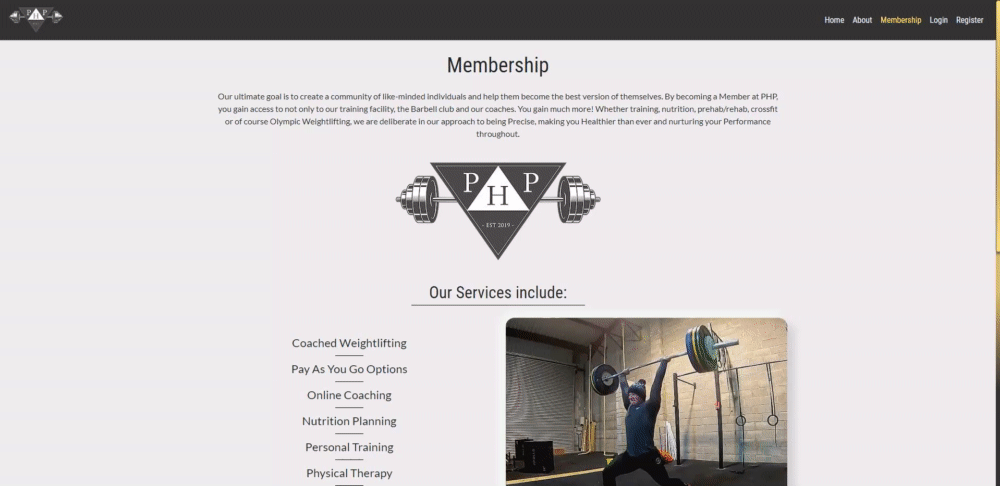
Membership Template:
This template is comprised of some context pertaining to the services offered with membership options, branding throughout and an image to break up the flow of the page a bit. Each payment plan detailed on this template can be controlled by the Admin in the Admin panel of the site, but for examples sake of the project submission, 3 Membership Plans have been created and displayed.
These plans are returned to the template by querying the database table "Membership" and grabbing all the available objects within. A filter was placed on this aswell to ensure the cheapest options were placed on the left of the screen, or on top for mobile and then in ascending order by price.
memberships = Membership.objects.all().order_by('price')
The wireframe initially had a button to add a plan to the Cart but during application development I utilised the anchor element & empty span method combo as detailed previously to add a cart to the user. Users can only add a plan to a cart if they are logged in, or if they are logged & their cart is empty. This idea behind this is that as these plans are monthly subscription based it was to ensure a user would never buy multiple plans for the forthcoming 30-day period. A user can re-buy a Plan at their leisure right now in separate transactions, with a future implementation being they can only buy one plan in any 30-day period.
When a plan is in the cart, the anchor & empty span link is removed via a jinja template expression checking for the total price of the cart is greater than 0, as well as swapping out the helper text located at the bottom of each membership plan card. This acts as a small defensive element so a user cannot add more than one plan to the cart at any one time. There are also defensive measures added to the
add_to_cartfunction as part of the cart app that we will take about later. If a user attempts to add a plan to a cart while the cart already has a plan added or if the user is not logged in, an error message to suit each action is thrown. Otherwise, a success message is thrown to the user detailing successful addition to cart.Membership Template Wireframes


-
Register Template:
The Registration template contains some directional text, the brand image to break up the page a bit and the Registration Form. As with the Login form below, the Registration form is created as a class and is a built-in form from Django Contrib Auth ~ UserCreationForm and was created using reference from the Django documentation linked.
By default the
UserCreationFormhas 3 fields, username, password1 and password2. As planned for this project I also added fields for First Name, Last Name and Email to be captured and added to the User table in the database. All fields are required and a user cannot register by leaving any of the fields blank. Labels are excluded from the Registration form in keeping with the clean aesthetic of the application and in keeping with common design trends of late. Placeholders are used in-place of labels and this theme is consistent throughout all form fields rendered in the application.The original helper text that accompanies the
UserCreationFormhas been excluded also as it added an unnecessary dis-pleasing aesthetic to the form that personal preference from myself did not like, I also asked several of my peers for their direction with this design approach and it was positively received. Removing the helper text proved problematic at first but using this post from StackOverflow gave me the answer needed. As the original fields of theUserCreationFormhadusernameas the default autofocus field, I also used the same dunder init method to set the default autofocus to the First Name field."""Disable help text of User Creation Form & set default autofocus to first_name.""" def __init__(self, *args, **kwargs): super().__init__(*args, **kwargs) for fieldname in ['username', 'password1', 'password2']: self.fields[fieldname].help_text = None self.fields['first_name'].widget.attrs['autofocus'] = True self.fields['username'].widget.attrs['autofocus'] = False
During Peer-code-review of my project it was pointed out that a User could register with a Password of 1 character. This was an unintended consequence of extending the UserCreationForm class and thanks to Peer and Fellow student, Johan de Leeuw for pointing out that my view and method of checking for defensive supports in the view were flawed. Using the
.is_valid()method to ensure the UserCreationForm's built-in validators worked did the trick and ultimately allowed me to compress and refactor my code easily. I used the Django docs for Form & field validation as provided by Johan to help me implement the method.Additional Defensive design is implemented in ensuring that emails used are unique by using the
clean_<fieldname>()method directly in the Form class. Coupled with the below jinja expression statement to check if a user is already logged in or not. If they are, we produce the_error.htmlpartial indicating that they have attempted to navigate to this template in error and are potentially already logged in.{% if user.is_authenticated %} {% include 'partials/_error.html' %} {% else %} <!-- Render normal Login template html --> {% endif %}Lastly, to ensure users are met with the appropriate flow of the application, if they have already registered there is a link directing them to the
login.htmltemplate which is available just under the "Register" button on the form.Registration Template Wireframes


-
Login Template:
The Login Template is simple, some text, the brand image to break up the page a bit and the login form. The login form itself is generated via a Django Form class. It takes two fields, Username & Password. It checks the username submitted versus the list of Registered users to the site which is held via the PostGres Database, and the password for that user. If both are met entry to the application is permitted. If not, an error alert is displayed detailing that login details were submitted incorrect, and that is produced by passing a message to be stored in the Django Messages Framework and outputting same to the included partial
_alerts.htmlon thelogin.htmltemplate.As with the registration page, defensive design elements are achieved in the login template itself using Jinja expression syntax to produce the
_error.htmlpartial template instead of the defaultlogin.htmltemplate if the expression returnsTruemeaning the User is already logged into the application. This step is crucial in maintaining that a user cannot attempt to login multiple times resulting in poor User Experience of the site.Lastly, in an attempt to direct users to the appropriate section of the application, included under the form "Submit" button is a link to the Registration page allowing users who have yet to register for the application navigate to same and register.
Login Template Wireframes


-
Accessibility Template:
The Accessibility template is a completely static page. It encompasses the use of the card component from the Bootstrap framework as it is inherent throughout the site. It is a secondary accompanying page to the application that professional brands and established businesses will have included. The content within was obtained from Dean Roche, the owner of Precision Health Performance as an added asset when approached on the subject of what I could use for my project.
Accessibility Template Wireframes


-
Privacy Policy Template:
As with The Accessibility template, the Privacy Policy is a completely static page. It encompasses the use of the card component from the Bootstrap framework as it is inherent throughout the site. It is a secondary accompanying page to the application that professional brands and established businesses will have included. The content within was obtained from Dean Roche, the owner of Precision Health Performance as an added asset when approached on the subject of what I could use for my project.
Privacy Policy Template Wireframes


-
Cart Template:
The cart template is only accessible to those who have logged in, and shows a user if the cart has something to checkout or not. If it is empty and the user navigates to this template, some helpful short text is displayed to the user detailing same. If the cart has had a plan added to it, then the Cart will display that plan and also a small asterisk symbol will appear in the Navbar alongside the
CartNav-item. For as long as the user is currently logged in, without checking out or clearing the basket, this asterisk symbol will persist, highlighted in yellow across all pages.If the user wants to checkout, then clicking on the checkout button displayed in the cart card will navigate the user onto same, however, as with the edit-post.html template, a two factor visual cue delete is in play. When a user clicks on
Click here to Clear Cart, a dialog box slides open with some warning text as to the permanency of this action. If the user wants to continue, a final click on theClearbutton will clear the cart and navigate the user back to the membership template. As the cart is now clear, the asterisk also disappears from view denoting to the user that their cart is empty.Cart Template Wireframes


-
Checkout Template:
The checkout template is only accessible to a logged in user, and if a Cart has had an item added to it and then if the user has selected to Checkout that Cart. It will detail the currently selected plan for checkout as a secondary visual inspection for the user to ensure they are getting exactly what they want. And it will also have the Payment form. The Payment details form rendered on the checkout.html template is comprised of two seperate Django forms. One for capturing the Payment details pertaining to the card being used and the other to capture the necessary information for the Order.
There are multiple defensive elements at play for this particular form, from ensuring that the user cannot leave any fields blank to ensuring the correct length of digits is entered for the Credit Card No. & CVV number.
Once a user clicks to buy, and if successful payment is made, the user is redirected back to the Memberships page displaying a success message, and the cart is cleared. If there are any errors detected on submission, the Stripe Error messages will appear detailing the found error, or the normal HTML field warnings will show per field if a field is left blank etc.
Checkout Template Wireframes


-
Forum Template:
Being the forefront page for the Forum itself, the Forum template utilises multiple call to actions. User can only navigate and use any of the functionality of the Forum after they Login. If an attempt to navigate to the Forum is made without Logging in first, the check of
user.is_authenticatedreturns False and renders the_error.htmlpartial instead, otherwise the normal flow of the page is rendered and exposes the functionality within to the logged in User. The primary cta for this page is to Navigate a user to create a Post.Included in this template is also a Fitlering system. This is a single field form with a select element containing all the possible categories a Post could be. A user cannot submit a filter request without ensuring a category is selected beforehand, and if an attempt to do so is made an error alert is displayed via the
_alerts.htmlpartial template embedded in the template. The categories in the select field are rendered via a jinja expressionforloop, which has been passed to the template in the context of the form view function. We check for both key and value of the key-value pair of the categories and render the{{ value }}of the category to the user in the template, while the{{ key }}is the check in our function that we pass into our querset when rendering thefiltered-posts.htmltemplate.{% for key,value in categories %} <option value="{{ key }}">{{ value }}</option> {% endfor %}The physical user posts are rendered on the page in Ascending Date Order, meaning that the most recent post will be rendered first and the oldest post will be last. If there are no posts to display, a small helper text is displayed to the user detailing same. Each Post is rendered with an anchor element and blank span overlaid over the Post Card, and when clicked will trigger the function view
view_postand navigate the user to view that particular post in it's entirety and any comments it may have etc.As this page is the repository for all Posts made, the page is capped at '6' posts before switching to a Paginated view to ensure that the
never-endingscrolling scenario is not a feature of the design. Pagination is implemented and custom styled inline with the Application's theme and branding prevalent throughout, and using Pagination keeps User Experience at a maximum.Forum Template Wireframes


-
Create Post Template:
Navigation to the Create Post Template is locked behind an initial check to ensure that the user is first logged in. If not logged in, as with other similar pages, the
_error.htmlpartial will display instead of the normal page flow for when a user is logged in. The form itself is generated as a Django Form class and comprises of several input fields ofPost title,Post DetailsandPost Categoryfor the user to detail and two that populate on Post Submission ofDate PostedandPost Originator.As detailed in the Database Schema, the
Date Postedis autopopulated to the current date/time of the post submission and thePost Originatoris a foreign key into the Users table to get the current Logged in User. ThePost Categoryfield choices are imported from thecategoriesdict available in the models.py file of the app.Each visible form field to the user has the required attribute assigned to them in the forms.py class Form
CreatePost, including the Select Dropdown field ofPost Categoryusing the following dunder init method, which was needed as the Select widget attributes can only be set this way due to the nature of the choices import:def __init__(self, *args, **kwargs): super().__init__(*args, **kwargs) self.fields['category'].widget.attrs['class'] = 'form-control' self.fields['category'].label = '' self.fields['category'].required = True
Upon successful creation of a post, the user is navigated back to the
forum.htmltemplate and a success message is rendered detailing the successful action.Create Post Template Wireframes


-
Filtered Posts Template:
This template returns a filtered queryset of Posts dependent on the category selected by the user on the
forum.htmltemplate. If no posts are available for that category, a small amount of text is detailed to the user to show same, otherwise the posts for the queryset are rendered with pagination in tow to ensure that similar design standards are concurrent throughout the application and saving on vital visual real estate of the page.As with the
forum.htmlclicking on any of the posts returned in the queryset rendered will navigate the user to theview-post.htmltemplate to view, comment, and access the edit/delete settings for the post if they own same.Filtered Posts Template Wireframes


-
View Post Template:
Navigating to the
view-post.htmltemplate can be achieved once a user is logged into the system and has clicked on any post in theforum.htmlorfilter-posts.htmltemplates. As with all other templates, we still check to ensure that a user is logged in before rendering the normal flow of the view, if a user is not logged in and attempts to gain access to this page, the_error.htmltemplate partial is rendered instead.If the user who is currently logged in clicks to view a post that they are the originator for, there is extra functionality added to the
view-post.htmltemplate. There is some additional helper text along with a Font Awesome Icon of a Cog-wheel to denote how to access the post for editing/deletion.If the user who is currently logged does not own the post they are currently viewing then the Post renders without the originator functionality. The template itself plays host to some common elements shared between the types of users. For one, the
post originatoris displayed in the page-title at the top of the page and the entire post is displayed in a card, with thetitle,post details,categoryandpost date.Comments are displayed under the brand image, and is paginated to 8 comments per page. Each comment is separated into their own card and is styled with neumorphism style prevalent throughout the application. This is against what was planned in the wireframes but after seeing both stand-points I settled on this layout as it kept the content to the top portion of the view and the call-to-action add comment section to the bottom portion.
The comment field is a single field for the user to add their comment details for the post and the model comprises a total of 4 fields, 3 of which are auto-populated on submission of a comment,
date_commentedwhich is set to the current datetime, a foreign key to the users table for thecommenterfield and then another foreign key into the Post table linking the comments to the current respectivepost. When a comment is added to the Post it is automatically added to the top of the list of comments, with the user redirected back to the sameview-post.htmltemplate and a success message relayed to the user detailing the comment being added to the Post.View Post Template Wireframes


-
Edit Post Template:
Access and navigation to this template is locked behind several defensive design elements. Firstly in the template itself we are checking to ensure that the user is logged in before attempting to navigate to this template, as before, if not logged in the
_error.htmlpartial template is rendered in place of the normal flow of the template.Then as previously mentioned on the
view-post.htmltemplate the iconcogto access theedit-post.htmltemplate is also hidden unless the currently logged in user is equal to thepost originator. And even then any attempt to navigate to theedit-post.htmltemplate via a URL browser injections is met with a check on whether or not the currently logged in user is the Post originator, if not, then the user is redirected to theindex.htmltemplate with an error message displayed to the user that they are not the owner of that post.When a user is the Post originator, the
edit-form.htmltemplate renders with theCreatePostform and any values that it previously had originally via passing theinstance=postkeyword argument, in the form fields for editing. The only fields that can be edited are the same three fields visible to the user when creating a Post,title,post_textandcategory. When clicking Update the record will save the details to the database and redirect the user back to theview-post.htmltemplate with a success message displaying to the user of the update.The
edit-post.htmltemplate also contains the only user delete function for a particular post. As a permanent irreversible action this action is behind a two-check and dual-confirmation in the form of a user needs to click onDelete Postlink first which expands out a warning dialog under theedit-postform and then click a second highly contrasted in warning color of the supplementary color #2#ec9e9eto delete the post. Once the post is deleted the user is redirected back to theforum.htmltemplate with a success message as to the action just performed. Again as with each element of the Forum, there is a check in place to ensure that the currently logged in user is thepost.originator, if not or a user somehow manages to not be logged in, they are redirected back to theindex.htmltemplate with an error message returned and displayed via_alerts.htmlpartial.Edit Post Template Wireframes


-
Dashboard Template:
This template is locked behind login as it directly related to the Logged in User Experience and functionally acts much in the same way and structure of the Filter Posts template mentioned above, but instead of having a categories returned, we just return the User's individually owned Posts for easy access to same. Over time, this template will grow to include many other features, some of which were attempted during the development of this project but instead made it into the Future Features portion.
To return the User's Own Posts we query the database
Posttable to return all posts, then we add a filter where the User's username matches the originator. This function view is part of theaccountsapp as I see this as an integral piece of functionality for any application that promotes User interaction."""Function to direct User to bespoke dashboard containing details about Posts they own.""" user = request.user forum_posts = Post.objects.order_by('-date_posted') my_posts = forum_posts.filter(originator__exact=user)
In keeping with good User Experience and Interaction, this template also boasts pagination when a User's number of Post's exceeds 6, this also assists in saving on Vital real-estate on mobile devices.
Dashboard Template Wireframes


-
404 Page Template:
A simple template that exists in the root
templatesfolder and is the automatic return to a User when they attempt to navigate to a Page that does not exist. Contains some context information as to why this page is returning for the User and some directional prompts on how to navigate the site from their.404 Page Template Wireframes


-
500 Page Template:
A simple template that exists in the root
templatesfolder and is the automatic return to a User when the Server for the application goes down. Contains some context information as to why this page is returning for the User and some directional prompts on how to navigate the site from their.500 Page Template Wireframes


- HTML, CSS, JS & Python ~ core languages used to create this multi-page CRUD application.
- Django ~ Used as the architectural engine following the model-template-view approach.
- Bootstrap Framework ~ Used as the core structuring layout for the application, ensuring mobile-first design and screen size fluidity.
- Bootstrap's Imported Javascript & JQuery ~ For the Modal and Responsive Navbar expand & collapse functionality.
- PyCharm IDE ~ PyCharm was used as the preferred IDE for this project.
- PyCharm built-in Terminal ~ Used to commit to local repository and further push to Github Repo ensuring adequate version controlling throughout the life-cycle of the project build.
- Git ~ Installed on local device and integrated to PyCharm as a Plugin to enable version controlling.
- Github ~ Used to host the repository of all previous versions of the build and linked to Heroku to push the latest changes to the deployed build version held there.
- Heroku ~ A cloud platform as a service enabling deployment for this CRUD application.
- PostgreSQL ~ A free and open-source relational database management system emphasizing extensibility and technical standards compliance. Designed to handle high range of workloads including Web services with many concurrent users.
- WhiteNoise ~ Used to easily allow the Deployed project to serve it's own static files.
- ColorSpace ~ Used to find complimentary color schemes used throughout the application.
- Eye Dropper (Color Picker) ~ Open Source Google Chrome Extension used to obtain hexadecimal/rgba/hsl values of colours. Built by Kepi (Kepi's Github)
- Google Chrome DevTools ~ Used to test the application's functionality, the responsiveness of same, and the CSS visualisation, as well as assisting in such tasks as figuring out the correct style properties to override Bootstraps user agent styling.
- Balsamiq ~ Used for the creation of my pre-build wireframes showing the main elements and differences in size of same through small to large screen sizes.
- Favicon Generator ~ Used to create favicon from custom Logo I created for the project.
- W3C HTML Validator & W3C CSS Validator & JSHint ~ Used to check the validity and efficiency of my code.
- Django Extensions Plugin ~ For validating my templates for any jinja rendering errors.
- Autoprefixer CSS Online ~ Used to check for possible webkits required in the applications stylesheet ensuring Cross-browser support.
- PEP 8 Online Validator ~ to check my python code to be consistent with PEP8 requirements.
- Font Awesome Icons ~ For social icons used in Footer and Iconography present throughout site.
- PineTools ~ Used to round corners of images used in Carousel.
- Table To Markdown ~ Used to convert Excel spreadsheet table to markdown.
The database used for this Project was Postgres, as an Installed add-on to the deployed Heroku Application. Sqlite3 was used for a little while in the beginning to test the User Authentication, Registration & Login, and for testing the creation of Posts for the Forum. Mid-development I moved to local & deployed testing so Postgres was used from that point on.
When each app and its models were created and implemented, python manage.py makemigrations was run in the terminal to create the initial model package and python manage.py migrate was then used to apply the model to the database and create the table.
Where possible, first-time-right methodology was approached when creating the models to avoid to many alterations to the models and the database table through multiple makemigrations and migrate commands.
In error during development coming close to the end of the build, I incorrectly deleted a migrations file from the contact app's migrations folder. This ultimately led to my database being corrupt, causing an irreversible error to be displayed whenever attempts to migrate new changes to the database were made. With the help of Michael_ci, Code Institute Tutor, I was guided towards resetting my Database in the Heroku add-on settings. This was a harsh lesson in law of unintended consequences, one I'm sure never to make again.
The database schema is comprised of 8 current tables, with the 9th proposed table of darkmode being dropped to save on time coming towards the Project deadline. This table will be re-added as a Future Feature once my Assessment grade comes back.
The tables relationships breakdown is as follow:
- One user can have many:
- Posts
- Post Comments
- Contact Submissions
- Orders
- One Post can have many:
- Post Comments
- One Membership can have many:
- Order Line Items
- One Order can have one:
- Order Line Item
- Staff Member tables has no related tables.
- Darkmode was stripped from this build for Future Feature.
As is detailed in the database schema diagram, the User table has the most related interaction. A user can be a Post originator, Post Comment commenter, Order user and Contact user. The contact form can be filled out by both logged users and public users meaning that the user field in this table can be left unassigned or Null.
The Post Comment table has two foreign key fields linking it to the Comment and a User. This ensure that the comments for a particular post can be displayed to the user or queried via related search methods to return the Post and Users for which they belong to. This is what most online forums do at a much higher intricate level for which I took inspiration from in building my Forum app.
The Order Line Item table works in much the same way as the Post Comment table and is linked to both the Membership table and Order table via foreign keys to display different levels to one order in the admin dashboard to the Administrator of the site.
Several of the tables have an automatically populated datetime field on creation of the object. For example, the Post table has a date_posted field which is autopopulated to now on creation of a Post. This is controlled in the model Post itself meaning it doesn't have to be handled in the function view. This process was used for any date that needed to be populated on creation of the object to its respective table.
date_posted = models.DateTimeField(default=timezone.now)All tables were created with Django's innate ability to auto-assign a Primary Key (ID) once the migrations were made to the database and no field in the models were identified as same. This alleviated some workload from me and meant that the Primary key per table was identified via id.
The Staff Member table is unrelated to any other existing table as it is a standalone interface for the administrator of the site to create, read, update or delete any of their staff whenever they want. These objects are then displayed via the About page to the public to see who is employed by the brand at any given time.
The Memberships table is the primary interface for a user to make a transaction for. The administrator of the site has the ability to again alter, add, read or delete objects for this table to be displayed to the users. For testing purposes and for assessment, there are currently 3 Memberships on display in the Membership page.

This project uses Django 3 in conjunction with Bootstrap 4 to structure and display elements on templates/views to the user. As Django 3 was the most up to date version of the templating framework, it allowed me to broaden my horizons and expand on the learning material of the course. Streamlining such processes as setting up urlpatterns. Python 3.8 was also used as the base Python language and as the Project's interpreter in my IDE.
The project is fully responsive and renders as expected on all modern and up to date browser as you will see in the Testing section below.
HTML, CSS and JS were used to implement the Frontend of the project and Django and Postgres was used to create and control the Backend. Stripe and Stripe JS V2 was used to control the credit card payments and Stripe library errors.
The project boasts several key features:
- User Authorisation, Authentication and Logout Features
- CRUD Functionality for Authenticated Users in the Forum and for the Admin of the Site itself with all available tables.
- Flickr is used to host coach images and then passed into urlfield in model to render it to the template img src attribute for the admin of the website to populate. This solution was to counteract the heavy duty set-up and implementation of Amazon Aws S3 Bucket to host any images uploaded to the site by the admin.
- Stripe Integration to allow for e-commerce functionality.
- A modern and currently trending Design aspect via Neumorphism.
- Fully integrated Navigation dynamically mapped per User type, Public/Authenticated.
- Pagination is integrated for column tiered data to save on vital visual real estate on those pages, for example the
Forumpage andView-Postpage in the comments section. - A User Filter function was integrated into the
Forumpage to allow users to navigate to and filter posts by Category type. - Two step visual confirmation on permanent actions, such as Deleting a Post or Clearing a cart.
- An evolve over time, ever growing functional User Dashboard to make it easy for Users to see Posts they've created and access same.
- A contact form that can be utilised by Public/Authenticated users, which sends an email to the Administrator of the application, notifying them of a new Contact form submission. This is currently wired to come to myself as the developer during Assessment but a copy of a previously submitted contact notification email:

Future Features as of right now are:
- Password Reset for Users.
- Edit/Delete Functionality for Post Comments.
- Show number of comments per Post in Forum page.
- Show current Membership Plan bought in User Dashboard and display countdown of when renewal of same is needed.
- Darkmode Switch coupled to User Account, to give users the option to select there preferred theme between Light/Dark, or future themes that may present themselves.
- User Account Update/Delete functionality.
Defensive design for this application was implemented where possible via function views, form field types, model fields and even in the templates themselves. Throughout the development of the project, all aspects of developed and present Defensive Design elements were tested thoroughly both through local preview and deployed Live Application.
-
On registration & login functions, several defensive elements are at play. Between checking the unique fields are in fact unique, to testing if the user is logged in already when attempting to get to both of these views via a browser url injection. Error messaging and the use of the
_alerts.htmlpartials component work in conjunction with each other to detail to the user the type of error they have.For example, if a user is already logged in, and attempts to access the login page via
https://php-barbell.herokuapp.com/accounts/loginthey are met with a custom partial_error.htmltemplate and an error message within detailing that they are already logged in and to use the navigation elements in the navbar to return to the normal flow of the site. -
A Public user can only access the Index, About, Membership, Login, Registration and additional Footer pages such as Accessibility and Privacy as well as Contact pages. On top of that, the Membership page contains plans that can be added to a cart by a User. In the interest of keeping purchases to only those user who are Authenticated, when a Public user click to add a Plan to a cart they are met with an error detailing they much register & login to perform that action.
The same ideology exists for if users attempt to reach a page locked behind Authentication via a browser url forced injection. As an example, if a Public User attempted to navigate to the Forum page, the template itself will render the
_error.htmltemplate partial in place of the normal flow of the page via a jinja statement checking ifrequest.user.is_authenticated<-- if this returns false, meaning the user is not authenticated, then the error partial is rendered protecting the proposed available content if the user was authenticated.If any user attempts to reach a page that doesn't exist via a browser url or any other means they may have, the application will throw a custom
404.htmltemplate detailing same and how to navigate back to the normal flow of the application. -
All form fields existing throughout the site are built with specific field types befitting the data warranted for collection, and even simple validation like min/max lengths or even if the field should be required to be filled or not. And any forms where necessary include Cross-site forgery tokens to safeguard against Cross site forgery attacks.
Testing was done manually as was the case with all my projects throughout my time on the course. Testing was a constant affair during development and was tested on multiple devices at a time from a Huawei P20 Pro Smartphone to my PC as well as a Samsung Tab 2 Tablet. This ensured that any prevalent bugs at time of development were dealt with in a swift and timely manner and not on an ad-hoc basis at the end of the Development of the Application.
The actual file code validation was done via automatic Validators where possible for example, W3C CSS Validation Service & JSHint etc. It became apparent though that due to Django's template structure passing the templates themselves into a HTML validator was proving difficult as Jinja expressions and variable injection into the template would return as an error in the Validator. I set out to see if there was any way to validate the project's templates in alternative fashion. Luckily, I stumbled across this collection of custom Django Extensions where by I could pip install it to the project's dependencies and add it to the INSTALLED_APPS to enable it for use within the project. Running the python manage.py validate_templates command in the terminal allowed me to check my templates for rendering errors of which there were none. Using this coupled with the HTML Validator allowed me to fully check my templates for any errors, if any existed at time of inspection. Luckily, PyCharm's interpreter will throw an error for most HTML errors too. Documentation available here for this plugin.

All modern browsers were used to test the responsivity and frontend functionality of the site, as well as the CSS for the application across same. These browsers included Google Chrome, Opera, Microsoft Edge and on Safari via iPad Tablet courtesy of fellow student and Peer Jamie Boyd.
At the end of the development of the project an Excel spreadsheet was used to track the functionality of each page and assign a pass/fail to same, if any to show the steps and necessary approaches made for manual testing of the Application. This Spreadsheet was then passed into converter to render out the Markdown version of the table for me to display here.
Manual Testing Log:
| Functionality | Page | User Type | Browser | Pass/Fail |
|---|---|---|---|---|
| User can open application via Heroku deployed link? | All | Public/Authenticated | Chrome/Opera/Edge/Safari/FireFox | Pass |
| Home Page loads for User? | Index | Public/Authenticated | Chrome/Opera/Edge/Safari/FireFox | Pass |
| Typewriter custom JS loads for User on Index page? | Index | Public/Authenticated | Chrome/Opera/Edge/Safari/FireFox | Pass |
| Page call-to-actions are accessible to Login/Register for User? | Index | Public | Chrome/Opera/Edge/Safari/FireFox | Pass |
| Page call-to-actions are accessible to Forum/Membership for User? | Index | Authenticated | Chrome/Opera/Edge/Safari/FireFox | Pass |
| Navbar displays relevant nav-links per User type? | All | Public/Authenticated | Chrome/Opera/Edge/Safari/FireFox | Pass |
| Footer displays as exptected and on each page? | All | Public/Authenticated | Chrome/Opera/Edge/Safari/FireFox | Pass |
| User can Login Successfully? | Login | Public | Chrome/Opera/Edge/Safari/FireFox | Pass |
| Authenticated User cannot access Login/Register pages? | Login/Register | Authenticated | Chrome/Opera/Edge/Safari/FireFox | Pass |
| User can Register using Unique values for username & email? | Register | Public | Chrome/Opera/Edge/Safari/FireFox | Pass |
| User cannot Register using existing username & email? | Register | Public | Chrome/Opera/Edge/Safari/FireFox | Pass |
| About page renders and displays correctly? | About | Public/Authenticated | Chrome/Opera/Edge/Safari/FireFox | Pass |
| Map renders, and controls via mouse, or touch on mobile? | About | Public/Authenticated | Chrome/Opera/Edge/Safari/FireFox | Pass |
| Carousel controls react when actioned upon and images load? | About | Public/Authenticated | Chrome/Opera/Edge/Safari/FireFox | Pass |
| Membership page renders and displays correctly? | Membership | Public/Authenticated | Chrome/Opera/Edge/Safari/FireFox | Pass |
| User cannot add Membership plan to Cart, if public? | Membership | Public | Chrome/Opera/Edge/Safari/FireFox | Pass |
| Authenticated User can add Membership plan to Cart? | Membership | Authenticated | Chrome/Opera/Edge/Safari/FireFox | Pass |
| Authenticated User can only add one item to Cart at any one time? | Membership | Authenticated | Chrome/Opera/Edge/Safari/FireFox | Pass |
| Public User cannot access Cart page? | Cart | Public | Chrome/Opera/Edge/Safari/FireFox | Pass |
| Authenticated User can access Cart page, and page renders as expected? | Cart | Authenticated | Chrome/Opera/Edge/Safari/FireFox | Pass |
| Authenticated User can Clear Cart via two step visual confirmations? | Cart | Authenticated | Chrome/Opera/Edge/Safari/FireFox | Pass |
| Authenticated User can see Cart asterisk notification in Navbar when cart has item added from any page? | All | Authenticated | Chrome/Opera/Edge/Safari/FireFox | Pass |
| Authenticated User can proceed to Checkout? | Cart | Authenticated | Chrome/Opera/Edge/Safari/FireFox | Pass |
| Public User cannot access Checkout page? | Checkout | Public | Chrome/Opera/Edge/Safari/FireFox | Pass |
| Authenticated User can input Card and Process detail into Payment form? | Checkout | Authenticated | Chrome/Opera/Edge/Safari/FireFox | Pass |
| Checkout page renders as expected to Authenticated User? | Checkout | Authenticated | Chrome/Opera/Edge/Safari/FireFox | Pass |
| If any errors present in Payment Details form appropriate errors are thrown and displayed to User, either via Stripe or messages framework? | Checkout | Authenticated | Chrome/Opera/Edge/Safari/FireFox | Pass |
| All fields behave as expected in Payment Details form? | Checkout | Authenticated | Chrome/Opera/Edge/Safari/FireFox | Pass |
| Public User cannot access User Dashboard page? | User Dashboard | Public | Chrome/Opera/Edge/Safari/FireFox | Pass |
| Authenticated User can access bespoke User Dashboard? | User Dashboard | Authenticated | Chrome/Opera/Edge/Safari/FireFox | Pass |
| Authenticated User can see any Posts they may own in the User Dashboard and access same? | User Dashboard | Authenticated | Chrome/Opera/Edge/Safari/FireFox | Pass |
| Public User cannot access Forum/View-Post/Create-Post/Edit-Post/Filter Posts pages? | Forum/View-Post/Create-Post/Edit-Post/Filter Posts | Public | Chrome/Opera/Edge/Safari/FireFox | Pass |
| Public User cannot access and delete a Post via browser url injection? | Edit-Post | Public | Chrome/Opera/Edge/Safari/FireFox | Pass |
| Authenticated User can navigate and view Forum? | Forum | Authenticated | Chrome/Opera/Edge/Safari/FireFox | Pass |
| Authenticated User can Create-Post via create button on Forum? | Forum/Create-Post | Authenticated | Chrome/Opera/Edge/Safari/FireFox | Pass |
| Authenticated User cannot create post without relevant fields being filled? | Create-Post | Authenticated | Chrome/Opera/Edge/Safari/FireFox | Pass |
| Authenticated User can create post and is returned with success message to Forum? | Create-Post/Forum | Authenticated | Chrome/Opera/Edge/Safari/FireFox | Pass |
| Authenticated User can Filter posts on Forum Page by Category? | Forum | Authenticated | Chrome/Opera/Edge/Safari/FireFox | Pass |
| Authenticated User can access any posts detailed in the Forum? | Forum | Authenticated | Chrome/Opera/Edge/Safari/FireFox | Pass |
| Authenticated User can use pagination elements if present? | Forum/View-Post/User Dashboard | Authenticated | Chrome/Opera/Edge/Safari/FireFox | Pass |
| Authenticated User can create a comment on any Post? | View-Post | Authenticated | Chrome/Opera/Edge/Safari/FireFox | Pass |
| Authenticated User can access a Post they own and edit same? | View-Post | Authenticated | Chrome/Opera/Edge/Safari/FireFox | Pass |
| Authenticated User edit/delete post in Edit-Post view? | Edit-Post | Authenticated | Chrome/Opera/Edge/Safari/FireFox | Pass |
| Authenticated user can delete Post they own via two step visual confirmation? | Edit-Post | Authenticated | Chrome/Opera/Edge/Safari/FireFox | Pass |
| User can't access pages that don't exist? 404 page thrown? | 404 | Public/Authenticated | Chrome/Opera/Edge/Safari/FireFox | Pass |
| User can logout? | All | Public/Authenticated | Chrome/Opera/Edge/Safari/FireFox | Pass |
| Neumorphism styling present? | All | Public/Authenticated | Chrome/Opera/Edge/Safari/FireFox | Pass |
| Stylesheet rendering as expected? | All | Public/Authenticated | Chrome/Opera/Edge/Safari/FireFox | Pass |
| Favicon renders in Browser tab? | All | Public/Authenticated | Chrome/Opera/Edge/Safari/FireFox | Pass |
During development and ongoing testing of the Application both via local and deployed links several bugs were found that proved to be a little more than a quick fix. I've documented them here to show any bugs, whether outstanding or rectified and the method of rectifying / source material with applicable solves.
-
When implementing Travis (at the inception of my project), I ran into a rather bespoke bug whereas the build would not pass even though I had what seemed to be the correct code (see below):
language: python
python:
  - "3.8"
# command to install dependencies
install:
  - "pip3 install -r requirements.txt"
# command to run tests
script:
  - SECRET_KEY="whatever" ./manage.py test
The error appeared in the logs whenever the script would attempt to run and pass the secret_key. With help from Chris Quinn in the Slack Full Stack Frameworks channel, I was able to rectify this issue thanks to his guidance. Chris also explained to me the reason why this was happening. It is down to a default linux permission of 644 being set on my basic
./manage.pymeaning it is not executable via the script. Changing this topython manage.py testallowed Python to call and run the file circumventing Travis now potentially enforcing file permissions when testing builds. -
When developing the Privacy Policy & Accessibility Statement templates, I encountered a strange visual bug where overflow-x was persistent even though the flow of the code followed the Bootstrap structure to the letter,
container > row > col. This was caused by my use of auto margin on the.contentsection element. I was using margin to push the content down away from the navbar as this project uses a sticky property to fix the navbar to the top of the viewport at all times, regardless of scroll position. After a lengthy period of time debugging and turning to Slack for help, Simen Daehlin pointed out the issue could be potentially coming from my.contentcss code block of:.content { margin: 77px auto 0; -webkit-box-flex: 1; -ms-flex: 1; flex: 1; }
After which I turned my attention to the code block in question and using devtools was able to narrow down my search to the left and right auto margin property being the culprit. For some reason it was causing the site and the actual components injected inside the block content to no longer be responsive. Removing the
autovalue rectified this visual bug. -
The select and number field types rendered on Firefox with a strange visual bug. As you can see in the snapshot, the interact-able icon for these fields would be defaulted to the browsers native color scheme. Considering my site utilises dark tones as the primary coloring, it was rather annoying that this bug is left outstanding. Even after spending some time in the devtools that Firefox comes equipped with and after attempting to implement several StackOverflow remedies, nothing seemed to work. So this bug is outstanding at present and probably for the foreseeable future unless Firefox accept the current webkit fixings in place.

- Custom styling the select fields when active proved to be a rather difficult task, but I achieved the desired affect in the end using specificity and the Chrome devtools to really hone in on what I needed to target. This started out as a very unpleasant visual bug and still sometimes, although intermittently, will pop for me on Autofill of the field. It's kind of a half glass full scenario, except this time around it works 95% of the time, and I've seen the visual bug pop up a few times during testing. When the visual bug happens, it appears as if all of the options inside the dropdown list when active are greyed out, almost indicating that they are inactive. This is in fact not the case and the value is still captured in the backend.

- While testing the fire & forget notification email to the Administrator for when a new Contact form is submitted by a User, it would intermittently throw a
smtpAuthenticationError. This was down to the way gmail handles it's less secure apps function to allow for calls to the mailbox to be made to send an email. After several attempts and implemented work-arounds in the actualsend_mailmethod of the function view itself proved inadequate, I stumbled across this Article and the comment fromgrovalmitchwithin detailing how to permanently ensure Less secure apps would stay on in gmail.
This full stack application was developed using PyCharm IDE and version controlled via local (git) and online (github) repository technologies. Any secret environment variables were stored in an env.py file which was added to a .gitignore file keeping those files out of play from the public repo. Those variables detailed in the env.py file were re-enacted over in the Heroku Settings tab for this application under the Config Vars section allowing the deployed site to utilise these secret variables.
Branches were used throughout the development of the applications per large feature. These branches were used to develop each feature and then when tested and working, were merged back into the Master branch of the github repo. The branches are visible in the branches tab of the public repo dashboard. This ensured that the deployed build of the site was functioning and building and passing in travis from the Master branch while simultaneously allowing me the freedom to implement and test any functionality locally without worrying about a push being made that add an imposing or looming bug to the deployed site.
Deploying this application was achieved by:
- Pushing the code from my IDE to Github via Git and the built-in PyCharm terminal.
- Creating an app on Heroku & deploying it from same.
- Adding any secret environment variables to the Config Vars of Heroku App Settings tab and assigning those the requisite secret values held in the env.py for Live Deployment.
- Installing and Adding Whitenoise to Middleware of project
settings.pyfile to allow our application to serve it's own static files. - In Heroku 'Deploy tab', deployment method was set to Github with automatic deploys set from the master branch.
- Once the above was done, the app was deployed via this link.
To clone the repository:
- Select the Repository from the Github Dashboard.
- Click on the "Clone or download" green button located above and to the right of the File Structure table.
- Click on the "clipboard icon" to the right of the Git URL to copy the web URL of the Clone.
- Open your preferred Integrated Development Environment (IDE) and navigate to the terminal window.
- Change the directory to where you want to clone the repository too. (In the case of PyCharm the directory path can be found through the "Navigate" tab).
- Paste the Git URL copied from above and click "Ok". (Again in the case of PyCharm once you click "clone", Git Root mapping will be automatically set to the project Root directory).
- Once open create an env.py file and assign the Database URL, Secret Key, Stripe Publishable & Stripe Secret, and finally Emailing variables. Ensure the
env.pyis living in the root of your project directory and then add it to.gitignoreto ensure your Secret details aren't exposed.
- Chris Quinn ~ For his guidance and solution on setting up Travis correctly. Link to solution.
- Johan de Leeuw ~ For pointing out my method of checking for unique values in the User Registration could be refactored much cleaner.
- Default coach image obtained from https://static.thenounproject.com/png/363639-200.png and is a free to use vector download from the noun project.
- Success cards in Stripe V2 Test get accepted even if a CVV field is left blank. This was brought to the attention in a Slack Thread after I had found that what should of been an incorrect card number length of 12-digits (424242424242) was allowing skipping the try block in our views.py file in the checkout app. Link to slack post. After more defensive steps taken in the forms.py file of the checkout app, they were also deemed insufficient to stop this from happening, so with thanks to Slack user Dave L for pointing out the correctional defensive measures should be made in the stripe.js file to suit.
- Brad Traversy ~ Dev to Deployment Django course for providing me with the learning criteria to start my project.
- smtpAuthenticationError solve from digital ocean article.
- Those in Slack, Tutor Support, especially Tim Nelson for incredible amounts of help and effort to rectify issues, and my Mentor Spencer Barriball for assisting with me with countless queries since starting on this journey until now. Huge thanks to those in the Full Stack Frameworks channel who helped me with my queries on a more than regular basis, Chris Zielinski, Joke Heyndels. And to the friends I've made along the way, thank you most of all. Wouldn't be finished this course without you all, too many to name. Ye know who ye are!
Disclaimer: This project was created for educational use only as part of the Code Institute Full Stack Software Development Course for Milestone 4 Grading!
![]()