XMPP activated call light
Requirements
- Raspberry Pi
- Relay
- Busy Light
- two XMPP accounts
- One for monitoring
- Address of the account you want to monitor
System Prep:
Before installing this repo the following things must be done on the Pi
I have tested this on the Pi 2 and Pi 3. It runs 10x better on the Pi 3. This install guide assumes you already have SSH access enabled to your Pi.
- sudo su
- Next we are going to download the latest node bianaries for ARM.
- For Pi 2:
wget https://nodejs.org/dist/v7.8.0/node-v7.8.0-linux-armv6l.tar.xz
- For Pi 3:
wget https://nodejs.org/dist/v7.8.0/node-v7.8.0-linux-armv7l.tar.xz
- For Pi 2:
- Extract all the files to home directory
tar -xvf node-v7.8.0-linux-armv7l.tar.xz (or the file you downloaded)- Next copy the files into /usr/local/
cp -R * /usr/local/- We will be using GPIO PIN 17 to trigger the light. Set the PIN for output
gpio export 17 out- Create a directory for the project.
cd /usr/local/
mkdir node
cd node- Clone this repo into the node directory.
git clone https://github.com/bdm1981/onair.git- Install all the node modules
cd onair
npm install- Start the node process
pm2 start process.json- Now that everything is installed and running, we will configure PM2 to start On-Air when the Pi boots up.
pm2 startup
pm2 save
Usuage Instructions:
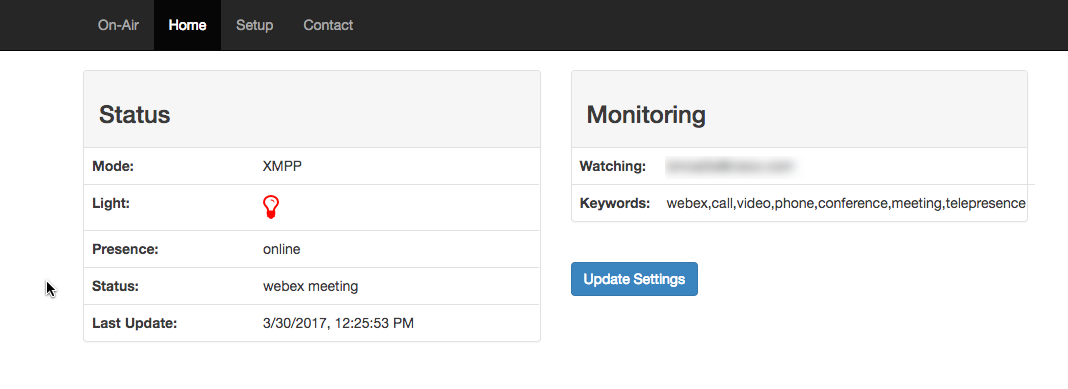
Once On-Air is running, it needs to be configured with your XMPP settings.
- Navigate to http://:3000/setup
- Enter the username/password of the user that will be monitoring along with the XMPP server
- Enter the XMPP address that will be monitored
- Modify the keywords to your liking
- Once the settings are saved, PM2 will restart the node process with the new settings.
Wiring up the Light:
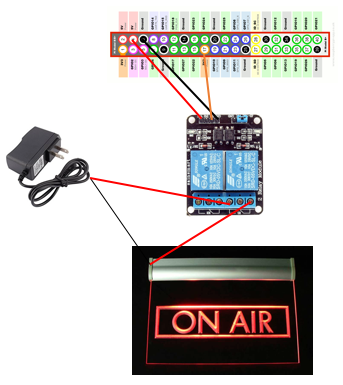
The simple way to wire this up is with a relay from SainSmart that steps up the output voltage from the Pi in order to trigger the 5v relay. This can done as follows.
Thats it! Changing the status of your user to something containing one of your keywords, should trigger the light.
Troubleshooting:
If your light is not triggering by changing your XMPP status, try manually updating the GPIO state from the Pi.
sudo su
gpio -g write 17 1
gpio -g write 17 0
1 should turn the light on 0 should turn the light off
If the light doesn't turn on and you do not hear the relay "click", check to make sure the relay is conneted to the correct PINs on the Pi.
If this works but updating the status does not, try the following:
-
Log in with a deskop client such as Adium with the secondary XMPP client. Make sure it can see the presence of the XMPP account you are monitoring. If not make sure the primary account has added the secondary account to its contact list and has authorized the sharing of presence. Then try again
-
From the Pi run the following command to see if there are any errors
sudo su
pm2 logs
When the status is updated, it should be logged to the console of the Pi


