This is another backup of all of them!
****https://www.notion.so/webdevhub42/Medium-01388d77ba0e4d5ba27704e083e16a58****
****
{% embed url="https://webdevhub42.notion.site/Medium-01388d77ba0e4d5ba27704e083e16a58" caption="" %}
****
Web Development Resource List #4
Update:bryanguner.medium.com
BASH CHEAT SHEET
My Bash Cheatsheet Index:bryanguner.medium.com
Heroku Cheat Sheet
a cheatsheet for using heroku-clibryanguner.medium.com
Basic React Tutorial
Random Things to Rememberbryanguner.medium.com
Data Structures… Under The Hood
Data Structures Referencebryanguner.medium.com
CSS Interview Prep Quiz
Plus Css Cheat Sheet (82 questions total)bryanguner.medium.com
Object Methods
Iterating Through Objectsmedium.com
Objects in Javascript
Codepen with examples for you to practice with below!medium.com
The Beginner’s Guide To JavaScript
Part 1javascript.plainenglish.io
Web Developer Resource List Part 2
Because I compile these things compulsively anyway…medium.com
JavaScript Frameworks & Libraries
My Awesome JavaScript List Part 2javascript.plainenglish.io
My Favorite VSCode Themes
Themeslevelup.gitconnected.com
Object Oriented Programming in JavaScript
Object-Oriented Programminglevelup.gitconnected.com
JavaScript Rotate (Array) ProblemWalkthrough
Explanation for Rotate Rightmedium.com
The Complete JavaScript Reference Guide
You will want to bookmark thisjavascript.plainenglish.io
Modules in Javascript
Differences between Node.js and browsersmedium.com
Web Dev Resources
Web Developmentlevelup.gitconnected.com
Regular Expressions
description:medium.com
Learn CSS So That Your Site Doesn’t Look Like Garbage
CSS Selectorsjavascript.plainenglish.io
Emmet Cheat Sheet
EMMETbryanguner.medium.com
Git-Tricks
Refsbryanguner.medium.com
Fetch Quick Sheet
Fetchbryanguner.medium.com
Express Quick Sheet
Settingsbryanguner.medium.com
Fundamental Data Structures In JavaScript
Data structures in JavaScriptmedium.com
Postgresql Cheat Sheet
PostgreSQL commandsmedium.com
This list is in no particular order!
This list is in no particular order!
Web-Dev-Hub
Memoization, Tabulation, and Sorting Algorithms by Example Why is looking at runtime not a reliable method of…bgoonz-blog.netlify.app
bgoonz — Overview
Web Developer, Electrical Engineer JavaScript | CSS | Bootstrap | Python | React | Node.js | Express | Sequelize…github.com
Or Checkout my personal Resource Site:
https://bgoonz-blog.netlify.app/
By Bryan Guner on March 6, 2021.
Exported from Medium on August 31, 2021.
An in-depth look into the world of React.
Photo by Ferenc Almasi on Unsplash
ALLOFMYOTHERARTICLES
bryanguner.medium.com
- Using
()implictly returns components. - Role of
index.jsis to render your application. - The reference to
rootcomes from a div in the body of your public HTML file. - State of a component is simply a regular JS Object.
- Class Components require
render()method to return JSX. - Functional Components directly return JSX.
ClassisclassNamein React.- When parsing for an integer just chain
Number.parseInt("123") - Use ternary operator if you want to make a conditional inside a fragment.
{ x === y ? <div>Naisu</div> : <div>Not Naisu</div>; }- Purpose of
React.Fragmentis to allow you to create groups of children without adding an extra dom element.
- React makes it easier for you to make front-end elements. A front-end timeline
- Some noteworthy front end libraries that have been used in the past few years:
- 2005: Script.aculo.us
- 2005: Dojo
- 2006: YUI
- 2010: Knockout
- 2011: AngularJS
- 2012: Elm
- 2013: React (Considered the standard front-end library)
- React manages the creation and updating of DOM nodes in your Web page.
- All it does is dynamically render stuff into your DOM.
- What it doesn’t do:
- Ajax
- Services
- Local Storage
- Provide a CSS framework
- React is unopinionated
- Just contains a few rules for developers to follow, and it just works.
- JSX : Javascript Extension is a language invented to help write React Applications (looks like a mixture of JS and HTML)
- Here is an overview of the difference between rendering out vanilla JS to create elements, and JSX:
fetch("https://example.com/api/people")
  .then((response) => response.json())
  .then((people) => {
    const html = "<ul>";
    for (let person of data.people) {
      html += `<li>${person.lastName}, ${person.firstName}</li>`;
    }
    html += "</ul>";
    document.querySelector("#people-list").innerHTML = html;
  });
function PeopleList(props) {
return (
<ul>
$
{props.people.map((person) => (
<li>
{person.lastName}, {person.firstName}
</li>
))}
</ul>
);
}
const peopleListElement = document.querySelector("#people-list");
fetch("https://example.com/api/people")
.then((response) => response.json())
.then((people) => {
const props = { people };
ReactDOM.render(<PeopleList props={props} />, peopleListElement);
});
- This may seem like a lot of code but when you end up building many components, it becomes nice to put each of those functions/classes into their own files to organize your code. Using tools with React
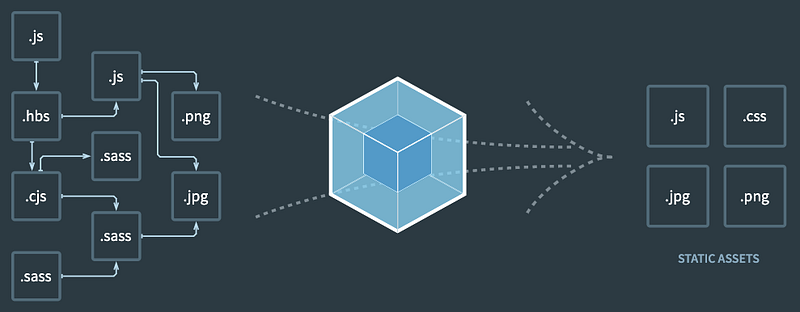
React DevTools: New tool in your browser to see ow React is working in the browsercreate-react-app: Extensible command-line tool to help generate standard React applications.Webpack: In between tool for dealing with the extra build step involved.
- HMR : (Hot Module Replacement) When you make changes to your source code the changes are delivered in real-time.
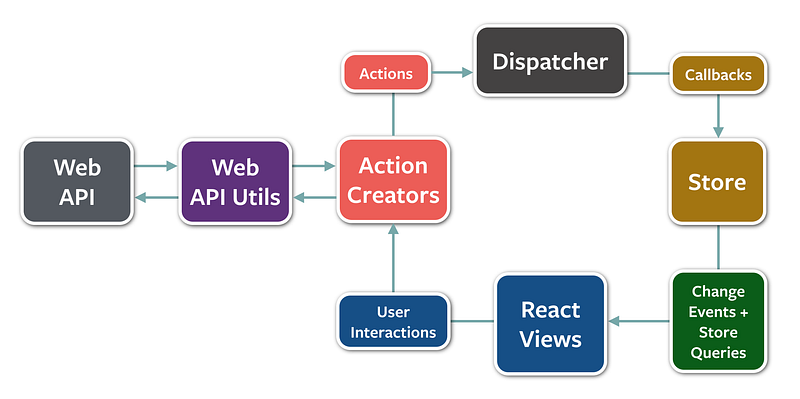
- React Developers created something called
Flux Architectureto moderate how their web page consumes and modifies data received from back-end API’s.
- Choosing React
- Basically, React is super important to learn and master.
There are many benefits to using React over just Vanilla JavaScript.
Modularity- To avoid the mess of many event listeners and template strings, React gives you the benefit of a lot of modularity.
Easy to start- No specials tools are needed to use Basic React.
- You can start working directly with
createElementmethod in React. Declarative Programming- React is declarative in nature, utilizing either it’s built-in createElement method or the higher-level language known as JSX.
Reusability- Create elements that can be re-used over and over. One-flow of data
- React apps are built as a combination of parent and child components.
- Parents can have one or more child components, all children have parents.
- Data is never passed from child to the parent.
Virtual DOM: React provides a Virtual DOM that acts as an agent between the real DOM and the developer to help debug, maintain, and provide general use.- Due to this usage, React handles web pages much more intelligently; making it one of the speediest Front End Libraries available.
Exporting one item per file
- Use
export defaultstatement in ES6 to export an item. ES6
export default class Wallet {
  // ...
}
// sayHello will not be exported
function sayHello() {
  console.log("Hello!");
}
CommonJS (Equivalent)
class Wallet {
  // ...
}
// sayHello will not be exported
function sayHello() {
  console.log("Hello!");
}
module.exports = Wallet;
Exporting multiple items per file
- Use just thw
exportkeyword (without default) to export multiple items per file. ES6 (Better to export them individually like this, rather than bunching them all into an object)
export class Wallet {
  // ...
}
export function sayHello() {
  console.log("Hello!");
}
export const sayHi = () => {
  console.log("Hi!");
};
class Wallet {
  // ...
}
function sayHello() {
  console.log("Hello!");
}
const sayHi = () => {
  console.log("Hi!");
};
export { Wallet, sayHello, sayHi };
CommonJS (Equivalent)
class Wallet {
  // ...
}
function sayHello() {
  console.log("Hello!");
}
const sayHi = () => {
  console.log("Hi!");
};
module.exports = {
  Wallet,
  sayHello,
  sayHi,
};
Importing with ES6 vs CommonJS
- Import statements in ES6 modules must always be at the top of the file, because all imports must occur before the rest of the file’s code runs. ES6
import { Wallet } from "./wallet";
import * as fs from "fs";
const wallet = new Wallet();
CommonJS
let { Wallet } = require("./wallet");
const wallet = new Wallet();
let fs = require("fs");
Unnamed default imports
- You can name unnamed items exported with export default any name when you import them.
// exporting
export default class Wallet {
  // ...
}
// importing
import Money from "wallet.js";
const wallet = new Money();- Just remember if you use
exportinstead ofexport defaultthen your import is already named and cannot be renamed.
// exporting
export class Wallet {
  // ...
}
// importing
import { Wallet } from "wallet.js";
const wallet = new Wallet();
Aliasing imports
- Use as asterisk to import an entire module’s contents.
- Keep in mind you must use an
askeyword to refer to it later.
// export
export function sayHello() {
  console.log("Hello!");
}
export const sayHi = () => {
  console.log("Hi!");
};
//import
import * as Greetings from "greetings.js";
Greetings.sayHello(); // Hello!
Greetings.sayHi(); // Hi!- You can also name identically named functions or items from different files.
import { Wallet as W1 } from "./wallet1";
import { Wallet as W2 } from "./wallet2";
const w1 = new W1();
const w2 = new W2();
Browser support for ES6 Modules
- ES6 Modules can only be used when a JS file is specified as a module.
<script type="module" src="./wallet.js"></script> - You can get browser support for ES6 modules by adding module into your script tag.
- Remember that JSX is just syntactic sugar for the built in
React.createElement(component, props, ...children) - React Library must always be in scope from your JSX code.
- Use Dot Notation for JSX Type
- User-Defined Components Must Be Capitalized
<Foo />vs<div> - Cannot use a general expression as the React element type. (
Incorrect)
function Story(props) {
  // Wrong! JSX type can't be an expression.
    return <components[props.storyType] story={props.story} />;
};(Corrected)
function Story(props) {
  // Correct! JSX type can be a capitalized variable.
  const SpecificStory = components[props.storyType];
  return <SpecificStory story={props.story} />;
}
Props in JSX
- Several ways to specify props in JSX.
Javascript Expressions as Props
<MyComponent foo={1 + 2 + 3 + 4} />String Literals
<MyComponent message="hello world" /> <MyComponent message={'hello world'} /> <MyComponent message="<3" /> <MyComponent message={'❤'} />Props Default to “True”
<MyTextBox autocomplete /> <MyTextBox autocomplete={true} />Spread Attributes
function App1() { return <Greeting firstName="Ben" lastName="Hector" />; } function App2() { const props = { firstName: "Ben", lastName: "Hector" }; return <Greeting {…props} />; }Children in JSX
props.children: The content between opening and closing tag. JavaScript Expressions as Children
function Item(props) {
  return <li>{props.message}</li>;
}
function TodoList() {
  const todos = ["finish doc", "submit pr", "nag dan to review"];
  return (
    <ul>
      {todos.map((message) => (
        <Item key={message} message={message} />
      ))}
    </ul>
  );
}
Functions as Children
props.childrenworks like any other prop, meaning it can pass any sort of data.
// Calls the children callback numTimes to produce a repeated component
function Repeat(props) {
  let items = [];
  for (let i = 0; i < props.numTimes; i++) {
    items.push(props.children(i));
  }
  return <div>{items}</div>;
}
function ListOfTenThings() {
  return (
    <Repeat numTimes={10}>
      {(index) => <div key={index}>This is item {index} in the list</div>}
    </Repeat>
  );
}
Booleans, Null, and Undefined Are Ignored
false,null,undefined, andtrueare all valid children.- They will not render.
- You can use these to conditionally render items.
<div>
  {showHeader && <Header />}
  <Content />
</div>- In this example, the component will only render if
showHeaderevals to True.
// Before work-around
<div>
  {props.messages.length &&
    <MessageList messages={props.messages} />
  }
</div>
// After work-around
<div>
  {props.messages.length > 0 &&
    <MessageList messages={props.messages} />
  }
</div>- Note that certain falsy values such as zero will still be rendered by React, you can work around this by ensuring situations like the above eval. into a boolean.
- In the times you want booleans to be rendered out, simply convert it into a string first.
<div>My JavaScript variable is {String(myVariable)}.</div>The Diffing Algorithm
Diffing: When the state of a component changes React creates a new virtual DOM tree.- Elements of Different Types
- Every time the root elements have different types, React tears down the old tree and builds the new tree from scratch.
- DOM Elements Of the Same Type
- When comparing two DOM elements of the same type, React keeps the same underlying DOM node and only updates the changes attributes.
<div className=”before” title=”stuff” /> <div className=”after” title=”stuff” />
<div style={{ color: “red”, fontWeight: “bold” }} /> <div style={{color: ‘green’, fontWeight: ‘bold’}} />
- Component Elements Of The Same Type
- When components update, instances will remain the same, so that state maintains across renders.
- React will only update the props, to match the new element.
- Recursing On Children
- React will iterate both lists of children and generate a mutation whenever there’s a difference.
- This is why we use
keys. - Makes it easier for React to match children in the original tree with children in the subsequent tree.
- Tradeoffs
- Important to remember that reconciliation algorithm is an implementation detail.
- Re-rendering only to apply the differences following the rules stated in the previous sections.
- As your application grows, you can use React’s
typecheckingto catch bugs. propTypesis a special property to run typechecking.- exports range of built in validators to ensure your received data is valid.
- propTypes is only checked in development mode.
import PropTypes from "prop-types";
class Greeting extends React.Component {
  render() {
    return <h1>Hello, {this.props.name}</h1>;
  }
}
Greeting.propTypes = {
  name: PropTypes.string,
};
Requiring Single Child
- Use
PropTypes.elementto specify only a single child can be passed to a component as children.
import PropTypes from "prop-types";
class MyComponent extends React.Component {
  render() {
    // This must be exactly one element or it will warn.
    const children = this.props.children;
    return <div>{children}</div>;
  }
}
MyComponent.propTypes = {
  children: PropTypes.element.isRequired,
};
Default Prop Values
- Use
defaultPropsto assign default values for props.
class Greeting extends React.Component {
  render() {
    return <h1>Hello, {this.props.name}</h1>;
  }
}
// Specifies the default values for props:
Greeting.defaultProps = {
  name: "Stranger",
};
// Renders "Hello, Stranger":
ReactDOM.render(<Greeting />, document.getElementById("example"));
class Greeting extends React.Component {
static defaultProps = {
name: 'stranger'
}
render() {
return (
<div>Hello, {this.props.name}</div>
)
}
React Routeris the answer for rendering different components for different pages.- A front-end library that allows you to control which components to display using the browser location.
Client-side RoutingGetting started with routing- Install React Router with:
- npm install — save react-router-dom@⁵.1.2
- Import
Browser Routerfrom package. - import { BrowserRouter } from “react-router-dom”;
BrowserRouteris the primary component of the router that wraps your route hierarchy.- Wrap it around components.
- Creates a
React Contextthat passes routing information down to all its descendant components. - You can also use
HashRouter, where it would generate a hash before the endpoint. Creating frontend routes - React Router helps your app render specific components based on the URL.
- The most common component is
<Route> - Wrapped around another component, causing the comp. to only render if the a certain URL is matched.
Props: path, component, exact, and [render]- Browser Router can only have a single child component.
- The Browser Router wraps all routes within a parent div element.
const Root = () => {
  const users = {
    1: { name: "Andrew" },
    2: { name: "Raymond" },
  };
  return (
    <BrowserRouter>
      <div>
        <h1>Hi, I'm Root!</h1>
        <Route exact path="/" component={App} />
        <Route path="/hello" render={() => <h1>Hello!</h1>} />
        <Route path="/users" render={() => <Users users={users} />} />
      </div>
    </BrowserRouter>
  );
};- component
- Indicates component to render.
- path
- Indicates path to render a specific component.
- exact
- Tells route to not pattern match and only render a certain route exclusively to it’s associated component.
- render
- Optional prop that takes in a function to be called.
- Causes extra work for React.
- Preferred for inline rendering of simple functional components.
- Difference between
componentandrenderis that component returns new JSX that be re-mounted, but render returns the JSX that will be mounted only once. - // This inline rendering will work, but is unnecessarily slow. <Route path=”/hello” component={() => <h1>Hello!</h1>} /> // This is the preferred way for inline rendering. <Route path=”/hello” render={() => <h1>Hello!</h1>} />
- Also useful if you need to pass in specific props to a component.
- // `users` to be passed as a prop: const users = { 1: { name: “Andrew” }, 2: { name: “Raymond” }, }; <Route path=”/users” render={() => <Users users={users} />} />;
Route path params
- Your component’s props can hold information about URL’s parameters.
- Will match segments starting at
:to the next/,?,#.
<Route
  path="/users/:userId"
  render={(props) => <Profile users={users} {...props} />}
/>{...props}spreads out the router’s props.props.match.paramsis used to access the match prop’s parameters.- Useful keys on the
matchobject: isExact: boolean that tells you whether or not the URL exactly matches the path.url: the currentURLpath: Route path it matched against (w/o wildcards)params: Matches for the individual wildcard segments.
React Router Navigation
Link,NavLink,Redirect,historyprops of React Router are used to help your user navigate routes. Adding links for navigation- Issues on-click navigation event to a route defined in app.
- Usage renders an anchor tag with a correctly set
hrefattribute.
import { BrowserRouter, Route, Link } from "react-router-dom";Linktakes two properties:toandonClick.to: route location that points to an absolute path.onClick: clickHandler.NavLinkworks just likeLinkbut has a bit of extra functionality.- Adds extra styling, when the path it links to matches the current path.
- As it’s name suggests, it is used to Nav Bars.
- Takes three props:
activeClassName: allows you to set a CSS class name for styling. (default set to ‘active’)activeStyle: style object that is applied inline when it’stoprop. matches the current URL.exactprop is a boolean that defaults to false; you can set it to true to apply requirement of an exact URL match.- exact can also be used as a flag instead of a reg. property value.
- benefit of adding this is so that you don’t trigger other matches. Switching between routes
<Switch>: Component allows you to only render one route even if several match the current URL.- You may nest as many routes as you wish but only the first match of the current URL will be rendered.
- Very useful if we want a default component to render if none of our routes match.
<Switch>
  <Route path="some/url" component={SomeComponent} />
  <Route path="some/other/url" component={OtherComponent} />
  <Route component={DefaultComponent} />
</Switch>DefaultComponentwill only render if none of the other URLs match up.<Redirect>: Helps redirect users.- Only takes a single prop:
to.
<Route
  exact
  path="/"
  render={() => (this.props.currentUser ? <Home /> : <Redirect to="/login" />)}
/>
History
Historyallows you to update the URL programmatically.- Contains two useful methods:
push: Adds a new URL to the end of the history stack.replace: Replaces the current URL on the history stack, so the back button won’t take you to it.
// Pushing a new URL (and adding to the end of history stack):
const handleClick = () => this.props.history.push("/some/url");
// Replacing the current URL (won't be tracked in history stack):
const redirect = () => this.props.history.replace("/some/other/url");Why nested routes?
- Create routes that tunnel into main components vs getting rendered on the main page as it’s own thing. What are nested routes?
const Profile = (props) => {
  // Custom call to database to fetch a user by a user ID.
  const user = fetchUser(props.match.params.userId);
  const { name, id } = user;
  return (
    <div>
      <h1>Welcome to the profile of {name}!</h1>
      <Link to={`/users/${id}/posts`}>{name}'s Posts</Link>
      <Link to={`/users/${id}/photos`}>{name}'s Photos</Link>
      <Route path="/users/:userId/posts" component={UserPosts} />
      <Route path="/users/:userId/photos" component={UserPhotos} />
    </div>
  );
};
Alt. version using props.match
// Destructure `match` prop
const Profile = ({ match: { url, path, params }) => {
  // Custom call to database to fetch a user by a user ID.
  const user = fetchUser(params.userId);
  const { name, id } = user;
  return (
    <div>
      <h1>Welcome to the profile of {name}!</h1>
      <Link to={`${url}/posts`}>{name}'s Posts</Link>
      <Link to={`${url}/photos`}>{name}'s Photos</Link>
      <Route path={`${path}/posts`} component={UserPosts} />
      <Route path={`${path}/photos`} component={UserPhotos} />
    </div>}
  );
};- As you can see above, our end URL isn’t even defined until we apply those flexible values in.
Build: Process of converting code into something that can actually execute or run on the target platform.- In regards to React, the minimum a build should do is convert JSX to something that browsers can understand. Reviewing common terminology
Linting: Process of using a tool to analyze your code to catch common errors, bugs, inconsistencies etc…Transpilation: Process of converting source code, like JS, from one version to another.Minification: Process of removing all unnecessary characters in your code.Bundling: Process of combining multiple code files into a single file.Tree Shaking: Process of removing unused or dead code from your application before it’s bundled. Configuration or code?Configurationallows developers to create build tasks by declaring either JSON, XML, or YAML without explicitly writing every step in the process.CodingorScriptingsimply requires code. Babel and webpack (yes, that’s intentionally a lowercase ‘w’)Babel: Code Transpiler that allows you to use all of the latest features and syntax wihtout worrying about what browsers support what.webpack: Allows developers to use JS modules w/o requiring users to use a browser that natively supports ES modules.- Create React App uses webpack and Babel under the hood to build applications. The Create React App build process
- What happens when you run
npm start:
- .env variables are loaded.
- list of browsers to support are checked.
- config’d HTTP port checked for availability.
- application compiler is configured and created.
webpack-dev-starteris startedwebpack-dev-startercompiles app.index.htmlis loaded into browser- file watcher is started to watch for changes. Ejecting
- There is a script in Create React App called
ejectthat allows you to ‘eject’ your application and expose all the hidden stuff. Preparing to deploy a React application for production - Defining Env Variables
REACT_APP_FOO: some value REACT_APP_BAR: another valueconsole.log(process.env.REACT_APP_FOO);
Can be referenced in your index.html like so: <title>%REACT_APP_BAR%</title>
Configuring the supported browsers
{
  "browserslist": {
    "production": [
      ">0.2%",
      "not dead",
      "not op_mini all"
    ],
    "development": [
      "last 1 chrome version",
      "last 1 firefox version",
      "last 1 safari version"
    ]
  }
}- If you specify older browsers it will affect how your code get’s transpiled. Creating a production build
- Run
npm run buildto create a production build. - Bundles React in production mode and optimizes the build for the best performance.
- Simply a nice library that turns data into DOM.
Tree Diffing: Fast comparison and patching of data by comparing the current virtual DOM and new virtual DOM - updating only the pieces that change.It's just a tree with some fancy diffing
From JavaScript To DOM
- The
React.createElementfunction has the following form:
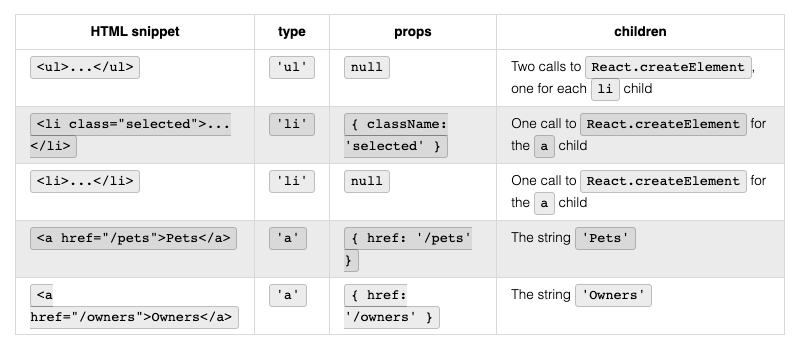
React.createElement(type, [props], [...children]);Type: Type of element to create, i.e. a string for an HTML element or a reference to a function or class that is a React component.Props: Object that contains data to render the element.Children: Children of the elemet, as many as you want. Creating elements- Our rendering goal:
<ul>
  <li class="selected">
    <a href="/pets">Pets</a>
  </li>
  <li>
    <a href="/owners">Owners</a>
  </li>
</ul>- There are five tags to create:
- One
ul - Two
li - Two
a - There are certain attributes we want to appear in the DOM for these tags as well:
- Each
lihas aclass(orclassNamein React) - Both
aele’s havehrefattributes - Also keep in mind the parent child relationships happening between the tags.
ulis the parent of bothli- Each
lihas anaelement as a child - Each
ahas atext contentchild
React.createElement( “ul”, null, React.createElement( “li”, { className: “selected” }, React.createElement(“a”, { href: “/pets” }, “Pets”) ), React.createElement( “li”, null, React.createElement(“a”, { href: “/owners” }, “Owners”) ) );
Converting to virtual DOM
- After you set up your
React.createElement, you useReact.renderto take the value returned from cE and a DOM node to insert into the conversion of the real DOM.
// Put the element tree in a variable
const navList = React.createElement(
  "ul",
  null,
  React.createElement(
    "li",
    { className: "selected" },
    React.createElement("a", { href: "/pets" }, "Pets")
  ),
  React.createElement(
    "li",
    null,
    React.createElement("a", { href: "/owners" }, "Owners")
  )
);
// Get a DOM node for React to render to
const mainElement = document.querySelector("main");
// Give React the element tree and the target
ReactDOM.render(navList, mainElement);- JS Code => Virtual DOM => Real Dom Updates
- If you call React.render a second or multiple times it just checks the existing Virtual DOM and it knows which smaller areas to change. Thinking in Components
- Components are pieces of reusable front-end pieces.
- Components should be Single Responsibility Principle compliant.
React.createElement Demo
- Can import non-local dependencies with
import 'package-link'
const App = () => React.createElement("h1", null, "Hello, Programmers!");
const target = document.querySelector("main");
const app = React.createElement(App, null);
// Give React the element tree and the target
ReactDOM.render(app, target);- Remember when importing modules from other files you have to denote the file type in the import statement. HTML Original
<section class="clue">
  <h1 class="clue__title">Clue$ 268530</h1>
  <div class="clue__question">
      2009: I dreamed a Dream
  </div>
  <div class="clue__category">
      <<unparsed>>
  </div>
  <div class="clue__amount">
      $800
  </div>
</section>
React Version
const Clue = () =>
  React.createElement(
    "section",
    { className: "clue" },
    React.createElement("h1", { className: "clue__title" }, "Title"),
    React.createElement("div", { className: "clue__question" }, "?"),
    React.createElement("div", { className: "clue__category" }, "Category"),
    React.createElement("div", { className: "clue__amount" }, "$800")
);- Because
classis a reserved keyword in JS, in React we can useclassNameto assign a class to an element. - Remember the data that goes into createElement: element type, data to pass into the element, and then children.
props: Properties;- To handle certain values that are initially undefined, we can use
defaultProps.
Clue.defaultProps = {
  category: {},
};- You can change in the devTools Network tab the internet speed to check for values that may be undefined to hangle with defaultProps.
- If we fetch multiple pieces of data, we can render many things by using
map. - You need to assign a unique key to each of the clues.
- We need to keep track of them individually so that React can easily refer to a specific one if there is an issue.
clue => { key:clue.id, ...clue }
const App = (props) =>
  React.createElement(
    "h1",
    null,
    props.clues.map((clue) =>
      React.createElement(Clue, { key: clue.id, ...clue })
    )
  );
export default App;- Note: JSX is preferred over React.createElement;
- When you import modules from websites they must have CORs activated.
- These import statements, import
global variables. - When we want to move our code into production we need to change the imports into the production minified versions.
import "https://unpkg.com/react@16/umd/react.production.min.js";
import "https://unpkg.com/react-dom@16.13.1/umd/react-dom.production.min.js";- While we will never actually be creating full apps with just React.createElement => it is the enginer that is running under the hood!
import "https://unpkg.com/react@16/umd/react.development.js";
import "https://unpkg.com/react-dom@16/umd/react-dom.development.js";
const Links = () =>
  React.createElement(
    "ul",
    { id: "nav-links" },
    React.createElement(
      "li",
      { className: "is-selected" },
      React.createElement("a", { href: "http://appacademy.io" }, "App Academy")
    ),
    React.createElement(
      "li",
      null,
      React.createElement("a", { href: "https://aaonline.io" }, "a/A Open")
    )
  );
// Set up React Element: Type, Imported Data, Child (Child is Text in this Scenario)
// HelloWorld is a function based component
const HelloWorld = () => React.createElement("h1", null, "Hello, Programmers");
const AllTogether = () =>
  React.createElement(
    "div",
    null,
    React.createElement(HelloWorld, null),
    React.createElement(Links, null)
  );
// Target the Element to append new Ele
const target = document.querySelector("main");
// Assign your 'App' to your created Elements
// We are creating an element from the HelloWorld function.
const app = React.createElement(AllTogether, null);
// Render from the Virtual Dom to the Actual Dom
ReactDOM.render(app, target);JSX: Javascript Extension, a new language created by React developers to have an easier way of interacting with the React API. How to use JSX- We will use
babelto convert version of modern JS into an older version of JS. React Create Element
const ExampleComponent = (props) =>
  React.createElement(
    React.Fragment,
    null,
    React.createElement("h1", null, "Hello!"),
    React.createElement("img", { src: "https://via.placeholder.com/150" }),
    React.createElement("a", { href: props.searchUrl }, props.searchText)
  );
JSX Version
const ExampleComponent = (props) => (
  <React.Fragment>
    <h1>Hello!</h1>
    <img src="https://via.placeholder.com/150" />
    <a href={props.searchUrl}>{props.searchText}</a>
  </React.Fragment>
);- Keep in mind that self closing tags in React must have a
forward slashto close it.
- Properties and Data
<img src="https://via.placeholder.com/150" />;
// becomes..
React.createElement("img", { src: "https://via.placeholder.com/150" });
// if we want to pass in data vs just a string literal
<a href={props.searchUrl}>{props.searchText}</a>;
// so it becomes..
React.createElement("a", { href: props.searchUrl }, props.searchText);
// if you want the text search uppercase..
<a href={props.searchUrl}>{props.searchText.toUpperCase()}</a>;- Comments in JSX have the following syntax:
<div>
  <h2>This is JSX</h2>
  {/* This is a comment in JSX */}
</div>
Property Names:checked: Attribute of input components such as checkbox or radio, use it to set whether the component is checked or not.className: Used to specify a CSS class.dangerouslySetInnerHTML: React’s equivalent of innerHTML because it is risky to cross-site scripting attacks.htmlFor: Becauseforis protected keyword, React elements use this instead.onChange: Event fired whenever a form field is changed.style: Accepts a JS object with camelCase properties rather than a CSS string.value: Supported by Input, Select, and TextArea components; use it to set the value of the component.- Note: React uses camel-case!!! The JSX semicolon gotcha
function App() {
  return (
    <div>
      <h1>Hello!</h1>
      <div>Welcome to JSX.</div>
    </div>
  );
}
create Element equivalent
is equivalent to
function App() {
  return (
    React.createElement(
      'div',
      null,
      React.createElement('h1', null, 'Hello!'),
      React.createElement('div', null, 'Welcome to JSX.'),
    )
  );
}- We wrap what want to return in parenthesis so JS doesn’t auto add semi-colons after every line and run the code incorrectly.
- Just remember if you decided to use the return keyword in a function to ‘return some JSX’, then make sure you wrap the JSX in parenthesis.
npx create-react-app my-app
- Single line used to initiate a React application.
- React has a great toolchain where you can see changes live as you’re editing your application.
- React errors will be rendered directly onto the browser window.
- A downside is that it installs a lot of bloat files.
- Examples of React create Element and JSX equivalent
React.createElement(
  "a",
  {
    className: "active",
    href: "https://appacademy.io",
  },
  "App Academy"
);
// JSX Version
<a className="active" href="https://appacademy.io">
  App Academy
</a>;
React.createElement(
OwnerDetails,
{
owner: props.data.owner,
number: props.index + 1,
},
props.name
);
// JSX Version
<OwnerDetails owner={props.data.owner} number={props.index + 1}>
{props.name}
</OwnerDetails>;
More Complex JSX Example
const BookPanel = (props) => {
  <section className="book" id={`book-${props.id}`}>
    <h1 className="book__title">{props.title}</h1>
    <img src={props.coverUrl} />
    <div className="book__desc">{props.description}</div>
  </section>;
};Using a Custom Template npx create-react-app my-app --template @appacademy/simple
- Keep in mind that using
create-react-appautomatically initializes a git repository for you! - App Academy custom template for creating a react app.
- If using the default react create project you can delete the following files:
- favicon.ico
- robots.txt
- logo192.png
- logo512.png
- manifest.json
- You can also simplify the
htmlfile into:
<!DOCTYPE html>
<html lang="en">
  <head>
    <meta charset="utf-8" />
    <title>React App</title>
  </head>
  <body>
    <div id="root"></div>
  </body>
</html>
Simplifying the src folder
- Remove: App.css App.test.js logo.svg serviceWorker.js setupTests.js
- Update the Following Files:
// ./src/App.js
import React from "react";
function App() {
  return <h1>Hello world!</h1>;
}
export default App;
``;
// ./src/index.js
import React from "react";
import ReactDOM from "react-dom";
import "./index.css";
import App from "./App";
ReactDOM.render(
<React.StrictMode>
<App />
</React.StrictMode>,
document.getElementById("root")
);
Class Components
- You can write React components using ES2015 Classes: Function Component
// ./src/Message.js
import React from "react";
const Message = (props) => {
  return <div>{props.text}</div>;
};
export default Message;
ES2015 Version
// ./src/Message.js
import React from "react";
class Message extends React.Component {
  render() {
    return <div>{this.props.text}</div>;
  }
}
export default Message;- We can access props within a
class componentby usingthis.props - Keep in mind Class Components are used just like function components.
// ./src/index.js
import React from "react";
import ReactDOM from "react-dom";
import Message from "./Message";
ReactDOM.render(
  <React.StrictMode>
    <Message text="Hello world!" />
  </React.StrictMode>,
  document.getElementById("root")
);
Setting and accessing props
class Message extends React.Component {
  constructor(props) {
    super(props);
    // TODO Initialize state, etc.
  }
  render() {
    return <div>{this.props.text}</div>;
  }
}- If we define a constructor method in our Class Component, we have to define the
supermethod withpropspassed through it. - Side Note: Before React used ES2015 Classes, it used
React.createclassfunction, if you ever need to use this antiquated method make sure you install a module calledcreate-react-classStateful components - One of the major reasons why you would choose to use a Class Component over a Function Component is to add and manage local or internal state to your component.
- Second of the major reasons is to be able to use a Class Component’s lifecycle methods. What is state?
- Props are data that are provided by the consumer or caller of the component.
- Not meant to be changed by a component.
- State is data that is
internalto the component. - Intended to be updated or mutated. When to use state
- Only Use State when it is absolutely necessary
- If the data never changes, or if it’s needed through an entire application use props instead.
- State is more often used when creating components that retrieve data from APIs or render forms.
- The general rule of thumb: If a component doesn’t need to use state or lifecyle methods, it should be prioritized as a
function component. - Functional:Stateless || Class:Stateful Initializing state
- Use a class constructor method to initialize
this.stateobject. // Application Entry Point
// ./src/index.js
import React from 'react'
import ReactDOM from 'react-dom';
import RandomQuote from './RandomQuote';
ReactDOM.render(
  <React.StrictMode>
    <RandomQuote />
  </React.StrictMode>
  document.getElementById('root');
)
// Class Component: RandomQuote
import React from "react";
class RandomQuote extends React.Component {
  constructor() {
    super();
    const quotes = [
      "May the Force be with you.",
      "There's no place like home.",
      "I'm the king of the world!",
      "My mama always said life was like a box of chocolates.",
      "I'll be back.",
    ];
    this.state = {
      quotes,
      currentQuoteIndex: this.getRandomInt(quotes.length);
    }
  }
  getRandomInt(max) {
    return Math.floor(Math.random() * Math.floor(max));
  }
  render() {
    return (
      <div>
        <h2>Random Quote</h2>
        <p>{this.state.quotes[this.state.currentQuoteIndex]}</p>
      </div>
    )
  }
}
export default RandomQuote;
Updating State
- Let’s say we want to update our state with a new quote.
- We can set up event listeners in React similarly to how we did them before.
- <button type=”button” onClick={this.changeQuote}> Change Quote </button>
onClickis the event listener.{this.changeQuote}is the event handler method.- Our Class Component File should now look like this with the new additions:
import React from "react";
class RandomQuote extends React.Component {
  constructor() {
    super();
    const quotes = [
      "May the Force be with you.",
      "There's no place like home.",
      "I'm the king of the world!",
      "My mama always said life was like a box of chocolates.",
      "I'll be back.",
    ];
    this.state = {
      quotes,
      currentQuoteIndex: this.getRandomInt(quotes.length);
    }
  }
  changeQuote = () => {
    const newIndex = this.getRandomInt(this.state.quotes.length);
    // Setting the 'new state' of currentQuoteIndex state property
    // to newly generated random index #.
    this.setState({
      currentQuoteIndex: newIndex;
    })
  }
  getRandomInt(max) {
    return Math.floor(Math.random() * Math.floor(max));
  }
  render() {
    return (
      <div>
        <h2>Random Quote</h2>
        <p>{this.state.quotes[this.state.currentQuoteIndex]}</p>
        <button type="button" onClick={this.changeQuote}>
          Change Quote
        </button>
      </div>
    )
  }
}
export default RandomQuote;
Don’t modify state directly
- It is important to
nevermodify your state directly! - ALWAYS use
this.setStatemethod to update state. - This is because when you only use this.state to re-assign, no re-rendering will occur => leaving our component out of sync. Properly updating state from the previous state
- In our current example, the way we have
changeQuoteset up leaves us with occasionally producing the same index twice in a row. - One solution is to design a loop but keep in mind that state updates are handled asynchronously in React (your current value is not guaranteed to be the latest)
- A safe method is to pass an anonymous method to
this.setState(instead of an object literal) Previous
changeQuote = () => {
    const newIndex = this.getRandomInt(this.state.quotes.length);
    this.setState({
      currentQuoteIndex: newIndex;
    })
  }
Passing w/ Anon Method
changeQuote = () => {
  this.setState((state, props) => {
    const { quotes, currentQuoteIndex } = state;
    let newIndex = -1;
    do {
      newIndex = this.getRandomInt(quote.length);
    } while (newIndex === currentQuoteIndex);
    return {
      currentQuoteIndex: newIndex,
    };
  });
};
Providing default values for props
- In our current example, we pass in a static array of predefined quotes in our constructor.
- The way it is set up right now leaves our list of quotes unchanged after initialization.
- We can make quotes more dynamic by replacing our static array with a
propsargument passed intosuper. - constructor(props) { super(props); }
- We can now move our quotes array to our application entry point and pass it in as a prop. // Application Entry Point
// ./src/index.js
import React from 'react'
import ReactDOM from 'react-dom';
import RandomQuote from './RandomQuote';
// Re-assign our array here and pass it in as a prop in Render.
const quotes = [
      "May the Force be with you.",
      "There's no place like home.",
      "I'm the king of the world!",
      "My mama always said life was like a box of chocolates.",
      "I'll be back.",
      "This way I can define more quotes",
    ];
ReactDOM.render(
  <React.StrictMode>
    <RandomQuote quotes={quotes}/>
  </React.StrictMode>
  document.getElementById('root');
)- One thing to note about this workaround is that the caller of the component must set the quotes prop or the component will throw an error => so use
defaultProps!
// At the bottom of RandomQuote.js...
RandomQuote.defaultProps = {
  quotes: [
    "May the Force be with you.",
    "There's no place like home.",
    "I'm the king of the world!",
    "My mama always said life was like a box of chocolates.",
    "I'll be back.",
    "This way I can define more quotes",
  ],
};- A good safety net in case the consumer/caller doesn’t provide a value for the quotes array.
- We can even remove it from our index.js now and an error will not be thrown.
- To add an event listener to an element, just define a method to handle the event and associate that method with the element event you are listening for. Example
import React from "react";
class AlertButton extends React.Component {
  showAlert = () => {
    window.alert("Button Clicked!");
  };
  render() {
    return (
      <button type="button" onClick={this.showAlert}>
        Submit
      </button>
    );
  }
}- Note that when refering the handler method in onClick we’re not invoking showAlert simply just passing a reference. Preventing default behavior
- HTML Elements in the browser often have a lot of default behavior.
- I.E. Clicking on an
<a>element navigates so a resource denoted by<href>property. - Here is an example of where using
e.preventDefault()could come in handy.
import React from "react";
class NoDefaultSubmitForm extends React.Component {
  submitForm = (e) => {
    e.preventDefault();
    window.alert("Handling form submission...");
  };
  render() {
    return (
    <form onSubmit={this.submitForm}>
      <button>Submit</button>
    </form>;
    )}
}- The button contained within the form will end up refreshing the page before
this.submitFormmethod can be completed. - We can stick an
e.preventDefault()into the actual method to get around this problem. e: Parameter that references aSynthetic Eventobject type. Usingthisin event handlers
// ./src/AlertButton.js
import React from "react";
class AlertButton extends React.Component {
  showAlert = () => {
    window.alert("Button clicked!");
    console.log(this);
  };
  render() {
    return (
      <button type="button" onClick={this.showAlert}>
        Click Me
      </button>
    );
  }
}
export default AlertButton;- When we console log
thiswe see the AlertButton object. - If we were to write the showAlert method with a regular class method like:
showAlert() {
  console.log(this);
}- We would get
undefined=> remember that fat arrow binds to the current context! Reviewing class methods and thethiskeyword - Let’s refresh on binding.
class Boyfriend {
  constructor() {
    this.name = "Momato Riruru";
  }
  displayName() {
    console.log(this.name);
  }
}
const Ming = new Boyfriend();
Ming.displayName(); // => Momato Riruru
const displayAgain = Ming.displayName;
displayAgain(); // => Result in a Type Error: Cannot read property 'name' of undefined.- The first time we use our
displayMethodcall, it is called directly on the instance of the boyfriend class, which is whyMomato Riruruwas printed out. - The second time it was called, the ref of the method is stored as a variable and method is called on that variable instead of the instance; resulting in a type error (it has lost it’s context)
- Remember we can use the
bindmethod to rebind context! - We can refactor to get the second call working like this:
- const displayAgain = Ming.displayName.bind(Ming); displayAgain(); // => Now Momato Riruru will be printed out.
- To continue using function declarations vs fat arrow we can assign context in a constructor within a class component.
import React from "react";
class AlertButton extends React.Component {
  constructor() {
    super();
    this.showAlert = this.showAlert.bind(this); // binding context
  }
  showAlert() {
    console.log(this);
  }
  render() {
    return (
      <button type="button" onClick={this.showAlert}>
        Submit
      </button>
    );
  }
}
export default AlertButton;
Experimental Syntax: Syntax that has been proposed to add to ECMAScript but hasn’t officially been added to the language specification yet.- It’s good to pick one approach and use it consistently, either:
- Class Properties & Arrow Functions
- Bind Method & This Keyword The
SyntheticEventobject
- Synthetic Event Objects: Cross Browser wrappeds around the browser’s native event.
- Includes the use of stopPropagation() and preventDefault();
- Attributes of the Synthetic Event Object:Attributesboolean bubblesboolean cancelableDOMEventTarget currentTargetboolean defaultPreventednumber eventPhaseboolean isTrustedDOMEvent nativeEventvoid preventDefault()boolean isDefaultPrevented()void stopPropagation()boolean isPropagationStopped()void persist()DOMEventTarget targetnumber timeStampstring type
nativeEvent: property defined in a synthetic event object that gives you access to the underlying native browser event (rarely used!)
Exercise being done in a separate file Random Notes
onChange: detects when a value of an input element changes.- Assigning
onChangeto our input fields makes our component’s state update in real time during user input. - Dont forget to add
preventDefaultonto form submissions to deal with the default behavior of the browser refreshing the page! submittedOn: new Date(),Can be added to a form, most likely will persist into a DB.- Controlled Components
- We use the
onChangeevent handlers on form fields to keep our component’s state as the"one source of truth" - Adding an
onChangeevent handler to every single input can massively bloat your code. - Try assiging it to it’s own method to apply everywhere.
textareais handled differently in react: it takes in a value property to handle what the inner text will be.
// ./src/ContactUs.js
import React from "react";
class ContactUs extends React.Component {
  constructor() {
    super();
    this.state = {
      name: "",
      email: "",
      phone: "",
      phoneType: "",
      comments: "",
      validationErrors: [],
    };
  }
  onChange = (e) => {
    const { name, value } = e.target;
    this.setState({ [name]: value });
  };
  // Vanilla JS Function for validating inputs
  validate(name, email) {
    const validationErrors = [];
    if (!name) {
      validationErrors.push("Please provide a Name");
    }
    if (!email) {
      validationErrors.push("Please provide an Email");
    }
    return validationErrors;
  }
  onSubmit = (e) => {
    // Prevent the default form behavior
    // so the page doesn't reload.
    e.preventDefault();
    // Retrieve the contact us information from state.
    const { name, email, phone, phoneType, comments } = this.state;
    // Get Validation Errors - proceeding destructuring values from this.state.
    const validationErrors = this.validate(name, email);
    // If we have errors...
    if (validationErrors.length > 0) {
      this.setState({ validationErrors });
    } else {
      // Proceed normally
      // Create a new object for the contact us information.
      const contactUsInformation = {
        name,
        email,
        phone,
        phoneType,
        comments,
        submittedOn: new Date(),
      };
      console.log(contactUsInformation);
      // Reset the form state.
      this.setState({
        name: "",
        email: "",
        phone: "",
        phoneType: "",
        comments: "",
        validationErrors: [],
      });
    }
  };
  render() {
    const { name, email, phone, phoneType, comments, validationErrors } =
      this.state;
    return (
      <div>
        <h2>Contact Us</h2>
        {validationErrors.length > 0 && (
          <div>
            The following errors were found:
            <ul>
              {validationErrors.map((error) => (
                <li key={error}>{error}</li>
              ))}
            </ul>
          </div>
        )}
        <form onSubmit={this.onSubmit}>
          <div>
            <label htmlFor="name">Name:</label>
            <input
              id="name"
              name="name"
              type="text"
              onChange={this.onChange}
              value={name}
            />
          </div>
          <div>
            <label htmlFor="email">Email:</label>
            <input
              id="email"
              name="email"
              type="text"
              onChange={this.onChange}
              value={email}
            />
          </div>
          <div>
            <label htmlFor="phone">Phone:</label>
            <input
              id="phone"
              name="phone"
              type="text"
              onChange={this.onChange}
              value={phone}
            />
            <select name="phoneType" onChange={this.onChange} value={phoneType}>
              <option value="">Select a phone type...</option>
              {this.props.phoneTypes.map((phoneType) => (
                <option key={phoneType}>{phoneType}</option>
              ))}
            </select>
          </div>
          <div>
            <label htmlFor="comments">Comments:</label>
            <textarea
              id="comments"
              name="comments"
              onChange={this.onChange}
              value={comments}
            />
          </div>
          <div>
            <button>Submit</button>
          </div>
        </form>
      </div>
    );
  }
}
ContactUs.defaultProps = {
  phoneTypes: ["Home", "Work", "Mobile"],
};
export default ContactUs;- We can use validation libraries like
validateto make our validation functions more complex.
import isEmail from "validator/es/lib/isEmail";
  validate(name, email) {
    const validationErrors = [];
    if (!name) {
      validationErrors.push("Please provide a Name");
    }
    if (!email) {
      validationErrors.push("Please provide an Email");
    } else if (!isEmail(email)) {
      validationErrors.push("Please provide a valid Email");
    }
    return validationErrors;
  }
Note About Client-side vs server-side validation
- Server-side validation is not optional.
- Tech-savvy users can manipulate client-side validations.
- Sometimes the ‘best approach’ is to skip implementing validations on the client-side and rely completely on the server-side validation.
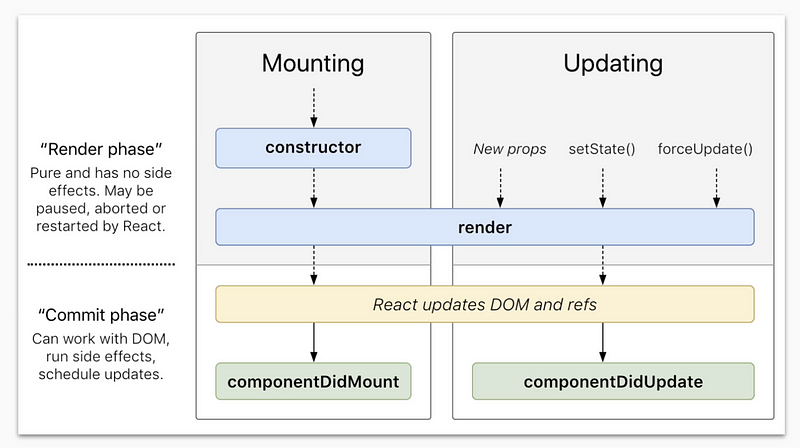
- Component Lifecycle is simply a way of describing the key moments in the lifetime of a component.
- Loading (Mounting)
- Updating
- Unloading (Unmounting) The lifecycle of a React component
- Each
Class Componenthas severallifecycle methodsthat you can add to run code at specific times. componentDidMount: Method called after your component has been added to the component tree.componentDidUpdate: Method called after your component has been updated.componentWillUnmount: Method called just before your component is removed from the component tree.Mounting
constructormethod is calledrendermethod is called- React updates the
DOM componentDidMountis called
Updating- When component receives new
props
rendermethod is called- React updates the
DOM componentDidUpdateis called
- When
setStateis called
rendermethod is called- React updates the
DOM componentDidUpdateis called
Unmounting- The moment before a class component is removed from the component tree:
componentDidMountwill be called. Avoiding the legacy lifecycle methods- Occasionally you will encounter some deprecated lifecycle methods:
- UNSAFE_componentWillMount
- UNSAFE_componentWillReceiveProps
- UNSAFE_componentWillUpdate
- Just know they will be removed soon from React’s API, peace. Using the class component lifecycle methods Exercise done in sep. directory
- Assorted Notes:
- Common Use for
componentDidMountlifecycle method is for fetching data from an API.
—
- You can use
React Contextto pass data through a component tree without having to manually thread props. - Convenient way to share & update
global data. Creating a Context
// PupContext.js
import { createContext } from "react";
const PupContext = createContext();
export default PupContext;- We use
React.createContextto create context. - Keep in mind if you invoke this method with aruguments, those arguments will be set as default context. Adding a Provider to the App component
- In order to pass context over to child components we need to wrap them in a provider component.
- The provider component takes in a value property that points to the information that needs to be passed to the children.
<MyContext.Provider value={/* some value */}>
  <ChildComponent />
</MyContext.Provider>
Setting up a Consumer
<MyContext.Consumer>
  {(value) => <Component value={value} />}
</MyContext.Consumer>- Keep in mind that
Context.Consumerexpects a function as a child. - The function has a value prop passed in from
Context.Provider
- JS Framework for managing the frontend state of a web application.
- Gives us ability to store information in an organized manner in a web app and quickly retrieve that information from anywhere in the app.
Redux- Client Side Data Management
- Controls “Frontend State”
- NOT Your Database
- NOT Component State
- Just used for managing Data
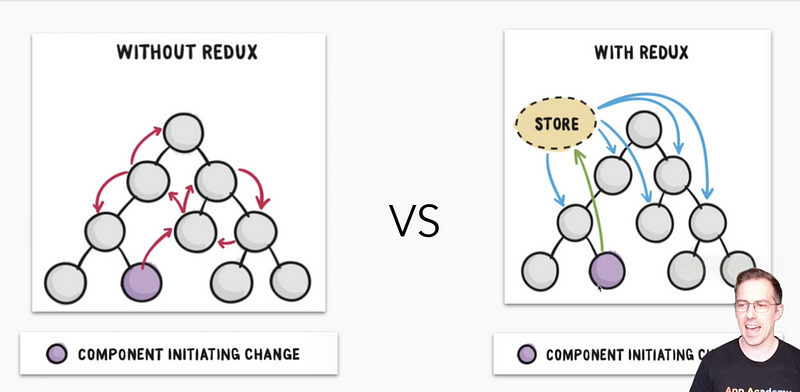
- Visual of how an app without React manages it’s data.
- A lot of prop threading happening.
- Data stored in a sep. location —
global data. The Anatomy of Redux Store- Holds the Frontend State
- Provides an API for the Frontend State
Action- POJOs
- Outline Changes to Frontend State
Reducers- Functions
- Make Changes to Frontend State Where did Redux come from?
- There are three central philosophies of Redux:
A Single Source of Truth: state is stored in a POJOState is Read Only: State is immutable, modified by dispatching actions.Changes are Made with Pure Functions: Reducers that receive the actions and return updated state are pure functions of the old state and action. When is it appropriate to use Redux?
- When doing a project with simpler global state requirements, it may be better to choose React’s Context API over Redux.
- Redux offers more flexibility and support for middleware along with richer developer tools. Vocabulary
State- Redux is a State Manager
- State is all the information stored by that program at a particular point in time.
- Redux’s main job is to store the state and make it directly available to your entire app.
Store- Redux stores state in a single store.
- Redux store is a single JS object with a couple of methods (not a class!)
- Methods include:
getState,dispatch(action), andsubscribe(listener) Actions- Redux store is updated by dispatching actions
- Action is just a POJO that includes a mandatory
typeproperty. - Contain info to update the store.
- We dispatch actions in response to User actions or AJAX requests.
Pure Functions- Redux Reducers are Pure Functions
- Functions are pure when their behavior depends only on it’s arguments as has no side effects.
- Simply takes in an argument and outputs a value.
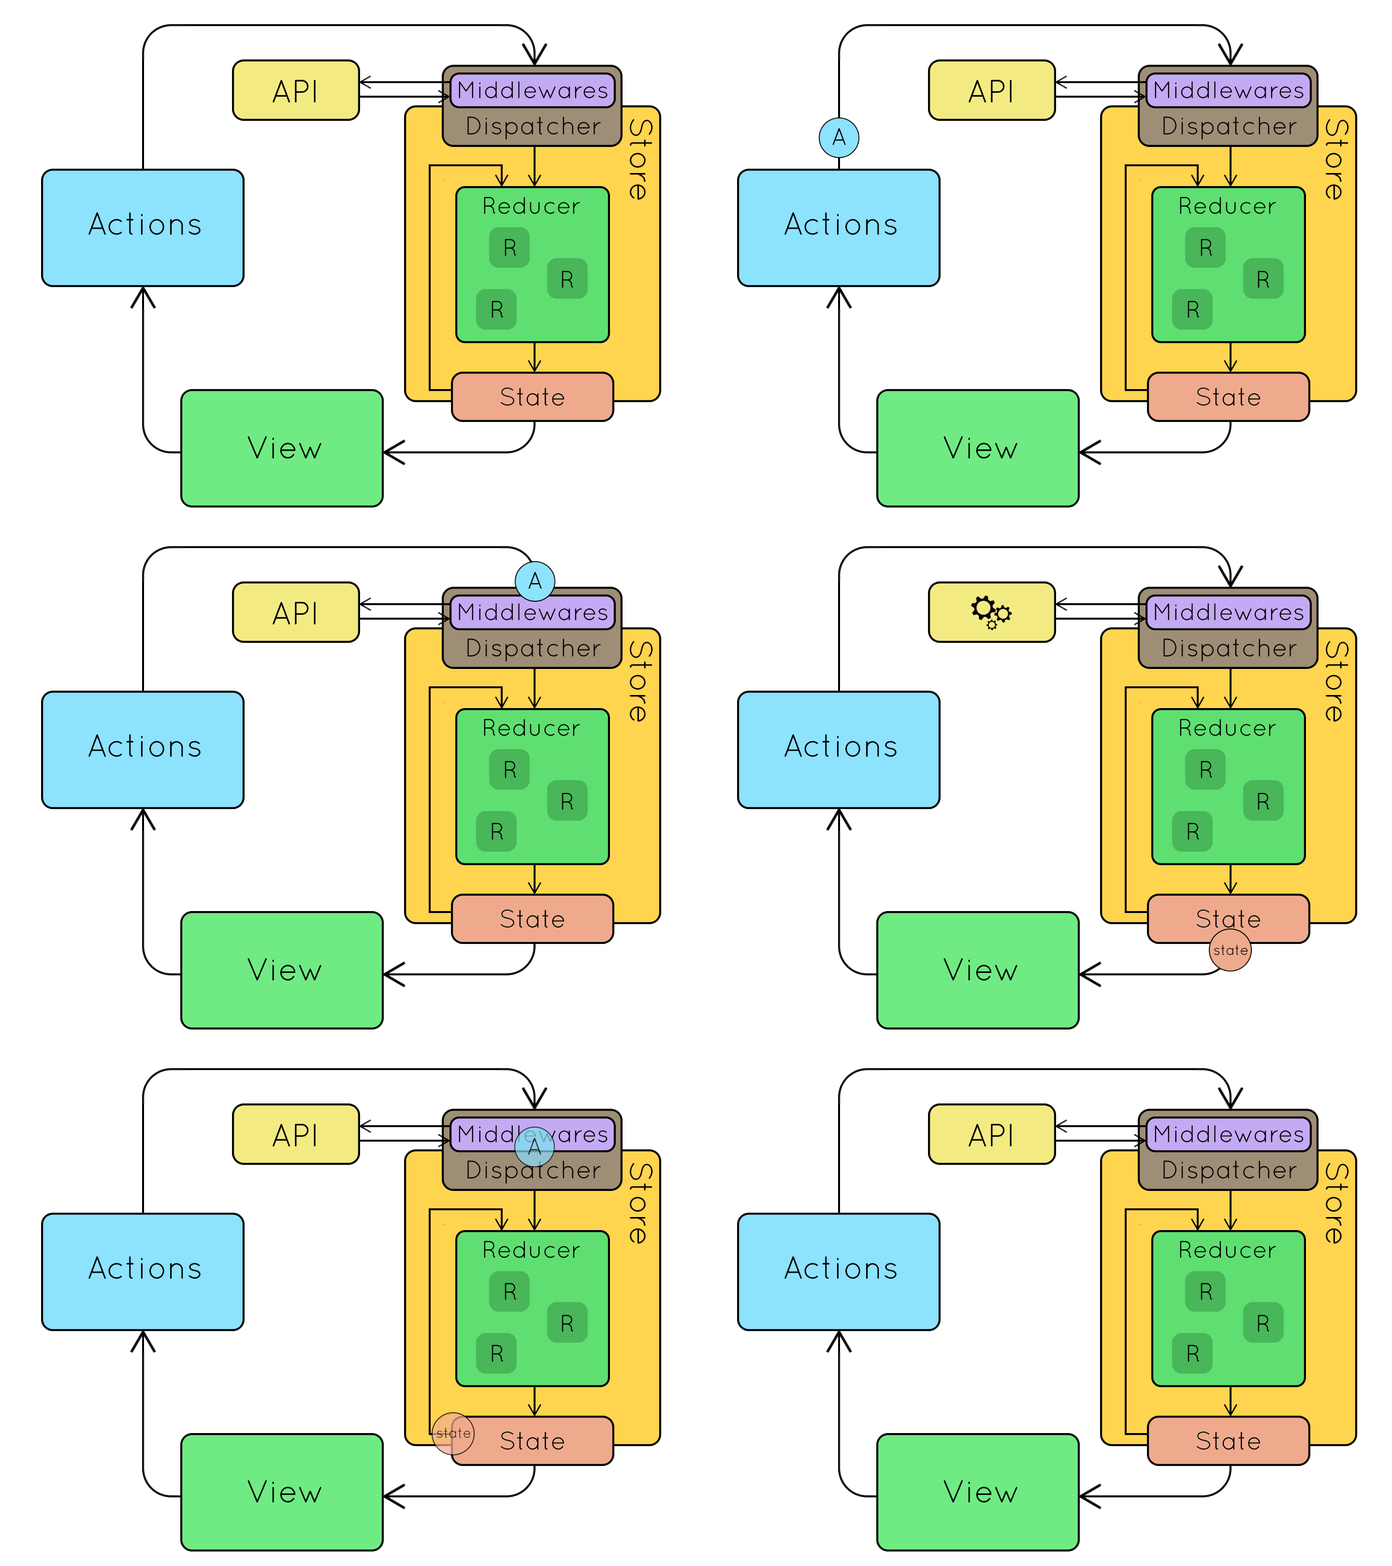
Reducer- Redux handles actions using reducers
- A function that is called each time an action is dispatched.
- Takes in an
actionandcurrent state - Required to be pure functions so their behavior is predictable.
Middleware- Customize response to dispatch actions by using Middleware
- Middleware is an optional component of Redus that allows custom responses to dispatched actions.
- Most common use is to dispatch async requests to a server.
Time Traveling Dev Tools- Redux can time travel wow
- Time travel refers to Redux’s ability to revert to a previous state because reducers are all pure functions.
Thunks- Convenient format for taking async actions in Redux
- General concept in CS referring to a function who’s primary purpose is to call another function.
- Most commonly used to make async API requests.
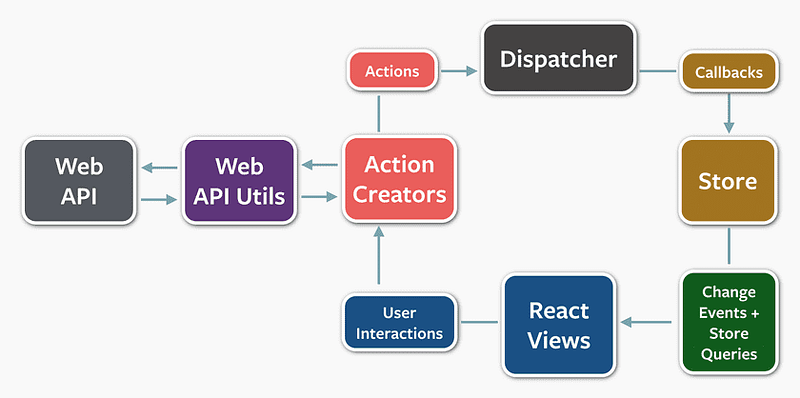
What is Flux?
- Front-end application architecutre.
- A pattern in which to structure an application.
- Unidirectional Data Flow — offers more predictability.
Actions: Begins the data flow of data, simple object that contains a type; type indicates the type of change to be performed.Dispatcher: Mechanism for distributing actions to the store.Store: The entire state of the application, responsible for updating the state of your app.View: Unit of code that’s responsible for rendering the user interface. Used to re-render the application when actions and changes occur.
- Redux
- Library that facilitates the implementation of Flux.
- Redux Three Principles
Single Source of TruthState is Read-OnlyOnly Pure Functions Change State
- Simply an object that holds the application state wrapped in an API.
Three methods:getState(): Returns the store’s current state.dispatch(action): Passes an action into the store’s reducer to tell it what info to update.subscribe(callback): Registers a callback to be triggered whenever the store updates. Updating the Store
store.dispatch(action);
// Add Orange Action
const addOrange = {
  type: "ADD_FRUIT",
  fruit: "orange",
};
// Reducer for Orange Action
const fruitReducer = (state = [], action) => {
  switch (action.type) {
    case "ADD_FRUIT":
      return [...state, action.fruit];
    default:
      return state;
  }
};
// Run the Dispatch
console.log(store.getState()); // []
store.dispatch(addOrange);
console.log(store.getState()); // [ 'orange' ]
Subscribing to the store
- Whenever a store process a dispatch(), it triggers all its subscribers.
Subscribers: callbacks that can be added to the store via subscribe().
const display = () => {
  console.log(store.getState());
};
const unsubscribeDisplay = store.subscribe(display);
store.dispatch(addOrange); // [ 'orange', 'orange' ]
// display will no longer be invoked after store.dispatch()
unsubscribeDisplay();
store.dispatch(addOrange); // no output
Reviewing a simple example
// app.js
const { createStore } = require("redux");
// Define the store's reducer.
const fruitReducer = (state = [], action) => {
  switch (action.type) {
    case "ADD_FRUIT":
      return [...state, action.fruit];
    default:
      return state;
  }
};
// Create the store.
const store = createStore(fruitReducer);
// Define an 'ADD_FRUIT' action for adding an orange to the store.
const addOrange = {
  type: "ADD_FRUIT",
  fruit: "orange",
};
// Log to the console the store's state before and after
// dispatching the 'ADD_FRUIT' action.
console.log(store.getState()); // []
store.dispatch(addOrange);
console.log(store.getState()); // [ 'orange' ]
// Define and register a callback to listen for store updates
// and console log the store's state.
const display = () => {
  console.log(store.getState());
};
const unsubscribeDisplay = store.subscribe(display);
// Dispatch the 'ADD_FRUIT' action. This time the `display` callback
// will be called by the store when its state is updated.
store.dispatch(addOrange); // [ 'orange', 'orange' ]
// Unsubscribe the `display` callback to stop listening for store updates.
unsubscribeDisplay();
// Dispatch the 'ADD_FRUIT' action one more time
// to confirm that the `display` method won't be called
// when the store state is updated.
store.dispatch(addOrange); // no output- Reducer function receives the current
stateandaction, updates the state appropriately based on theaction.typeand returns the following state. - You can bundles different action types and ensuing logic by using a switch/case statement.
const fruitReducer = (state = [], action) => {
  switch (action.type) {
    case "ADD_FRUIT":
      return [...state, action.fruit];
    case "ADD_FRUITS":
      return [...state, ...action.fruits];
    case "SELL_FRUIT":
      const index = state.indexOf(action.fruit);
      if (index !== -1) {
        // remove first instance of action.fruit
        return [...state.slice(0, index), ...state.slice(index + 1)];
      }
      return state; // if action.fruit is not in state, return previous state
    case "SELL_OUT":
      return [];
    default:
      return state;
  }
};
Reviewing how Array#slice works
const fruits = ["apple", "apple", "orange", "banana", "watermelon"];
// The index of the 'orange' element is 2.
const index = fruits.indexOf("orange");
// `...fruits.slice(0, index)` returns the array ['apple', 'apple']
// `...fruits.slice(index + 1)` returns the array ['banana', 'watermelon']
// The spread syntax combines the two array slices into the array
// ['apple', 'apple', 'banana', 'watermelon']
const newFruits = [...fruits.slice(0, index), ...fruits.slice(index + 1)];- Approach that can be used to remove an element without mutating the original array. Avoiding state mutations
- Your reducer must always return a new object if the state changes. GOOD
const goodReducer = (state = { count: 0 }, action) => {
  switch (action.type) {
    case "INCREMENT_COUNTER":
      const nextState = Object.assign({}, state);
      nextState.count++;
      return nextState;
    default:
      return state;
  }
};
BAD
const badReducer = (state = { count: 0 }, action) => {
  switch (action.type) {
    case "INCREMENT_COUNTER":
      state.count++;
      return state;
    default:
      return state;
  }
};- Actions are the only way to trigger changes to the store’s state. Using action creators
const addOrange = {
  type: "ADD_FRUIT",
  fruit: "orange",
};
store.dispatch(addOrange);
console.log(store.getState()); // [ 'orange' ]- fruit is the
payload keyand orange is thestate data Action Creators: Functions created from extrapolating the creation of an action object.
const addFruit = (fruit) => ({
  type: "ADD_FRUIT",
  fruit,
});- Use parenthesis for implicit return value.
- We can now add whatever fruit we’d like.
store.dispatch(addFruit("apple"));
store.dispatch(addFruit("strawberry"));
store.dispatch(addFruit("lychee"));
console.log(store.getState()); // [ 'orange', 'apple', 'strawberry', 'lychee' ]
Preventing typos in action type string literals
const ADD_FRUIT = "ADD_FRUIT";
const ADD_FRUITS = "ADD_FRUITS";
const SELL_FRUIT = "SELL_FRUIT";
const SELL_OUT = "SELL_OUT";
const addFruit = (fruit) => ({
  type: ADD_FRUIT,
  fruit,
});
const addFruits = (fruits) => ({
  type: ADD_FRUITS,
  fruits,
});
const sellFruit = (fruit) => ({
  type: SELL_FRUIT,
  fruit,
});
const sellOut = () => ({
  type: SELL_OUT,
});- Using constant variables helps reduce simple typos in a reducer’s case clauses.
- It is important to learn how to use debugger statements with arrow functions to effectively debug Redux cycle. Understanding the limitations of implicit return values
const addFruit = (fruit) => {
  return {
    type: "ADD_FRUIT",
    fruit,
  };
};
const addFruit = (fruit) => {
  debugger;
  return {
    type: "ADD_FRUIT",
    fruit,
  };
};- You must use explicit return statement arrow function to use a debugger.
Now that you know how to render components in a React app, how do you handle rendering different components for different website pages? React Router is the answer!
Think of how you have created server-side routes in Express. Take the following URL and server-side route. Notice how the /users/:userId path corresponds with the http://localhost:3000/users/2 URL to render a specific HTML page.
// http://localhost:3000/users/2
app.get('/users/:userId', (req, res) => {
  res.render('userProfile.pug');
});
In the default React setup, you lose the ability to create routes in the same manner as in Express. This is what React Router aims to solve!
React Router is a frontend routing library that allows you to control which components to display using the browser location. A user can also copy and paste a URL and email it to a friend or link to it from their own website.
When you finish this article, you should be able to use the following from the react-router-dom library:
<BrowserRouter>to provide your application access to thereact-router-domlibrary; and<Route>to connect specific URL paths to specific components you want rendered; and<Switch>to wrap severalRouteelements, rendering only one even if several match the current URL; and- React Router’s
matchprop to access route path parameters.
Since you are writing single page apps, you don’t want to refresh the page each time you change the browser location. Instead, you want to update the browser location and your app’s response using JavaScript. This is known as client-side routing. You are using React, so you will use React Router to do this.
Create a simple react project template:
npx create-react-app my-app --template @appacademy/simpleThen install React Router:
npm install --save react-router-dom@^5.1.2Now import BrowserRouter from react-router-dom in your entry file:
import { BrowserRouter } from 'react-router-dom`;BrowserRouter is the primary component of the router that wraps your route hierarchy. It creates a React context that passes routing information down to all its descendent components. For example, if you want to give <App> and all its children components access to React Router, you would wrap <App> like so:
// ./src/index.js import React from 'react'; import ReactDOM from 'react-dom'; import { BrowserRouter } from 'react-router-dom'; import App from './App';const Root = () => { return ( <BrowserRouter> <App /> </BrowserRouter> ); };
ReactDOM.render( <React.StrictMode> <Root /> </React.StrictMode>, document.getElementById('root'), );
Now you can route the rendering of certain components to certain URLs (i.e https://www.website.com/profile).
Alternatively, you could import and use HashRouter from react-router-dom. Links for applications that use <HashRouter> would look like https://www.website.com/#/profile (with an # between the domain and path).
You’ll focus on using the <BrowserRouter>.
React Router helps your React application render specific components based on the URL. The React Router component you’ll use most often is <Route>.
The <Route> component is used to wrap another component, causing that component to only be rendered if a certain URL is matched. The behavior of the <Route> component is controlled by the following props: path, component, exact, and render (optional).
Create a simple Users component that returns <h1>This is the users index!</h1>. Now let’s refactor your index.js file so that you can create your routes within the component:
// ./src/index.js import React from 'react'; import ReactDOM from 'react-dom'; import { BrowserRouter, Route } from 'react-router-dom'; import App from './App'; import Users from './Users';const Root = () => { return ( <BrowserRouter> <div> {/_ TODO: Routes _/} </div> </BrowserRouter> ); };
ReactDOM.render( <React.StrictMode> <Root /> </React.StrictMode>, document.getElementById('root'), );
Note that BrowserRouter can only have a single child component, so the snippet above wraps all routes within parent a <div> element. Now let’s create some routes!
Begin with the component prop. This prop takes a reference to the component to be rendered. Let’s render your App component:
const Root = () => {
  return (
    <BrowserRouter>
      <div>
        <Route component={App} />
      </div>
    </BrowserRouter>
  );
};
Now you’ll need to connect a path to the component!
The wrapped component will only be rendered when the path is matched. The path matches the URL when it matches some initial portion of the URL. For example, a path of / would match both of the following URLs: / and /users. (Because /users begins with a / it matches the path /)
<Route path='/' component={App} />
<Route path='/users' component={Users} />
Take a moment to navigate to http://localhost:3000/users to see how both the App component and Users component are rendering.
If this exact flag is set, the path will only match when it exactly matches the URL. Then browsing to the /users path would no longer match / and only the Users component will be rendered (instead of both the App component and Users component).
<Route exact path='/' component={App} />
<Route path='/users' component={Users} />This is an optional prop that takes in a function to be called. The function will be called when the path matches. The function’s return value is rendered. You could also define a functional component inside the component prop, but this results in extra, unnecessary work for React. The render prop is preferred for inline rendering of simple functional components.
The difference between using component and render is that component returns new JSX to be re-mounted every time the route renders, while render simply returns to JSX what will be mounted once and re-rendered. For any given route, you should only use either the component prop, or the render prop. If both are supplied, only the component prop will be used.
// This inline rendering will work, but is unnecessarily slow.
<Route path="/hello" component={() => <h1>Hello!</h1>} />
// This is the preferred way for inline rendering.
<Route path="/hello" render={() => <h1>Hello!</h1>} />
It can be helpful to use render instead of component in your <Route> when you need to pass props into the rendered component. For example, imagine that you needed to pass the users object as a prop to your Users component. Then you could pass in props from Root to Users by returning the Users component like so:
// `users` to be passed as a prop:
const users = {
  1: { name: 'Andrew' },
  2: { name: 'Raymond' }
};
<Route path="/users" render={() => <Users users={users} />} />
As a reminder, BrowserRouter can only have a single child component. That’s why you have wrapped all your routes within parent a <div> element.
const Root = () => {
  const users = {
    1: { name: 'Andrew' },
    2: { name: 'Raymond' }
  };
return (
<BrowserRouter>
<div>
<h1>Hi, I'm Root!</h1>
<Route exact path="/" component={App} />
<Route path="/hello" render={() => <h1>Hello!</h1>} />
<Route path="/users" render={() => <Users users={users} />} />
</div>
</BrowserRouter>
);
};
With this Root component, you will always render the <h1>Hi, I'm Root!</h1>, regardless of the path. Because of the first <Route>, you will only render the App component if the path exactly matches /. Because of the second <Route>, you will only render the Users component if the path matches /users.
A component’s props can also hold information about a URL’s parameters. The router will match route segments starting at : up to the next /, ?, or #. Those matched values are then passed to components via their props. Such segments are wildcard values that make up your route parameters.
For example, take the route below:
<Route path="/users/:userId"
       render={(props) => <Profile users={users} {...props} />} />
The router would break down the full /users/:userId/photos path to two parts: /users, :userId.
The Profile component’s props would have access to the :userId part of the http://localhost:3000/users/:userId/photos URL through the props with router parameter information. You would access the the match prop’s parameters (props.match.params). If you are using the render prop of the Route component, make sure to spread the props back into the component if you want it to know about the “match” parameters.
// Route's `render` prop allows you to pass the `users`
// prop and spread the router `props`.
render={(props) => <Profile users={users} {...props} />}
The params object would then have a property of userId which would hold the value of the :userId wildcard value. Let’s render the userId parameter in a user profile component. Take a moment to create a Profile.js file with the following code:
// ./src/Profile.js import React from "react";const Profile = (props) => ( <div> The user's id is {props.match.params.userId}. </div> );
export default Profile;
Notice how it uses the match prop to access the :userId parameter from the URL. You can use this wildcard to make and AJAX call to fetch the user information from the database and render the return data in the Profile component. Recall that your Profile component was rendered at the path /users/:userId. Thus you can use your userId parameters from match.params to fetch a specific user:
// ./src/Profile.js import React from "react";const Profile = ({ users, match: { params } }) => {
// In a real-world scenario, you'd make a call to an API to fetch the user, // instead of passing down and keying into a
usersprop. const user = users[params.userId];return ( <div> The user's id is {params.userId} and the user's name is {user.name}. </div> ); };
export default Profile;
Now that you’ve seen your React Router’s match prop in action, let’s go over more about route props! React Router passes information to the components as route props, accessible to all components with access to the React Router. The three props it makes available are location, match and history. You’ve learned about props.match.params, but now let’s review the other properties of the match prop!
This is an object that contains important information about how the current URL matches the route path. Here are some of the more useful keys on the match object:
isExact: a boolean that tells you whether or not the URL exactly matches the pathurl: the current URLpath: the route path it matched against (without wildcards filled in)params: the matches for the individual wildcard segments, nested under their names
When you use React Router, the browser location and history are a part of the state of your app. You can store information about which component should be displayed, which user profile you are currently viewing, or any other piece of state, in the browser location. You can then access that information from anywhere your Router props are passed to in your app.
Now that you’ve learned about parameters and route props, let’s revisit your Root component to add an exact flag to your /users route so that it does not render with your /users/:userId route. Your component should look something like this:
const Root = () => { const users = { 1: { name: 'Andrew' }, 2: { name: 'Raymond' } };return ( <BrowserRouter> <h1>Hi, I'm Root!</h1> <div> <Route exact path="/" component={App} /> <Route path="/hello" render={() => <h1>Hello!</h1>} />
{/* Render the `Users` page if no ID is included. */} <Route exact path="/users" render={() => <Users users={users} />} /> {/* Otherwise, render the profile page for that userId. */} <Route path="/users/:userId" component={(props) => <Profile users={users} {...props} />} /> </div> </BrowserRouter>
); };
In this article, you learned how to:
- Use components from the React Router library; and
- Create routes to render specific components; and
- Manage the order of rendered routes; and
- Use the
exactflag to ensure that a specific path renders a specific component; and - Use the React Router
matchprop to access Router params.
Now that you know how to create front-end routes with React Router, you’ll need to implement a way for your users to navigate the routes! This is what using React Router’s Link, NavLink, Redirect, and history prop can help you do.
In this article, you’ll be working off of the demo project you built in the React Router Intro reading. When you finish this article, you should be able to use the following components from the react-router-dom library:
<Link>or<NavLink>to create links with absolute paths to routes in your application (like “/users/1”); and,<Redirect>to redirect a user to another path (i.e. a login page when the user is not logged in); and- React Router’s
historyprop to update a browser’s URL programmatically.
React Router’s <Link> is one way to simplify navigation around your app. It issues an on-click navigation event to a route defined in your app’s router. Using <Link> renders an anchor tag with a correctly set href attribute.
To use it, update your imports from the react-router-dom package to include Link:
import { BrowserRouter, Route, Link } from 'react-router-dom';Note that <Link> can take two props: to and onClick.
The to prop is a route location description that points to an absolute path, (i.e. /users). Add the following Link components in your index.js file above your routes:
<Link to="/">App</Link>
<Link to="/users">Users</Link>
<Link to="/users/1">Andrew's Profile</Link>
The onClick prop is just like any other JSX click handler. You can write a function that takes in an event and handles it. Add the following Link before your routes and the following click handler function within your Root component:
// Link with onClick prop
<Link to="/" onClick={handleClick}>App with click handler</Link>
// Click handler function
const handleClick = () => {
console.log('Thanks for clicking!')
};
Now, test your routes and links! If you inspect the page, you’ll see that your links are now rendered as <a> elements. Notice that clicking the App with click handler link logs a message in your console while directing your browser to render the App component.
The <NavLink> works just like a <Link>, but with a little extra functionality. It has the ability to add extra styling when the path it links to matches the current path. This makes it an ideal choice for a navigation bar, hence the name. This styling can be controlled by three extra props: activeClassName, activeStyle, and exact. To begin using NavLink, update your imports from the react-router-dom package:
import { BrowserRouter, Route, NavLink } from 'react-router-dom';The activeClassName prop of the NavLink component allows you to set a CSS class name for styling the NavLink when its route is active. By default, the activeClassName is already set to active. This means that you simply need to add an .active class to your CSS file to add active styling to your link. A NavLink will be active if its to prop path matches the current URL.
Let’s change your “Users”, “Hello”, and “Andrew’s Profile” links to be different colors and have a larger font size when active.
<NavLink to="/">App</NavLink>
<NavLink activeClassName="red" to="/users">Users</NavLink>
<NavLink activeClassName="blue" to="/hello">Hello</NavLink>
<NavLink activeClassName="green" to="/users/1">Andrew's Profile</NavLink>
<NavLink to="/" onClick={handleClick}>App with click handler</NavLink>
For example, this is what the rendered HTML <a> tag would look like when when the browser is navigated to the / path or the /users path:
<!-- Navigated to the / path (the activeClassName prop is set to active by default) --> <a href="/" class="active">App</a><!-- NOT navigated to the
/path --> <a href="/">App</a><!-- Navigated to the /users path (the activeClassName prop is manually set to red) --> <a href="/users" class="red">Users</a>
<!-- NOT navigated to the/userspath --> <a href="/users">Users</a>
Import NavLink into your index.js file and take a moment to update all your Link elements to NavLink elements. Set an activeClassName prop to an active class. Add the following .active class to your index.css file:
.active { font-weight: bold; }.red { color: red; font-size: 30px; }
.blue { color: blue; font-size: 30px; }
.green { color: green; font-size: 30px; }
Test your styled links! Notice how the App and App with click handler links are always bolded. This is because all of your links include the / path, meaning that the link to / will be active when browsing to /users and /users/1 because of how users and users/1 are both prefaced by a /.
The activeStyle prop is a style object that will be applied inline to the NavLink when its to prop matches the current URL. Add the following activeStyle to your App link and comment out the .active class in your CSS file.
<NavLink to="/" activeStyle={{ fontWeight: "bold" }}>App</NavLink>The following html is rendered when at the / path:
<a href="/" style="font-weight:bold;" class="active">App</a>Notice how your App with click handler is not bolded anymore. This is because the default active class being applied does not have any CSS stylings set to the class. Uncomment your .active class in your CSS file to bring back bolding to this NavLink.
The exact prop is a boolean that defaults to false. If set to true, then the activeStyle and activeClassName props will only be applied when the current URL exactly matches the to prop. Update your App and App with click handler links with an exact prop set. Just like in your routes, you can use the exact flag instead of exact={true}.
<NavLink to="/" exact={true} activeStyle={{ fontWeight: "bold" }}>App</NavLink>
<NavLink to="/" exact onClick={handleClick}>App with click handler</NavLink>
Now your App and App with click handler links will only be bolded when you have navigated precisely to the / path.
You came across styling issues when the /users and /users/1 paths matched the / path. Routing can have this issue as well. This is why you need to control the switching between routes.
React Router’s <Switch> component allows you to only render one <Route> even if several match the current URL. You can nest as many Routes as you wish between the opening and closing Switch tags, but only the first one that matches the current URL will be rendered.
This is particularly useful if you want a default component that will only render if none of our other routes match. View the example below. Without the Switch, DefaultComponent would always render. Since there isn’t set a path in the DefaultComponent route, it will simply use the default path of /. Now the DefaultComponent will only render when neither of the preceding routes match.
<Switch>
  <Route path="some/url" component={SomeComponent} />
  <Route path="some/other/url" component={OtherComponent} />
  <Route component={DefaultComponent} />
</Switch>
Import Switch from react-router-dom and add <Switch> tags around your routes to take care of ordering and switching between your routes! Begin by adding the following route to the bottom of your routes to render that a 404: Page not found message:
<Route render={() => <h1>404: Page not found</h1>} />This is what your Root component should look like at this point:
const Root = () => { const users = [ { name: 'andrew' }, { name: 'raymond' } ];const handleClick = () => { console.log('Thanks for clicking!') };
return ( <BrowserRouter> <h1>Hi, I'm Root!</h1>
<div> <NavLink to="/" exact={true} activeStyle={{ fontWeight: "bold" }}>App</NavLink> <NavLink activeClassName="red" to="/users">Users</NavLink> <NavLink activeClassName="blue" to="/hello">Hello</NavLink> <NavLink activeClassName="green" to="/users/1">Andrew's Profile</NavLink> <NavLink to="/" exact onClick={handleClick}>App with click handler</NavLink> <Switch> <Route path="/users/:userId" component={(props) => <Profile users={users} {...props} />} /> <Route exact path="/users" render={() => <Users users={users} />} /> <Route path="/hello" render={() => <h1>Hello!</h1>} /> <Route exact path="/" component={App} /> <Route render={() => <h1>404: Page not found</h1>} /> </Switch> </div> </BrowserRouter>
); };
Now you have control over the precedence of rendered components! Try navigating to http://localhost:3000/asdf or any other route you have not defined. The <h1>404: Page not found</h1> JSX of the last <Route> will be rendered whenever the browser attempts to visit an undefined route.
But what if you want to redirect users to a login page when they aren’t logged in? The <Redirect> component from React Router helps you redirect users!
The component takes only one prop: to. When it renders, it replaces the current URL with the value of its to prop. Typically you conditionally render <Redirect> to redirect the user away from some page you don’t want them to visit. The example below checks whether there is a defined currentUser prop. If so, the <Route> will render the Home component. Otherwise, it will redirect the user to the /login path.
<Route
  exact path="/"
  render={() => (this.props.currentUser ? <Home /> : <Redirect to="/login" />)}
/>
Note: you will learn how to use a more flexible auth pattern — don’t directly imitate this example.
You know how to redirect users with a <Redirect> component, but what if you need to redirect users programmatically? You’ve learned about the React Router’s match prop, but now let’s go over another one of the route props: history!
// Pushing a new URL (and adding to the end of history stack):
const handleClick = () => this.props.history.push('/some/url');
// Replacing the current URL (won't be tracked in history stack):
const redirect = () => this.props.history.replace('/some/other/url');
This prop lets you update the URL programmatically. For example, suppose you want to push a new URL when the user clicks a button. It has two useful methods:
push- This adds a new URL to the end of the history stack. That means that clicking the back button will take the browser to the previous URL. Note that pushing the same URL multiple times in a row will have no effect; the URL will still only show up on the stack once. In development mode, pushing the same URL twice in a row will generate a console warning. This warning is disabled in production mode.replace- This replaces the current URL on the history stack, so the back button won’t take you to it. For example:
In this article, you learned how to:
- Create navigation links for your route paths; and
- Redirect users through using the
<Redirect>component; and - Update a browser’s URL programmatically by using React Router’s
historyprop.
Now you know how to create front-end routes and add navigation with React Router. When initializing Express projects, you declare static routes. Static routes are routes that are declared when an application is initialized. When using React Router in your application’s initialization, you can declare dynamic routes. React Router introduces dynamic routing, where your routes are created as your application is rendering. This allows you to create nested routes within components!
In this article, let’s dive into nested routes! When you finish the article, you should:
- Describe what nested routes are; and
- Be able to use React Router to create and navigate nested routes; and
- Know how to use the React Router
matchprop to generate links and routes.
Let’s begin with why you might need nested routes. As you remember, you are using React to create a single-page application. This means that you’ll be organizing your application into different components and sub-components.
For example, imagine creating a simple front-end application with three main pages: a home welcome page (path of /), a users index page (path of /users), and user profile pages (path of /users/:userId). Now imagine if every user had links to separate posts and photos pages.
You can create those routes and links within the user profile component, instead of creating the routes and links where the main routes are defined.
Now let’s dive into a user profile component to understand what are nested routes! Imagine you have a route in your application’s entry file to each user’s profile like so:
<Route path="/users/:userId" component={Profile} />This means that upon navigating to http://localhost:3000/users/1, you would render the following Profile component and the userId parameter within props.match.params would have the value of "1".
const Profile = (props) => { // Custom call to database to fetch a user by a user ID. const user = fetchUser(props.match.params.userId); const { name, id } = user;return ( <div> <h1>Welcome to the profile of {name}!</h1>
{/* Links to a specific user's posts and photos */} <Link to={`/users/${id}/posts`}>{name}'s Posts</Link> <Link to={`/users/${id}/photos`}>{name}'s Photos</Link> {/* Routes to a specific user's posts and photos */} <Route path='/users/:userId/posts' component={UserPosts} /> <Route path='/users/:userId/photos' component={UserPhotos} /> </div>
); };
Since this route is not created until the Profile component is rendered, you are dynamically creating your nested /users/:userId/posts and /users/:userId/photos routes. Remember that your match prop also has other helpful properties. You can use match.url instead of /users/${id} in your profile links. You can also use match.path instead of /users/:userId in your profile routes. Remember that you can destructure url, path, and params from your match prop!
// Destructure `match` prop const Profile = ({ match: { url, path, params }) => {// Custom call to database to fetch a user by a user ID. const user = fetchUser(params.userId); const { name, id } = user;
return ( <div> <h1>Welcome to the profile of {name}!</h1>
{/* Replaced `/users/${id}` URL with `props.match.url` */} <Link to={`${url}/posts`}>{name}'s Posts</Link> <Link to={`${url}/photos`}>{name}'s Photos</Link> {/* Replaced `/users/:userId` path with `props.match.path` */} <Route path={`${path}/posts`} component={UserPosts} /> <Route path={`${path}/photos`} component={UserPhotos} /> </div>}
); };
In tomorrow’s project, you’ll build a rainbow of routes as well as define nested routes. In the future, you may choose to implement nested routes to keep your application’s routes organized within related components.
In this article, you learned:
- What nested routes are; and
- About creating and navigating nested routes with React Router; and
- How to use the React Router props to generate nested links and routes.
A “build” is the process of converting code into something that can actually execute or run on the target platform. A “front-end build” is a process of preparing a front-end or client-side application for the browser.
With React applications, that means (at a minimum) converting JSX to something that browsers can actually understand. When using Create React App, the build process is automatically configured to do that and a lot more.
When you finish this article, you should be able to:
- Describe what front-end builds are and why they’re needed;
- Describe at a high level what happens in a Create React App when you run
npm start; and - Prepare to deploy a React application into a production environment.
The need for front-end builds predates React. Over the years, developers have found it helpful to extend the lowest common denominator version of JavaScript and CSS that they could use.
Sometimes developers extend JavaScript and CSS with something like TypeScript or Sass. Using these non-standard languages and syntaxes require you to use a build process to convert your code into standard JavaScript and CSS that can actually run in the browser.
Browser-based applications also require a fair amount of optimization to deliver the best, or at least acceptable, experience to end users. Front-end build processes could be configured to lint code, run unit tests, optimize images, minify and bundle code, and more — all automatically at the press of a button (i.e. running a command at the terminal).
Developers are generally an impatient lot. When new features are added to JavaScript, we don’t like to wait for browsers to widely support those features before we start to use them in our code. And we really don’t like when we have to support older, legacy versions of browsers.
In recent years, JavaScript has been updated on a yearly basis and browser vendors do a decent job of updating their browsers to support the new features as they’re added to the language. Years ago though, there was an infamous delay between versions 5 and 6 of JavaScript. It took years before ES6 (or ES2015 as it eventually was renamed to) to officially be completed and even longer before browsers supported all of its features.
In the period of time before ES2015 was broadly supported by browsers, developers used front-end builds to convert or transpile ES2015 features and syntax to an older version of the language that was more broadly supported by browsers (typically ES5). The transpilation from ES2015/ES6 down to ES5 was one of the major drivers for developers to add front-end builds to their client-side projects.
When learning about front-end or React builds, you’ll encounter a lot of terminology that you may or may not be familiar with. Here’s some of the terminology that you’ll likely encounter:
Linting is process of using a tool to analyze your code to catch common programming errors, bugs, stylistic inconsistencies, and suspicious coding patterns. ESLint is a popular JavaScript linting tool.
Transpilation is the process of converting source code, like JavaScript, from one version to another version. Usually this means converting newer versions of JavaScript, ES2019 or ES2021, to a version that’s more widely supported by browsers, like ES2015, or even ES5 or ES3 (if you need to support the browser that your parents or grandparents use).
Minification is the process of removing all unnecessary characters in your code (e.g. white space characters, new line characters, comments) to produce an overall smaller file. Minification tools will often also rename identifers in your code (i.e. parameter and variable names) in the quest for smaller and smaller file sizes. Source maps can also be generated to allow debugging tools to cross reference between minified code and the original source code.
Bundling is the process of combining multiple code files into a single file. Creating a bundle (or a handful of bundles) reduces the number of requests that a client needs to make to the server.
Tree shaking is the process of removing unused (or dead) code from your application before it’s bundled. Tree shaking external dependencies can sometimes have a dramatic positive impact on overall bundled file sizes.
Front-end build tools have come and gone over the years; sometimes very quickly, which helped bring about the phenomenon known as JavaScript fatigue.
Configuration based tools allow you to create your build tasks by declaring (usually using JSON, XML, or YAML) what you want to be done, without explicitly writing every step in the process. In contrast, coding or scripting based tools allow you to, well, write code to create your build tasks. Configuration based tools can sometimes feel simpler to use while giving up some control (at least initially) while coding based tools can feel more familiar and predictable (since you’re describing tasks procedurally). Every generalization is false though (including this one), so there are plenty of exceptions.
Grunt is a JSON configuration based task runner that can be used to orchestrate the various tasks that make up your front-end build. Grunt was very quickly supplanted by Gulp, which allowed developers to write JavaScript to define front-end build tasks. After Gulp, the front-end tooling landscape became a bit more muddled. Some developers preferred the simplicity of using npm scripts to define build tasks while others preferred the power of configuration based bundlers like webpack.
As front-end or client-side applications grew in complexity, developers found themselves wanting to leverage more advanced JavaScript features and newer syntax like classes, arrow functions, destructuring, async/await, etc. Using a code transpiler, like Babel, allows you to use all of the latest and greatest features and syntax without worrying about what browsers support what.
Module loaders and bundlers, like webpack, also allowed developers to use JavaScript modules without requiring users to use a browser that natively supports ES modules. Also, module bundling (along with minification and tree-shaking) helps to reduce the bandwidth that’s required to deliver the assets for your application to the client.
[Create React App][cra] uses webpack (along with Babel) under the covers to build your React applications. Even if you’re not using Create React App, webpack and Babel are still very popular choices for building React applications.
Running an application created by Create React App using npm start can feel magical. Some stuff happens in the terminal and your application opens into your default browser. Even better, when you make changes to your application, your changes will (usually) automatically appear in the browser!
At a high level, here’s what happens when you run npm start:
- Environment variables are loaded (more about this in a bit);
- The list of browsers to support are checked (more about this too in a bit);
- The configured HTTP port is checked to ensure that it’s available;
- The application compiler is configured and created;
webpack-dev-serveris started;webpack-dev-servercompiles your application;- The
index.htmlfile is loaded into the browser; and - A file watcher is started to watch your files, waiting for changes.
Create React App provides a script that you can run to “eject” your application from the Create React App tooling. When you eject your application, all of the hidden stuff is exposed so that you can review and customize it.
The need to customize Create React App rarely happens. Also, don’t eject an actual project as it’s a one-way trip! Once a Create React App project has been ejected, there’s no going back (though you could always undo the ejection process by reverting to an earlier commit if you’re using source control).
To eject your application from Create React App, run the command npm run eject. You’ll be prompted if you want to continue; type “y” to continue with the ejection process. Once the ejection process has completed, you can review the files that were previously hidden from you.
In the package.json file, you’ll see the following npm scripts:
{
  "scripts": {
    "start": "node scripts/start.js",
    "build": "node scripts/build.js",
    "test": "node scripts/test.js"
  }
}
You can open the ./scripts/start.js file to see the code that’s executed when you run npm start.
If you’re curious about the webpack configuration, you can open and review the ./config/webpack.config.js.
Before you deploy your application to production, you’ll want to make sure that you’ve replaced static values in your code with environment variables and considered what browsers you need to support.
Create React App supports defining environment variables in an .env file. To define an environment variable, add an .env file to your project and define one or more variables that start with the prefix REACT_APP_:
REACT_APP_FOO: some value
REACT_APP_BAR: another value
Environment variables can be used in code like this:
console.log(process.env.REACT_APP_FOO);You can also reference environment variables in your index.html like this:
<title>%REACT_APP_BAR%</title>Important: Environment variables are embedded into your HTML, CSS, and JavaScript bundles during the build process. Because of this, it’s very important to not store any secrets, like API keys, in your environment variables as anyone can view your bundled code in the browser by inspecting your files.
In your project’s package.json file, you can see the list of targeted browsers:
{
  "browserslist": {
    "production": [
      ">0.2%",
      "not dead",
      "not op_mini all"
    ],
    "development": [
      "last 1 chrome version",
      "last 1 firefox version",
      "last 1 safari version"
    ]
  }
}
Adjusting these targets affect how your code will be transpiled. Specifying older browser versions will result in your code being transpiled to older versions of JavaScript in order to be compatible with the specified browser versions. The production list specifies the browsers to target when creating a production build and the development list specifics the browsers to target when running the application using npm start.
The browserl.ist website can be used to see the browsers supported by your configured browserslist.
To create a production build, run the command npm run build. The production build process bundles React in production mode and optimizes the build for the best performance. When the command completes, you’ll find your production ready files in the build folder.
Now your application is ready to be deployed!
For more information about how to deploy a Create React App project into production, see this page in the official documentation.
In this article, you learned how to:
- Describe what front-end builds are and why they’re needed;
- Describe at a high level what happens in a Create React App when you run
npm start; and - Prepare to deploy a React application into a production environment.
Now that you’ve had an introduction to React Router, feel free to explore the official documentation to learn more! As you become a full-fledged software engineer, remember that documentation is your friend. You can take a brief overview for now, as the documentation might include a lot of information at first. The more you learn about React, the more you should revisit the official documentation and learn!
Today you’re going to get our first experience using React Router. The goal is to create a basic app that displays the colors of the rainbow. This rainbow, however, has something special about it — some of the colors are nested within others.
Begin by creating a new React project:
npx create-react-app rainbow-routes --template @appacademy/simpleNow you’ll remove all the contents of your src and all the contents from your public directory to build the application architecture from scratch! After you have deleted all your files within the directories, create a new index.html file in your public folder. Use the html:5 emmet shortcut to generate an HTML template. Title your page “Rainbow Routes” and create a div with an id of root in your DOM’s <body> element. Create an index.css file in your src directory with the following code. Now let’s create your entry file!
h4 { color: darkblue; cursor: pointer; }h4:hover { text-decoration: underline; }
#rainbow { position: absolute; top: 0; left: 300px; }
h3 { position: absolute; top: 1px; }
.red { background-color: red; width: 100px; height: 100px; }
.orange { background-color: orange; width: 100px; height: 50px; }
.yellow { background-color: yellow; width: 100px; height: 50px; }
.green { background-color: green; width: 100px; height: 100px; }
.blue { background-color: blue; width: 100px; height: 100px; }
.indigo { background-color: mediumslateblue; width: 100px; height: 50px; }
.violet { background-color: darkviolet; width: 100px; height: 100px; }
a { display: block; margin-bottom: 10px; }
Create an index.js entry file in the src directory. At the top of the file, make sure to import React from the react package and ReactDOM from the react-dom package. Make sure to also import your the index.css file you just created! This will take care of styling your rainbow routes.
Now you can use the ReactDOM.render() method to render a <Root /> component instead of the DOM element with an id of root. Lastly, wrap your render function with a DOMContentLoaded event listener, like so:
document.addEventListener('DOMContentLoaded', () => {
  ReactDOM.render(
    <Root />,
    document.getElementById('root'),
  );
});
Let’s create your Root component right in your entry file! Your Root component will take care of applying your BrowserRouter to the application. Applying the BrowserRouter to your Root component allows all the child components rendering within <BrowserRouter> tags to use and access the Route, Link, and NavLink components within the react-router-dom package.
const Root = () => (
  // TODO: Apply BrowserRouter
  // TODO: Render rainbow
);
Install the react-router-dom package:
npm install react-router-dom@^5.0.0Now import BrowserRouter from the react-router-dom package, like so:
import { BrowserRouter } from 'react-router-dom';You’re going to be rendering a lot of components, so let’s keep your src directory organized by creating a components directory within. Within your new ./src/components directory, create a Rainbow.js file for your Rainbow component with the following code:
// ./src/components/Rainbow.js import React from 'react'; import { Route, Link, NavLink } from 'react-router-dom';const Rainbow = () => ( <div> <h1>Rainbow Router!</h1> {/_ Your links should go here _/}
<div id="rainbow"> {/* Your routes should go here */} </div></div> );
export default Rainbow;
Your Rainbow component will act as the home page or default path (/) of your application. Import the Rainbow component into your entry file and have your Root component render <Rainbow /> wrapped within <BrowserRouter> tags, like so:
const Root = () => (
  <BrowserRouter>
    <Rainbow />
  </BrowserRouter>
);
Within your Rainbow component, you’ll be rendering <NavLink> and <Route> components to add different navigation paths to different components. Let’s create all the components you will render!
Create files for the following components in your ./src/components directory:
RedBlueGreenIndigoOrangeVioletYellow
Your Red and Blue components will look something like this:
import React from 'react'; import { Route, Link, NavLink } from 'react-router-dom';const Color = () => ( <div> <h2 className="color">Color</h2> {/_ Links here _/}
{/* Routes here */}</div> );
export default Color;
Your Green, Indigo, Orange, Violet, and Yellow components will look something like this:
import React from 'react';const Color = () => ( <div> <h3 className="color">Color</h3> </div> );
export default Color;
Now start your server and verify you can see the “Rainbow Router!” header from your Rainbow component. Currently there is no functionality. Let’s fix that!
As a reminder, wrapping the Rainbow component in <BrowserRouter> tags makes the router available to all descendent React Router components. Now open the Rainbow.js file. You’re going to render some of your color components from here. Ultimately you want your routes to look like this.
URLComponents/Rainbow/redRainbow -> Red/red/orangeRainbow -> Red -> Orange/red/yellowRainbow -> Red -> Yellow/greenRainbow -> Green/blueRainbow -> Blue/blue/indigoRainbow -> Blue -> Indigo/violetRainbow -> Violet
This means that the Red, Green, Blue, and Violet components need to render in the Rainbow component, but only when you are at the corresponding URL. You’ll do this with Route components. Begin by importing the Red, Green, Blue, and Violet components into your Rainbow.js file. Then add the necessary Route components inside the div with id="rainbow" in the Rainbow component. For example to render the Red component with the /red path, you would use the following Route component:
<Route path="/red" component={Red} />Test that your code works! Manually type in each URL you just created, and you should see the color component pop up. Remember, these are React Routes, so the paths you created will come after the /. For example, your default rainbow route will look like http://localhost:3000/ while your red route will look like http://localhost:3000/red.
You want to nest the Orange and Yellow components inside the Red component, and the Indigo component inside the Blue component. Remember to import your components to use them in a Route tag. You’ll have to go add the corresponding Route tags to the Red.js and Blue.js files. Make sure to use the correct nested paths, such as "/red/orange" for the orange Route.
Manually navigating to our newly created routes is tiresome, so let’s add functionality to take care of this process for us. React Router provides the Link and NavLink components for this purpose.
Add Links to the paths /red, /green, /blue, and /violet in the Rainbow component. For example, your red link should look like
<Link to="/red">Red</NavLink>When you are at blue you want to be able to get to /blue/indigo, and then back to /blue. Add the corresponding Links to the Blue component like this:
<Link to='/blue' >Blue only</Link>
<Link to='/blue/indigo' >Add indigo</Link>
Similarly, add Links to /red, /red/orange and /red/yellow to the Red component. Test all your links. Navigation is so much easier now!
It would be nice if our links gave us some indication of which route you were at. Fortunately, React Router has a special component for that very purpose: NavLink. NavLinks get an extra CSS class when their to prop matches the current URL. By default this class is called active.
Go ahead and switch all your Links to NavLinks. If you open the app you won’t see any change yet. That’s because you haven’t added any special styling to the active class. Go ahead and open the index.css file. Create an .active class and add the line font-weight: 700. Now your active links will be bold. Isn’t that nice!
The only problem is that now the Blue only link is active even when the path is /blue/indigo. That doesn’t make a lot of sense. Let’s add the exact flag to that link so it will only be active when its to exactly matches the current path. Now it should look like:
<NavLink exact to="/blue">
  Blue only
</NavLink>
Do the same for the Red only link. Everything should be working now.
You’ve already set up NavLink to bold the link text using the .active class in src/index.css. But what if you wanted this class to be something else? For instance, what if you want your main color links (Red, Green, Blue, Violet) to be styled differently when active than your sub-route links (Red Only, Add Orange, Add Yellow, etc.).
You can set the class that React Router sets to an active NavLink by adding the activeClassName prop.
For instance, when we are at a route matching the below NavLink’s to prop, the component will have a class of .parent-active applied:
<NavLink to="/blue" activeClassName="parent-active" >
  Blue
</NavLink>
This allows much more flexibility to style an active NavLink!
Using the example above, add an activeClassName prop to each of your NavLinks in src/components/Rainbow.js. Now, add some CSS styling for that class in your src/index.css to distinguish your main and your sub-route links.
Compare your work to the solution and make sure the behavior is the same. Time to celebrate! ✨ 🌈 ✨
You can also learn more about using the React Router at reacttraining.com!
In this project, you’ll use Create React App to create a simple React application. You’ll experiment with some of the features that Create React App provides and deploy a production build of your application to a standalone Express application.
Begin by using the create-react-app package to create a React application:
npx create-react-app exploring-react-builds --template @appacademy/simpleRemember that using the
create-react-appcommand initializes your project as a Git repository. If you use thels -ato view the hidden files in your project, you’ll see the.gitfile.
Update the App component:
- Wrap the
<h1>element with a<div>element; and - Change the
<h1>element content to something like “Exploring React Builds”.
// ./src/App.jsimport React from 'react';
function App() { return ( <div> <h1>Exploring React Builds</h1> </div> ); }
export default App;
You’ve already seen an example of using the import keyword to import a stylesheet into a module so that it’ll be included in your application build. That’s the technique being used to include the global index.css stylesheet:
// ./src/index.jsimport React from 'react'; import ReactDOM from 'react-dom'; import './index.css'; import App from './App';
ReactDOM.render( <React.StrictMode> <App /> </React.StrictMode>, document.getElementById('root') );
You can also leverage CSS modules in your Create React App projects. CSS Modules scope stylesheet class names so that they are unique to a specific React component. This allows you to create class names without having to worry if they might collide with class names used in another component.
Add a new css-modules folder to the src folder. Within that folder, add the following files:
HeadingA.jsHeadingA.module.cssHeadingB.jsHeadingB.module.css
Then update the contents of each file to the following:
// ./src/css-modules/HeadingA.jsimport React from 'react'; import styles from './HeadingA.module.css';
function HeadingA() { return ( <h1 className={styles.heading}>Heading A</h1> ); }
export default HeadingA;
/_ ./src/css-modules/HeadingA.module.css _/
.heading { color: green; }
// ./src/css-modules/HeadingB.js
import React from 'react'; import styles from './HeadingB.module.css';
function HeadingB() { return ( <h1 className={styles.heading}>Heading B</h1> ); }
export default HeadingB;
/_ ./src/css-modules/HeadingB.module.css _/
.heading { color: red; }
Notice how the .heading CSS class name is being used within each component to set the color of the <h1> element. For the HeadingA component, the color is green, and for the HeadingB component, the color is red. Using the file naming convention [name].module.css let’s Create React App know that we want these stylesheets to be processed as CSS Modules. Using CSS Modules allows the .heading class name to be reused across components without any issue.
To see this feature in action, update your App component to render both of your new components:
import React from 'react'; import HeadingA from './css-modules/HeadingA'; import HeadingB from './css-modules/HeadingB';function App() { return ( <div> <h1>Exploring React Builds</h1> <HeadingA /> <HeadingB /> </div> ); }
export default App;
Then run your application (npm start) to see “Heading A” and “Heading B” displayed respectively in green and red. If you use the browser’s developer tools to inspect “Heading A”, you’ll see that the .heading class name has been modified so that it’s unique to the HeadingA component:
CSS Modules is an example of how a front-end build process can be used to modify code to enable a feature that’s not natively supported by browsers.
Create React App configures webpack with support for loading images (as well as CSS, fonts, and other file types). What this means, for you as the developer, is that you can add an image file to your project, import it directly into a module, and render it in a React component.
Download any image of off the Web or click here to download the below image.
Then within the src folder add a new folder named image. Within that folder add a new component file named Image.js. Also add your downloaded image file to the image folder (so it’s a sibling to the Image.js file).
Update the contents of the Image.js file to this:
// ./src/image/Image.jsimport React from 'react'; import cat from './react-builds-cat.png';
console.log(cat); // /static/media/react-builds-cat.45f7f4d2.png
function Image() { // Import result is the URL of your image. return <img src={cat} alt="images/images/Cat" />; }
export default Image;
You can import an image into a component using the import keyword. This tells webpack to include the image in the build. Notice that when you import an image into a module, you’ll get a path to the image’s location within the build. You can use this path to set the src attribute on an <img> element.
Be sure to update the image
importstatement to the correct file name if you’re using your own image!
Now update the App component to import and render the Image component:
// ./src/App.jsimport React from 'react'; import HeadingA from './css-modules/HeadingA'; import HeadingB from './css-modules/HeadingB'; import Image from './image/Image';
function App() { return ( <div> <h1>Exploring React Builds</h1> <HeadingA /> <HeadingB /> <Image /> </div> ); }
export default App;
If you run your application (npm start) you’ll see your image displayed on the page! You can also open your browser’s developer tools and view the “Sources” for the current page. If you can expand the localhost:3000 > static > media node on the left, you can see the image file that webpack copied to your build.
You can also reference images in your CSS files too. Add a CSS file named Image.css to the ./src/image folder and update its contents to this:
/* ./src/image/Image.css */
.cat {
background-image: url(./react-builds-cat.png);
width: 400px;
height: 400px;
}
Then update the Image component to this:
// ./src/image/Image.jsimport React from 'react'; import './Image.css'; import cat from './react-builds-cat.png';
console.log(cat); // /static/media/react-builds-cat.45f7f4d2.png
function Image() { return ( <div> {/_ Import result is the URL of your image. _/} <img src={cat} alt="Cat" /> <div className='cat'></div> </div> ); }
export default Image;
Now you’ll see the image displayed twice on the page!
Earlier you learned about the browerslist setting in the package.json file and now adjusting these targets affect how your code will be transpiled:
{
  "browserslist": {
    "production": [
      ">0.2%",
      "not dead",
      "not op_mini all"
    ],
    "development": [
      "last 1 chrome version",
      "last 1 firefox version",
      "last 1 safari version"
    ]
  }
}
The production list specifies the browsers to target when creating a production build and the development list specifics the browsers to target when running the application using npm start. Currently, you’re targeting relatively recent versions of the major browsers when creating a development build. Targeting older browser versions results in your code being transpiled to an older version of JavaScript.
To experiment with this configuration option, let’s add a class component to the project. Add a new folder named class-component to the src folder. Within that folder, add a file named ClassComponent.js containing the following code:
// ./src/class-component/ClassComponent.jsimport React from 'react';
class ClassComponent extends React.Component { render() { return ( <h1>Class Component</h1> ); } }
export default ClassComponent;
Don’t forget to update your App component to render the new component:
// ./src/App.jsimport React from 'react'; import HeadingA from './css-modules/HeadingA'; import HeadingB from './css-modules/HeadingB'; import Image from './image/Image'; import ClassComponent from './class-component/ClassComponent';
function App() { return ( <div> <h1>Exploring React Builds</h1> <HeadingA /> <HeadingB /> <Image /> <ClassComponent /> </div> ); }
export default App;
Now run your application using npm start. Open your browser’s developer tools and view the “Sources” for the current page. Expand the localhost:3000 > static > js node on the left and select the main.chunk.js file. Press CMD+F on macOS or CTRL+F on Windows to search the file for “Class Component”. Here’s what the transpiled code looks like for the ClassComponent class:
class ClassComponent extends react__WEBPACK_IMPORTED_MODULE_0___default.a.Component {
  render() {
    return /*#__PURE__*/react__WEBPACK_IMPORTED_MODULE_0___default.a.createElement("h1", {
      __self: this,
      __source: {
        fileName: _jsxFileName,
        lineNumber: 7,
        columnNumber: 7
      }
    }, "Class Component");
  }
}
Have you wondered yet why you need to use the developer tools to view the bundles generated by Create React App? Remember that when you run
npm start, Create React App builds your application usingwebpack-dev-server. To keep things as performant as possible, the bundles generated bywebpack-dev-serverare stored in memory instead of writing them to the file system.
The JSX in the component’s render method has been converted to JavaScript but the ClassComponent ES2015 class is left alone. This makes sense though as JSX isn’t natively supported by any browser while ES2015 classes have been natively supported by browsers for awhile now.
But what if you need to target a version of a browser that doesn’t support ES2015 classes? You can use the “Can I use…” website to see when browsers started supporting ES2105 (or ES6) classes. Starting with version 49, Chrome natively supported classes. But imagine that you need to support Chrome going back to version 30, a version of Chrome that doesn’t support classes.
Change the browserslist.development property in the package.json file to this:
{
  "browserslist": {
    "production": [
      ">0.2%",
      "not dead",
      "not op_mini all"
    ],
    "development": [
      "chrome >= 30",
      "last 1 firefox version",
      "last 1 safari version"
    ]
  }
}
The query chrome >= 30 specifies that you want to target Chrome version 30 or newer.
The browserl.ist website can be used to see the browsers supported by your configured
browserslist.
Stop your application if it’s currently running. Delete the ./node_modules/.cache folder and run npm start again. Then view the main.chunk.js bundle again in the developer tools:
Now your ES2015 class component is being converted to a constructor function! Here’s the transpiled code for reference:
var ClassComponent = /*#__PURE__*/function (_React$Component) { Object(_Users_jameschurchill_Documents_GitHub_Modular_Curriculum_content_react_redux_topics_react_builds_projects_exploring_react_builds_solution_node_modules_babel_preset_react_app_node_modules_babel_runtime_helpers_esm_inherits__WEBPACK_IMPORTED_MODULE_2__["default"])(ClassComponent, _React$Component);var _super = Object(_Users_jameschurchill_Documents_GitHub_Modular_Curriculum_content_react_redux_topics_react_builds_projects_exploring_react_builds_solution_node_modules_babel_preset_react_app_node_modules_babel_runtime_helpers_esm_createSuperWEBPACK_IMPORTED_MODULE_3["default"])(ClassComponent);
function ClassComponent() { Object(_Users_jameschurchill_Documents_GitHub_Modular_Curriculum_content_react_redux_topics_react_builds_projects_exploring_react_builds_solution_node_modules_babel_preset_react_app_node_modules_babel_runtime_helpers_esm_classCallCheckWEBPACK_IMPORTED_MODULE_0["default"])(this, ClassComponent);
return _super.apply(this, arguments);}
Object(_Users_jameschurchill_Documents_GitHub_Modular_Curriculum_content_react_redux_topics_react_builds_projects_exploring_react_builds_solution_node_modules_babel_preset_react_app_node_modules_babel_runtime_helpers_esm_createClassWEBPACK_IMPORTED_MODULE_1["default"])(ClassComponent, [{ key: "render", value: function render() { return /#PURE/react__WEBPACK_IMPORTED_MODULE_4___default.a.createElement("h1", { __self: this, __source: { fileName: _jsxFileName, lineNumber: 7, columnNumber: 7 } }, "Class Component"); } }]);
return ClassComponent; }(reactWEBPACKIMPORTED_MODULE_4default.a.Component);
Luckily it’s very rare that you’ll need to read the code in your generated bundles. webpack, by default, is configured to generate sourcemaps. Sourcemaps are a mapping of the code in a generated file, like a bundle file, to the original source code. This gives you access to your original source code in the browser’s developer tools:
You can even set a breakpoint in your source within the developer tools to stop execution on a specific line of code!
Earlier you learned that Create React App supports defining environment variables in an .env file. This gives you a convenient way to avoid hard coding values that vary across environments.
Let’s experiment with this feature so that you can see how the Create React App build process embeds environment variables into your HTML, CSS, and JavaScript bundles.
Add an .env file to the root of your Create React App project. Define an environment variable named REACT_APP_TITLE:
REACT_APP_TITLE=Exploring React BuildsRemember that environment variables need to be prefixed with REACT_APP_ for Create React App to process them. After defining your environment variable, you can refer to it within JSX using an expression and process.env:
// ./src/App.jsimport React from 'react'; import HeadingA from './css-modules/HeadingA'; import HeadingB from './css-modules/HeadingB'; import Image from './image/Image'; import ClassComponent from './class-component/ClassComponent';
function App() { return ( <div> <h1>{process.env.REACT_APP_TITLE}</h1> <HeadingA /> <HeadingB /> <Image /> <ClassComponent /> </div> ); }
export default App;
Environment variables can also be referred to in regular JavaScript code:
console.log(process.env.REACT_APP_TITLE);You can also reference environment variables in your ./public/index.html file like this:
<!DOCTYPE html>
<html lang="en">
  <head>
    <meta charset="utf-8" />
    <title>%REACT_APP_TITLE%</title>
  </head>
  <body>
    <div id="root"></div>
  </body>
</html>
Run your application again using npm start. Open your browser’s developer tools and view the “Sources” for the current page. Expand the localhost:3000 node on the left and select (index). Notice that the text %REACT_APP_TITLE% within the <title> element has been converted to the text literal Exploring React Builds:
If you expand the localhost:3000 > static > js node on the left and select the main.chunk.js file, you can see how the App component’s JSX has been converted to JavaScript:
Here’s a closer look at the relevant React.createElement method call:
/*#__PURE__*/react__WEBPACK_IMPORTED_MODULE_0___default.a.createElement("h1", {
    __self: this,
    __source: {
      fileName: _jsxFileName,
      lineNumber: 10,
      columnNumber: 7
    }
  }, "Exploring React Builds")
Again, notice how the environment variable has been replaced with a text literal. This has important security implications for you to consider. Because environment variables are embedded into your HTML, CSS, and JavaScript bundles during the build process, it’s very important to not store any secrets, like API keys, in your environment variables. Remember, anyone can view your bundled code in the browser by inspecting your files!
In the last phase of this project, let’s add routing to the React application, create a production build, and deploy the build to an Express application!
To add React Router to the application, start by installing the react-router-dom npm package:
npm install react-router-dom@^5.0.0Then update the App component to this code:
// ./src/App.jsimport React from 'react'; import { BrowserRouter, Switch, Route, Link } from 'react-router-dom'; import HeadingA from './css-modules/HeadingA'; import HeadingB from './css-modules/HeadingB'; import Image from './image/Image'; import ClassComponent from './class-component/ClassComponent';
function App() { return ( <BrowserRouter> <div> <h1>{process.env.REACT_APP_TITLE}</h1> <nav> <ul> <li> <Link to="/">Home</Link> </li> <li> <Link to="/image">Image</Link> </li> <li> <Link to="/class-component">Class Component</Link> </li> </ul> </nav> <Switch> <Route path="/image"> <Image /> </Route> <Route path="/class-component"> <ClassComponent /> </Route> <Route path="/"> <HeadingA /> <HeadingB /> </Route> </Switch> </div> </BrowserRouter> ); }
export default App;
Be sure to run and test your application to ensure that the defined routes work as expected:
/- Should display theHeadingAandHeadingBcomponents;/image- Should display theImagecomponent; and/class-component- Should display theClassComponentcomponent.
To create a production build, run the command npm run build from the root of your project. The output in the terminal should look something like this:
> solution@0.1.0 build [absolute path to your project] > react-scripts buildCreating an optimized production build... Compiled successfully.
File sizes after gzip:
47.83 KB build/static/js/2.722c16c4.chunk.js 773 B build/static/js/runtime-main.b7d1e5ee.js 745 B build/static/js/main.12299197.chunk.js 197 B build/static/css/main.e9a0d1f8.chunk.css
The project was built assuming it is hosted at /. You can control this with the homepage field in your package.json.
The build folder is ready to be deployed. You may serve it with a static server:
npm install -g serve serve -s build
Find out more about deployment here:
bit.ly/CRA-deploy
Ignore the comments about using serve to deploy your application (i.e. npm install -g serve and serve -s build). In the next step, you’ll create a simple Express application to server your React application.
Create a new folder for your Express application outside of the Create React App project folder.
For example, from the root of your project, use
cd ..to go up a level and then create a new folder namedexpress-serverby running the commandmkdir express-server. This makes theexpress-serverfolder a sibling to your Create React App project folder.
Browse into the express-server folder and initialize it to use npm (i.e. npm init -y). Then install Express by running the command npm install express@^4.0.0.
App a file named app.js with the following contents:
// ./app.jsconst express = require('express'); const path = require('path');
const app = express();
app.use(express.static(path.join(__dirname, 'public')));
app.get('*', function(req, res) { res.sendFile(path.join(__dirname, 'public', 'index.html')); });
const port = 9000;
app.listen(port, () => console.log(Listening on port ${port}...));
This simple Express application will:
- Attempt to match incoming requests to static files located in the
publicfolder; and - If a matching static file isn’t found, then the
./public/index.htmlfile will be served for all other requests.
Now add a folder named public to the root of your Express project. Copy the files from the build folder in your Create React App project to the public folder in the Express application project. Then run your application using the command node app.js.
Open a browser and browse to the URL http://localhost:9000/. You should see your React application served from your Express application! Be sure to click the navigation links to verify that all of your configured routes work as expected.
Also, because you configured Express to serve the ./public/index.html file for any request that doesn’t match a static file, you can “deep link” to any of your React application’s routes:
More content at plainenglish.io
By Bryan Guner on July 15, 2021.
Exported from Medium on August 31, 2021.
Curating Complexity: A Guide to Big-O Notation
Curating Complexity: A Guide to Big-O Notation
Medium-article-comp-complex
A Node.js repl by bgoonzreplit.com
- Why is looking at runtime not a reliable method of calculating time complexity?
- Not all computers are made equal( some may be stronger and therefore boost our runtime speed )
- How many background processes ran concurrently with our program that was being tested?
- We also need to ask if our code remains performant if we increase the size of the input.
- The real question we need to answering is:
How does our performance scale?.
- Big O Notation is a tool for describing the efficiency of algorithms with respect to the size of the input arguments.
- Since we use mathematical functions in Big-O, there are a few big picture ideas that we’ll want to keep in mind:
- The function should be defined by the size of the input.
SmallerBig O is better (lower time complexity)- Big O is used to describe the worst case scenario.
- Big O is simplified to show only its most dominant mathematical term.
- We can use the following rules to simplify the our Big O functions:
Simplify Products: If the function is a product of many terms, we drop the terms that don’t depend on n.Simplify Sums: If the function is a sum of many terms, we drop the non-dominant terms.n: size of the inputT(f): unsimplified math functionO(f): simplified math function.
Putting it all together
- First we apply the product rule to drop all constants.
- Then we apply the sum rule to select the single most dominant term.
Common Complexity Classes
The algorithm takes roughly the same number of steps for any input size.
In most cases our hidden base of Logarithmic time is 2, log complexity algorithm’s will typically display ‘halving’ the size of the input (like binary search!)
Linear algorithm’s will access each item of the input “once”.
Combination of linear and logarithmic behavior, we will see features from both classes.
Algorithm’s that are log-linear will use both recursion AND iteration.
C is a fixed constant.
C is now the number of recursive calls made in each stack frame.
Algorithm’s with exponential time are VERY SLOW.
- Memoization : a design pattern used to reduce the overall number of calculations that can occur in algorithms that use recursive strategies to solve.
- MZ stores the results of the sub-problems in some other data structure, so that we can avoid duplicate calculations and only ‘solve’ each problem once.
- Two features that comprise memoization:
- FUNCTION MUST BE RECURSIVE.
- Our additional Data Structure is usually an object (we refer to it as our memo… or sometimes cache!)
Our memo object is mapping out our arguments of factorial to it’s return value.
- Keep in mind we didn’t improve the speed of our algorithm.
- Our time complexity for Fibonacci goes from O(2^n) to O(n) after applying memoization.
Rules:
- Write the unoptimized brute force recursion (make sure it works);
- Add memo object as an additional argument .
- Add a base case condition that returns the stored value if the function’s argument is in the memo.
- Before returning the result of the recursive case, store it in the memo as a value and make the function’s argument it’s key.
- When solving DP problems with Memoization, it is helpful to draw out the visual tree first.
- When you notice duplicate sub-tree’s that means we can memoize.
Use When:
- The function is iterative and not recursive.
- The accompanying DS is usually an array.
- Create a table array based off the size of the input.
- Initialize some values in the table to ‘answer’ the trivially small subproblem.
- Iterate through the array and fill in the remaining entries.
- Your final answer is usually the last entry in the table.
Normal Recursive Fibonacci
function fibonacci(n) {
  if (n <= 2) return 1;
  return fibonacci(n - 1) + fibonacci(n - 2);
}
Memoization Fibonacci 1
Memoization Fibonacci 2
Tabulated Fibonacci
- Worst Case Scenario: The term does not even exist in the array.
- Meaning: If it doesn’t exist then our for loop would run until the end therefore making our time complexity O(n).
Time Complexity: Quadratic O(n^2)
- The inner for-loop contributes to O(n), however in a worst case scenario the while loop will need to run n times before bringing all n elements to their final resting spot.
Space Complexity: O(1)
- Bubble Sort will always use the same amount of memory regardless of n.
- The first major sorting algorithm one learns in introductory programming courses.
- Gives an intro on how to convert unsorted data into sorted data.
It’s almost never used in production code because:
- It’s not efficient
- It’s not commonly used
- There is stigma attached to it
Bubbling Up: Term that infers that an item is in motion, moving in some direction, and has some final resting destination.- Bubble sort, sorts an array of integers by bubbling the largest integer to the top.
- Worst Case & Best Case are always the same because it makes nested loops.
- Double for loops are polynomial time complexity or more specifically in this case Quadratic (Big O) of: O(n²)
Time Complexity: Quadratic O(n^2)
- Our outer loop will contribute O(n) while the inner loop will contribute O(n / 2) on average. Because our loops are nested we will get O(n²);
Space Complexity: O(1)
- Selection Sort will always use the same amount of memory regardless of n.
- Selection sort organizes the smallest elements to the start of the array.
Summary of how Selection Sort should work:
- Set MIN to location 0
- Search the minimum element in the list.
- Swap with value at location Min
- Increment Min to point to next element.
- Repeat until list is sorted.
Time Complexity: Quadratic O(n^2)
- Our outer loop will contribute O(n) while the inner loop will contribute O(n / 2) on average. Because our loops are nested we will get O(n²);
Space Complexity: O(n)
- Because we are creating a subArray for each element in the original input, our Space Comlexity becomes linear.
Time Complexity: Log Linear O(nlog(n))
- Since our array gets split in half every single time we contribute O(log(n)). The while loop contained in our helper merge function contributes O(n) therefore our time complexity is O(nlog(n));
Space Complexity: O(n) - We are linear O(n) time because we are creating subArrays.
- Merge sort is O(nlog(n)) time.
- We need a function for merging and a function for sorting.
Steps:
- If there is only one element in the list, it is already sorted; return the array.
- Otherwise, divide the list recursively into two halves until it can no longer be divided.
- Merge the smallest lists into new list in a sorted order.
Time Complexity: Quadratic O(n^2)
- Even though the average time complexity O(nLog(n)), the worst case scenario is always quadratic.
Space Complexity: O(n)
- Our space complexity is linear O(n) because of the partition arrays we create.
- QS is another Divide and Conquer strategy.
- Some key ideas to keep in mind:
- It is easy to sort elements of an array relative to a particular target value.
- An array of 0 or 1 elements is already trivially sorted.
Time Complexity: Log Time O(log(n))
Space Complexity: O(1)
Recursive Solution
Min Max Solution
- Must be conducted on a sorted array.
- Binary search is logarithmic time, not exponential b/c n is cut down by two, not growing.
- Binary Search is part of Divide and Conquer.
- Works by building a larger and larger sorted region at the left-most end of the array.
Steps:
- If it is the first element, and it is already sorted; return 1.
- Pick next element.
- Compare with all elements in the sorted sub list
- Shift all the elements in the sorted sub list that is greater than the value to be sorted.
- Insert the value
- Repeat until list is sorted.
bgoonz’s gists
Instantly share code, notes, and snippets. Web Developer, Electrical Engineer JavaScript | CSS | Bootstrap | Python |…gist.github.com
bgoonz — Overview
Web Developer, Electrical Engineer JavaScript | CSS | Bootstrap | Python | React | Node.js | Express | Sequelize…github.com
Web-Dev-Hub
Memoization, Tabulation, and Sorting Algorithms by Example Why is looking at runtime not a reliable method of…bgoonz-blog.netlify.app
Web-Dev-Hub
Memoization, Tabulation, and Sorting Algorithms by Example Why is looking at runtime not a reliable method of…bgoonz-blog.netlify.app
By Bryan Guner on February 27, 2021.
Exported from Medium on August 31, 2021.
Big O: big picture, broad strokes, not details
Big O: big picture, broad strokes, not details
For a more complete guide… checkout :
A Quick Guide to Big-O Notation, Memoization, Tabulation, and Sorting Algorithms by Example
Curating Complexity: A Guide to Big-O Notationmedium.com
- way we analyze how efficient algorithms are without getting too mired in details
- can model how much time any function will take given
ninputs - interested in order of magnitude of number of the exact figure
- O absorbs all fluff and n = biggest term
- Big O of
3x^2 +x + 1=O(n^2)
no loops or exit & return = O(1)
0 nested loops = O(n)
1 nested loops = O(n^2)
2 nested loops = O(n^3)
3 nested loops = O(n^4)
recursive: as you add more terms, increase in time as you add input diminishes
recursion: when you define something in terms of itself, a function that calls itself
- used because of ability to maintain state at diffferent levels of recursion
- inherently carries large footprint
- every time function called, you add call to stack
iterative: use loops instead of recursion (preferred)
- favor readability over performance
O(n log(n)) & O(log(n)): dividing/halving
- if code employs recursion/divide-and-conquer strategy
- what power do i need to power my base to get n
- constant: does not scale with input, will take same amount of time
- for any input size n, constant time performs same number of operations every time
- logarithmic: increases number of operations it performs as logarithmic function of input size n
- function log n grows very slowly, so as n gets longer, number of operations the algorithm needs to perform doesn’t increase very much
- halving
- linear: increases number of operations it performs as linear function of input size n
- number of additional operations needed to perform grows in direct proportion to increase in input size n
- log-linear: increases number of operations it performs as log-linear function of input size n
- looking over every element and doing work on each one
- quadratic: increases number of operations it performs as quadratic function of input size n
- exponential: increases number of operations it performs as exponential function of input size n
- number of nested loops increases as function of n
- polynomial: as size of input increases, runtime/space used will grow at a faster rate
- factorial: as size of input increases, runtime/space used will grow astronomically even with relatively small inputs
- rate of growth: how fast a function grows with input size
- How does the space usage scale/change as input gets very large?
- What auxiliary space does your algorithm use or is it in place (constant)?
- Runtime stack space counts as part of space complexity unless told otherwise.
For similar content check out my GitHub:
bgoonz - Overview
Web Developer, Electrical Engineer https://bryanguner.medium.com/ https://portfolio42.netlify.app/…github.com
By Bryan Guner on May 19, 2021.
Exported from Medium on August 31, 2021.
You should probably skip this one… seriously it’s just for internal use!
All OF MEDIUM ARTICLES
2021-02-27_A-Quick-Guide-to-Big-O-Notation–Memoization–Tabulation–and-Sorting-Algorithms-by-Example-803ff193c522…golden-lobe-519.notion.site
Notes I Wish I Had When I Started Learning Python
Plus resources for learning data structures and algorithms in python at the bottom of this article!medium.com
Awesome List Of Github Repositories
Platformsbryanguner.medium.com
My Personal Arsenal Of Convenience Scripts
At the bottom the following commands are listed as a markdown file and embed in this article as a github gist.bryanguner.medium.com
Adding CSS To Your HTML
For beginners … very picture heavy since CSS is such a visual discipline!bryanguner.medium.com
Most Common Javascript Errors
Written in quiz formatbryanguner.medium.com
Super Simple Intro To React
This is a basic introduction for those who feel overwhelmed by the vast microcosm that is the React ecosystem!bryanguner.medium.com
React State
Demystifiedmedium.com
Awesome Web Development Youtube Video Archive
This is going to be a running list of youtube videos and channels that I discover as I learn web development. It will…bryanguner.medium.com
Python Problems & Solutions For Beginners
Introduction to python taught through example problems. Solutions are included in embedded repl.it at the bottom of…levelup.gitconnected.com
Fundamental Concepts In Javascript
This is the stuff that comes up on interviews…medium.com
Bash Proficiency In Under 15 Minutes
Cheat sheet and in-depth explanations located below main article contents… The UNIX shell program interprets user…bryanguner.medium.com
Mini Review Of SQL For PostgreSQL W Node & Express
What is a Query?medium.com
All The Things You Can Embed In A Medium Article
I have this innate desire to make everything available all in one place and it’s usually an unnecessary waste of time……bryanguner.medium.com
Front End Behavioral Interview
Web Developer Job Interview Questionsbryanguner.medium.com
The ExpressJS Way To Write APIs
This article will cover the basics of express from the perspective of a beginner without concerning its self with the…medium.com
Heroku Deploy Guides & Cheatsheet Compilation
Heroku lets you deploy, run and manage applications written in Ruby, Node.js, Java, Python, Clojure, Scala, Go and PHP…medium.com
A Comprehensive Deep Dive into React
An in-depth look into the world of React.javascript.plainenglish.io
Web Development Resource List #4
Update:bryanguner.medium.com
BASH CHEAT SHEET
My Bash Cheatsheet Index:bryanguner.medium.com
Heroku Cheat Sheet
a cheatsheet for using heroku-clibryanguner.medium.com
The ExpressJS Way To Write APIs
This article will cover the basics of express from the perspective of a beginner without concerning it’s self with the…bryanguner.medium.com
Heroku Deploy Guides & Cheatsheet Compilation
Heroku lets you deploy, run and manage applications written in Ruby, Node.js, Java, Python, Clojure, Scala, Go and PHP…bryanguner.medium.com
A Comprehensive Deep Dive into React
An in-depth look into the world of React.javascript.plainenglish.io
Web Development Resource List #4
Update:bryanguner.medium.com
BASH CHEAT SHEET
My Bash Cheatsheet Index:bryanguner.medium.com
Heroku Cheat Sheet
a cheatsheet for using heroku-clibryanguner.medium.com
Web Developer’s Technical Glossary
This will be a running list as I make updates!bryanguner.medium.com
PostgreSQL In 43 Commands Or Less
In database jargon, PostgreSQL uses a client/server model. A PostgreSQL session consists of the following cooperating…medium.com
Why Jamstack Rocks🤘😎🤙
JAMstack websites don’t use the microservices architecture, but they go for the micro frontends architecture. Each…medium.com
What Are Bash Aliases And Why Should You Be Using Them!
A Bash alias is a method of supplementing or overriding Bash commands with new ones. Bash aliases make it easy for…bryanguner.medium.com
Life Saving Bash Scripts Part 2
I am not saying they’re in any way special compared with other bash scripts… but when I consider that you can never…medium.com
Job Boards and The Hunt
I can’t imagine the kind of masochism it would take to enjoy the act of posting and daily maintenance on a job…medium.com
Absolutely Everything You Could Need To Know About How JavaScript Works.
Seriously… this list is utterly exhaustive it covers more core concepts than I can hold the names of in working memory…bryanguner.medium.com
Basic React Tutorial
Random Things to Rememberbryanguner.medium.com
Fundamental Concepts In React That Will Probably Come Up On An Interview
Incomplete Articlebryanguner.medium.com
The Penultimate Web Developer’s Cheat Sheet
I am literally just going to combine a fair number of my Cheat Sheets in no particular order.medium.com
Bash Commands That Save Me Time and Frustration
Here’s a list of bash commands that stand between me and insanity.medium.com
Quick Web Developers Website Checklist & A List Of Tools For Improvement
A set of questions you should use before handing off your application to the client.bryanguner.medium.com
10 Essential React Interview Questions For Aspiring Frontend Developers
Comprehensive React Cheatsheet included at the bottom of this article!javascript.plainenglish.io
Long List Of Invaluable NodeJS Resources
Disclaimer: I know that I did not create this list all on my own… I can’t recall or track down the original list if you…levelup.gitconnected.com
Open Ended Frontend Interview Questions You Should Answer Before Your Next Interview
Explain event delegation.bryanguner.medium.com
Data Structures… Under The Hood
Data Structures Referencebryanguner.medium.com
Web Development Interview Resource List
Most good programmers do programming not because they expect to get paid or get adulation by the public, but because it…medium.com
Beginners Guide To Python
My favorite language for maintainability is Python. It has simple, clean syntax, object encapsulation, good library…medium.com
Data Structures & Algorithms Resource List Part 1
Guess the author of the following quotes:bryanguner.medium.com
What is Memoization?
And why this programming paradigm shouldn’t make you cringe.javascript.plainenglish.io
CSS Interview Prep Quiz
Plus Css Cheat Sheet (82 questions total)bryanguner.medium.com
Graph Data Structure Interview Questions At A Glance
Because they’re just about the most important data structure there is.medium.com
Object Methods
Iterating Through Objectsmedium.com
Github Repositories That Will Teach You How To Code For Free!
30-seconds/30-seconds-of-codelevelup.gitconnected.com
Resources By Programming Language
Here’s a list of programming resources sorted by programming language.bryanguner.medium.com
Breaking Down Scope, Context, And Closure In JavaScript In Simple Terms.
“JavaScript’s global scope is like a public toilet. You can’t avoid going in there, but try to limit your contact with…medium.com
These Are A Few Of My Favorite Things
A web development student’s declassified school survival guide.medium.com
Objects In JavaScript
The object is a data structure that stores other data, similar to how an array stores elements.medium.com
Fundamental Javascript Concepts You Should Understand
Plain Old JS Object Lesson Conceptsbryanguner.medium.com
Mutability And Reference VS Privative Types in JavaScript
Mutability && Primitive && Reference Examplesbryanguner.medium.com
Array Callback Methods Implemented With For Loops
How to implement array callback methods in JavaScriptjavascript.plainenglish.io
Beginner’s Guide To React Part 2
As I learn to build web applications in React I will blog about it in this series in an attempt to capture the…bryanguner.medium.com
A Very Quick Guide To Calculating Big O Computational Complexity
Big O: big picture, broad strokes, not detailsbryanguner.medium.com
Introduction to React for Complete Beginners
All of the code examples below will be included a second time at the bottom of this article as an embedded gist.javascript.plainenglish.io
Scheduling: setTimeout and setInterval
We may decide to execute a function not right now, but at a later time. That’s called “scheduling a call”.javascript.plainenglish.io
LocalStorage VS SessionStorage
Web storage objects localStorage and sessionStorage allow to save key/value pairs in the browser.bryanguner.medium.com
These Are The Bash Shell Commands That Stand Between Me And Insanity
I will not profess to be a bash shell wizard… but I have managed to scour some pretty helpful little scripts from Stack…levelup.gitconnected.com
How To Implement Native(ES6) Data Structures Using Arrays & Objects
Smart data structures and dumb code works better than the other way around -“Eric S. Raymond”bryanguner.medium.com
Objects in Javascript
Codepen with examples for you to practice with below!medium.com
The Beginner’s Guide To JavaScript
Part 1javascript.plainenglish.io
Web Developer Resource List Part 4
A all encompassing list of tools and resources for web developersmedium.com
VSCode Extensions Specifically for JavaScript Development
VSCode Extensions that are indispensable in JavaScript developmentmedium.com
A list of all of my articles to link to future posts
You should probably skip this one… seriously it’s just for internal use!bryanguner.medium.com
Fundamental Data Structures in JavaScript
A simple to follow guide to Lists Stacks and Queues, with animated gifs, diagrams, and code examples!javascript.plainenglish.io
Web Development Resources Part 3
I’m the psychological equivalent of a physical hoarder only instead of empty soda cans and dead racoons it’s lists of…bryanguner.medium.com
Web Development Interview Part 3💻
This installment is going to be the least technically demanding thus far however these questions are a more realistic…medium.com
The Best Cloud-Based Code Playgrounds of 2021 (Part 1)
A plethora of front-end code playgrounds have appeared over the years. They offer a convenient way to experiment with…bryanguner.medium.com
Front End Interview Questions Part 2
These will focus more on vocabulary and concepts than the application driven approach in my last post!medium.com
Web Developer Resource List Part 2
Because I compile these things compulsively anyway…medium.com
HTTP Basics
“If you want to build a ship, don’t drum up the men and women to gather wood, divide the work, and give orders…levelup.gitconnected.com
JavaScript Frameworks & Libraries
My Awesome JavaScript List Part 2javascript.plainenglish.io
My ‘awesome’ list of JavaScript resources
Everyone’s seen the ‘Awesome’ lists on GitHub… and they are indeed awesome… so today I am going to attempt to curate my…javascript.plainenglish.io
Everything You Need to Get Started With VSCode + Extensions & Resources
Commands:levelup.gitconnected.com
My Favorite VSCode Themes
Themeslevelup.gitconnected.com
Object Oriented Programming in JavaScript
Object-Oriented Programminglevelup.gitconnected.com
JavaScript Rotate (Array) ProblemWalkthrough
Explanation for Rotate Rightmedium.com
Super Simple Intro To HTML
What is HTML, CSS & JS and why do we need all three?levelup.gitconnected.com
Everything You Need To Know About Relational Databases, SQL, PostgreSQL and Sequelize To Build…
For Front end developers who like myself struggle with making the jump to fullstack.medium.com
Understanding Git (A Beginners Guide Containing Cheat Sheets & Resources)
Basic Git Work Flow.levelup.gitconnected.com
The Complete JavaScript Reference Guide
You will want to bookmark thisjavascript.plainenglish.io
Modules in Javascript
Differences between Node.js and browsersmedium.com
An Introduction to Markdown (Bonus Markdown Templates Included)
Basic Syntax Guidelevelup.gitconnected.com
Web Dev Resources
Web Developmentlevelup.gitconnected.com
Regular Expressions
description:medium.com
Writing Files Using Python
Basics of Writing Files in Python
The common methods to operate with files are open() to open a file,medium.com
A Collection of my most useful Gist Entries
This list is in no particular order!bryanguner.medium.com
Learn CSS So That Your Site Doesn’t Look Like Garbage
CSS Selectorsjavascript.plainenglish.io
PostgreSQL Setup For Windows & WSL/Ubuntu
If you follow this guide to a tee… you will install PostgreSQL itself on your Windows installation. Then, you will…bryanguner.medium.com
Emmet Cheat Sheet
EMMETbryanguner.medium.com
Git-Tricks
Refsbryanguner.medium.com
Python Study Guide for a JavaScript Programmer
A guide to commands in Python from what you know in JavaScriptlevelup.gitconnected.com
Fetch Quick Sheet
Fetchbryanguner.medium.com
Express Quick Sheet
Settingsbryanguner.medium.com
Fundamental Data Structures In JavaScript
Data structures in JavaScriptmedium.com
Deploy React App To Heroku Using Postgres & Express
Heroku is an web application that makes deploying applications easy for a beginner.bryanguner.medium.com
Postgresql Cheat Sheet
PostgreSQL commandsmedium.com
A Quick Guide to Big-O Notation, Memoization, Tabulation, and Sorting Algorithms by Example
Curating Complexity: A Guide to Big-O Notationmedium.com
Basic Web Development Environment Setup
Windows Subsystem for Linux (WSL) and Ubuntulevelup.gitconnected.com
By Bryan Guner on March 22, 2021.
Exported from Medium on August 31, 2021.
Seriously… this list is utterly exhaustive it covers more core concepts than I can hold the names of in working memory on a very good day.
Seriously… this list is utterly exhaustive it covers more core concepts than I can hold the names of in working memory on a very good day.
(self promotion ends after the line denoted by a bunch of pictures of my dog🐕 )
(Followed by a brief introduction to JavaScript for beginners)
(Finally the main content / resources / imbedded YouTube links)
Web-Dev-Hub
Memoization, Tabulation, and Sorting Algorithms by Example Why is looking at runtime not a reliable method of…bgoonz-blog.netlify.app
This is a work in progress and may be broken or hosted elsewhere at some time in the future.
Related posts:
JS Modules
A module is a reusable piece of code that encapsulates implementation details and exposes a public API so it can be…dev.to
Closures In JavaScript
Answer A closure is a function defined inside another function and has access to its lexical scope even when it is…dev.to
A list of all of my articles to link to future posts
bryanguner.medium.com
The Complete JavaScript Reference Guide
You will want to bookmark thisjavascript.plainenglish.io
This is a quick intro for complete beginners … skip below for more advanced content and resources! (below the next photo montage of my dog)
If you wanna skip this section you’ll find the main content about 10% of the way down the page… it will look like this:
The number data type in JS is used to represent any numerical
values, including integers and decimal numbers. Basic Arithmetic Operators are the symbols that perform particular operations.
- + (addition)
- - (subtraction)
- asterisk (multiplication)
- / (division)
- % (modulo)
JS evaluates more complex expressions using the general math order of
operations aka PEMDAS.
- PEMDAS : Parentheses, Exponents, Multiplication, Division, Modulo, Addition, Subtraction.
- To force a specific order of operation, use the group operator ( ) around a part of the expression.
Modulo : Very useful operation to check divisibility of numbers,
check for even & odd, whether a number is prime, and much more!
(Discrete Math concept, circular problems can be solved with modulo)
- Whenever you have a smaller number % a larger number, the answer will just be the initial small number.
console.log(7 % 10); // => 7;
The string data type is a primitive data type that used to represent
textual data.
- can be wrapped by either single or double quotation marks, best to choose one and stick with it for consistency.
- If your string contains quotation marks inside, can layer single or double quotation marks to allow it to work.
"That's a great string"; (valid)
'Shakespeare wrote, "To be or not to be"'; (valid)
'That's a bad string'; (invalid)- Alt. way to add other quotes within strings is to use template literals.
${function} // use ${} to invoke functions within.
.length : property that can be appended to data to return the length.
empty strings have a length of zero.
indices : indexes of data that begin at 0, can call upon index by using the bracket notation [ ].
console.log("bootcamp"[0]); // => "b"
console.log("bootcamp"[10]); // => "undefined"
console.log("boots"[1 * 2]); // => "o"
console.log("boots"["boot".length - 1]); // => "t"- we can pass expressions through the brackets as well since JS always evaluates expressions first.
- The index of the last character of a string is always one less than it’s length.
- indexOf() : method used to find the first index of a given character within a string.
console.log("bagel".indexOf("b")); // => 0 console.log("bagel".indexOf("z")); // => -1- if the character inside the indexOf() search does not exist in the string, the output will be -1.
- the indexOf() search will return the first instanced index of the the char in the string.
- concatenate : word to describe joining strings together into a single string.
The Boolean data type is the simplest data type since there are only
two values: true and false.
- Logical Operators (Boolean Operators) are used to establish logic in our code.
- ! (not) : reverses a Boolean value.
console.log(!true); // => false console.log(!!false); // => false
- && (and) Truth Table
- Logical Order of Operations : JS will evaluate !, then &&, then ||.
- De Morgan’s Law : Common mistake in Boolean logic is incorrectly distributing ! across parentheses.
!(A || B) === !A && !B; !(A && B) === !A || !B;- In summary, to correctly distribute ! across parentheses we must also flip the operation within.
All comparison operators will result in a Boolean output.
The relative comparators
- > (greater than)
- < (less than)
- >= (greater than or equal to)
- <= (less than or equal to)
- === (equal to)
- !== (not equal to)
Fun Fact: “a” < “b” is considered valid JS Code because string
comparisons are compared lexicographically (meaning dictionary order),
so “a” is less than “b” because it appears earlier!
If there is ever a standstill comparison of two string
lexicographically (i.e. app vs apple) the comparison will deem the
shorter string lesser.
Difference between == and ===
- === : Strict Equality, will only return true if the two comparisons are entirely the same.
- == : Loose Equality, will return true even if the values are of a different type, due to coercion. (Avoid using this)
Variables are used to store information to be referenced and manipulated
in a program.
- We initialize a variable by using the let keyword and a = single equals sign (assignment operator).
let bootcamp = "Lambda"; console.log(bootcamp); // "Lambda"- JS variable names can contain any alphanumeric characters,
underscores, or dollar signs (cannot being with a number). - If you do not declare a value for a variable, undefined is
automatically set. let bootcamp; console.log(bootcamp); // undefined- We can change the value of a previously declared variable (let, not
const) by re-assigning it another value. - let is the updated version of var; there are some
differences in terms of hoisting and global/block scope — will be
covered later in the course (common interview question!)
Assignment Shorthand
let num = 0;num += 10; // same as num = num + 10num -= 2; // same as num = num - 2num /= 4; // same as num = num / 4num *= 7; // same as num = num * 7- In general, any nonsensical arithmetic will result in NaN ; usually operations that include undefined.
- declaration : process of simply introducing a variable name.
- initialization : process of both declaring and assigning a variable on the same line.
A function is a procedure of code that will run when called. Functions
are used so that we do not have to rewrite code to do the same thing
over and over. (Think of them as ‘subprograms’)
- Function Declaration : Process when we first initially write our function.
- Includes three things:
- Name of the function.
- A list of parameters ()
- The code to execute {}
- Function Calls : We can call upon our function whenever and wherever* we want. (*wherever is only after the initial declaration)
- JS evaluates code top down, left to right.
- When we execute a declared function later on in our program we refer to this as invoking our function.
- Every function in JS returns undefined unless otherwise specified.
- When we hit a return statement in a function we immediately exit the function and return to where we called the function.
- When naming functions in JS always use camelCase and name it something appropriate. > Great code reads like English and almost explains itself. Think: Elegant, readable, and maintainable!
- Parameters : Comma separated variables specified as part of a function’s declaration.
- Arguments : Values passed to the function when it is invoked.
- If the number of arguments passed during a function invocation is different than the number of parameters listed, it will still work.
- However, is there are not enough arguments provided for parameters our function will likely yield Nan.
END OF INTRO FOR BEGINNERS (MAIN ARTICLE BELOW)
leonardomso/33-js-concepts
This repository was created with the intention of helping developers master their concepts in JavaScript. It is not a…github.com
Call stack - MDN Web Docs Glossary: Definitions of Web-related terms | MDN
A call stack is a mechanism for an interpreter (like the JavaScript interpreter in a web browser) to keep track of its…developer.mozilla.org
Understanding Javascript Function Executions — Call Stack, Event Loop , Tasks & more
Web developers or Front end engineers, as that’s what we like to be called, nowadays do everything right from acting as…medium.com
Understanding the JavaScript call stack
The JavaScript engine (which is found in a hosting environment like the browser), is a single-threaded interpreter…medium.freecodecamp.org
Javascript: What Is The Execution Context? What Is The Call Stack?
What is the Execution Context in Javascript? I bet you don’t know the answer. What are the most basic components of a…web.archive.org
Understanding Execution Context and Execution Stack in Javascript
Understanding execution context and stack to become a better Javascript developer.blog.bitsrc.io
How JavaScript works: an overview of the engine, the runtime, and the call stack
As JavaScript is getting more and more popular, teams are leveraging its support on many levels in their stack …blog.sessionstack.com
Breaking Down Scope, Context, And Closure In JavaScript In Simple Terms.
“JavaScript’s global scope is like a public toilet. You can’t avoid going in there, but try to limit your contact with…medium.com
The Ultimate Guide to Hoisting, Scopes, and Closures in JavaScript - ui.dev
It may seem surprising, but in my opinion the most important and fundamental concept to understanding the JavaScript…tylermcginnis.com
How JavaScript Works: An Overview of JavaScript Engine, Heap, and Call Stack
Hello everyone 👋, I hope you are doing great. So, today you are going to learn An Overview of JavaScript Engine, Heap…dev.to
Fundamental Data Structures In JavaScript
Data structures in JavaScriptmedium.com
Here’s a live code editor where you can mess with any of the examples…
Here’s a live code editor where you can mess with any of the examples…
- LeetCode
- InterviewBit
- Codility
- HackerRank
- Project Euler
- Spoj
- Google Code Jam practice problems
- HackerEarth
- Top Coder
- CodeChef
- Codewars
- CodeSignal
- CodeKata
- Firecode
Something that data structure and algorithms have in common when talking about time complexity is that they are both dealing with data. When you deal with data you become dependent on them and as a result the time complexity is also dependent of the data that you received. To solve this problem we talk about 3 different time complexity.
- The best-case complexity: when the data looks the best
- The worst-case complexity: when the data looks the worst
- The average-case complexity: when the data looks average
The complexity is usually expressed with the Big O notation. The wikipedia page about this subject is pretty complex but you can find here a good summary of the different complexity for the most famous data structures and sorting algorithms.
An Array data structure, or simply an Array, is a data structure consisting of a collection of elements (values or variables), each identified by at least one array index or key. The simplest type of data structure is a linear array, also called one-dimensional array. From Wikipedia
Arrays are among the oldest and most important data structures and are used by every program. They are also used to implement many other data structures.
JavaScript data types and data structures - JavaScript | MDN
Programming languages all have built-in data structures, but these often differ from one language to another. This…developer.mozilla.org
How numbers are encoded in JavaScript
Edit description2ality.com
Here is what you need to know about JavaScript’s Number type
Why 0.1+0.2 IS NOT equal to 0.3 and 9007199254740992 IS equal to 9007199254740993medium.com
What Every JavaScript Developer Should Know About Floating Point Numbers
After I gave my talk on JavaScript (really, I was there trying to shamelessly plug my book - Underhanded JavaScript and…blog.chewxy.com
The Secret Life of JavaScript Primitives
You may not know it but, in JavaScript, whenever you interact with string, number or boolean primitives you enter a…javascriptweblog.wordpress.com
Here’s the paradox faced by the creator of JavaScript:
- There are many things one would want to do with a primitive like a string or a number. It would be great to access them using methods.
- Primitives must be as fast and lightweight as possible.
The solution looks a little bit awkward, but here it is:
- Primitives are still primitive. A single value, as desired.
- The language allows access to methods and properties of strings, numbers, booleans and symbols.
- In order for that to work, a special “object wrapper” that provides the extra functionality is created, and then is destroyed.
The “object wrappers” are different for each primitive type and are called: String, Number, Boolean and Symbol. Thus, they provide different sets of methods.
For instance, there exists a string method str.toUpperCase() that returns a capitalized str.
Here’s how it works:
let str = "Hello";
alert( str.toUpperCase() ); // HELLO
Simple, right? Here’s what actually happens in str.toUpperCase():
- The string
stris a primitive. So in the moment of accessing its property, a special object is created that knows the value of the string, and has useful methods, liketoUpperCase(). - That method runs and returns a new string (shown by
alert). - The special object is destroyed, leaving the primitive
stralone.
So primitives can provide methods, but they still remain lightweight.
The JavaScript engine highly optimizes this process. It may even skip the creation of the extra object at all. But it must still adhere to the specification and behave as if it creates one.
Primitive Types | Flow
JavaScript has a number of different primitive types ( MDN): The primitive types appear in the language as either…flow.org
(Not) Everything in JavaScript is an Object
This was originally published on The Brewing Press For those who just wants the answers, feel free to jump to the…dev.to
Objects In JavaScript
The object is a data structure that stores other data, similar to how an array stores elements.medium.com
Diving Deeper in JavaScripts Objects
A Closer Look at JavaScript Object Descriptorsblog.bitsrc.io
The differences between Object.freeze() vs Const in JavaScript
ES6 has brought several new features and methods into JavaScript since its release. These features have better improved…medium.com
Explaining Value vs. Reference in Javascript
A simple look at computer memory explains what’s happeningcodeburst.io
no mutation
The concat() method is used to merge two or more arrays. This method does not change the existing arrays, but instead returns a new array.
Array.prototype.concat ( [ item1 [ , item2 [ , … ] ] ] )Array.prototype.concat() - JavaScript | MDN
The concat() method is used to merge two or more arrays. This method does not change the existing arrays, but instead…developer.mozilla.org
var array1 = ['a', 'b', 'c'];
var array2 = ['d', 'e', 'f'];
console.log(array1.concat(array2));
// expected output: Array ["a", "b", "c", "d", "e", "f"]
mutates
The copyWithin() method shallow copies part of an array to another location in the same array and returns it, without modifying its size.
arr.copyWithin(target)
arr.copyWithin(target, start)
arr.copyWithin(target, start, end)
Array.prototype.copyWithin() - JavaScript | MDN
The copyWithin() method shallow copies part of an array to another location in the same array and returns it without…developer.mozilla.org
var array1 = ['a', 'b', 'c', 'd', 'e'];// copy to index 0 the element at index 3 console.log(array1.copyWithin(0, 3, 4)); // expected output: Array ["d", "b", "c", "d", "e"]
// copy to index 1 all elements from index 3 to the end console.log(array1.copyWithin(1, 3)); // expected output: Array ["d", "d", "e", "d", "e"]
The entries() method returns a new Array Iterator object that contains the key/value pairs for each index in the array.
a.entries()Array.prototype.entries() - JavaScript | MDN
The entries() method returns a new Array Iterator object that contains the key/value pairs for each index in the array.developer.mozilla.org
var array1 = ['a', 'b', 'c'];var iterator1 = array1.entries();
console.log(iterator1.next().value); // expected output: Array [0, "a"]
console.log(iterator1.next().value); // expected output: Array [1, "b"]
The every() method tests whether all elements in the array pass the test implemented by the provided function.
Array.prototype.every ( callbackfn [ , thisArg ] )Array.prototype.every() - JavaScript | MDN
The every() method tests whether all elements in the array pass the test implemented by the provided function. It…developer.mozilla.org
function isBelowThreshold(currentValue) { return currentValue < 40; }var array1 = [1, 30, 39, 29, 10, 13];
console.log(array1.every(isBelowThreshold)); // expected output: true
The fill() method fills all the elements of an array from a start index to an end index with a static value.
arr.fill(value)
arr.fill(value, start)
arr.fill(value, start, end)
Array.prototype.fill() - JavaScript | MDN
The fill() method changes all elements in an array to a static value, from a start index (default 0) to an end index…developer.mozilla.org
var array1 = [1, 2, 3, 4];// fill with 0 from position 2 until position 4 console.log(array1.fill(0, 2, 4)); // expected output: [1, 2, 0, 0]
// fill with 5 from position 1 console.log(array1.fill(5, 1)); // expected output: [1, 5, 5, 5]
console.log(array1.fill(6)); // expected output: [6, 6, 6, 6]
The filter() method creates a new array with all elements that pass the test implemented by the provided function.
Array.prototype.filter ( callbackfn [ , thisArg ] )Array.prototype.filter() - JavaScript | MDN
The method creates a new array with all elements that pass the test implemented by the provided function. Function is a…developer.mozilla.org
var words = ['spray', 'limit', 'elite', 'exuberant', 'destruction', 'present'];const result = words.filter(word => word.length > 6);
console.log(result); // expected output: Array ["exuberant", "destruction", "present"]
no mutation
The find() method returns a value of the first element in the array that satisfies the provided testing function. Otherwise undefined is returned.
arr.find(callback[, thisArg])Array.prototype.find() - JavaScript | MDN
The find() method returns the value of the first element in the provided array that satisfies the provided testing…developer.mozilla.org
var array1 = [5, 12, 8, 130, 44];var found = array1.find(function(element) { return element > 10; });
console.log(found); // expected output: 12
Value types, reference types and scope in JavaScript
There are only two things fundamental to JavaScript: objects and functions.medium.com
Back to roots: JavaScript Value vs Reference
Let’s look at the concept of Value vs Reference. Every JavaScript developer should know this topic as it’s often the…medium.com
Grasp “By Value” and “By Reference” in JavaScript
And learn why it’s crucial to know the differencehackernoon.com
JavaScript Reference and Copy Variables | Hacker Noon
Each programming language has its own peculiarities (and JavaScript has a lot), and today I’m going to talk about…hackernoon.com
JavaScript Primitive vs. Reference Values
Summary: in this tutorial, you will learn the differences between primitive and reference values. In JavaScript, a…www.javascripttutorial.net
JavaScript by reference vs. by value
I’m looking for some good comprehensive reading material on when JavaScript passes something by value and when by…stackoverflow.com
JavaScript Interview Prep: Primitive vs. Reference Types
original article In a JavaScript interview, they might ask if you understand the difference between primitive and…dev.to
What you need to know about Javascript’s Implicit Coercion
Javascript’s implicit coercion simply refers to Javascript attempting to coerce an unexpected value type to the…dev.to
JavaScript type coercion explained
Know your enginesmedium.freecodecamp.org
Javascript Coercion Explained
Along with some practical exampleshackernoon.com
What exactly is Type Coercion in Javascript?
Let’s start with a short intro to type systems which I think will help you understand the general idea of type…stackoverflow.com
https://thedevs.network/
Weak dynamic typing is arguably one of those things everybody likes to pick at about JavaScript. For an elegant dynamic…thedevs.network
getify/You-Dont-Know-JS
A book series on JavaScript. @YDKJS on twitter. Contribute to getify/You-Dont-Know-JS development by creating an…github.com
JavaScript — Double Equals vs. Triple Equals
Learn equality in JavaScript in 3 minutescodeburst.io
Should I use === or == equality comparison operator in JavaScript?
You know there are two different equality comparison operators in JavaScript: the === and == operators, or the triple…bytearcher.com
== vs === JavaScript: Double Equals and Coercion | Codementor
The == (double equals or loose equality) operator is an interesting operator. Many avoid it because they don’t know how…www.codementor.io
Why Use the Triple-Equals Operator in JavaScript? - Impressive Webs
“Determining whether two variables are equivalent is one of the most important operations in programming.” That’s…www.impressivewebs.com
What is the difference between == and === in JavaScript?
On the surface == and === appear to be functionally the same, so why bother typing an extra character? In this video…www.oreilly.com
Why javascript’s typeof always return “object”?
To add in with the others, typeof returns both objects and primitives. There are 5 primitive types in javascript…stackoverflow.com
Checking Types in Javascript
Have you ever wondered: what is the correct way to check if a Javascript variable is an Array? Do a Google search and…tobyho.com
How to better check data types in javascript - Webbjocke
To check what data type something has in javascript is not always the easiest. The language itself provides an operator…webbjocke.com
Tomer Aberbach | Checking for the Absence of a Value in JavaScript
When I first started learning JavaScript I was confused by the seemingly endless ways developers check for the absence…tomeraberba.ch
getify/You-Dont-Know-JS
A book series on JavaScript. @YDKJS on twitter. Contribute to getify/You-Dont-Know-JS development by creating an…github.com
JavaScript Functions — Understanding The Basics
Explore Functions in JavaScript — declaration, expressions, invocation, and more.codeburst.io
ES6: var, let and const - The battle between function scope and block scope
In the pre-ES6 era, there was only one way of declaring variables in JavaScript - being the usage of var. var has…www.deadcoderising.com
Emulating Block Scope in JavaScript
While there are many issues that trip up developers coming from other languages, variable scoping may be number one…adripofjavascript.com
The Difference Between Function and Block Scope in JavaScript
Back to the basics with the var, let and const variablesjosephcardillo.medium.com
Function scopes and block scopes in JavaScript
Is the following line a valid line of JavaScript code?edgecoders.com
Understanding Scope and Context in JavaScript
Understanding Scope and Context in JavaScript August 16, 2013 JavaScript JavaScript’s implementation of scope and…ryanmorr.com
JavaScript Scope and Closures
Scopes and closures are important in JavaScript. But, they were confusing for me when I first started. Here’s an…css-tricks.com
Understanding Scope in JavaScript - Telerik Blogs
Scope is an important, yet ambiguous concept in JavaScript. Used correctly, it allows you to leverage good design…developer.telerik.com
Chapter 16. Variables: Scopes, Environments, and Closures
Chapter 16. Variables: Scopes, Environments, and Closures This chapter first explains how to use variables and then…speakingjs.com
Understanding Scope in JavaScript
JavaScript has a feature called Scope. Though the concept of scope is not that easy to understand for many new…scotch.io
When to use a function declaration vs. a function expression
The differences between them and when to use one or the other.medium.freecodecamp.org
A JavaScript Fundamentals Cheat Sheet: Scope, Context, and “this”
Scope Scope refers to where a variable can be accessed within a program. Some variables can be accessed from anywhere…dev.to
Quick Tip: Function Expressions vs Function Declarations - SitePoint
This article was peer reviewed by Jeff Mott. Thanks to all of SitePoint’s peer reviewers for making SitePoint content…www.sitepoint.com
JavaScript Function — Declaration vs Expression
Functions are considered as First Class citizen in JavaScript and it is really important to be clear with the concept…medium.com
Function Declarations vs. Function Expressions
What is Function Statement/Declarations in JavaScript?medium.com
Function Declarations vs. Function Expressions
Lets start with a short quiz. What is alerted in each case?: Question 1: Question 2: Question 3: Question 4: If you…javascriptweblog.wordpress.com
Essential JavaScript: Mastering Immediately-invoked Function Expressions
Understanding functions inside out and then learning how to exploit them to write modern, clean JavaScript code is a…vvkchandra.medium.com
Do ES6 Modules make the case of IIFEs obsolete? - Hashnode
IIFE was one of the most used patterns in the ES5 standard, as functions were the only way to declare a scoped block of…hashnode.com
A 10 minute primer to JavaScript modules, module formats, module loaders and module bundlers
Modern JavaScript development can be overwhelming. When working on a project, you may wonder why all the modern…www.jvandemo.com
16. Modules
Edit descriptionexploringjs.com
ES modules: A cartoon deep-dive - Mozilla Hacks - the Web developer blog
ES modules bring an official, standardized module system to JavaScript. With the release of Firefox 60 in May, all…hacks.mozilla.org
Understanding ES6 Modules - SitePoint
Almost every language has a concept of modules - a way to include functionality declared in one file within another…www.sitepoint.com
An overview of ES6 Modules in JavaScript
Introduction Until recently if you wanted to take full advantage of modules in JavaScript you needed to make use of…blog.cloud66.com
ES6 Modules in Depth
Welcome back to ES6 - “Oh, good. It’s not another article about Unicode” - in Depth series. If you’ve never been around…ponyfoo.com
ES6 modules, Node.js and the Michael Jackson Solution
JavaScript’s never had a standard way to import and export functionality from a source file to another. Well, it has…medium.com
JavaScript Modules: A Beginner’s Guide
If you’re a newcomer to JavaScript, jargon like “module bundlers vs. module loaders,” “Webpack vs. Browserify” and “AMD…medium.freecodecamp.org
JavaScript modules
This article explains how to use JavaScript modules, how to deploy them responsibly, and how the Chrome team is working…developers.google.com
IIFE: Immediately Invoked Function Expressions
IIFE is a function that is declared and invoked at the same time. You create them by using anonymous functions and…dev.to
JavaScript Event Loop Explained
“How is JavaScript asynchronous and single-threaded ?” The short answer is that JavaScript language is single-threaded…medium.com
The JavaScript Event Loop: Explained
With JavaScript approaching near-ubiquity as the scripting language of the web browser, it benefits you to have a basic…blog.carbonfive.com
Understanding JS: The Event Loop
Due to the amazing quantity of libraries, tools and all kinds of things that make your development easier, a lot of…hackernoon.com
Understanding the JavaScript event loop
If you are someone who has heard about the terms event loop, callback queue, concurrency model and call stack but…www.zeolearn.com
Event loop in javascript
If you love javascript you’ve need to learn this. One of the deeper aspects of JavaScript is it’s Event Loop. Its…code.likeagirl.io
The JavaScript Event Loop
The Event Loop is one of the most important aspects to understand about JavaScript. I’ve programmed for years with…flaviocopes.com
How JavaScript works: Event loop and the rise of Async programming + 5 ways to better coding with…
Welcome to post # 4 of the series dedicated to exploring JavaScript and its building components. In the process of…blog.sessionstack.com
Tasks, microtasks, queues and schedules
Edit descriptionjakearchibald.com
Visualising the JavaScript Event Loop with a Pizza Restaurant analogy
Consider a pizza restaurant. There are two types of orders that we currently have from a single customer - one is an…dev.to
✨♻️ JavaScript Visualized: Event Loop
Oh boi the event loop. It’s one of those things that every JavaScript developer has to deal with in one way or another…dev.to
Scheduling: setTimeout and setInterval
Edit descriptionjavascript.info
Why not to use setInterval
Recently, I came across a requirement where I had to call a function repeatedly after specific time interval, like…dev.to
setTimeout VS setInterval
Introdeveloger.com
Using requestAnimationFrame
There used to be just one way to do a timed loop in JavaScript: setInterval(). If you needed to repeat something pretty…css-tricks.com
Understanding JavaScript’s requestAnimationFrame() method for smooth animations
Updated: Nov 1st, 2017 The modern web of today is filled with sights to behold on every page, where menus slide in and…www.javascriptkit.com
Handling time intervals in JavaScript
While working on an Electron app Pomolectron, I needed to handle different time intervals through setInterval()…www.amitmerchant.com
JavaScript Engines -
By Jen Looper Writing code for the Web sometimes feels a little magical in that developers write a sequence of…www.softwaremag.com
Understanding How the Chrome V8 Engine Translates JavaScript into Machine Code
Before diving deep into the core of Chrome’s V8, first, let’s get our fundamentals down. All of our systems consist of…medium.freecodecamp.org
Understanding V8’s Bytecode
V8 is Google’s open source JavaScript engine. Chrome, Node.js, and many other applications use V8. This article…medium.com
A Brief History of Google’s V8 JavaScript Engine
Javascript has a reputation in developer circles as a terrible language. It’s classless, loosely typed, and plagued by…www.mediacurrent.com
JavaScript essentials: why you should know how the engine works
This article is also available in Spanish.medium.freecodecamp.org
JavaScript engine fundamentals: Shapes and Inline Caches
This article describes some key fundamentals that are common to all JavaScript engines - and not just V8, the engine…mathiasbynens.be
JavaScript engine fundamentals: optimizing prototypes
This article describes some key fundamentals that are common to all JavaScript engines - and not just V8, the engine…mathiasbynens.be
Elements kinds in V8
Note: If you prefer watching a presentation over reading articles, then enjoy the video below! JavaScript objects can…v8.dev
Programming with JS: Bitwise Operations
In this series of articles we take a look at different Computer Science topics from the prism of JavaScript. We’ve…hackernoon.com
Using JavaScript’s Bitwise Operators in Real Life
Let’s pretend we’re machine code programmers!codeburst.io
JavaScript Bitwise Operators - w3resource
Bitwise operators perform an operation on the bitwise (0,1) representation of their arguments, rather than as decimal…www.w3resource.com
Bitwise Operators in Javascript
So far the two programming languages we have worked with are Ruby and Javascript. There are many differences between…medium.com
A Comprehensive Primer on Binary Computation and Bitwise Operators in Javascript
Bitwise operators, though they take a few minutes to learn, are a fun way to make your code more space and…medium.com
How can I understand Bitwise operation in JavaScript?
Answer: Okay, I was going to just write that bitwise operations in JavaScript are the same as in every other language…www.quora.com
The Document Object Model :: Eloquent JavaScript
Too bad! Same old story! Once you’ve finished building your house you notice you’ve accidentally learned something that…eloquentjavascript.net
How To Understand and Modify the DOM in JavaScript | DigitalOcean
The Document Object Model, usually referred to as the DOM, is an essential part of making websites interactive. It is…www.digitalocean.com
What’s the Document Object Model, and why you should know how to use it.
So, you’ve studied HTML, you’ve created your first tags, learned about CSS, made beautiful forms, amazing buttons…medium.freecodecamp.org
JavaScript DOM Tutorial with Example
Details JavaScript can access all the elements in a webpage making use of Document Object Model (DOM). In fact, the web…www.guru99.com
What is the DOM?
A reader recently wrote in asking me what the DOM was. They said they’ve heard it mentioned and alluded to, but aren’t…css-tricks.com
Traversing the DOM with JavaScript
A good JavaScript developer needs to know how to traverse the DOM-it’s the act of selecting an element from another…zellwk.com
DOM tree
The backbone of an HTML document is tags. According to the Document Object Model (DOM), every HTML tag is an object…javascript.info
How to traverse the DOM in JavaScript
Learn how to navigate your way through the DOM tree.javascript.plainenglish.io
Render-tree Construction, Layout, and Paint | Web Fundamentals
The CSSOM and DOM trees are combined into a render tree, which is then used to compute the layout of each visible…developers.google.com
What, exactly, is the DOM?
The Document Object Model, or the “DOM”, is an interface to web pages. It is essentially an API to the page, allowing…bitsofco.de
A Vanilla JS Guide On Mastering the DOM
Note: The contents of this post are intended to be introductory and does not include use of any libraries like jQuery…dev.to
How To Use Classes in JavaScript | DigitalOcean
JavaScript is a prototype-based language, and every object in JavaScript has a hidden internal property called…www.digitalocean.com
Javascript Classes — Under The Hood
Javascript classes are nothing but a syntactic sugar over existing prototype based inheritance and constructor…medium.com
ES6 Classes - JavaScript January
Object-Oriented Programming (OOP) can be a great way to organize your projects. Introduced with ES6, the javascript…www.javascriptjanuary.com
Better JavaScript with ES6, Pt. II: A Deep Dive into Classes
Out with the Old, In with the new Let’s be clear about one thing from the start: Under the hood, ES6 classes are not…scotch.io
Understand the Factory Design Pattern in plain javascript
The simplest way to understand Factory Design Patternmedium.com
Factory Functions in JavaScript | Aten Design Group
As we move from an age of jQuery plugins and script drop-ins to a world of CommonJS and modular architectures it’s…atendesigngroup.com
The Factory Pattern in JS ES6
I’m trying to get the most out of all the new things in ES6 (ES2015). And I’m writing a new library where I need a…medium.com
Class vs Factory function: exploring the way forward
ECMAScript 2015 (aka ES6) comes with the class syntax, so now we have two competing patterns for creating objects. In…medium.freecodecamp.org
How ES6 classes really work and how to build your own
The 6th edition of ECMAScript (or ES6 for short) revolutionized the language, adding many new features, including…medium.com
Understanding super in JavaScript
With the adoption of ES6/2015 by nearly all browsers (with one notable exception), developers have access to the new…jordankasper.com
An Easy Guide To Understanding Classes In JavaScript
1. An Introduction To Classes In JavaScript In the previous article in this series we looked at function constructors…dev.to
Function.prototype.call() - JavaScript | MDN
The value to use as this when calling . Note: In certain cases, may not be the actual value seen by the method. If the…developer.mozilla.org
Function.prototype.bind() - JavaScript | MDN
The bind() method creates a new function that, when called, has its this keyword set to the provided value, with a…developer.mozilla.org
Function.prototype.apply() - JavaScript | MDN
The apply() method calls a function with a given this value, and arguments provided as an array (or an array-like…developer.mozilla.org
Grokking call(), apply() and bind() methods in JavaScript
These are very important for every aspiring JavaScript Developer, these are used in almost every JavaScript Library or…levelup.gitconnected.com
How-to: call() , apply() and bind() in JavaScript | Codementor
In this post, we will be discussing the difference between call(), apply(), and bind() methods of JavaScript functions…www.codementor.io
JavaScript’s Apply, Call, and Bind Methods are Essential for JavaScript Professionals
Prerequisite: - Understand JavaScript’s “this” With Ease, and Master It. - JavaScript Objects - Understand JavaScript…javascriptissexy.com
Understanding the “this” keyword, call, apply, and bind in JavaScript - ui.dev
Before diving into the specifics of the this keyword in JavaScript, it’s important to take a step back and first look…tylermcginnis.com
Javascript: call(), apply() and bind()
“this” refreshermedium.com
The difference between call / apply / bind
JavaScript is a dynamic language, and is flexible enough to let you do things like multiple inheritance. That’s when an…medium.com
What the hack is call, apply, bind in JavaScript
Before start looking into call, apply, bind you should understand - how does “this” keyword works in JavaScript. In…dev.to
Mastering ‘this’ in JavaScript: Callbacks and bind(), apply(), call() - The New Stack
In Part One of our tutorial on mastering the ‘this’ keyword in JavaScript, we looked at why the concept of ‘this’ can…thenewstack.io
JavaScript’s apply, call, and bind explained by hosting a cookout
If you have ever been in charge of operating the grill at a family event or party, then you can understand apply, call…dev.to
How AND When to use bind, call, and apply in Javascript - Eigen X
In order for you to fully understand bind, call, and apply you have to understand the Javascript concept of this …www.eigenx.com
JavaScript: bind() vs apply() and call()
var fruit = { name: ‘Apple’ }; and this function: function showDetails(size, price) { console.log(this.name + ’ ’ +…www.hacksparrow.com
Let me explain to you what is this. (Javascript)
Original post: https://www.ycmjason.com/blog/2018/06/15.html this article assumes ‘use strict’ in all context this…dev.to
Understanding the “this” Keyword in JavaScript
How the value of “this” is assigned in different scenariosbetterprogramming.pub
How to understand the keyword this and context in JavaScript
As mentioned in one of my earlier articles, mastering JavaScript fully can be a lengthy journey. You may have come…medium.freecodecamp.org
What is “this” in Javascript ?
While learning JavaScript there are many roadblocks like closures, asynchronous programming, this keywords, etc. These…dev.to
This and Bind In Javascript
If you’re learning Javascript, you’ll no doubt run into the this keyword early on. At first, it appears quite simple…dev.to
3 Techniques for Maintaining Your Sanity Using “This” in JavaScript
Of JavaScript’s many confusing aspects, the keyword this can be one of the most complicated – Here’s a joke about the…dev.to
Mastering the JavaScript “this” Keyword
The this keyword is a very important concept in JavaScript, and also a particularly confusing one to both new…dev.to
This binding in JavaScript - 4. New binding
This post ( This binding in JavaScript - 4. New binding) was originally published on Sargalias. In this series we talk…dev.to
A quick intro to ‘this’ in JavaScript
Probably one of the most confusing aspects of JavaScript is finding out what ‘this’ means. In this post, I will try to…dev.to
Explaining JavaScript ‘this’ to my cat
My cat is not very good at JavaScript (also at many other things), so today I will try to explain this keyword to him…dev.to
A conversation with the ‘this’ keyword in Javascript
‘This’ is one of the most confusing concepts in Javascript. Here’s the sad news. It is just as important to understand…dev.to
What are call(), apply() and bind() in JavaScript - JS Curious
In JavaScript this refers to the owner object. If you want to attach some extra properties to a function, then you can…jscurious.com
Understanding “this” binding in Javascript
In order to understand “this” keyword clearly, we need to go through of how the execution context works at first. Every…medium.com
JavaScript For Beginners: the ‘new’ operator
Prefacecodeburst.io
Let’s demystify JavaScript’s ‘new’ keyword
Over the weekend, I completed Will Sentance’s JavaScript: The Hard Parts. It might not sound like the most glorious way…medium.freecodecamp.org
Constructor, operator “new”
The regular {…} syntax allows to create one object. But often we need to create many similar objects, like multiple…javascript.info
Understanding JavaScript Constructors
The following is a guest post by Faraz Kelhini. Some of this stuff is out of my comfort zone, so I asked Kyle Simpson…css-tricks.com
Beyond typeof and instanceof: simplifying dynamic type checks
This blog post describes a technique for making instanceof applicable to more values (on the right-hand side)…2ality.com
What Is the Instanceof Operator in JavaScript?
Learn more about What Is the Instanceof Operator in JavaScript? from DevelopIntelligence. Your trusted developer…appendto.com
Function and Object, instances of each other
Explaining why Function is an instance of Object, and why Object is an instance of Functionjavascriptrefined.io
Inheritance and the prototype chain - JavaScript | MDN
JavaScript is a bit confusing for developers experienced in class-based languages (like Java or C++), as it is dynamic…developer.mozilla.org
Javascript : Prototype vs Class
Let’s see how classes in JS are not what you think they are.medium.com
https://codeburst.io/javascript-prototype-cb29d82b8809
Prototype in Javascript | Codementor
By default every function has a property name as prototype which is EMPTY ( by default). We can add properties and…www.codementor.io
Prototypes in JavaScript
In this post, we will discuss what are prototypes in JavaScript, how they help JavaScript in achieving the concepts of…betterprogramming.pub
Prototype in JavaScript: it’s quirky, but here’s how it works
The following four lines are enough to confuse most JavaScript developers:medium.freecodecamp.org
Understanding JavaScript: Prototype and Inheritance
Due to the amazing quantity of libraries, tools and all kinds of things that make your development easier, a lot of…hackernoon.com
Understanding Classes (ES5) and Prototypal Inheritance in JavaScript
In a nutshell the above snippet creates a Person class that can have multiple instances. By convention functional…dev.to
prototype, proto and Prototypal inheritance in JavaScript
This post was originally published on my website If you have spent some time with JavaScript, chances are that you have…dev.to
Prototypal inheritance
In programming, we often want to take something and extend it. For instance, we have a user object with its properties…javascript.info
How To Work with Prototypes and Inheritance in JavaScript | DigitalOcean
JavaScript is a prototype-based language, meaning object properties and methods can be shared through generalized…www.digitalocean.com
Master JavaScript Prototypes & Inheritance
Inheritancecodeburst.io
JavaScript’s Prototypal Inheritance Explained Using CSS
Prototypal inheritance is arguably the least understood aspect of JavaScript. Well the good news is that if you…medium.freecodecamp.org
Demystifying ES6 Classes And Prototypal Inheritance
In the early history of the JavaScript language, a cloud of animosity formed over the lack of a proper syntax for…scotch.io
Intro To Prototypal Inheritance - JS
In this article I will try to give an introduction to protypal inheritance. As an “optional” pre-requisite, you can…dev.to
Let’s Build Prototypal Inheritance in JS
The idea for this post is pretty simple. I want to some extent build and with that, illustrate how prototypes work in…dev.to
Objects, Prototypes and Classes in JavaScript
JavaScript is based on a simple object-oriented programming model with objects being a fundamental part of the…dev.to
The magical world of JavaScript prototypes
How many times have we heard “JavaScript is not an Object-Oriented language, it’s Prototype-oriented”? It turns out…dev.to
Understanding Prototypal Inheritance In JavaScript
What Is Object-oriented Programming (OOP) Classical vs Prototypal Inheritance The Prototype Object And The Prototype…dev.to
Object.create() - JavaScript | MDN
The Object.create() method creates a new object, using an existing object as the prototype of the newly created object…developer.mozilla.org
Object.assign() - JavaScript | MDN
The Object.assign() method copies all enumerable own properties from one or more source objects to a target object. It…developer.mozilla.org
Object.create in JavaScript
The Object.create method is one of the methods to create a new object in JavaScript.medium.com
Javascript Objects | A New Way to Create Objects | HTML Goodies
There are a lot of ways to create Objects in JavaScript, perhaps even more to integrate inheritance into them. Just…www.htmlgoodies.com
Basic Inheritance with Object.create
A few issues back we looked at how to implement basic inheritance with constructors. In this issue, we’ll look at how…adripofjavascript.com
Object.create( ) In JavaScript - GeeksforGeeks
Object and Object Constructors in JavaScript? In the living world of object-oriented programming we already know the…www.geeksforgeeks.org
Understanding the difference between Object.create() and the new operator.
Why is it important to know the difference?medium.com
JavaScript Object Creation: Patterns and Best Practices - SitePoint
Jeff Mott guides you through a step-by-step approach to JavaScript object creation - from object literals to factory…www.sitepoint.com
Dealing With Objects in JavaScript With Object.assign, Object.keys and hasOwnProperty |…
This post is a sort of grab bag to help you explore a few very useful methods to help you manage your objects in…alligator.io
Copying Objects in JavaScript | DigitalOcean
Objects are the fundamental blocks of JavaScript. An object is a collection of properties, and a property is an…scotch.io
JavaScript: Object.assign()
Veja nesse artigo como utilizar o Object.assign() do ECMAScript 6codeburst.io
How to deep clone a JavaScript object
Copying objects in JavaScript can be tricky. Some ways perform a shallow copy, which is the default behavior in most of…flaviocopes.com
Object.create(): When and Why to Use
Object.create() is a method available on all JavaScript objects. It takes two arguments: the object you want to copy…dev.to
JavaScript Functional Programming — map, filter and reduce
Even if you don’t know what functional programming is you’ve probably been using map, filter and reduce just because…medium.com
Learn map, filter and reduce in Javascript
The perfect toolset for your venture in Functional Programmingmedium.com
JavaScript’s Map, Reduce, and Filter * Dan Martensen
As engineers we build and manipulate arrays holding numbers, strings, booleans and objects almost everyday. We use them…danmartensen.svbtle.com
How to Use Map, Filter, and Reduce in JavaScript
Functional programming has been making quite a splash in the development world these days. And for good reason…code.tutsplus.com
JavaScript — Learn to Chain Map, Filter, and Reduce
Learn how to chain map, filter, and reduce in JavaScriptcodeburst.io
Understanding map, filter and reduce in Javascript
When working on Javascript projects you inevitably come across situations where you have to do some data manipulation…hackernoon.com
Functional Programming in JS: map, filter, reduce (Pt. 5)
Note: This is part of the “Javascript and Functional Programming” series on learning functional programming techniques…hackernoon.com
JavaScript: Map, Filter, Reduce
JavaScript’s built-in map, filter, and reduce array methods are invaluable to a modern JavaScript developer. First…wsvincent.com
JavaScript Arrow Functions: Fat and Concise Syntax in ES6
In this article, you’ll learn all about JavaScript’s arrow function syntax - including some of the gotchas you need to…www.sitepoint.com
JavaScript: Arrow Functions for Beginners
Last week I published this post on the keyword this for beginners. One of the topics that wasn’t covered in that…codeburst.io
When (and why) you should use ES6 arrow functions — and when you shouldn’t
Arrow functions (also called “fat arrow functions”) are undoubtedly one of the more popular features of ES6. They…medium.freecodecamp.org
JavaScript — Learn & Understand Arrow Functions
A beginners guide to Arrow Functions in JavaScriptcodeburst.io
(JavaScript )=> Arrow functions
This post is meant to summarise some of the things someone new to JavaScript and arrow functions needs to know. I do…medium.com
Javascript.reduce()
The Mutli-Tool of JSandepaulj.medium.com
Why you should replace forEach with map and filter in JavaScript - Gofore
TL;DR Prefer map and filter over forEach when you need to copy an array or part of it to a new one. One of the best…gofore.com
Simplify your JavaScript – Use .map(), .reduce(), and .filter()
If you haven’t heard of .map(), .reduce(), and .filter() in JavaScript, you might want to learn to use it!medium.com
JavaScript’s Reduce Method Explained By Going On a Diet
The reduce method in JavaScript gives you a simple way to take an array of values and combine them into one value, or…blog.codeanalogies.com
Difference between map, filter and reduce in JavaScript
I’ve seen a lot of JS beginners struggle when using map, filter or reduce and don’t know the different use cases of…medium.com
Map⇄Filter⇄Reduce↻ | Hacker Noon
Share it on LinkedIn! Due to that reason we were introduced with these three higher order functions, namely 🗺️Map…hackernoon.com
Finding Your Way With .Map()
At the end of the article is a CodePen that demonstrates the concepts presented here.medium.freecodecamp.org
How to write your own map, filter and reduce functions in JavaScript
A sneak peek into functional programming and higher order functions in Javascript.medium.freecodecamp.org
How to Manipulate Arrays in JavaScript
An important part of any programming language. Most times we need to do several operations on arrays, hence this…www.freecodecamp.org
.map(), .filter(), and .reduce()
Originally posted on my blog For the last several weeks I’ve been applying for jobs. Sadly, the startup I was working…dev.to
Map, Filter and Reduce – Animated
Map, filter and reduce have been around for a long time. They are often seen as part of Functional Programming style.jstutorial.medium.com
Map, Filter, Reduce and others Arrays Iterators You Must Know to Become an Algorithms Wizard
In this article we are going to take a close look at some arrays iterators like , , or others methods that use…dev.to
How to Use JavaScript’s .map, .filter, and .reduce
How to use these three useful JavaScript functionsbetterprogramming.pub
Javascript performance test - for vs for each vs (map, reduce, filter, find).
We all know that for loop are faster than for each or javascript function since under the hood of javascript functions…towardsdatascience.com
Using .map(), .filter() and .reduce() properly 👩🏽💻
Map, reduce, and filter are all array methods in JavaScript. Each one will iterate over an array and perform a…javascript.plainenglish.io
Javascript and Functional Programming — Pt. 3: Pure Functions
Purityhackernoon.com
Master the JavaScript Interview: What is a Pure Function?
Pure functions are essential for a variety of purposes, including functional programming, reliable concurrency, and…medium.com
JavaScript: What Are Pure Functions And Why Use Them?
The first time I heard the term “Pure Function” I was confused. What was wrong with a regular function? Why does it…medium.com
Pure functions in JavaScript
A pure function doesn’t depend on and doesn’t modify the states of variables out of its scope. Concretely, that means a…www.nicoespeon.com
Functional Programming: Pure Functions - SitePoint
This is the second part of a two part series on functional programming in Ruby. Before we explored immutable values…www.sitepoint.com
Pure Functions In Javascript
Pure functions in Javascript are kind of Functions where the return value is determined by its parameter passed at call…appdividend.com
Making your JavaScript Pure
Once your website or application goes past a small number of lines, it will inevitably contain bugs of some sort. This…alistapart.com
Arrays, Objects and Mutations
Here are some thoughts on how to avoid mutations when working with arrays and objects in JavaScript by treating them as…medium.com
The State of Immutability
Immutability is a hot subject in modern JavaScript. The reason why this topic is so popular now is of course the…medium.com
How to deal with dirty side effects in your pure functional JavaScript
If you start learning about functional programming, it won’t be long before you come across the idea of pure functions…jrsinclair.com
Preventing Side Effects in JavaScript
JavaScript is very dynamic these days but I still see a lot of legacy code, whether it be for optimal backward…davidwalsh.name
Wielding Pure Functions in JavaScript and Function Composition
Today, I’d like to share some thoughts on two fundamental concepts in functional programming: Pure functions and…scotch.io
JavaScript: Pure Functions
Pure functions are fundamental to functional programming, concurrency, writing testable code, and having deterministic…wsvincent.com
Functional programming paradigms in modern JavaScript: Pure functions
JavaScript is one of the most popular programming languages out there. It runs in the browser, on desktop, on mobile…hackernoon.com
Understanding Javascript Mutation and Pure Functions
Boost your app performance by better understanding Mutation and Pure Functions in JSblog.bitsrc.io
Functional-ish JavaScript
Functional programming is a great discipline to learn and apply when writing JavaScript. Writing stateless, idempotent…bluepnume.medium.com
Introduction to events - Learn web development | MDN
Events are actions or occurrences that happen in the system you are programming, which the system tells you about so…developer.mozilla.org
Bubbling and capturing
Let’s start with an example. This handler is assigned to , but also runs if you click any nested tag like or : Isn’t it…javascript.info
https://www.youtube.com/watch?v=Jh_Uzqzz_wM
https://developer.mozilla.org/en-US/docs/Web/JavaScript/Closures
https://javascript.info/closure
I never understood JavaScript closures
Until someone explained it to me like this …medium.com
Understand JavaScript Closures With Ease
Closures allow JavaScript programmers to write better code. Creative, expressive, and concise. We frequently use…javascriptissexy.com
Understanding JavaScript Closures
When you’re first learning JavaScript, terms like “closures” may make the language appear mystical and hard to…codeburst.io
https://codeburst.io/understand-closures-in-javascript-d07852fa51e7
A simple guide to help you understand closures in JavaScript
Closures in JavaScript are one of those concepts that many struggle to get their heads around. In the following…medium.freecodecamp.org
Understanding JavaScript Closures: A Practical Approach
Learning a new language involves a series of steps, whereas its mastery is a product of patience, practice, mistakes…scotch.io
Understanding JavaScript: Closures
Why learn JavaScript in depth?hackernoon.com
How to use JavaScript closures with confidence
Using closures will be a piece of (chocolate) cakehackernoon.com
JavaScript Closures by Example
At some point you may have run into a problem when executing functions from within a for loop. The first time it…howchoo.com
JavaScript — Closures and Scope
Looking at JavaScript today, it can be scary as a beginner. People talk about watching out for all the little quirks or…codeburst.io
Discover the power of closures in JavaScript
Discover Functional JavaScript was named one of the best new Functional Programming books by BookAuthority! A closure…medium.freecodecamp.org
Simplified JavaScript: Getting Started with Closures
Eric Elliot, in his Medium article Master the JavaScript Interview: What is a Closure?, explains that when he…code.likeagirl.io
Javascript Closures 101 - Explaining how closures work
So, “closures”, right? That’s a fun one that tends to cause confusion all around. It’s pretty much a given that at some…reallifejs.com
Closure, Currying and IIFE in JavaScript
These are some of the concepts of JavaScript where everyone struggle in beginning. Lets try to simplify them bit by…dev.to
Understanding Closures in JavaScript
Learn How Closures Really Work in JavaScript: hands-on guideblog.bitsrc.io
A basic guide to Closures in JavaScript
The Closure is a collection of all variables in scope at the time of function creation. To use closure create a…medium.freecodecamp.org
Closures: Using Memoization
One of the core tenets of Functional Programming is that a function should return the same value if given the same…dev.to
A Brief Introduction to Closures and Lexical Scoping in JavaScript
“Writing in ECMAScript language without understanding closure is like writing Java without understanding classes”betterprogramming.pub
Demystify Closures
In the previous post we implemented functions, but not about closures. Let’s fix this. Without closures following code…dev.to
Scope - JavaScript Concepts
This is part of a series where I try to explain through each of 33 JS Concepts. Originally written on my blog with…dev.to
Understanding Closures in JavaScript
When you declare a function inside another function, a closure is the new environment created by combining the inner…dev.to
What the fuck is a closure? ・ Dan’s JavaScript Glossary
Closures are confusing because they are an “invisible” concept. When you use an object, a variable, or a function, you…whatthefuck.is
Closures in JavaScript can…
I gain more understanding of a topic when I get to talk/write about it… much to my wife’s horror as she has zero…dev.to
https://www.youtube.com/watch?v=1JsJx1x35c0
Higher-Order Functions :: Eloquent JavaScript
Tzu-li and Tzu-ssu were boasting about the size of their latest programs. ‘Two-hundred thousand lines,’ said Tzu-li…eloquentjavascript.net
Higher-Order Functions in JavaScript - SitePoint
Continuing his look at functional programming in JavaScript, M. David Green examines higher-order functions and how…www.sitepoint.com
Higher Order Functions: Using Filter, Map and Reduce for More Maintainable Code
Higher order functions can help you to step up your JavaScript game by making your code more declarative. That is…medium.freecodecamp.org
First-class and Higher Order Functions: Effective Functional JavaScript
Functions: the killer JavaScript feature we never talk about.hackernoon.com
Higher Order Functions in JavaScript
Higher-order functions can be intimidating at first, but they’re not that hard to learn. A higher-order function is…www.lullabot.com
Higher-order Functions - JavaScript Is Sexy
In JavaScript, functions are first-class objects; that is, functions are of the type Object and they can be used in a…javascriptissexy.com
Fun With Higher Order Functions In JavaScript
JavaScript is often referred to as a language with functional programming capabilities because of it’s "higher order…derickbailey.com
pedroapfilho/array-methods
Just a reminder on how to use array methods. Contribute to pedroapfilho/array-methods development by creating an…github.com
Understanding Higher-Order Functions in JavaScript
Learn What Higher-Order Functions are and how to use them in JavaScriptblog.bitsrc.io
Higher Order Functions - A pragmatic approach
Its a common saying that functions are the bread and butter of programming, and the basic unit for building reusable…dev.to
Recursion in JavaScript
I’m just gonna get this out of the way right up front, because people get really angry otherwise:medium.freecodecamp.org
Understanding Recursion in JavaScript
One of the many things that JavaScript has going for it is the ability to recursively call functions. This feature is…medium.com
Learn and Understand Recursion in JavaScript
I’ll walk you through two popular JS recursion examples in 10 minutes so you can finally understand how recursion works…codeburst.io
Recursion in Functional JavaScript - SitePoint
M. David Green demonstrates the powerful, but dizzying concept of recursion by refactoring normal for and while loops…www.sitepoint.com
Programming with JS: Recursion
Understanding data structures, algorithms and basic programming concepts is essential for one to become a better…hackernoon.com
Anonymous Recursion in JavaScript
Yes, there is such thing, and I thought it would be an interesting example to share. It features: closures…dev.to
Recursion, iteration and tail calls in JS
If you’ve been on the business for some time, you have, most likely, come across the definition of recursion, for which…www.jstips.co
Intro to Recursion
Recursion can be a difficult concept to wrap your head around, but its definition is rather simple: recursion is when a…medium.com
Accio Recursion!: Your New Favorite JavaScript Spell
The spell “Accio” allows a witch or wizard to summon something to them. Casting Accio is just like accessing a value in…medium.datadriveninvestor.com
Recursion Explained (with Examples)
“To understand recursion, one must first understand recursion” - Unknown Recursion is a method of solving problems…dev.to
Generator - JavaScript | MDN
This object cannot be instantiated directly. Instead, a Generator instance can be returned from a generator function…developer.mozilla.org
ES6 In Depth: Collections - Mozilla Hacks - the Web developer blog
ES6 In Depth is a series on new features being added to the JavaScript programming language in the 6th Edition of the…hacks.mozilla.org
ES6 Collections: Using Map, Set, WeakMap, WeakSet - SitePoint
Most major programming languages have several types of data collections. Python has lists, tuples, and dictionaries…www.sitepoint.com
Introduction to Maps in JavaScript | DigitalOcean
While this tutorial has content that we believe is of great benefit to our community, we have not yet tested or edited…alligator.io
Map and Set
Till now, we’ve learned about the following complex data structures: Objects are used for storing keyed collections…javascript.info
Maps in ES6 - A Quick Guide
Maps and Sets often get lumped together in articles. They’re both new ES6 collection types with similar interfaces but…dev.to
ES6 — Set vs Array — What and when?
What is Set and what is Array?medium.com
ES6 — Map vs Object — What and when?
You may wonder — why Map vs Object but not Map vs Array, or Object vs Set? Well, you can also compare between any of…medium.com
ES6: Working with Sets in JavaScript
In this post we’re continuing to look at features introduced in ES6. Amongst all the cool things happening in ES6, we…www.deadcoderising.com
Array vs Set vs Map vs Object — Real-time use cases in Javascript (ES6/ES7)
The internet is a great place to find information, but there is one teeny-tiny problem. You are on a boat in the middle…codeburst.io
How to create an array of unique values in JavaScript using Sets
Sorry for the verbose title - sometimes things can be explained better with a code example. Imagine you have a…dev.to
What You Should Know About ES6 Maps
JavaScript ES6 introduces a new data structure, called maps. Maps are designed as an alternative to using Object…hackernoon.com
ES6 Maps in Depth
A very common abuse case of JavaScript objects is hash-maps, where we map string keys to arbitrary values.ponyfoo.com
What are JavaScript Generators and how to use them
In this article, we’re going to take a look at the generators that were introduced in ECMAScript 6. We’ll see what it…codeburst.io
Understanding Generators in ES6 JavaScript with Examples
ES6 introduced a new way of working with functions and iterators in the form of Generators (or generator functions). A…codeburst.io
The Basics Of ES6 Generators
One of the most exciting new features coming in JavaScript ES6 is a new breed of function, called a generator. The name…davidwalsh.name
An Introduction to JavaScript Generators
One of the fundamentals of JavaScript is that it is single-threaded, meaning that two pieces of code cannot run at the…dev.to
Promise - JavaScript | MDN
The Promise object represents the eventual completion (or failure) of an asynchronous operation and its resulting…developer.mozilla.org
Understanding JavaScript Promises | DigitalOcean
Javascript Promises can be challenging to understand. Therefore, I would like to write down the way I understand…scotch.io
Understanding Promises in JavaScript
An in-depth look at creating and handling Promiseshackernoon.com
Master the JavaScript Interview: What is a Promise?
“Master the JavaScript Interview” is a series of posts designed to prepare candidates for common questions they are…medium.com
An Overview of JavaScript Promises - SitePoint
This article explores JavaScript’s new Promises API, showing how you can leverage promises in your JavaScript…www.sitepoint.com
How to use Promises in JavaScript
Promises in JavaScript are a way to handle async calls. Before Promises were introduced in JavaScript ES6, async calls…medium.freecodecamp.org
Implementing Promises In JavaScript
The thing I love most about programming is the aha! moment when you start to fully understand a concept. Even though it…medium.freecodecamp.org
JavaScript: Promises explained with simple real life analogies
Talking about promises in layman termscodeburst.io
25. Promises for asynchronous programming
This chapter is an introduction to asynchronous programming via Promises in general and the ECMAScript 6 Promise API in…exploringjs.com
JavaScript Promises Explained By Gambling At A Casino
We all love the asynchronous capabilities of JavaScript. In fact, we love them so much that sometimes, we overindulge…blog.codeanalogies.com
ES6 Promises: Patterns and Anti-Patterns
When I first got started with NodeJS a few years ago, I was mortified by what is now affectionately known as “callback…medium.com
A Simple Guide to ES6 Promises
The woods are lovely, dark and deep. But I have promises to keep, and miles to go before I sleep. — Robert Frostcodeburst.io
The ES6 Promises
A very helpful feature in ES6codeburst.io
ES6 Promises in Depth
Promises are a very involved paradigm, so we’ll take it slow. Here’s a table of contents with the topics we’ll cover in…ponyfoo.com
Javascript Promises: An In-Depth Approach
“Write down the syntax for promises on this sheet of paper”, is enough to give nightmares to a lot of junior and even…codeburst.io
How to Write a JavaScript Promise
What is a promise?medium.freecodecamp.org
A Coding Writer’s Guide: An Introduction To ES6 Promises
Welcome back to the ‘A Coding Writer’s Guide’ series! If you have been keeping up with this series, you’d know that I…medium.com
Reverse engineering - Understanding Promises in JavaScript
We will reverse engineer Promises in JavaScript together with some 90s nostalgia. Tagged with showdev, tutorial…dev.to
Converting callbacks to promises
It’s easier to work with Promises (or Async/await) compared to callbacks. This is especially true when you work in…dev.to
JavaScript Promises: Zero To Hero Plus Cheat Sheet
It’s time, friend. Native JavaScript promises explained how I wish they were explained to me — plus a handy cheat…medium.com

