-
Notifications
You must be signed in to change notification settings - Fork 129
HISE Tutorial Part 1: Setup
This tutorial will guide you through the process of building a simple sample library and export it as VST / AU plugin. The following topics are covered:
- Part 1: Application overview and Project setup
- Part 2: Sample Mapping
- Part 3: Adding effects and modulators
- Part 4: Add some custom MIDI processing scripts
- Part 5: Design the interface using scripting
- Part 6: Export the patch as plugin
The sample library will have these features:
- small sample set of a music box (
- a convolution reverb with a impulse response
- A synthesised mallet click sound that can be added to the samples.
- modwheel controled decay time
- release samples
- a custom interface that controls some selected parameters:
The interface and the samples are kinldy provided by Wavesfactory
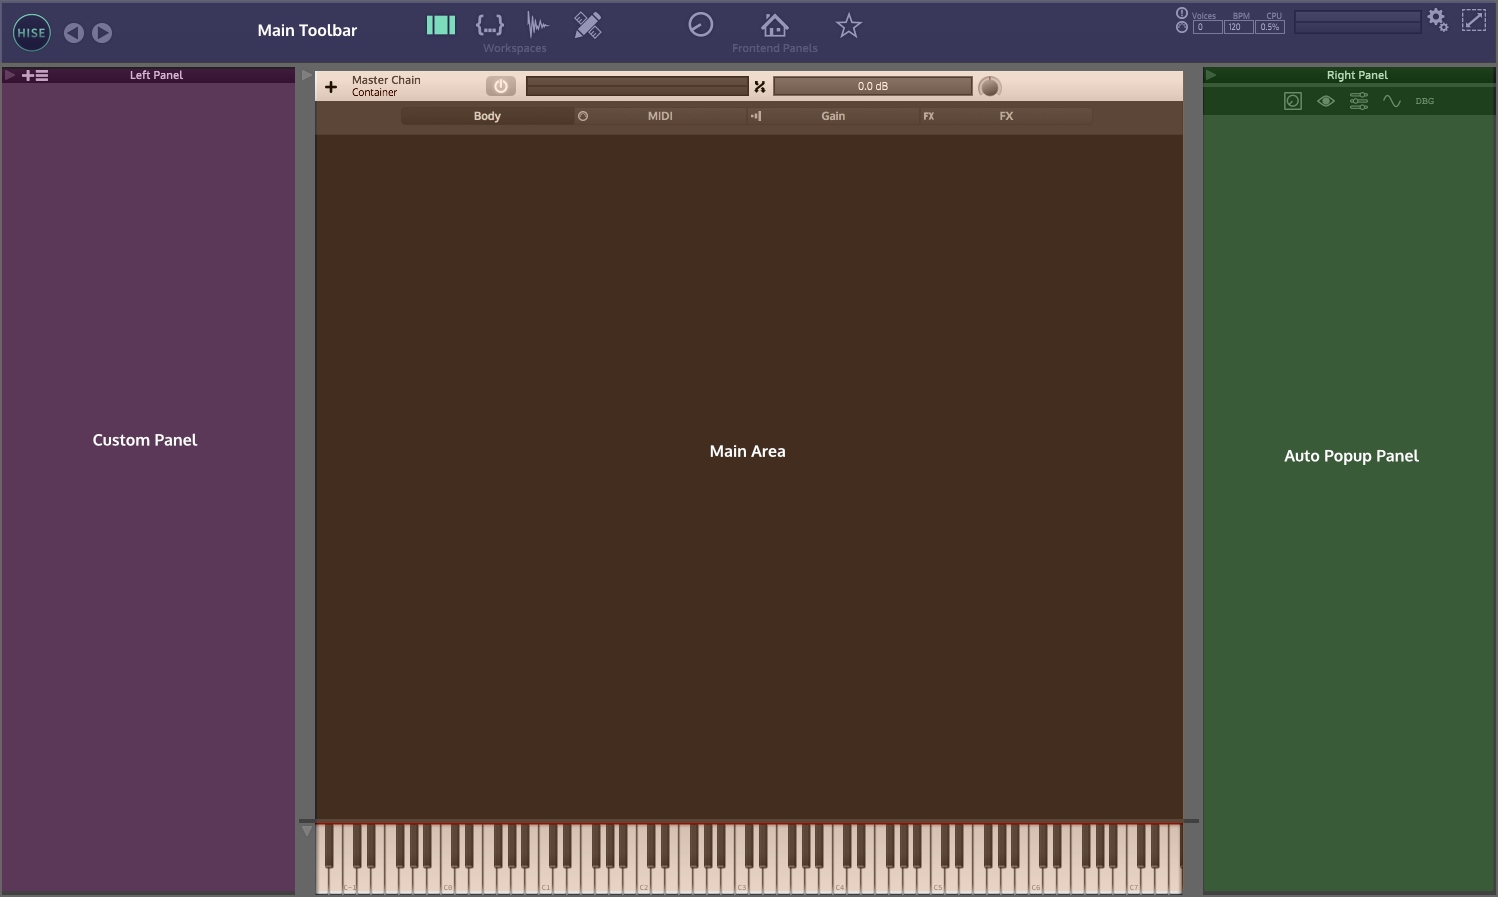
Before we start, let's take a look at the interface of HISE first.
Download the HISE installer and follow the instructions. For actual development I recommend using the standalone application. HISE changes it appearance according to the window size, so if you want all controls, set it to fullscreen (or a minimal width of 1300px). The window is divided into three sections (from left to right):
The left area contains all windows loosely related to "resources". It can be thought of "stuff that can be put into HISE". You can toggle each panel by clicking on its icon:
| Icon | Description |
|---|---|
 |
a module browser with a list of every available module |
 |
a list with every scripting API call |
 |
A file browser |
 |
a list with every imported sample |
 |
5. a list with every imported audio file (impulse responses, loops, etc) |
 |
6. a list with every imported image |
The main area contains a vertically arranged list of all modules in the current patch. Everything in HISE is a tree. The root item is called master chain (and has the module type "Container"). You can add submodules by clicking on the + icon and select the desired module.
Above the area there are three another elements:
- A tooltip bar which displays some help when hovering over certain elements
- A real time statistics panel that shows the current voice count / CPU usage etc.
- A toolbar that toggles additional views (the most important being the house icon which shows a preview of the compiled plugin)
the right area contains all panels loosely related to "properties". These tools share their task to analyse / tweak the current patch.
| Icon | Description |
|---|---|
 |
A panel to set the macro controls settings |
 |
2. a live variable watch table for debugging scripts |
 |
3. the interface designer which allows WYSIWYG editing of script interfaces |
 |
4. a modulator plotter that is able to plot modulation signals of time variant modulators and envelopes. |
 |
5. the debugging console |
 |
6. a searchable browser that contains every module in this patch |
Now let's build this sample library. The first thing we have to deal with is some boring stuff first: project management.
HISE has a internal project system that allows you to easily share and switch between different projects and it's crucial to understand how it works before everything else.
A project in HISE is a folder which contains all files (samples / scripts / images) as well as some specific setting (Project name, version etc). So the first thing you should do after loading up HISE is to create a new project by choosing File -> Create New Project Folder.
If you want to learn more about the project management in HISE, check out the blog entry about the topic.
Select a directory and press OK. It will create all necessary sub folders within this directory. You can now copy all external files into the correct subfolder and access it within HISE as relative path so you can simply transfer the project on another computer. When you compile the plugin, all files (except for the actual samples) will be embedded into the plugin binary.
Now you are ready to get started with the sampler.
