Accurately Map Textures
A texture map is a two-dimensional image file that can be applied to the surface of a 3D model to add color, texture, or other surface detail like glossiness, reflectivity, or transparency. Texture maps are developed to directly correspond to the UV coordinates of an unwrapped 3D model and are either devised from real-life photos, or hand painted in a graphics application like Photoshop or Gimp.
Find it: Click the Edit Texture Mapping button 
- Fine-tune textures to get rid of seams on polygon objects.
- Break off instanced polygons to remap texture.
- Specify exactly how the texture gets mapped onto a face of an object.
-
Edit
- Undo and redo of local operations.
-
Selection
- Select or deselect all points or faces depending on whether the left or the right preview is active.
-
Mappings
- Use to get best texture mappings for object shape. By default, X3D maps the texture to the most prevalent surface of a model and smears the texture across the rest of the model. Using Mappings, you can change this mapping to reduce or eliminate smearing. For example, to get the best texture mapping for a chess piece, choose Cylinder: Best. You can also select mappings specific to X, Y, and Z combinations.
Mapping applies to the current polygon selection —�� before you apply a mapping select the all faces or only the desired faces. This enables you to map different functions to different parts of an object.
- Use to get best texture mappings for object shape. By default, X3D maps the texture to the most prevalent surface of a model and smears the texture across the rest of the model. Using Mappings, you can change this mapping to reduce or eliminate smearing. For example, to get the best texture mapping for a chess piece, choose Cylinder: Best. You can also select mappings specific to X, Y, and Z combinations.
Once you apply a texture to an object, you may want to adjust parts of the object by selecting specific polygons in the object and moving, rotating, or scaling the texture by manipulating those selected polygons.
To make the Edit Texture Mapping button in the toolbar available (not grayed-out):
- Select an object in your scene.
- Make the object into a IndexedFaceSet geometry by pressing the Hammer
button, if not already.
- Open the Texture Editor and apply a texture or drag and drop a image from your file browser into the browser window.
 button, if not already.
To use the Texture Mapping Editor:
- Click the Edit Texture Mapping button in the toolbar.
- In the Texture Mapping Editor, select the polygons onto which you'd like to adjust the texture.
- Remap the texture.
- Click Apply when you want to apply the changed texture to the selected object in your scene.
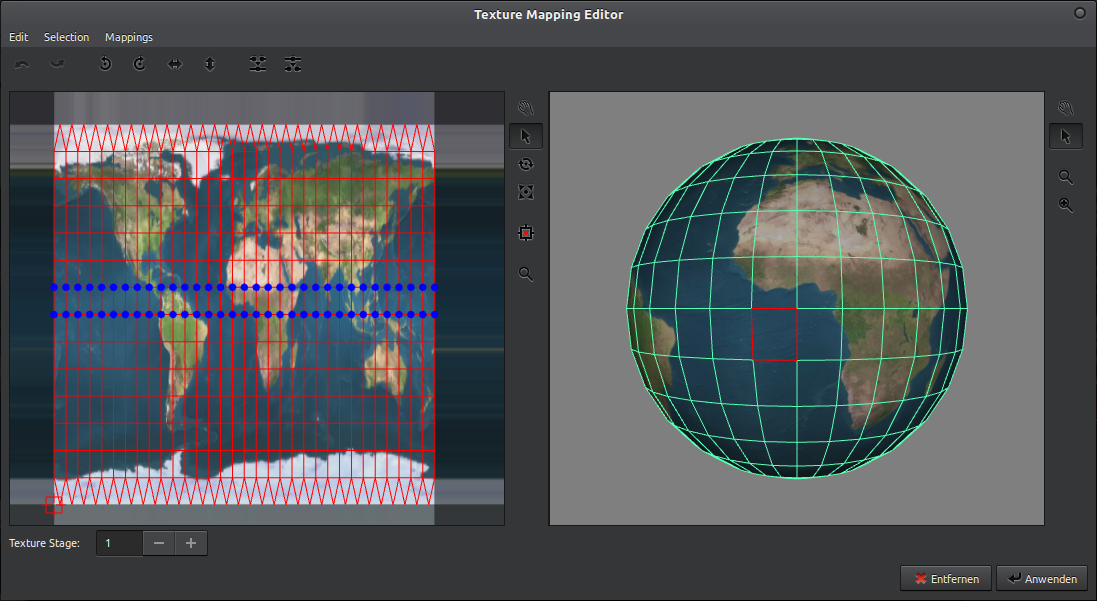
When you're fine-tuning a texture using the Texture Mapping Editor, you select the polygons to manipulate in the right side of the editor's window. Adjust your view here the same way you would in the Examiner Viewer. See Viewer Controls and Menus for details.
To select polygons:
- Make sure the cursor is in the right side of the Texture Mapping Editor''s window (the one with the 3D view).
- Click any part of the object to select a polygon. Shift-click to select multiple polygons or just click. You can also drag the mouse to select multiple polygons.
Notice the left window of the Texture Mapping Editor. This is a flat mapping of the texture and the polygons it covers. Switch to this window to choose a part of your selected polygons and move, resize, or rotate the texture. See Remapping a Texture in the Texture Mapping Editor for detailed steps.
To remap a texture:
- Make sure you have an area of polygons selected (see Selecting Polygons).
- In the left window (the 2D view of the texture) select the button pertaining to the action you want to perform on the selected polygons.
The arrowlets you select points of the polygons you have already selected in the left window (it's a sub-selection).
The next two buttons,
work in conjunction with the square orange box, which is the center of rotation and scaling.
- Move the center point anywhere on the texture map. Then choose the scaling button or the rotation button, and drag the mouse in the left window. You'll see the texture move with the selected points.
You can go to the preview window (the right window with the 3D view) at any time to see what the changes will look like. - When you like the way the texture looks, press the Apply button.
 ,
,  work in conjunction with the square orange box, which is the center of rotation and scaling.