Deploy to Amazon aws on a virtual private cloud with elastic beanstalk
A collection of best practice to deploy with Amazon AWS services.
- Amazon services
- Network topology
- Security Groups
- Public
- WebServer
- DBServer
- Virtual Private Cloud
- Subnets
- Route tables
- Subnet Associations
- Instances
- NAT
- DB
- Web
- Elastic Beanstalk
- SSH
- Conclusion
- Links
- vpc
- load balancing
- mongodb
EC2: virtual machine zones, where your instances are hosted mainly where you will configure everything.VPC: virtual private cloud offers a network infrastructure for your instances.Elastic Beanstalk: deployment manager including common technology like Tomcat, Php, NodeJS...Others: S3...other services are not described here, as more simple to use and some not focused on deployment.
First we will create your security rules, you will update it in future again but need it to start VPC creation context and/or instance deployment.
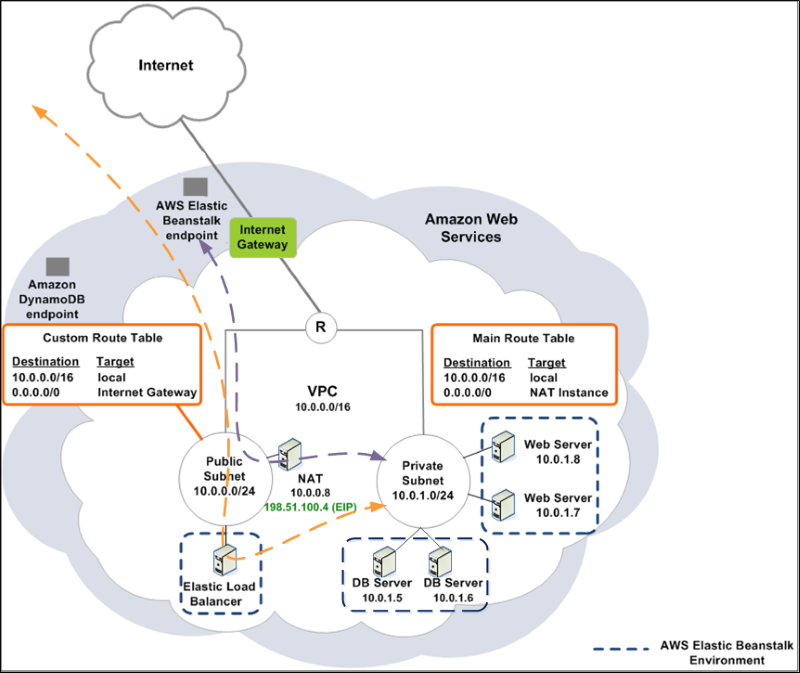
Here is what you will get at the end.
Main difference I have made is to divide private zone with 2 CIDR, one for webservers, one for database servers.
In following example, the main parts of your infrastructure are:
public: a public zone providing a door to enter your application, exclusively reserved for HTTP access (NAT instance and some amazon load balancers).webserver: a private zone hosting your webserver instances, you may use several for load balancing in case of high charge (scalability).dbserver: a private zone hosting your database servers application instances.
Let's create "Security Groups", use EC2 console view to create it.
Named it like 'vpc-public-sg', where your NAT instance (details later) will be deployed.
AWS will generate a technical ID for it, let's say: sg-11111111
| Type | Protocol | Port range | Source |
|---|---|---|---|
| All trafic | All | All | 0.0.0.0/0 |
| Type | Protocol | Port Range | Destination |
|---|---|---|---|
| All trafic | All | All | 0.0.0.0/0 |
Named it like 'vpc-webserver-sg', where your Beanstalk webservers(application servers) instances (details later) will be deployed.
AWS will generate a technical ID for it, let's say: sg-22222222
| Protocol | Port range | Source |
|---|---|---|
| SSH | 22 | 0.0.0.0/0 |
| HTTP | 80 | 0.0.0.0/0 |
| Protocol | Port Range | Destination |
|---|---|---|
| TCP | 27017 | sg-33333333 |
where sg-33333333 group policy of DBServer security group, 27017 MongoDB usual port.
Named it like 'vpc-dbserver-sg', where your database servers (PostGres, MongoDB, MySQL...) instances (details later) will be deployed.
AWS will generate a technical ID for it, let's say: sg-33333333
| Protocol | Port range | Source |
|---|---|---|
| SSH | 22 | 0.0.0.0/0 |
| TCP | 27017 | sg-22222222 |
where sg-22222222 group policy of WebServer, 27017 MongoDB usual port.
| Protocol | Port Range | Destination |
|---|---|---|
| TCP | 80 | 0.0.0.0/0 |
Go to VPC AWS Service zone and create a new one. Wizard will let you create a Public and Private zone with 2 subnets, take inspiration from these tables below, in order to create a third one at the end.
| Name | VPC ID | VPC CIDR |
|---|---|---|
| my-vpc | vpc-44b5252f | 10.0.0.0/16 |
Create 3, for public, webserver, and dbserver zones.
| Subnet ID | VPC | CIDR | Available IPs | Availability zone |
|---|---|---|---|---|
| subnet-5eb52535 | vpc-44b5252f | 10.0.0.0/24 | 248 | eu-west-1c |
| subnet-5cb52537 | vpc-44b5252f | 10.0.1.0/24 | 255 | eu-west-1c |
| subnet-f1c10094 | vpc-44b5252f | 10.0.2.0/24 | 255 | eu-west-1c |
Details
public: CIDR 10.0.0.0/24, Ex: 10.0.0.8 for a NAT instancewebserver: CIDR 10.0.1.0/24, Ex: 10.0.1.16 for a web (NodeJS...) instance(s)dbserver: CIDR 10.0.2.0/24, Ex: 10.0.2.32, 10.0.2.33, 10.0.2.34 for some MongoDB instance(s) (several for a replicat set...)
Note: be careful of creating it in same 'Availability zone' first.
Create one for each subnet.
Public
| Destination | Target |
|---|---|
| 10.0.0.0/16 | local |
| 0.0.0.0/0 | igw-78362e1a |
where igw-78362e1a is Internet Gateway id, create one if not existing yet.
WebServer and DBServer
| Destination | Target |
|---|---|
| 10.0.0.0/16 | local |
| 0.0.0.0/0 | eni-9a3e8ded |
where eni-9a3e8ded is Network Interface (EC2) id, corresponding to NAT instance ENI. You can specify id of your NAT instance, aws will find network interface for you (ENI).
Public
| Subnet | CIDR |
|---|---|
| subnet-5eb52535 (10.0.0.0/24) | 10.0.0.0/24 |
WebServer
| Subnet | CIDR |
|---|---|
| subnet-5cb52537 (10.0.1.0/24) | 10.0.1.0/24 |
DBServer
| Subnet | CIDR |
|---|---|
| subnet-f1c10094 (10.0.2.0/24) | 10.0.2.0/24 |
Your VPC is ready to host some new EC2 instances.
For general purpose of this instance, read here http://docs.aws.amazon.com/AmazonVPC/latest/UserGuide/VPC_NAT_Instance.html
- Go to EC2 console view
- Launch instance wizard, use 'Community AMIs' and search for 'NAT', select one like
amzn-ami-vpc-nat-pv-2013.09.0.x86_64-ebs - ami-f3e30084
Amazon Linux AMI VPC NAT x86_64 PV
Root device type: ebs Virtualization type: paravirtual
In Network and Subnet parameters, be careful launch it in your VPC created before and choose your public subnet.
When NAT instance is created, be also aware of disabling Source/Destination check.
- Go to EC2 console view
- Launch instance wizard, use 'Community AMIs' and search for 'MONGO, MYSQL...', select one or use your own ones. I use some custom home made images sometimes.
In Network and Subnet parameters, be careful launch it in your VPC created before and choose your dbserver subnet.
For this part, we gonna use amazing Elastic Beanstalk service to deploy in our webserver subnet.
Well, before existence of that kind of services ( like vpc or ec2 awesome solutions ) it has always been very tricky to deploy our work in a simple manner.
Idea was I work with Git, I make some build, I send it by ssh or with git on my instance, I configure NGINX, Apache or whatever, I restart everything...a kind of HELL you want to avoid.
Here we are.
What beanstalk if waiting for is a simple archive zip, war...whatever depending of context of your application stack.
- First create your application, zip it (NodeJS example, package.json is at root of your directories as usual).
- Create a new application, give it a name
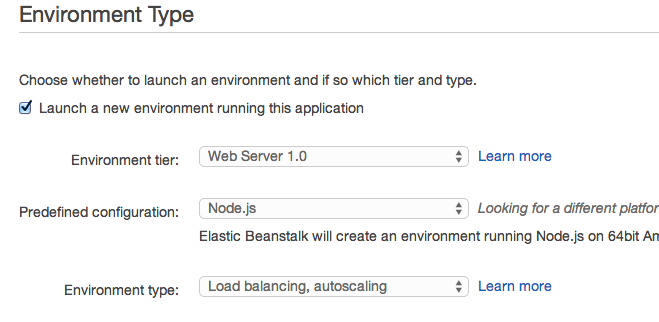
- Select environment type, my case is NodeJS
- Select archive to deploy, my case a zip
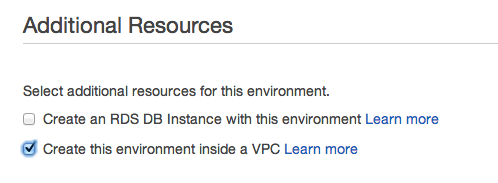
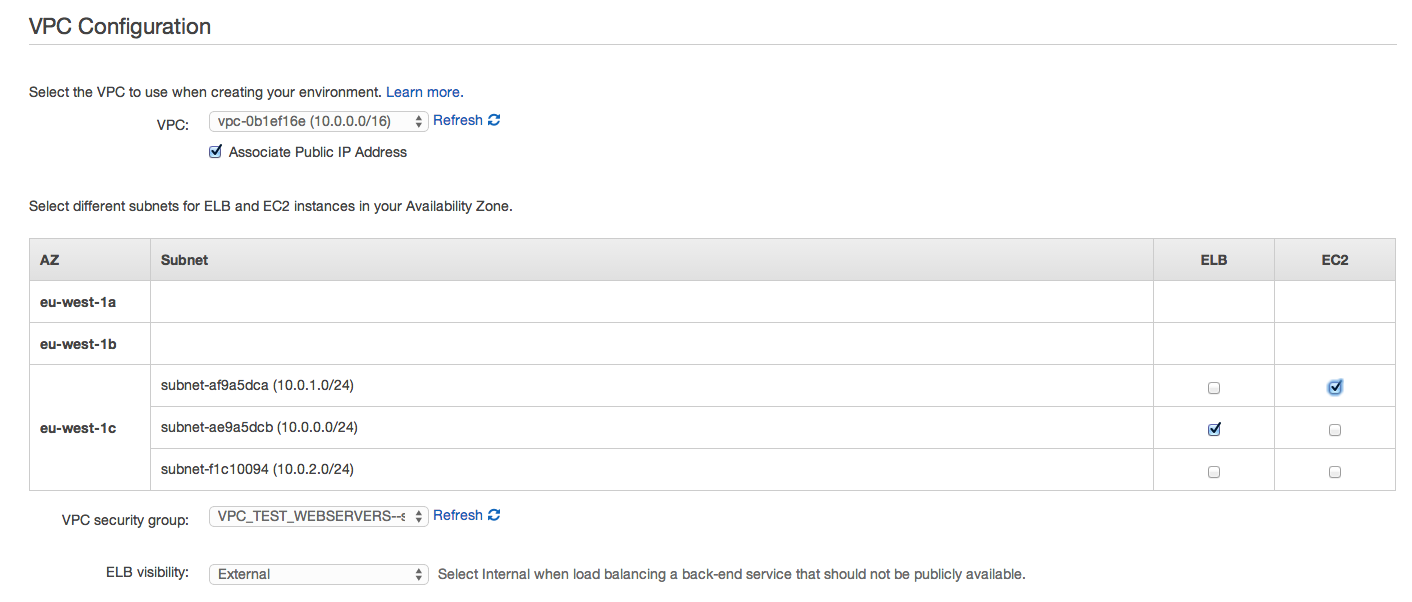
- Select VPC where to deploy
- Select zone for load balancer and instance ( EC2 )
Load balancers have to deployed (in that case of webserver balancing) in public zone. EC2 Beanstalk instances have to be deployed in your webserver zone.
Next step is to make all this stuff accessible by ssh for custom configuration.
Best choice for now I have found it to make some port forwarding by using NAT instance, the only one you may need to expose with a public IP.
Connect to your NAT instance with ssh and enter that kind of port forwarding.
iptables -A PREROUTING -t nat -i eth0 -p tcp --dport 2222 -j DNAT --to-destination 10.0.2.91:22
iptables -A FORWARD -p tcp --dport 22 -d 10.0.2.91 -j ACCEPT
iptables -A FORWARD -p tcp --dport 22 -s 10.0.2.91 -j ACCEPT
10.0.2.91: private IP of one of your private dbserver zone instance.
In this example you will connect to some instance in 'dbserver' zone by using port 2222 from your NAT instance.
From your host, this command will connect to 10.0.2.91 instance host in private area zone.
ssh -i your-pem.pem ec2-user@ip-of-your-nat-instance -p 2222
Hope you will enjoy, that was a big deal for me to understand all that stuff, I wish it will help you.
What we do:

