

⚠️ Difficulty:Beginners, we expect you to read some python code.
Learn how to build an app end-to-end application with multi-modal retrieval augmented generation (RAG) and vector search using Astra DB, Vertex AI, and Gemini.
HOUSEKEEPING
- 1.1 - Create Astra Account
- 1.2 - Create Astra Database
- 1.3 - Create VertexAI account
- 1.4 - Get your credentials
- 1.5 - VertexAI Studio
-
Discover how to use the following technologies:
-
Google Gemini: The latest large language model from Google
-
Langchain the leading framework for building application in generative AI
-
RagStackAI libraries provided by DataStax to ease the use of langchain
-
GoogleCollab: a notebook environment that runs in the cloud
-
StreamLit an easy way to build application with user interfaces in python
-
Github workspaces: a full IDE in the cloud
-
Astra DB (a Database-as-a-service built on Apache Cassandra)
-
-
Han fun with an interactive session
1️⃣ Can I run this workshop on my computer?
There is nothing preventing you from running the workshop on your own machine, If you do so, you will need the following
- git installed on your local system
- Python 3.8+ installed on your local system
2️⃣ What other prerequisites are required?
- You will need an enough *real estate* on screen, we will ask you to open a few windows and it does not file mobiles (tablets should be OK)
- You will need a GitHub account eventually a google account for the Google Authentication (optional)
- You will need an Astra account: don't worry, we'll work through that in the following
- You will need a Vertex AI Account: don't worry, we'll work through that in the following
- You will need a Streamlit Account: don't worry, we'll work through that in the following
3️⃣ Do I need to pay for anything for this workshop?
No. All tools and services we provide here are FREE. FREE not only during the session but also after.
It doesn't matter if you join our workshop live or you prefer to work at your own pace, we have you covered. In this repository, you'll find everything you need for this workshop:
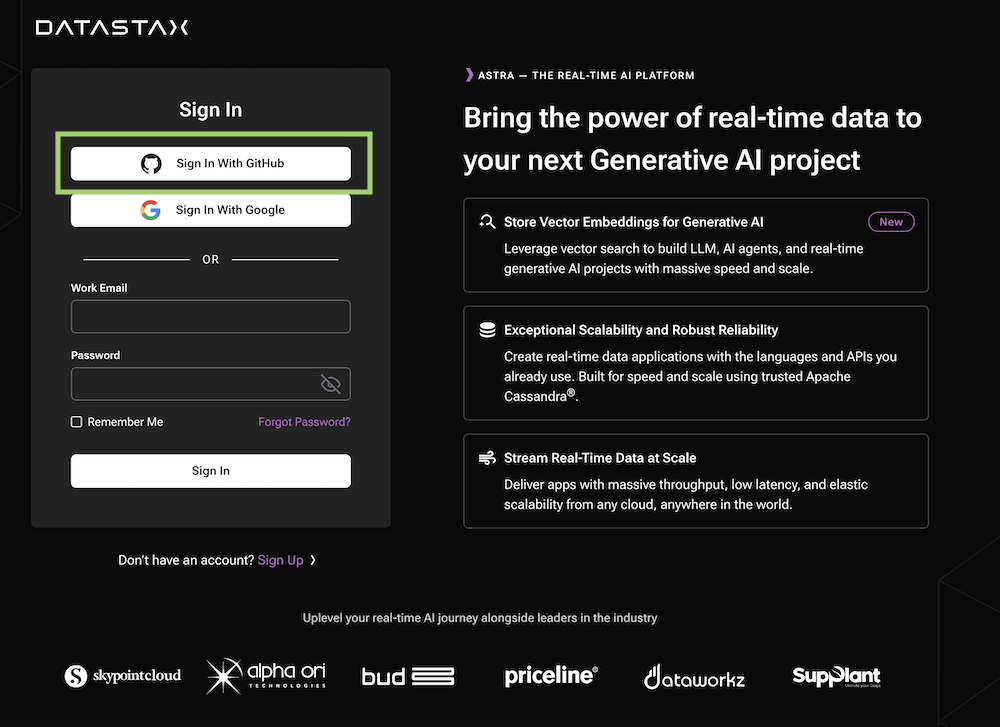
- Access https://astra.datastax.com and register with
GoogleorGithubaccount. It is free to use. There is free forever tiers of up to 25$ of consumption every month.
If you are creating a new account, you will be brought to the DB-creation form directly.
- Get to the databases dashboard (by clicking on Databases in the left-hand navigation bar, expanding it if necessary), and click the
[Create Database]button on the right.
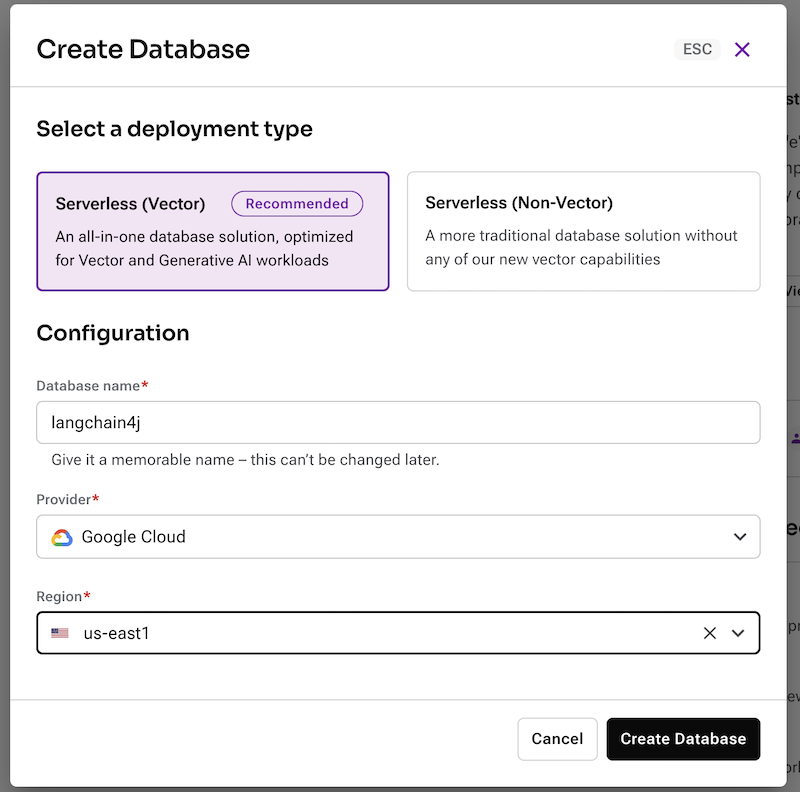
- ℹ️ Fields Description
| Field | Description |
|---|---|
| Vector Database vs Serverless Database | Choose Vector Database In june 2023, Cassandra introduced the support of vector search to enable Generative AI use cases. |
| Database name | It does not need to be unique, is not used to initialize a connection, and is only a label (keep it between 2 and 50 characters). It is recommended to have a database for each of your applications. The free tier is limited to 5 databases. |
| Cloud Provider | Choose whatever you like. Click a cloud provider logo, pick an Area in the list and finally pick a region. We recommend choosing a region that is closest to you to reduce latency. In free tier, there is very little difference. |
| Cloud Region | Pick region close to you available for selected cloud provider and your plan. |
If all fields are filled properly, clicking the "Create Database" button will start the process.
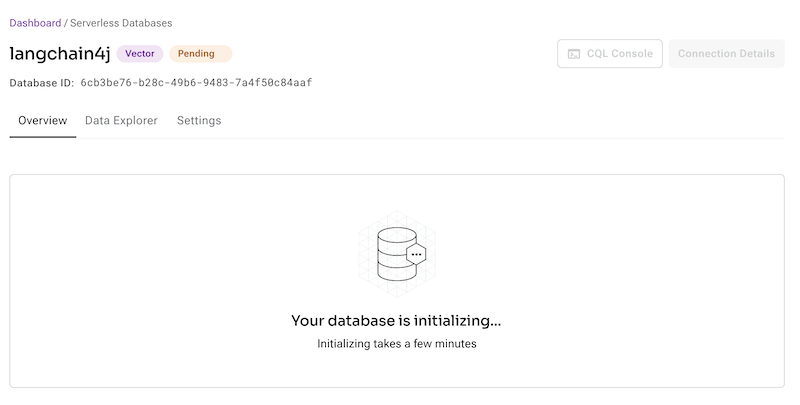
It should take a couple of minutes for your database to become Active.
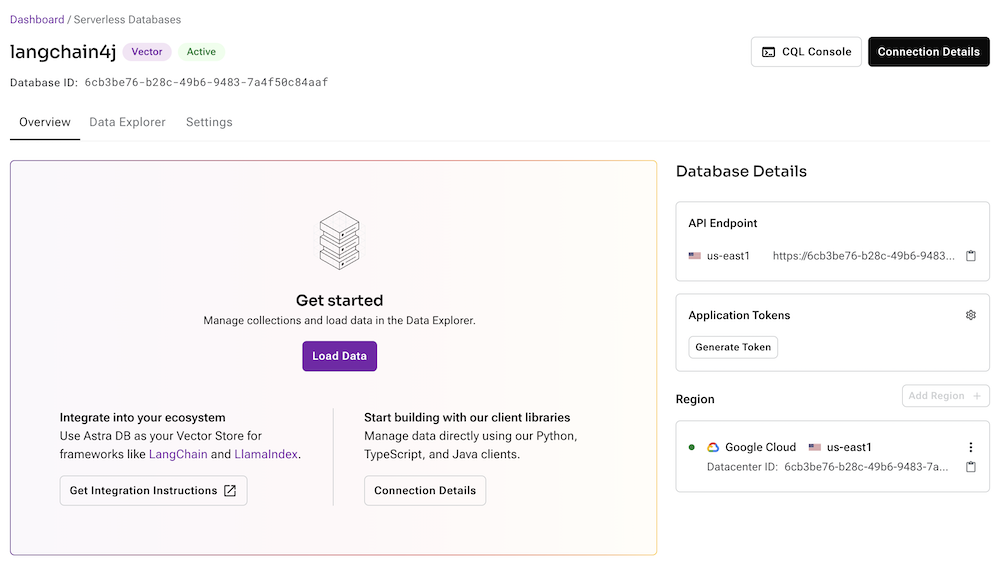
To connect to your database, you need the API Endpoint and a token. The api endpoint is available on the database screen, there is a little icon to copy the URL in your clipboard. (it should look like https://<db-id>-<db-region>.apps.astra.datastax.com).
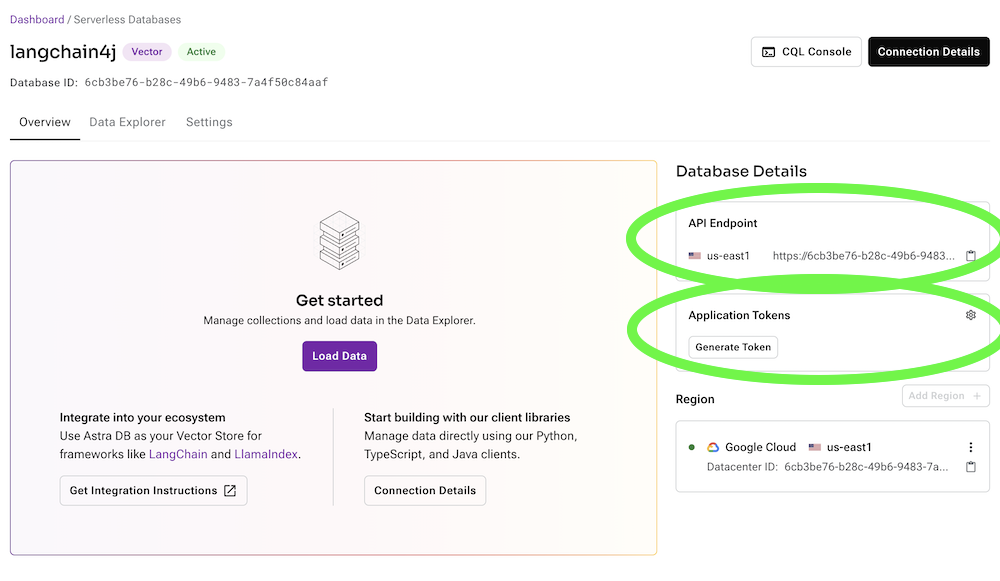
To get a token click the [Generate Token] button on the right. It will generate a token that you can copy to your clipboard.
https://console.cloud.google.com/
- Create a new project by clicking on the
Select a projectdropdown and then clicking onNew Project

- Name your project and click on
Create

- Make sure to select the project, then in the navigation menu, click on
Vertex AI.


- Enable all Api for Vertex AI (make sure to have your billing account or free credit setup_)

- You should agree with the condition

- And then you should be able to access the Vertex AI Studio

- Select
Try Gemini

- Here we can pick a multi-modal model to use for our application

- Download your service account key as a json file from Google Cloud console. Record the path to this json file. See instructions here
- Create a
.envfile in the same directory asfashion_buddy.py - Copy/paste the following into your
.envfile and replace with your environment variables.
GCP_PROJECT_ID = "<YOUR_GCP_PROJECT_ID>"
ASTRA_DB_TOKEN= "AstraCS:..."
ASTRA_API_ENDPOINT= "https://<DATABASE_ID>-<REGION>.apps.astra.datastax.com"
GOOGLE_APPLICATION_CREDENTIALS_PATH= <./PATH/TO/YOUR/GOOGLE_SERVICE_ACCOUNT_KEY.json>
To kick this workshop off, we'll first try the concepts in a Colab Notebook
This notebook shows the steps to take to use the Astra DB Vector Store as a means to make LLM interactions meaningfull and without hallucinations. The approach taken here is Retrieval Augmented Generation.
You'll learn:
- About the content in a CNN dataset (we'll use the news article about Daniel Radcliffe in this example)
- How to interact with the OpenAI Chat Model without providing this context
- How to load this context into Astra DB Vector Store
- How to run a semantic similarity search on Astra DB Vector Store
- How to use this context with the OpenAI Chat Model
- Follow the steps outlined here.

let's get started with coding. Click Create codespace on main as follows:

And you're ready to rock and roll! 🥳
As Codespaces creates your dev environment based on Python 3.11, it will automatically install the Python dependecies from requirements.txt. So, no need to pip install anything here. It will also set up prt forwarding so you can access subsequent Streamlit apps from anywhere.
When the codespace start up, it will run a Streamlit Hello World app for you which shows some of the awesome capabilities of this UI framework. When you're done playing, just click ctrl-c in the terminal to stop running it.
- Access the folder
cd streamlit_app- Copy your Service account files in
/workspaces/workshop-rag-fashion-buddy/streamlit_app/.streamlit/secret.json- Define the environment Variable
export GOOGLE_APPLICATION_CREDENTIALS="/workspaces/workshop-rag-fashion-buddy/streamlit_app/.streamlit/secret.json"- Open and change the file
secrets.toml
GCP_PROJECT_ID= ""

# Astra DB secrets
ASTRA_API_ENDPOINT = ""
ASTRA_DB_TOKEN = ""- Now run the application
streamlit run fashion_buddy.py

In this step we'll deploy your awesome app to the internet so everyone can enjoy your cool work and be amazed!
- Set up your Streamlit account
If you have not do so before, please set up your account on Streamlit. When you already have an account skip to the next step and deploy the app.
-
Head over to Streamlit.io and clikc
Sign up. Then selectContinue with Github:
-
Log in using your Github credentials:

-
Now authorize Streamlit:

-
And set up your account:


On the main screen, when logged in, click New app.
-
When this is your first deployment, provide additional permissions:

-
Now define your application settings. Use YOUR repository name, and name the Main file path as
app_7.py. Pick a cool App URL as you'll app will be deployed to that:
-
Click on Advanced, select Python 3.11 and copy-paste the contents from your
secrets.toml.


Click Deploy! Wait for a bit and your app is online for everyone to use!
⛔️ Be aware that this app is public and uses your OpenAI account which will incur cost. You'll want to shield it off by clicking Settings->Sharing in the main screen and define the email addresses that are allowed access. In order to enable this, link your Google account.