
![]()
This is arguably the biggest step in the whole workshop. Once you get your tools and environment setup you'll be good to go, not just for this workshop, but for your own JAMStack applications moving forward. Just repeat the process for your own application repositories.

- Setup your BattleStax
githubrepository - Setup your
Astrainstance (database) - Setup your
Netlifyaccount - Setup CI/CD between github and Netlify
- Setup your cloud-based
GITPODdevelopment environment - Setup your
LOCALdevelopment environment
The very first thing we want to do is create a copy of the BattleStax repository into YOUR GitHub account. This is important because as part of this workshop you will deploy the BattleStax application to production and will need your own repository to do so. The good thing is we've made this easy for you by creating a template you can use to quickly copy the repo.
✅ Step 1a: Launch the BattleStax repo into another tab |
|---|
🖱️ Click me to show detailsThis might seem like an odd step, but will allow you to keep your place in the instructions you are reading now until you move to the new repo. Scroll up on the GitHub repo page, Right-Click on the battlestax repo name, and choose Open Link in New Tab to launch it in a new tab: |
| ✅ Step 1b. Create repository from the provided template |
|---|
🖱️ Click me to show details✔ From the new tab you just launched, click on the Use this template button up on the top right of the toolbar. ✔ On the Create a new repository from battlestax page you are presented with, fill out the Repository name field with battlestax, choose Public (this should be default), and finally click the Create repository from template button at the bottom of the page. It should only take a moment for GitHub to generate a new repository in your account. |
| ✅ Step 1c. Navigate back to your place in the docs |
|---|
🖱️ Click me to show detailsOnce completed you will land in the root of your new repository. 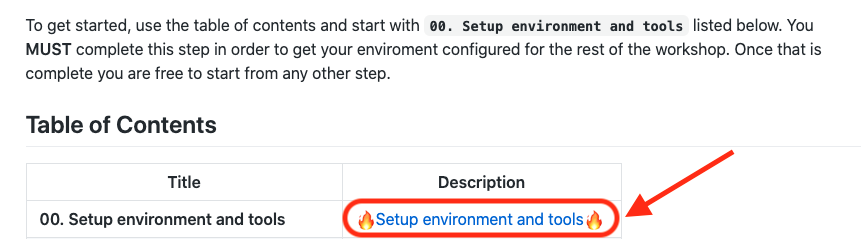 From there, navigate back to your place in the ocumentation and continue on with creating your Astra instance.  |
ASTRA service is available at url https://astra.datastax.com. ASTRA is the simplest way to run Cassandra with zero operations at all - just push the button and get your cluster. Astra offers 5 Gb Tier Free Forever and you don't need a credit card or anything to sign-up and use it.
| ✅ Step 2a. Register (if needed) and Sign In to Astra : |
|---|
🖱️ Click me to show detailsYou can use your Github, Google accounts or register with an email.Make sure to chose a password with minimum 8 characters, containing upper and lowercase letters, at least one number and special character - Registration Page  - Authentication Page  |
| ✅ Step 2b. Choose the free plan and select your region |
|---|
🖱️ Click me to show details - Select the free tier: 5GB storage, no obligation - Select the region: This is the region where your database will reside physically (choose one close to you or your users). For people in EMEA please use europe-west-1 idea here is to reduce latency. |
| ✅ Step 2c. Configure and create your database |
|---|
🖱️ Click me to show detailsYou will find below which values to enter for each field.  - Fill in the database name - battlestax_db. While Astra allows you to fill in these fields with values of your own choosing, please follow our reccomendations to make the rest of the exercises easier to follow. If you don't, you are on your own! :)- Fill in the keyspace name - battlestax. It's really important that you use the name sa_index here in order for all the exercises to work well. We realize you want to be creative, but please just roll with this one today.- Fill in the Database User name - battle_user. Note the user name is case-sensitive. Please use the case we suggest here.- Fill in the password - battle_password1. Fill in both the password and the confirmation fields. Note that the password is also case-sensitive. Please use the case we suggest here.- Create the database. Review all the fields to make sure they are as shown, and click the Create Database button.You will see your new database Pending in the Dashboard. The status will change to Active when the database is ready, this will only take 2-3 minutes. You will also receive an email when it is ready. |
| ✅ Step 3a. Setup a Netlify account |
|---|
🖱️ Click me to show details- Using the link HERE, sign up for a new account and follow Netlify's instructions to create a New Site from Git (you must be logged in to see this option). - Once signin ,you should land on the following page.  |
| ✅ Step 3b. Create a new site |
|---|
🖱️ Click me to show detailsMove to the Sites tab and Click the New site from git button. On the new page select Github and locate the proper repository in your github Account. After allowing the application Netlify on Github select the BattleStax  Use all of the defaults for Basic Build Settings Click Show advanced to enter the following variables:🟢 ASTRA_DB_USERNAME as battle_user (The user name we defined when creation the Astra instance)🟢 ASTRA_DB_PASSWORD as battle_password1 (The password we defined when creation the Astra instance)🟢 ASTRA_DB_KEYSPACE as battlestax (The keyspace we defined when creation the Astra instance)🟢 ASTRA_DB_ID as the cluster ID of your Astra DB. To get your database ID and region go the ASTRA summary page. Locate the cluster ID and copy it by clicking the clickboard icon as showed below.  🟢 ASTRA_DB_REGION as the region you picked when creating the DB., It should be either us-east-1 or europe-west1<br/🟢 GAMES_COLLECTION as games this is the collection where we will store all values.You should now have something like  |
| ✅ Step 3c. Deploy your site |
|---|
🖱️ Click me to show detailsClick Deploy Site and once deployed copy the domain name of your new site from Netlify. Finally, wait for deployment!  When your new site is ready, you will be able to go to: <your_url>.netlify.app to see your game. If you start new games it will create a new record in the database. If you want to validate this behavirour click on START NEW GAMEOpen Astra UI, show the CQLCONSOLE and execute the following command (here battlestax is your keyspace and games your collection name - if you chose another names adapt the query accordingly). 📘 Commands to execute select key,text_value from battlestax.games;You should have a result that looks like  |
Every application should have a CI/CD (Continous Integration, Continuous Deployment) pipeline. This allows for quick iteration of changes to production deployment by taking advantage of automation and tests to ensure everything is working properly.
After each commit a workshow is initialized to BUILD your project, EXECUTE tests and DEPLOY to netlify. The good thing is many CI/CD tools are provided right within GitHub. Adding this capabiity just takes a couple steps.
| ✅ Step 4a. Add secret variables |
|---|
🖱️ Click me to show detailsRemember those variables when we configured Netlify? We need to add these same to our GitHub repository. Within YOUR Battlestax repository click on Settings in the top toolbar, choose Secrets from the menu on the left, and finally click the New secret button on the top right of the page. Add a secret for each of the variables we used earlier.You notice that those are the same as used by netlify. Github will populate them at deploy time. ASTRA_DB_USERNAME=battle_userASTRA_DB_PASSWORD=battle_password1ASTRA_DB_KEYSPACE=battlestaxASTRA_DB_ID=[check Step3b]ASTRA_DB_REGION=[check Step3b]GAMES_COLLECTION=gamesThat should look like:  |
| ✅ Step 4b. Test out an application build |
|---|
Click to view the solution✔ Using git, create a new branch and issue an empty commit, then push it to your repository.📘 Commands to execute git checkout -b test_prgit commit --allow-empty -m "New branch to test ci/cd"git push origin test_pr✔️ Using Github UI, merge your new branch to the master through a pull request.Select your new branch in github  Open a PR but click and Compare & Pull request button. for test_pr into master. Caution don't target the original master from DataStax-Academy but YOUR master  Provide a comment and click Create Pull Request Your Pull request is now ready, let's merge it  Click on Merge Pull Request Click on Confirm Merge Congratulations you are done here is what it look like  ✔️ Browsing Netlify, see the ci/cd process rolling wuth tests deployment You have access to lofs  Notice how the status moved from deploying to published |
To code during the workshop you can either use your laptop or a Cloud-based IDE named Gitpod with everything installed. Here we explain the Gitpod way.
| ✅ Step 5a: Launch gitpod |
|---|
Click to view the solution✔ Gitpod is a cloud based IDE based on Eclipse Theia very similar to VSCode. You need to authenticate with your github account but then gipod will initialized you workspace, building the solution.To initialize your environment click on the button below (CTRL + Click to open in new tab)  Target url are dynamic and looks like https://<your_uid>.<your_region>.gitpod.io/#/workspace/battlestax |
| ✅ Step 5b. Define environment variables |
|---|
Click to view the solution✔ Copy and paste the contents of the .env.template file into an .env file:cat .env.example > .env✔ The .env file allows us to customize our own environmental variables. We set our Astra credential to env variable, which are outside of our program. Fill in the .env file variables with the Astra variables you made a copy of earlier:ASTRA_DB_USERNAME=battle_userASTRA_DB_PASSWORD=battle_password1ASTRA_DB_KEYSPACE=battlestaxASTRA_DB_ID=[cf bloc 3b]ASTRA_DB_REGION=[cf bloc 3b]GAMES_COLLECTION=games |
| ✅ Step 5c. Run the Tests |
|---|
Click to view the solution✔ At initialization gitpod has download dependencies already (you should have the node_modules folder already there. Still, check dependencies are installed with :npm install✔ Run the provided test on the master branch. The behavior of npm test is also specified in the package.json file.npm test |
| ✅ Step 5d. Start the application |
|---|
Click to view the solution✔ Start the application npm start✔ Hit the loading screen https://3000-<your_uid>.<your_region>.gitpod.io/#/workspace/battlestax Done! You have successfully set up your app, run your tests locally, and started BattleStax. |
To code during the workshop you can either use your laptop or a Cloud-based IDE named Gitpod. Here we explain how to work locally.
+ Information : We assume people working locally are not beginners
+ They should be autonomous to install a development environment.
Here is the list of tools you need:
- NodeJS 12.x+
- Git
- An IDE like Visual Studio Code or Jetbrain WebStorm or Atom
| ✅ Step 6a. Clone the repository |
|---|
Click to view the solution✔ Clone your BattleStax repository to localhost, use the following command in your terminal to do so:git clone git@github.com:[your_github_id]/battlestax.git✔ Move to the proper directory cd battlestax |
| ✅ Step 6b. Define environment variables |
|---|
Click to view the solution✔ Copy and paste the contents of the .env.template file into an .env file:cp .env.template .env✔ The .env file allows us to customize our own environmental variables. We set our Astra credential to env variable, which are outside of our program. Fill in the .env file variables with the Astra variables you made a copy of earlier:ASTRA_DB_USERNAME=battle_userASTRA_DB_PASSWORD=battle_password1ASTRA_DB_KEYSPACE=battlestaxASTRA_DB_ID=[cf bloc 3b]ASTRA_DB_REGION=[cf bloc 3b]GAMES_COLLECTION=games |
| ✅ Step 6d. Run the Tests |
|---|
Click to view the solution✔ Install Battlestax Dependencies. These are specified in the package.json file.npm install✔ Run the provided test on the master branch. The behavior of npm test is also specified in the package.json file.npm test |
| ✅ Step 6e. Start the application |
|---|
Click to view the solution✔ Start the application npm start✔ Hit the loading screen http://localhost:3000/ Done! You have successfully set up your app, run your tests locally, and started BattleStax.  |