I am the guy that:
-
Never checks for delays in his work commute until he is stuck in a four-lane accident
-
Forgets his umbrella when the forecast calls for afternoon showers
-
Doesn't find out about a major news event unless the story breaks on ESPN
-
Always forgets to pull my trash bins to the curb on garbage pick-up day
In short, my morning routine is a mess (#firstworldproblems). An Amazon Echo (or a phone, for that matter) would resolve most of those problems. Unfortunately, I never seem to have my phone with me as I'm getting ready in the morning (it's usually charging). And I'm usually not asking Alexa for these details (I have Alexa enabled through my Fire TV and it's impractical to stop, cut on the tv, find the remote, and ask a question).
60% of my morning routine is centered in and around the bathroom or bedroom, so I decided to build an Alexa skill and Alexa Voice Service-enabled magic mirror – which I've titled the Mystic Mirror.

A Magic Mirror is a Raspberry Pi device connected to a monitor fronted by a two way mirror. This gives the illusion that the text/words/images appear from the mirror (similar to the Magic Mirror in Snow White and the Seven Dwarfs). People have been making magic mirrors for years; lately there have been some that are enabled with Alexa (or other voice activated services). I wanted to make my Mystic Mirror a step further by adding a few features, such as:
-
Building Alexa functionality within the mirror, controlled by a button. This would allow the magic mirror to work with specific Alexa skills that would display messages. This would also let me use the Alexa for "base functionality" (set an alarm, use another skill, etc).
-
Not having the display always on (I am very sensitive to light when I am sleeping; an "always displaying" magic mirror wasn't going to be an option). My requested information appears for a few seconds (depending on the request) then fades away.
-
Building the functionality/"modules" using Lambda, this would allow others to use the skill (even without a having a magic mirror).
-
Build functionality into my Alexa skill that would support "visual push notifications" to my Mystic Mirror. This was really centered around reminders that would appear at the appropriate time.
-
Leverage Alexa to extend functionality of a typical magic mirror. For example, most magic mirrors have the location "hard coded" into code on the Raspberry Pi. I wanted to provide flexibility to get things (like weather) for any requested location.
I've built the following major requests into the Mystic Mirror:
Time
-
Question: What is the Time?
-
Response: Alexa says the time
-
Display: The day, date and time is displayed on the Mystic Mirror
Weather
-
Q: What is the Weather?
-
R: Alexa says the current weather temperature, conditions, and the day's high and low temperature
-
D: The current temperature, conditions, high and low are displayed, along with a 4 day forecast
Traffic
-
Q: What is the Traffic?
-
R: Alexa tells me the number of traffic incidents in my area.
-
D: The Mystic Mirror shows a map with traffic status and lists the incidents
News
-
Q: What are today's News Headlines
-
R: Alexa speaks one major headline.
-
D: The Mystic Mirror lists 5 headlines and a short blurb on each story (and image, if provided)
Messaging
-
Q: Send a message to a contact (e.g. – Tell John to come home)
-
R: Alexa confirms that the message was sent. The skill uses AWS SNS to send a message to a contact (note this requires that you "Add a Contact")
-
D: The display shows the message that was sent.
Take a Selfie
-
Q: Take a Selfie
-
R: Alexa tells you told still and sends a command to the Raspberry Pi to take a picture. Alexa asks if you want to send the picture to one of your saved contacts (using the messaging functionality listed above)
-
D: The picture is displayed.
Provide an inspirational quote
-
Q: Inspire Me
-
R: Alexa tells you an inspirational quote
-
D: The quote is displayed.
Set up a reminder
-
Q: Remind me to "do something"
-
R: Alexa prompts you for the frequency (single, daily, weekly), reminder time, and day to start the reminder
-
D: The reminder appears at the lower left corner of the display approximately one hour before the action needs to be taken. Reminders are removed by saying "clear reminders". Reminders can be deleted by saying "Delete reminder".
Brush Teeth Countdown
-
Q: Start teeth timer
-
R: Alexa confirms that the countdown has started.
-
D: A two minute countdown is displayed in the lower right corner. This countdown continues even if other action are requested
I also added a few Easter eggs:
-
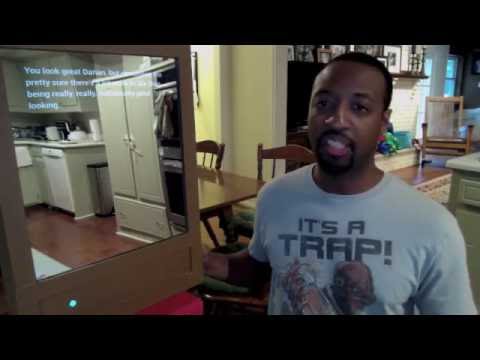
The Evil Queen's question to her magic mirror
-
A question based on the appeal of the shirt of this 90's one hit wonder
-
A response (when asked, how do I look) from a really, really, really ridiculously good looking model
The next section provides an overview of the code that runs the Mystic Mirror. Jump to the "Build Your Own" section for details on how to install the code and build your own Mystic Mirror.
I needed a mechanism to identify the user. I first planned to build my own, but instead decided to leverage Google's OAUTH service. This was a logical choice, as I plan to display (at a later point in time) the calendar details and task lists for a user.
When the user asks to "set a default location", the user id and provided city and state are saved to a DynamoDB table. I saved this information so that the user would not need to indicate location every time a request was made for time, traffic, or weather.
The user id was also saved in second DynamoDB table for the purpose of routing the message to the correct IOT device (more on this later on).
The following public APIs were used to build the functionality:
-
**Get Google Profile ** -> https://www.googleapis.com/oauth2/v2/userinfo (user name saved in DynamoDB table)
-
Get Time -> http://api.geonames.org/timezoneJSON
-
Get Location -> https://maps.googleapis.com/maps/api/geocode/json (default location saved in a DynamoDB table)
-
Get Weather -> "http://api.openweathermap.org/data/2.5/forecast
-
Get Traffic -> http://www.mapquestapi.com/traffic/v2/incidents
-
Get News -> https://api.cognitive.microsoft.com/bing/v5.0/news/
-
Send Message -> used AWS Simple Notification Services (contacts saved in DynamoDB table)
-
Get Quote (Inspire me) -> http://api.forismatic.com/api/1.0/?method=getQuote&format=json&lang=en
Messages are sent from Lambda to the RPI via MQTT. I enabled this interaction by using the AWS IoT service.
Instead of building this logic into the "main" Lambda function, I created a second Lambda function that would serve as the "Lambda based" MQTT client. This function receives (via SNS) a message from the "Magic Mirror" skill and publishes the message onto a topic. The diagram below shows the interaction in better detail.

Interaction diagram between physical device and AWS services
As started above, I used MQTT to send messages to the Raspberry Pi. These messages were sent to one of two "clients"
-
Display client - a javascript-coded website that displayed text/images on the monitor based on the commands from the Alexa skill
-
Take Selfie client - a python-coded script that took a picture if user made a request to "take a selfie"
The Display client is a basic js website that uses Paho mqtt to connect to the AWS IOT service and takes action if a message is received on the "success" topic. These messages are typically the words spoken by the Raspberry Pi, but could also be additional detail (as seen in the weather, traffic, and news requests).

The client requires AWS IAM credentials.
Functionality for the "Reminders" functionality required the client to publish messages. Every 30 minutes, the client will publish the local time to an MQTT topic (reminders/time). This message triggered a Lambda function to compare the local time to the reminder time for all reminders saved in the DynamoDB table. Any reminders that need to be displayed are published to the "success" topic and displayed on the screen.
The "take selfie" functionality required for the "fswebcam" command to be called on the RPI.
-
I created a python script that serves as an MQTT client; this code is always running on the RPI, monitoring a topic for a message.
-
When the user makes the request, the Lambda code sends a message to the MQTT client. This message triggers the camera to take a photo.
-
The photo is then uploaded to an AWS S3 bucket (using TinyS3).
-
If the user requests for the selfie be sent to a contact, the link is send (using AWS SNS) to the contact
-
Auto delete rules are enabled on the S3 object to delete it after 24 hours.

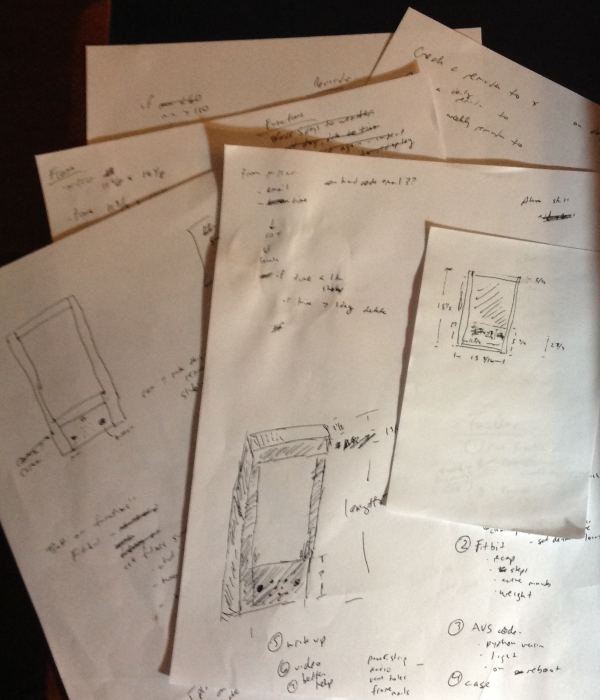
I looked at both the following JAVA and Python examples of the AVS code for use in the Mystic Mirror. While I liked the Python version (specifically because of the ability to restart on reboot), I ultimately decided to build on top of the JAVA example (I think it is slightly more robust and responds more quickly).
After I installed the code, I made two changes:
I used the code base (built by Eddie Hartmam) to configure my a physical button (used to control the requests to Alexa). The only change was that I used different pins (called out in schematics).
I decided to add an indicator light to supplement the verbal ques. Since I built off of Eddie's code (which already had Pi4J referenced), all I needed to do was add a few lines to control the output to the RGB LED. This would let me know when the microphone was recording.
The microphone and camera plugged in via USB. The speakers used the 3.5 aux port.
Once I got everything plugged in, and the code running....viola!

The connected, but not complete, Mystic Mirror
Building the frame was straight forward. I first found an inexpensive monitor (a refurbished 17 in Compaq LE 1171) and removed the frame (using a Phillips head screwdriver and a paint scraper).
Note: be careful of the wiring to the physical buttons; you'll need that intact to turn the monitor on and off.

From there, I measured the size of the monitor (without the plastic frame) and purchased a two way mirror with the same dimensions (I used a cut-to-order acrylic sheet from Tap Plastics).
From there, it was a quick trip to my local hardware store to purchase a 1x3 wood beam. I used Gorilla glue and a 24-in clamp to keep the piece in place while they dried.
Gluing the frame siding together with Gorilla Glue

After the frame siding was complete, I added the trim on the front, a panel for the speakers and the LED indicator, and a hole on the side for the push button. For the frame, I used both Gorilla Glue and small nails from a staple gun to keep things in place. I also used wood putty to cover the nails and address any cracks in the wood.

After the glue dried, I sanded and applied a couple of coats off paint, then loaded the monitor, RPI, and peripherals in the back. A few call-outs:
-
I did not add holes at the top/bottom for air flow. I have 100% landed one where I'll place the mirror (or it it will lay flush against the wall). I'll add those holes as appropriate.
-
Going with a cheaper monitor saved me $20, but cost be in real estate, as I needed a HDMI to VGA connector. I hindsight, I would have spent the extra $20 for an HDMI enabled monitor.
-
I wasn't comfortable building a single source that would power the speakers, monitor and RPI. It's a bit of an eyesore having three cables snaking out the back; I may revisit this once I decide where the Mystic Mirror will sit.

The final result - a Mystic Mirror that (a) works as a functional mirror and (b) reponds to an Alexa request (and displays the requested information if the Mystic Mirror skill is used).

The Mystic Mirror is a complicated project that requires code in the AWS cloud and on the Raspberry Pi.
Option A - Use the existing Mystic Mirror Alexa skill and build your Mystic Mirror to use this skill
For this option, all you need to do is build a Mystic Mirror display and download the provided code. (Note: There are a few variables that will nee to be updated. Also, you will need permission to connect to my AWS "infrastructure"; I can provide this on request (with restrictions that limit access to only your device).
If you want to do follow this option, skip to "Part 2".
This option is much more complicated, but will give you freedom to add/update logic as you see fit. The instructions for Option B are below.
-
Follow the instructions to Get Started with AWS IoT here
-
You can name your device anything; I named my "Mystic_Mirror"
-
Be sure to save your certificates; you'll need them later on.
You can create tables using CLI; however, I find that it's easier just to create them via the DynamoDB GUI.
-
Create table "Magic_Mirror" with a primary partion key titled "Email" (should be a string)
-
Create table "Magic_Mirror_Contact" with a primary partiton key titled "Email" (string) and a primary sort key titled "ContactName" (string)
-
Create table "Magic_Mirror_Reminders" with a primary partiton key titled "Email" (string) and a primary sort key titled "Reminder" (string)

Go to the AWS SNS console and create a SNS topic called "Magic_Mirror_MQTT"
Open the config.js script and make the following changes:
-
Update the config.host with the rest api for theIoT device you created in step 1 (note, you only need part of the address, e.g. "a6i0a3yz21r4k2.iot.us-east-1.amazonaws.com")
-
Update the config.privateKey variable to the text from the "private.pem.key" file that you downloaded in Step 1
-
Update the config.certificate variable to the text from the "certificate.pem.crt" file that you downloaded in Step 1
Once that is done, use the Lambda console to create a Lambda function
-
Click the "Create A Lambda function" button.
-
Click the "skip" button
-
Select "SNS" as the trigger. In the drop down, select "Magic_Mirror_MQTT" as the SNS topic. Check the "Enable Trigger" option. Click Next.

-
Enter the name of the function as "Write_to_MQTT_Node"
-
Give the code a logic description ("Lambda code to send MQTT messages to Raspberry Pi)
-
Select Node.js 4.3 as the runtime
-
Zip the contents of the src folder into a zip file and select the "Code entry type" as "Upload a ZIP file"
-
Create a new role and attach the following policies: AmazonSNSFullAccess
-
Ensure the role has the following policy
{
"Version": "2012-10-17",
"Statement": [
{
"Effect": "Allow",
"Action": [
 "logs:CreateLogGroup",

 "logs:CreateLogStream",

 "logs:PutLogEvents"
],
"Resource": "arn:aws:logs:*:*:*"
}
]
}
- Click next, then click create function
Open the lambda_function.py script and make the following changes:
-
update TopicARN = 'placeholder' with the TopicARN you created in Step 3
-
update the bucket= 'palceholder' with the name of your S3 bucket
Once that is done, use the Lambda console to create a Lambda function
-
Click the "Create A Lambda function" button.
-
Click the "skip" button
-
Select "Alexa Skills Kit" as the trigger

-
Enter the name of the function as "Magic_Mirror"
-
Give the code a logic description ("Lambda code for the Alexa skill")
-
Select Python 2.7 as the runtime
-
Zip the lambda_function.py script into a zip file and select the "Code entry type" as "Upload a ZIP file"
-
Create a new role and attach the following policies: AmazonS3FullAccess, AmazonDynamoDBFullAccess, AmazonSNSFullAccess
-
Ensure the role has the following policy
{
"Version": "2012-10-17",
"Statement": [
{
"Effect": "Allow",
"Action": [
 "logs:CreateLogGroup",

 "logs:CreateLogStream",

 "logs:PutLogEvents"
],
"Resource": "arn:aws:logs:*:*:*"
}
]
}
-
Change the timeout to 10 sec
-
Click next, then click create function
-
Save the ARN of the Lambda skill (you will need it in the next section)
-
Log into the Amazon Developer console, click on Alexa in the header, then click on Add a New Skill
-
Create a name for the skill (such as Mystic Mirror) and a Invocation Name (such as mystic mirror). Click Next.
-
On the "Interaction Model" page, use the code in the Alexa_Magic_Mirror/speechAssets folder and update the Intent Schema, Custom Slot Types, and Sample Utterances
-
On the "Configuration Screen" update the endpoint with the Lambda ARN you saved in Step 5.
-
Enable account linking. The code is built to authenticate using Google services. You'll need to create a login page to allow users to link their accounts. You'll also need to create a Google project. (This is a bit out of scope for these instructions; there is some good information available online, and I can provide direction if there are questions).
-
Go to the "Publishing Information" screen and update the values as directed.
-
Go to the "Privacy and Compliance" screen; you'll need to create Privacy Policy html page and provide the link. [Note - both the login and policy html pages can be hosted in S3 for ease).
-
Click save, and you're done. You can submit for certification if you desire (if you don't you'll still be able to use the skill, but others will not).
-
Download the code in the Reminders/src folder
-
Open the AWS Lambda Console and click the "Create A Lambda function" button.
-
Click the "skip" button
-
Click 'Next"
-
Enter the name as 'Get_Magic_Mirror_Reminders'
-
Enter the description as 'Get message from IoT Rule'
-
Select node.js 4.3 as the runtime.
-
Zip the downloaded code and upload it by selecting "Upload a Zip file" for Code Entry Type.
-
Select the role that you created for Mystic_Mirror lambda function (this function will need SNS access, just as the other lambda function needs)
-
Click next, then click create function
-
Open the AWS Iot Console. Click "Create a resource" then "Create a rule"
-
Call the rule "SendTimeToLambda_MM"
-
Give a description as "Get time from Magic Mirror"
-
Enter the rule query statement as: SELECT * FROM 'remindertime/#'
-
For "Choose as Action", select "Insert this message into a code function and execute it ( Lambda )"
-
Select "Function Name" as "Get_Magic_Mirror_Reminders"
-
Click "Create"
These steps will enable you to display content pushed from the Alexa Skill. The code of this section is in the Mystic_Mirror folder. You'll need to download the code to your Pi (I suggest putting it in "home/pi/Mystic_Mirror" and follow the steps below.
Step 1 - Configure the display client
-
Open the aws.js file and update the email variable to match the email address used for authentication (e.g. your Google email address)
-
In the aws.js file, update the region, secretKey, accessKey, and host If you are using my Alexa skill (Part 1, Option A), then send me a message on Twitter to request a keyfile. If you are using your own skill/Iot Thing, then use keys associated with your account.
-
Install tinyS3 (command - sudo pip install tinys3)
-
Install paho (command - pip install paho-mqtt)
-
Open take_selfie.py file and update the email variable to match the email address used for authentication (e.g. your google email address)
-
Update the secretkey and accesskey variables. If you are using my Alexa skill (Part 1, Option A), then send me a message on Twitter to request a keyfile. If you are using your own skill/Iot Thing, then use keys associated with your account.
-
Download the IoT certificates to the the "/home/pi/certs/" location. If you are using my Alexa skill (Part 1, Option A), then send me a message on Twitter to request valid certificates. If you are using your own skill/Iot Thing, then use download the certificates associated with your IoT thing.
-
run the file by typing "python take_selfie.py". This script must be running in order for the "take a selfie" functionality to work.
-
Note - you can set up the script to start at boot; I did not because I plan to remove the camera when I install the mirror in my bedroom (maybe I've watched too much "Mr. Robot")

Once you have the MQTT clients working, you'll need to make a few changes to get the display website to display without borders, mouse indicator, etc.
-
Install chromium (if you are on a RPI 3, then follow these instructions).
-
pen the autostart file ("/home/pi/.config/lxsession/LXDE-pi/autostart") and add the following line:
@chromium-browser--incognito--noerordialogs--disable-session-crashed-bubble--disable-infobars--kioskfile:///home/pi/Mystic_Mirror/index.html
Note - this assumes you installed the Mystic_Mirror code in the home/pi location.

-
Download the code and follow the instructions listed by Eddie Hartman ( here)
-
Once complete, replace the AVAjava file with the version in the AVS folder (this version will have the GPIO logic based on the wiring schema above).
I outlined how I built my frame in an earlier section. There's no perfect way to build a frame; it really comes down to the size of your monitor and how fancy you want to get (I am not very handy when it comes to woodworking, so my frame is fairly basic).
Instead of steps, I'll call out a few pointers/gotchas:
-
Do not underestimate the space you'll need to store your pi, speakers, cables, etc.
-
Measure, Measure, Measure. Then before you cut, measure again.
-
I spent a lot of time n this site getting ideas on how to build my frame
-
Wood putty is your friend, and can fix a lot of mistakes.
-
Be sure to drill small holes in your panel so that your speaker can be clearly heard and your microphone can pick up your voice.