Jochen Krapf - 2020-11-22
Bei MicroControllern hat sich die Programmiersprache C/C++ durchgesetzt. Für Hobbyisten, die einen ESP8266 oder ESP32 programmieren wollen, gibt es eine interessante Alternative: MicroPython.
Der Vortrag gibt einen Einblick in die Arbeitsweise mit dieser Sprache sowie einen Überblick über das reichhaltige Angebot an System-, Kommunikations- und hardwarenahen Bibliotheken.

Typische Größen:
| Rechner | Bits | CPU | RAM | Disk/Flash | P | Features |
|---|---|---|---|---|---|---|
| PC / Laptop | 64 | ~3GHz | ~8GB | ~1TB | >50W | Betriebssystem, (W)LAN, FPU, GPU, ... |
| Raspberry Pi 0/3/4 | 32 | ~1.2GHz | 512MB ... 4GB | 4 ... 32GB | 5 W | Betriebssystem, GPIO, (W)LAN |
| ESP32 | 32 | 240MHz | 160kB (4MB) | 4MB | <1W | GPIO, WLAN |
| ESP8266 | 32 | 80MHz | 80kB | 512kB ... 4MB | <1W | GPIO, WLAN |
| STM32 (Cortex M3/M4) | 32 | ...168MHz | 192kB | 1MB | <1W | (FPU) |
| Arduino (AVR) | 8 | 16MHz | 2Kb | 16kB | <100mW | GPIO |
=> Für Hardware-Spielereien: ESP
Quelle: micropython.org
Entwickelt von Damien P. George in 2014. Sourcen auf Github

- Programmiersprache (fast) C / C++
- Integrierter Compiler
- Integriertes Flash-Tool (speichern im Flash)
- Kein Debugger
http://micropython.org/ https://docs.micropython.org/ http://wiki.micropython.org/Home
- Programmiersprache MicroPython - entspricht CPython 3.4
- REPL (Read–Eval–Print-Loop)
- (WebREPL)
- Einfaches Flash-Dateisystem für *.py und Daten
- 'Boot-Loader' für ESP
- Standard-Module (fast) wie in CPython
- Hardware-Module für ESP
"MicroPython ist eine Softwareimplementierung einer Programmiersprache, die weitgehend kompatibel mit Python 3 ist, geschrieben in C, die für den Betrieb auf einem Mikrocontroller optimiert ist. MicroPython ist ein vollständiger Python-Compiler und eine Laufzeitumgebung, die auf der Mikrocontroller-Hardware läuft. Enthalten ist eine Auswahl von Python-Kernbibliotheken; MicroPython enthält Module, die dem Programmierer Zugriff auf Low-Level-Hardware ermöglichen. Der Quellcode für das Projekt ist auf GitHub unter der MIT-Lizenz verfügbar."
Quelle: Wikipedia.de / Wikipedia.com
http://micropython.org/download
Anleitung folgen...
esptool.py --chip esp32 --port /dev/ttyUSB0 erase_flash
esptool.py --chip esp32 --port /dev/ttyUSB0 --baud 460800 write_flash -z 0x1000 esp32-20190125-v1.10.bin
- Terminal (TTY/COM 115200 Buad 8N1)
- "uPyCraft" (GUI, Windows, Mac)
- "mpfshell" (CLI, alle)
- "rshell" (CLI, Linux)
- "pymakr"-Plugin (von pycom) für VS-Code (GUI, alle)
Antwort vom ESP:
MicroPython v1.12-164-g7679e3be9 on 2020-02-12; ESP module with ESP8266
Type "help()" for more information.
>>>
Spielen im REPL:
>>> 1 + 2
3

>>> "Hallo" + " Welt"
'Hallo Welt'

>>> a = "Hallo"
>>> print(a)
Hallo

>>> a
'Hallo'

>>>
REPL mit Tab-Completion ...
WebREPL: http://micropython.org/webrepl/
Siehe hallo.py
>>> import hallo
- Module "hallo" - Anfang
- Module "hallo" - Ende

>>> hallo.test
42

>>> hallo.welt()
Hallo Jochen

>>> help(hallo)
object <module 'hallo'> is of type module
  __name__ -- hallo
  test -- 42
  gc -- <module 'gc'>
  ram -- <function ram at 0x3fff06b0>
  welt -- <function welt at 0x3fff05b0>

>>>
>>> help('modules')
__main__          gc                ubinascii         urandom
_boot             inisetup          ubluetooth        ure
_onewire          machine           ucollections      urequests
_thread           math              ucryptolib        uselect
_uasyncio         micropython       uctypes           usocket
_webrepl          neopixel          uerrno            ussl
apa106            network           uhashlib          ustruct
btree             ntptime           uheapq            usys
builtins          onewire           uio               utime
cmath             uarray            ujson             utimeq
dht               uasyncio/__init__ umqtt/robust      uwebsocket
ds18x20           uasyncio/core     umqtt/simple      uzlib
esp               uasyncio/event    uos               webrepl
esp32             uasyncio/funcs    upip              webrepl_setup
flashbdev         uasyncio/lock     upip_utarfile     websocket_helper
framebuf          uasyncio/stream   upysh
Plus any modules on the filesystem
>>>
Diese Module sind in C geschrieben oder im Byte-Code kompiliert und liegen im Flash.
- cmath – mathematical functions for complex numbers
- gc – control the garbage collector
- math – mathematical functions
- sys – system specific functions
- uarray – arrays of numeric data
- ubinascii – binary/ASCII conversions
- ucollections – collection and container types
- uerrno – system error codes
- uhashlib – hashing algorithms
- uheapq – heap queue algorithm
- uio – input/output streams
- ujson – JSON encoding and decoding
- uos – basic “operating system” services
- ure – simple regular expressions
- uselect – wait for events on a set of streams
- usocket – socket module
- ussl – SSL/TLS module
- ustruct – pack and unpack primitive data types
- utime – time related functions
- uzlib – zlib decompression
- _thread – multithreading support
- btree – simple BTree database
- framebuf — frame buffer manipulation
- machine — functions related to the hardware
- micropython – access and control MicroPython internals
- network — network configuration
- ubluetooth — low-level Bluetooth
- ucryptolib – cryptographic ciphers
- uctypes – access binary data in a structured way
- ESP — functions related to the ESP8266 and ESP32 sleep...
- ESP32 — functionality specific to the ESP32 Flash partitions... RMT Ultra-Low-Power co-processor hall-sensor
-
Mit
import <name>werden Module geladen. -
Module mit führendem 'u' sind vereinfachte Versionen der CPython Module.
-
Wird ein Name ohne führendem 'u' angegeben wird zuerst ein Modul mit diesem Namen gesucht. Ist kein Modul mit diesem Namen vorhanden, wird ein Modul mit vorangestelltem 'u' gesucht und unter dem Originalnamen geladen.
>>> import os                 # entspricht: import uos as os

>>> os.__name__
'uos'
>>>

>>> os.listdir('/')
['boot.py',  ...   ]

>>>
Die Module mit 'u' sind fast komplett implementiert!
Spielen:
>>> import sys
>>> sys.    # <<<TAB>>>
__class__       __name__        argv            byteorder
exit            implementation  maxsize         modules
path            platform        print_exception
stderr          stdin           stdout          version
version_info
>>> sys.std    # <<<TAB>>>
stderr          stdin           stdout
>>> sys.stdAlle Klassen für den Zugriff auf Hardware sind im Modul "machine"
>>> from machine import Pin
>>> pin2 = Pin(2, Pin.OUT)
>>> pin2
Pin(2)
>>> pin2.
__class__       value           IN              IRQ_FALLING
IRQ_RISING      OPEN_DRAIN      OUT             PULL_UP
init            irq             off             on
>>> pin2.on()
>>> pin2.off()
>>> pin2.value(1)
>>> pin2.value(0)
>>>>>> from machine import Pin
>>> pin0 = Pin(0, Pin.IN, Pin.PULL_UP)
>>> pin0.value()
1
>>> pin0.value() # gedrückter Button
0
>>>>>> from machine import PWM, Pin
>>> pin2 = Pin(2, Pin.OUT)
>>> pwm2 = PWM(pin2)
>>> pwm2.duty(512)
>>> pwm2.duty(0)
>>> pwm2.duty(1023)
>>>>>> from machine import I2C, Pin
>>> i2c = I2C(scl=Pin(5), sda=Pin(4), freq=100000)
>>> i2c.readfrom(0x3a, 4) # read 4 bytes from slave device
>>> i2c.writeto(0x3a, '12') # write '12' to slave device with
>>>>>> from machine import Pin
>>> from neopixel import NeoPixel
>>> pin = Pin(0, Pin.OUT) # set GPIO0 to output to drive NeoPixels
>>> np = NeoPixel(pin, 8) # create NeoPixel driver on GPIO0 for 8 pixels
>>> np[0] = (255, 255, 255) # set the first pixel to white
>>> np.write() # write data to all pixels
>>> r, g, b = np[0] # get first pixel colourESP8266:
>>> from machine import ADC
>>> adc = ADC(0)            # create ADC object on ADC pin
>>> adc.read()              # read value, 0-1023
0 ... 1023
ESP32:
>>> from machine import ADC
>>> adc = ADC(Pin(32))          # create ADC object on ADC pin
>>> adc.read()                  # read value, 0-4095 across voltage range 0.0v - 1.0v
0 ... 4095
>>> adc.atten(ADC.ATTN_11DB)    # set 11dB input attenuation (voltage range roughly 0.0v - 3.6v)
>>> adc.width(ADC.WIDTH_9BIT)   # set 9 bit return values (returned range 0-511)
>>> adc.read()                  # read value using the newly configured attenuation and width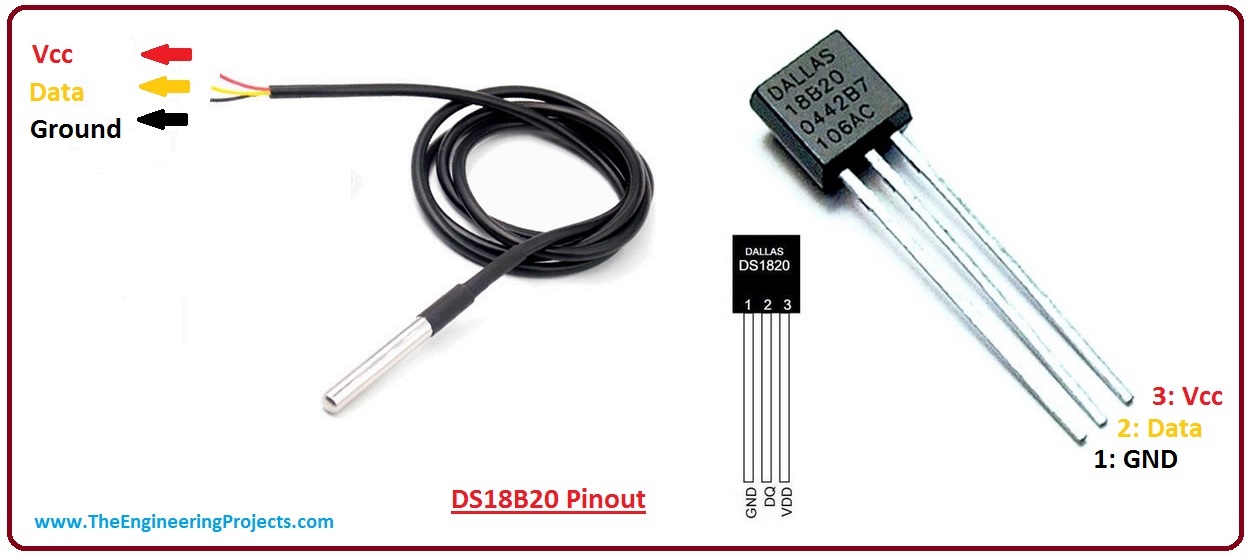
>>> import time, machine, onewire, ds18x20

>>> pin = machine.Pin(19)   # Pin für OneWire-Bus

>>> ds = ds18x20.DS18X20(onewire.OneWire(pin))

>>> roms = ds.scan()   # nach Sensoren suchen
>>> roms
[bytearray(b'(ad\x11\xb3\x94V\xf5'), bytearray(b'(ad\x11\x83\xd6q\x81')]

>>> ds.convert_temp()   # Messung starten
>>> time.sleep_ms(750)   # Messzeit abwarten: 750ms
>>> for rom in roms:
...    t = ds.read_temp(rom)
...    print(rom, t)
21.5
21.4375- UART
- SPI
- DAC
- RTC - Uhr
- RMT (ESP32) – HW-Pulsgenerator 12,5ns Auflösung
- Capacitive touch (ESP32)
- DHT - Temperatursensor
- Timer
- Sleep / Deep-Sleep
import network
import time

sta = network.WLAN(network.STA_IF)   # WLAN-Objekt als _Client_ erzeugen
sta.active(True)                     # Modem einschalten
sta.scan()                           # Scannen nach APs
sta.connect('<your-SSID>', '<your-password>') # Verbindung herstellen
while not sta.isconnected():         # Verbindung prüfen und warten
    pass
print(sta.ifconfig())                # IP ausgeben
siehe main.py
ap = network.WLAN(network.AP_IF)
ap.config(essid='ESP-AP', password='topsecret') # set the ESSID of the access point
ap.config(max_clients=10) # set how many clients can connect to the network
ap.active(True)

print(ap.ifconfig())>>> import ntptime
>>> ntptime.settime()
>>>
>>> rtc = machine.RTC()
>>> print('Date Time:', rtc.datetime())
Date Time: (2020, 2, 12, 2, 11, 8, 38, 481)
>>>Nur auf ESP32 als Standard-Modul
from umqtt.simple import MQTTClient

mqtt_client = MQTTClient(client_id, '192.168.1.123')
mqtt_client.set_callback(sub_cb)
mqtt_client.connect()
mqtt_client.subscribe('/zuhause/licht/#')

mqtt_client.publish('/zuhause/licht/schalter', 'ON')

def sub_cb(topic, msg):
    print(topic, msg)
    if topic == b'/zuhause/licht/schalter' and msg == b'ON':
print('Es werde Licht!')Nur auf ESP32 als Standard-Modul
import urequests as requests

>>> # WLAN-Verbindung herstellen...

>>> r = requests.get("https://api.nerd2nerd.org/status.html")
>>> r
<Response object at 3f826240>
>>> r.   # <<<TAB>>>
__class__       __init__        __module__      __qualname__
close           __dict__        encoding        text
json            content         raw             _cached
status_code     reason
>>> r.text
'<!doctype html>\n<html lang="de">\n<head>\n
  <meta charset="utf-8">\n  <title>Status</title>\n
  </head>\n\n
  <body style="margin: 0;">\n
  <img id="status" src="./images/closed.png" width="200" height="77">\n\n
  ...
  \n\n</body>\n</html>\n'

>>> r = requests.get("https://api.nerd2nerd.org/status.json")
>>> r.json()
{'state': {'lastchange': 1581530018, 'open': False},  ...  'space': 'Nerd2Nerd'}
>>> r.json()['state']['open']
False

>>>Nur auf ESP32 als Standard-Modul
>>> import urequests as requests

>>> # WLAN-Verbindung herstellen...

>>> r = requests.get("http://fs200.fritz.box/cm?cmnd=Power%20On")
>>> r.text
'{"POWER":"ON"}'>>> import socket
>>> socket.getaddrinfo('doku.nerd2nerd.org', 80)
[(2, 1, 0, 'doku.nerd2nerd.org', ('148.251.171.26', 80))]
>>>Zugriff auf Dateien mit den üblichen Python-Funktionen
f = open('hello.txt', 'w')
f.write('Hello world')
f.close()

f = open('hello.txt', 'r')
print(f.read())
f.close()with open('hello.txt', 'w') as f:
f.write('Hello world')
with open('hello.txt', 'r') as f:
print(f.read())>>> import json
>>> with open('config.json', 'r') as f:
... config = json.load(f)
>>> config
{'Lorem': 3.14, 'Dolor': [1, 2, 3], 'Ipsum': 'abc'}>>> import os
>>> os.listdir('/')
['boot.py', 'main.py', 'lib']
>>> os.chdir('/lib')
>>> os.getcwd()
'/lib'>>> from upysh import *
upysh is intended to be imported using:
from upysh import *
To see this help text again, type "man".
upysh commands:
pwd, cd("new_dir"), ls, ls(...), head(...), cat(...)
newfile(...), mv("old", "new"), rm(...), mkdir(...), rmdir(...),
clear
>>> ls
1073 LICENSE
230 boot.py
219 hallo.py
<dir> lib
590 main.py
4897 project.pymakr
2 scratch.py
6605 web.py
<dir> www
>>> cd("lib")
>>>Siehe web.py
Projekt auf Github: https://github.com/jczic/MicroWebSrv2
Dieses Projekt:
MicroPython:
Firmware selbst bauen:
- http://akshaim.github.io/IoT/MicroPython_ESP8266/MP_ESP_101.html https://medium.com/@alwint3r/compiling-micropython-for-esp32-85cc1968e424
Bücher: