Workshop project of David Heimgartner, Gerhard Hirschfeld & Ken Iseli
In this section are the contributors listed with their developed components.
| Contributor | Frontend | Backend |
|---|---|---|
| Ken Iseli | Rankings | Authentication, Ranking, Translations, Setup |
| David Heimgartner | Password-Reset, Profile, Teams | Teams |
| Gerhard Hirschfeld | Login, Registration, Admin, Games, Setup | Admin, Games, Setup |
To manage our project we create a project on GitHub.
We divided our project into 3 repositories:
Every repository is setup with a README.md file which explains how to setup and run the application. Moreover, we used Travis as CI for our frontend and backend project to build and test it. After Travis builded the application successfully heroku deploys the application in the cloud. To access the application could take a while, due to the free solution (if the apps are unused they go in sleep mode) of heroku.
The slides of the final presentation can be found here:

Source from Github

Source from Github
may be outdated - refer to the entitties. These define the database scheme that can be created using the property spring.jpa.hibernate.ddl-auto
Static data are the location, nation and the game_phase table. These tables will not be changed by the application.
When a visitor has registered successfully, he is a user of the application. There are two different types of users: administrator and user. A typical user can modify his bets, create teams, leave teams, accept team invitations and deny team invitations. In addition, a user can view the rankings (overall ranking and team rankings) and look for other users and teams.
An administrator has the additional page admin where games can be created or deleted. Additionally, the administrator is responsible for the entry of the results when a game is over.
A user can create a team and invite other users to this team by e-mail. Therefore, a team consists of several selected users. A team has an owner. The creator of the team acts as owner. An owner can modify the team name and invite other users or guests to a group. Invitations have to be made by e-mail address. The invited person gets an e-mail, logs in and can accept or deny the invitation. If he is not yet user he can register by following the link in the e-mail. A user can be member of maximum five teams. If he wants to accept the invitation of a new team, he has to leave another team firstly.
If the owner leaves the group, the new owner will be next user. A team can not be deleted by an user or owner. It will be deleted self-acting when the last user leaves the team.
The game table represents a soccer game like Spain vs Peru. Only an administrator is able to create, update and delete games.
A user can bet a game and this will be stored in the tip table. However, he can only alter the score fields and before the game has started. After the admin has enter the score of a game all tips will receive their points.
There are two types of rankings: user ranking and team ranking. The user ranking consists all users of the application. The team ranking filters the users that are member of the corresponding team. They are sorted according to the following criteria:
- Number of points
- Number of bets Submitted (less bets are higher valued)
- Alphabetical order
As additional feature pagination is implemented with the rankings.
At the beginning, a profile page was implemented. However, it was only possible to change the own password and the avatar. After we discovered Gravatar as avatar service there was only the possibility to change the password. The avatar can be changed by modify it at the Gravatar website. Due to the duration of the world cup tournament the probability that a user wants to change his password is quite small. In addition, the password can be reset if a user has forgotten it. Therefore, we decided to delete the profile page.
We defined our API with the help of an awesome tool called Swagger. Moreover, we deployed it on heroku to have a live API documentation of our project.
Go to the Swagger Documentation
- Open the Swagger Editor.
- Copy the Swagger File into the Swagger Editor.
- Change it
- Copy the new documentation back into repository
- Commit your changes.
We put the wireframes into a separate document.
The chosen JS-framework Vue.js does not force a specific structure. However, the ecosystem provides some useful tools and libraries to build large scale application.
├── public  # static files like index.html & favicon
├── src
│   ├── assets               # Fonts and images
│   ├── components
│   │   ├── Hello.vue        # Vue.JS components
│   │   └── ...
│   ├── config
│   │   └── app.config.ts    # configuration from the .env* files
│   ├── locals
│   │   ├── de.ts            # Translation files
│   │   └── ...
│   ├── models
│   ├── pages                # Page components
│   ├── plugins
│   │   └── **/*.plugin.ts   # Vue.JS plugins
│   ├── routes               # All defined application routes are here
│   ├── services
│   │   ├── api              # All service for making api requests
│   │   └── **/*.service.ts
│   ├── store                # Vuex store
│   │   ├── modules
│   │   └── index.ts
│   ├── styles               # Global styles written in SASS
│   ├── types                # Custom type definitions
│   ├── App.vue              # Main component
│   └── main.ts              # Bootstraps the app
├── .env.development         # App configuration for the development environment
├── .env.production
├── .travis.yml              # CI configuration
├── package.json
├── Procfile                 # Defines the run command for heroku
├── README.md                # Documentation
├── server.js                # Small web-server for deploying on heroku
├── static.json              # Defines the root path for heroku
├── tsconfig.json            # TypeScript configuration
├── tslint.json              # TypeScript lint configuration
└── vue.config.js            # Extends the webpack config
For the most libraries plugins are defined to serve the library through the Vue instance.
Axios is a promised based HTTP client for the browser. In this project it used for all the AJAX-request.
We used a response interceptor to catch the 401 responses to redirect the user to the login page. Moreover, there is a request interceptor to set the used language.
All the ./src/services/api/*.api.ts use this library.
To serve various languages we used the vue-i18n plugin. The translations are located in ./src/locals/<lang_key>.ts.
Routing is done by the plugin vue-router. All the routes are configured in ./src/routes/index.ts. We defined to route the following properties:
- auth These routes must have a valid authentication.
- guest These routes are only accessible when nobody is authenticated.
In the router plugin file ./src/plugins/vue-router.plugin.ts we defined a middleware which listens to those properties and redirects if necessary.
For the main styles we used bootstrap version 4. This is written in Sass and makes in easy to customize thanks to all the defined variables. Moreover, it has a flexible grid solution to handle responsive issues.
Icons are used from the library font-awesome and all the nation flags are from the flag-icon-css library.
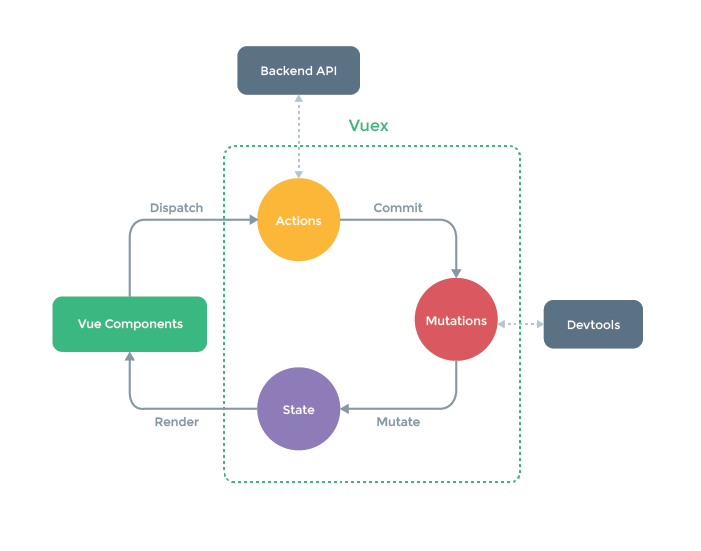
To serve a global store over all the components we used vuex. Vuex is not just a libary it is a state management pattern as well. It is heavily inspired by the flux and redux pattern.
Source from vuex
The image above shows the flow of the state management pattern. As example, the use-case of the login process is mapped.
Firstly, the user fills out correctly the login form and submits the action signInUser(...). The actions are bound with the annotation @Action(AuthActions.SignInUser).
@Component({
  components: {
    SpinnerButton,
  },
})
export default class Login extends Vue {
  public username = '';
  public password = '';
  public isSpinning = true;

  @Getter(AuthGetters.IsAuthenticated)
  public isAuthenticated: boolean;

  @Getter(AuthGetters.IsFetching)
  public isFetching: boolean;

  @Getter(AuthGetters.LoginHasFailed)
  public hasFailed: boolean;

  @Action(AuthActions.SignInUser)
  public signInUser: (cred: Credentials) => void;

  private log = this.$createLogger('Login');

  public async signIn(): Promise<void> {
    const isValid = await this.$validator.validateAll();
    if (isValid) {
      this.log.info('Try to sign in the user.');
      this.signInUser({
        username: this.username,
        password: this.password,
      });
    } else {
      this.$noty.warning('message.login_incomplete');
    }
  }
	...
The action actionTypes.SIGN_IN_USER firstly mutates the auth state, so that the user sees a spinner. Afterwards, the api call for the login is requested. When the request-promise resolves, the given token will be committed to the mutationTypes.SIGN_IN_USER_SUCCESS mutation,
otherwise the mutationTypes.SIGN_IN_USER_FAILED mutation will be called.
export const actions: ActionTree<AuthState, AuthState> = {
  [actionTypes.SIGN_IN_USER]({ commit, state }: ActionContext<AuthState, AuthState>, credentials: Credentials): void {
    commit(mutationTypes.SIGN_IN_USER_REQUESTED);
    authApi.signIn(credentials.username, credentials.password)
      .then((token: string) => commit(mutationTypes.SIGN_IN_USER_SUCCESS, token))
      .catch((err: any) => commit(mutationTypes.SIGN_IN_USER_FAILED, err));
  },
	...
Here the mutation of the login process are shown. Like mentioned above, the SIGN_IN_USER_REQUESTED mutation only sets the isFetching to true,so a spinner is shown to the user.
The SIGN_IN_USER_SUCCESS mutation is called when the login request was successful and a token is sent by the backend. This will set the token as a common authorization header for all further api requests. Moreover, it stores the token in the local-storage and mutates the state.
export const mutations: MutationTree<AuthState> = {
  [mutationTypes.SIGN_IN_USER_REQUESTED](state: AuthState): void {
    state.isFetching = true;
    state.isAuthenticated = false;
    state.loginHasFailed = false;
  },

  [mutationTypes.SIGN_IN_USER_SUCCESS](state: AuthState, token: string): void {
    tokenService.setToken(token);
    Vue.$http.defaults.headers.common.Authorization = `Bearer ${token}`;

    state.isFetching = false;
    state.isAuthenticated = true;
    state.loginHasFailed = false;
  },

  [mutationTypes.SIGN_IN_USER_FAILED](state: AuthState, error: any): void {
    state.isFetching = false;
    state.isAuthenticated = false;
    state.loginHasFailed = true;
  },
	...
After the states are mutated, the components receive the new data and re-render their view.
Entities contain business logic as long as it is not already in the database statements (which are located in the JpaRepository's in the persistence package). Services only contain shared business logic or collective functionality such as gathering and consolidating data into objects. For instance, the management of verification tokens or reset tokens is handled by the User but the adding of the ranking information is done in the RankingService as this is only data gathering and assembling.
The following diagram shows the entities and how they are related to each other:

Source from github
The Controller layer simply has the responsibility to receive requests and propagate parameters to the Service layer. Data is returned to the Controllers. The response is created here and sent to the client. This layer also controls which roles may access the routes.
The Service layer gathers information using business logic on the Model layer or using the Persistence layer. For instance, the rankings are assembled here while the actual data comes from the Persistence. Business logic used for the assembling of requested information is located in the Model layer.
The following diagram shows how the Controllers interact with the Services:

Source from github
This layer is used to load data from the database. It mostly consists of JpaRepositorys which hold generic as well as complex queries in order to load very specific data sets such as rankings. These queries exist because it is by far more performant to filter or aggregate data using sql and because it is by design much better not to load irrelevant data from the database. Pagination is also done in the persistence layer. One can simply pass a Pageable object to the repository's method. For instance, such an object can be created using PageRequest.of(offset, limit).
Emails are being sent using the EmailService class which uses the application properties to determine the parameterization such as
- SMTP server hostname
- SMTP server port
- Whether to use SMTP authentication
- The sender's login credentials
The EmailService offers a bunch of handy methods to put together an email:
prepareSessionprepares a javax.mail.SessioncreateMessage(String recipient, Locale locale, Session session, String subjectKey, String messageKey, String... contentParameters)which puts together the message:- fills in the sender
- fills in the recipient
- fills in the subject with the key from the
MessageBundlein the respective locale (see I18N for further information) - fills in the content with the key from the
MessageBundlein the respective locale populated by the contentParameters (these can be used with{n}in theMessageBundle)
sendMessage(Session session, MimeMessage message)which sends the email.
The service can easily be used to add another method that uses these helper methods to send another email. The logging is very verbose in order to make sure that information is not lost if the email sending fails. This could be very hard to analyze if bugs or incidents occur in production.
The internationalization is necessary in the backend as well because certain entities can be translated. As of now these are the following:
- Emails, obviously as they are sent from the backend to the receiver.
- Country names as we only maintain the key (jp for Japan, tn for Tunesien, ...) in the database and then access the correct translation in the respective
MessageBundle - Stadium names as we only maintain the key (Moscow.Luzhniki for Olympiastadion Luschniki, Moskau, ...) in the database and then access the correct translation in the respective
MessageBundle - Game phase names as we only maintain the key (phase.name.group1 for Gruppenphase 1, ...) in the database and then access the correct translation in the respective
MessageBundle - Tip rules such as correct winner, correct amount of guest score, ...
The translations are accessible via the I18NService class where a String can be loaded either parameterized or simple (that means it does not contain placeholders {n}):
getLocalizedString(String key, Locale locale): StringgetParameterizedLocalizedString(String key, Locale locale, String... parameters): String
Whenever something translated has to be used, the Locale should be loaded from the request headers in the Controller (can be passed as argument on a request method (example: AuthenticationController.register(Locale locale))).
The design decision was made that any Dto containing translated values, needs this service and the request Locale to translate the keys into values. This is a drawback to the convenience of not having to maintain translations in the database which would have lead to a much more complex database design.
In order to be compliant with state of the art security concepts and not to hold plain text credentials on the client side we decided to use JWT for user authentication. This mechanism enables us to maintain a signed token that expires (in our case) in one hour. This way we do not have to store critical data on the client where it could be accessed by mailcious parties. However, there are some exceptions where we grant access with other authentication methods. The following table describes the access level for the specific routes (as one as well can see in the swagger doucmentation):
| Route | Authentication | Reason |
|---|---|---|
| /api | public | This is an information that we display on every page in the footer (also on the login or registration pages) |
| /auth/login | Basic Authentication | Users have to have a way to receive the JWT token. This is done via providing the credentials as a Base64-encoded string containing the username and the password |
| /auth/reset and /auth/reset/{resetToken} | public | This route is used to reset a user's forgotten password. |
| /auth/verify | public | This route is used in the email verification process during the registration. |
| all others | JWT Authentication | All other routes are only accessible for authenticated users. |
As spring security does not provide JWT support out of the box developers have to implement this by themselves.

Source from github
- Among other spring boot spcific filters the request enters the
AuthenticationPathFilterwhere it is determined to be a valid request if it uses the Basic Authentication header. - Among other spring boot spcific filters the request enters the
JwtAuthFilterclass where nothing happens because this requests uses Basic Authentication and not the Bearer Token. - The requests hits the backend resource
AuthenticationControllerwhere it calls theAuthenticationServiceto do the login logic. - The
AuthenticationServicechecks whether the user exists or not. If the user does not exist, the request immediately returns. Otherwise a new JWT Token is being generated using theTokenHelper. The user object (with the transient populated attribute#token) is returned. - The response with the new JWT token is created in the
AuthenticationControllerand is sent to the client. The client now has a valid JWT token that can be used to call other services on the API.
- Among other spring boot spcific filters the request enters the
AuthenticationPathFilterwhere it is determined to be a valid request if it uses the Bearer Token header. - Among other spring boot spcific filters the request enters the
JwtAuthFilterclass where thisFiltercreates a newJwtAuthenticationwith the given Bearer Token (the JWT token if used correctly). This Authentication is set onto theSecurityContext. - The
JwtAuthenticationProvider's methodauthenticate(Authentication)will be called (as it was configured asAuthenticationProvidersupporting theJwtAuthenticationTokenin theAuthenticatonConfig - It uses the
UserRepositoryto check whether the user exists and theTokenHelperto check whether the token was expired. In case the user is not found in the database or the token has expired the a newAuthenticationExceptionwill be thrown. Otherwise the passedAuthenticationTokenis populated with its authorities (read from the database) and a successful authenticated flag. - Finally the request hits the respective
Controllerwhere it consumes a service (such as loading games or tips or alike)
There are many approaches to ensure password strength. We added support in the class AuthenticationService where one can simply add more checks in the method .validatePassword(String). At the moment this method only checks that the password is not shorter than 4 characters. For a productive system this is obviously not strong enough. However, we show here that additional checks are easily possible and extendable.
The passwords themselves are stored in the database as Argon2 hashes. The password hashes are written to the database when a user is being successfully created. The passwords are checked as hashes when a user tries to login with Basic Authentication, of course.
The communication between frontend and backend handled done exclusively via HTTPS. (Valid) certificates are managed by heroku so there is no need for further configuration on any stage. Obviously this has to be adjusted in case on wants to migrate to another service provider than heroku.
Out development process consists of several steps:

Source from github
- write tests and productive code on a feature branch (feature/xyz)
- build locally
- push to github when the build is green, otherwise fix everything
- Travis CI is triggered by any newly detected commit in Github
- peer review with other team members using pull requests in github (maybe some rework has to be done)
- merge the feature branch into develop
- Travis runs again
- When Travis successfully built the develop branch, heroku gets notified and deploys the new build. This takes a moment or two until the application is available again.
This process applies to frontend and backend.