
This repository offers a comprehensive collection of tutorials and practical examples focused on programming ATMEL 8051 Series Microcontrollers such as AT89C51, AT89S51, and AT89S52, using Assembly Language. Each example is simulated inProteus and, in most cases, verified on real hardware, making it ideal for both beginners and enthusiasts looking to learn the fundamentals of 8051 programming, circuit simulation, and customization.

|
|
|
-
🔧 Assembly Code: Source code for each specific 8051 example, available in
.asmformat for hands-on learning. -
🖥️ Proteus Simulation Files: Pre-built simulation files in
.pdsprjformat, allowing you to test and visualize the circuit before hardware implementation. -
📦 HEX File: Precompiled HEX file (
.hex), ready for direct upload to the microcontroller. -
📸 Screenshots & Photos: Visual documentation, showcasing successful testing on both Proteus and real hardware, typically available in
.pngor.jpgformats.
Note:
Ensure that you have the correct versions of:
- Proteus
- ATMEL 8051 Microcontroller Toolchain
installed on your system for smooth simulation and compilation.You can find the setup instructions and download links in the repository's Setup Instructions section.
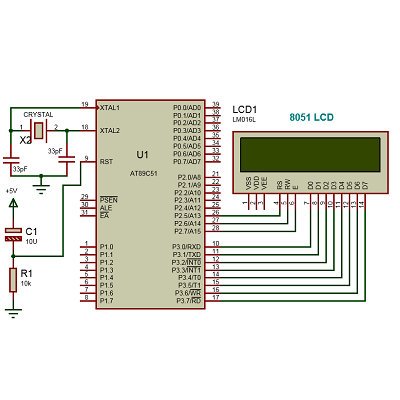
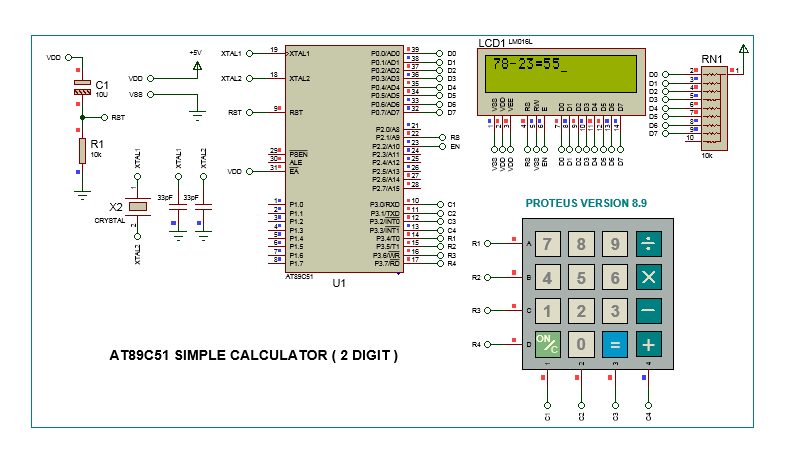
An example for interfacing an LCD to 8051 microcontrollers below:
 |
 |
 |
|---|---|---|
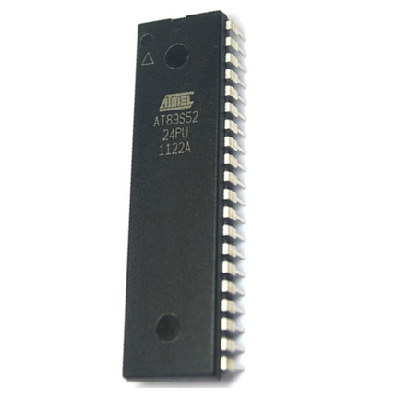
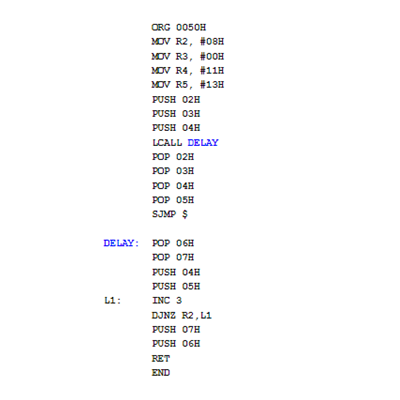
| 8051 Microntroller | Assembly Code | Circuit Schematic |
The 8051 microcontroller was designed by Intel in 1981. It is an 8-bit microcontroller built with a 40-pin DIP (dual inline package), 4KB of ROM storage, and 128 bytes of RAM storage. It consists of two 16-bit timers and four parallel 8-bit ports, which are programmable and addressable as per the requirement.
| **Pin Diagram** | **Description** |
|---|---|

|
Pin Number 1. P1.0 to P1.7: I/O pins. 2. RST: Reset pin. 3. P3.0 to P3.7: I/O pins. 4. XTAL1, XTAL2: Oscillator pins. 5. GND: Ground. 6. P2.0 to P2.7: I/O pins. 7. PSEN: Program Store Enable. 8. ALE: Address Latch Enable. 9. EA: External Access. 10. P0.0 to P0.7: I/O pins. 11. VCC: Power supply. |

|
Architecture Overview The 8051 microcontroller architecture consists of a CPU, memory (both RAM and ROM), I/O ports, and timer/counter modules, allowing for a versatile and efficient design. The key components include: 1. ALU: Performs operations. 2. Registers: Temporary storage. 3. Control Unit: Manages execution. 4. Bus System: Component communication. 5. Timer/Counters: Timing and counting operations. |
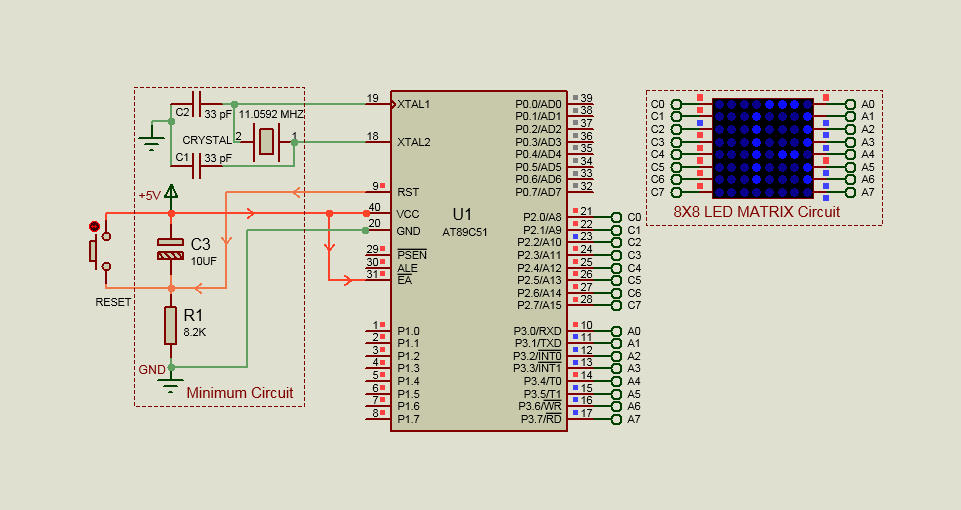
| Circuit Diagram | Key Components |
|---|---|
|
- VCC: Power supply to the 8051 microcontroller. - GND: Ground connection. - XTAL1, XTAL2: Connected to an 11.0592 MHz crystal oscillator. - 33 pF capacitors: Connected between the crystal and ground. - RST (Reset pin): Connected to a 10kΩ pull-up resistor and a 10 µF capacitor to handle reset operations. - EA (External Access): Tied to VCC to use internal memory. - ALE (Address Latch Enable) and PSEN (Program Store Enable): Connected to VCC for normal operation. |

If you're interested in programming, you've likely already used a programming language to write or compile code. If not, it's a good idea to start with the basics before diving into microcontrollers. Writing code for the 8051 Microcontroller is similar to general programming. Once you’ve chosen a language, you set up the development environment, and you're good to go!
Traditionally, you can program the 8051 microcontroller using two main languages:
- Assembly Language
- C Language (or Embedded C)
However, advanced microcontrollers now support a wider range of languages.
- Pros: Direct control over hardware, highly efficient use of memory and processing.
- Cons: Harder to learn and manage due to its complexity.
Assembly Language is a low-level programming language closely tied to the hardware. It uses mnemonics and hexadecimal codes to control the microcontroller’s actions. While it’s powerful, it can be more complex to write and understand.
- Pros: Easier to write, more flexible, and widely supported.
- Cons: Less control over hardware compared to Assembly.
C Language is a high-level language often used for microcontroller programming due to its balance between flexibility and performance. It's also supported by many **8051** development tools. If you’re already familiar with C++ or any high-level language, transitioning to C for microcontrollers is relatively simple.
Modern microcontrollers, especially advanced ones, can be programmed in languages beyond just Assembly and C. Some common options include:
-
Python (via MicroPython):
- Python is now used on platforms like the ESP32 and Raspberry Pi Pico. It’s great for quick prototyping and high-level control over hardware.
- Pros: Easy to learn and write, widely supported.
- Cons: Not as efficient as C or Assembly, especially for performance-critical applications.
- Learn more about MicroPython here.
-
JavaScript (via Node.js):
- JavaScript can be used to program microcontrollers, especially with NodeMCU boards that run on the ESP8266 and ESP32 platforms.
- Pros: A well-known language for web developers.
- Cons: Requires more overhead compared to C or Assembly.
- Explore Node.js for microcontrollers here.
-
Rust:
- Rust is gaining popularity in embedded systems due to its memory safety features and performance.
- Pros: Safe, fast, and increasingly used for low-level programming.
- Cons: Still developing support for some microcontroller platforms.
- Discover Rust for embedded systems here.
-
Arduino (using C++):
- Arduino is a popular platform for beginners, using a simplified version of C++.
- Pros: Simplifies hardware interaction with rich library support.
- Cons: Less efficient than lower-level programming languages.
- Get started with Arduino programming here.
For the 8051 microcontroller, you’ll likely stick with Assembly or C for most applications. However, if you’re working with more advanced microcontrollers, consider using languages like Python or Rust for added flexibility and ease.
- Assembly Language: Best if you need full control over the microcontroller’s resources and performance.
- C Language: Ideal for most projects due to its ease of use and balanced performance.
- Python and Other High-Level Languages: Great for rapid development, but less efficient in low-level control.
If you’re new to microcontroller programming, start with Assembly to understand the basics, then move to C for more complex projects. For advanced platforms, explore other languages like Python or Rust for faster development with high-level features.
For Example, assume that an LED is connected to 8051 microcontroller on an I/O pin (e.g., P1.0), then here is the code for blinking the LED of the 8051 microcontroller in both Assembly and C language shown below:
ORG 00H           ; Start at address 0
MAIN:             ; Main program label
    SETB P1.0     ; Set P1.0 (Turn LED off assuming active low)
    ACALL DELAY   ; Call delay subroutine
    CLR P1.0      ; Clear P1.0 (Turn LED on)
    ACALL DELAY   ; Call delay subroutine
    SJMP MAIN     ; Jump back to main (infinite loop)

; Delay subroutine
DELAY:
    MOV R1, #250  ; Load R1 with 250
DELAY_LOOP1:
    MOV R2, #250  ; Load R2 with 250
DELAY_LOOP2:
    DJNZ R2, DELAY_LOOP2  ; Decrement R2 and jump if not zero
    DJNZ R1, DELAY_LOOP1  ; Decrement R1 and jump if not zero
    RET                     ; Return to the main program

END ; End of program- P1.0: This is the pin on Port 1 used to control the LED.
- SETB P1.0: Turns the LED off (if it’s active low, i.e., LED is turned on when the pin is low).
- CLR P1.0: Turns the LED on.
- DELAY: Subroutine to provide a simple delay. The delay is implemented using two nested loops.
#include <reg51.h>  // Header file for 8051 microcontroller

sbit LED = P1^0;    // Define LED on P1.0

void delay(void);   // Function declaration for delay

void main() {
    while (1) {     // Infinite loop
        LED = 0;    // Turn on LED (active low)
        delay();    // Call delay function
        LED = 1;    // Turn off LED
        delay();    // Call delay function
    }
}

void delay(void) {
    unsigned int i, j;
    for (i = 0; i < 250; i++) {
        for (j = 0; j < 250; j++) {
            // Do nothing, just waste some time
        }
    }
}-
sbit LED = P1^0: Defines the bit that controls the LED connected to pin P1.0.
-
LED = 0; Turns the LED on (assuming it's active low).
-
LED = 1; Turns the LED off.
-
delay(): A simple delay function that uses two nested loops to create a delay.
Both codes will blink an LED connected to P1.0 of the 8051 microcontroller.
Each example in this repository is a folder containing the necessary files for programming the **8051 microcontroller** in Assembly, simulating it using **Proteus**, and downloading the compiled program to hardware via **avrdudes**.
For a beginner to work with the examples in your 8051 Microcontroller Tutorials repository, the following prerequisites would be helpful:
- Understanding of components like resistors, capacitors, LEDs, transistors, etc.
- Familiarity with circuits, such as series and parallel configurations, basic Ohm’s Law, and power supply management.
- Experience with reading schematics and wiring diagrams.
- Overview of microcontrollers: What they are and how they work.
- Familiarity with the 8051 architecture: Learn about its registers, memory organization, and basic instruction set.
- Basic understanding of Assembly language: Knowledge of how Assembly commands work and their relationship to hardware control.
- Assembly Language:
- Basic instruction set (like
MOV,ADD,SUB,JMP, etc.). - Registers and addressing modes of the 8051.
- How to write and compile simple Assembly programs.
- Basic instruction set (like
- Understanding how memory and I/O ports work in microcontrollers.
- Proteus Design Suite:
- Basic proficiency in using Proteus to simulate circuits.
- How to add components, run simulations, and debug.
- MIDE-51 IDE:
- Knowledge of how to write, compile, and debug Assembly code in MIDE-51.
- Familiarity with HEX file generation and loading into simulators or hardware.
The **USBasp** is a widely-used, open-source programmer that enables seamless interfacing between a computer and various microcontrollers, including the **8051 series**. It was developed by Thomas Fischl and is known for being **affordable, easy-to-use**, and **compatible with multiple microcontroller architectures**.
- Supports ISP (In-System Programming)
- Open-source and customizable
- Fast data transfer
- Cross-platform support
- Wide microcontroller support
- USBasp Programmer: Physical device to connect your PC to the microcontroller.
- AVRDude: A command-line tool to upload the compiled Assembly or C code (.hex files).
- Driver Installation: Use Zadig for Windows driver setup.
MIDE-51 is widely regarded as one of the best assemblers for programming the 8051 microcontroller family. Here are some key reasons why MIDE-51 stands out:
-
User-Friendly Interface: MIDE-51 features an intuitive graphical user interface that simplifies the coding process, making it accessible for both beginners and experienced programmers. It provides easy navigation through the code and quick access to various features.
-
Integrated Debugging Tools: One of MIDE-51's strongest points is its integrated debugging capabilities. Users can simulate their programs, step through the code, and monitor register and memory values in real-time, which greatly enhances the debugging experience.
-
Support for Multiple Devices: MIDE-51 supports various 8051 microcontroller variants, including the AT89C51, AT89S51, and AT89S52. This flexibility allows developers to write code that can be easily adapted for different microcontrollers within the 8051 family.
-
Rich Documentation and Examples: MIDE-51 comes with comprehensive documentation and numerous example projects that help users learn quickly. The availability of tutorials and sample code accelerates the learning curve for new users.
-
Assembly Language and C Support: While MIDE-51 is primarily an assembler, it also supports the C programming language through integration with Keil C51. This allows users to choose the programming paradigm that best suits their project requirements.
-
Cost-Effective: MIDE-51 is available as a free version with essential features, making it an economical choice for hobbyists and educational purposes. The professional version offers additional features at a reasonable price, ensuring value for money.
Overall, MIDE-51 is an excellent choice for programming 8051 microcontrollers. Its user-friendly design, robust debugging tools, and support for multiple devices make it suitable for both beginners and advanced users. Whether you're working on a simple project or a complex application, MIDE-51 can meet your development needs effectively.
- MIDE-51 – IDE for writing and compiling Assembly code for 8051.
- avrdudes – Uploads compiled programs to hardware.
- Proteus Design Suite – Circuit simulation software.
- MK-51S Microcontroller Development Kit
Note: You can still follow along by using a USBasp Programmer and basic components for hands-on practice.

Exp. 1: 8051 LED This experiment demonstrates how to blink an LED using the 8051 microcontroller. |

Exp. 2: Push Button Interfacing Learn how to interface a push button with the 8051 to control outputs. |

Exp. 3: Seven Segment Display Discover how to interface and display numbers on a seven-segment display. |
 8051 LED 8051 LED |
.png) 8051 Push Button 8051 Push Button |
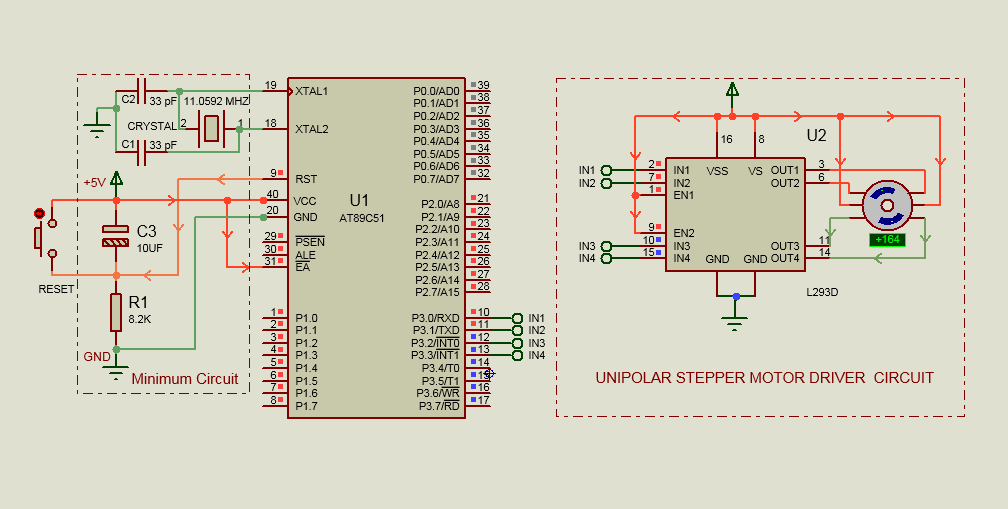 8051 Stepper Motor 8051 Stepper Motor |
 |
 |
 |
|
.png?raw=true) |
 |
A huge thank you to the following incredible tools and teams for making this repository possible:
-
MIDE-51 – for providing a feature-rich, user-friendly IDE that simplifies 8051 Assembly programming.
-
avrdudes – for the essential programmer tool that effortlessly bridges simulation and hardware deployment.
-
Atmel (Microchip) – for their legendary 8051 microcontroller series, which remains an integral part of embedded systems learning.
-
Proteus Design Suite – for their excellent circuit simulation platform that brings designs to life before hitting the hardware stage.
- Verify the connections based on the schematic.
- Modify the code to display different messages.
- Experiment with the contrast and observe its effects.
- 8051 Microcontroller Reference: Datasheet
- 8051 Microcontroller Overview
- Assembly Language Basics
- C Language for Embedded Systems
- Microcontroller Programming Languages
- MicroPython for Embedded Systems
- Rust for Embedded Systems
- GitHub: gmostofabd
- LinkedIn: Your LinkedIn Profile
- Website: melab BD
This project is licensed under the MIT License - see the LICENSE file for details.
Contributions, issues, and feature requests are welcome! Feel free to check out the issues page.
If you find this project helpful, please give it a ⭐ to show your support!
Made with ❤️ by gmostofabd