Home
This will be a very brief examination/review of the compilation process. It will be thorough in regards to addressing each of the 4 main steps of the compilation process with plenty of examples. It will not cover any step in a deep manner.
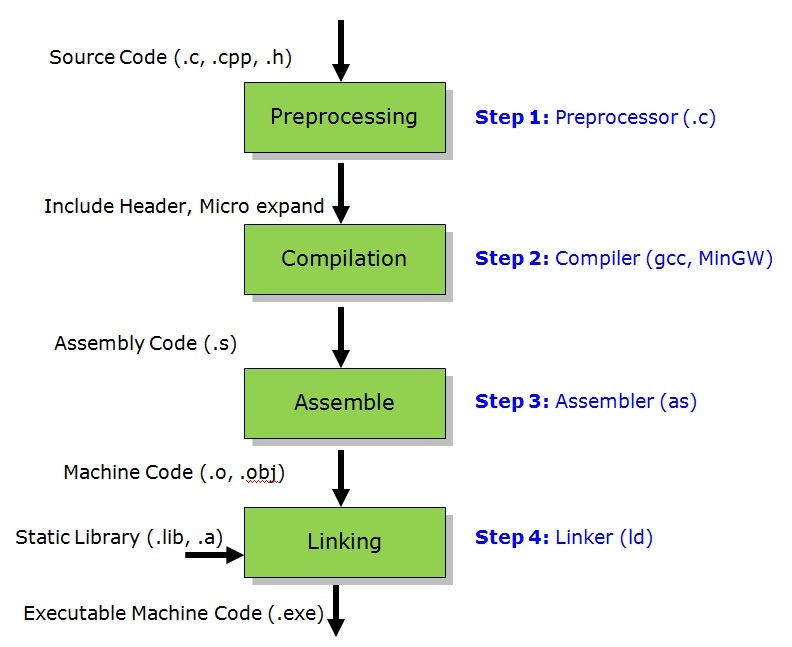
Compiling an executable happens in 4 steps as seen below: Preprocessing, Compilation, Assembly, and Linking. The image below shows the flow between each stage as well as the files that are produced.
Preprocessing can be thought of as simple text substitution. It is a little more complicated than that, but in our example main.c code, the preprocessing step is going to expand our #define macros and #include directives.
The image below is our original source code.

run $ gcc -E -P main.c to see the preprocessor leave only c code in the source file.

As seen above, only c code remains (the output is a .c file after all). The preprocessor expanded #include<stdio.h> and included that header file above int main(). All of those typedefs (not pictured) and function prototypes (some pictured) will allow our source code to call functions and types from other files. Additionally, notice that the #define macro was also expanded and that printf() no longer calls RESULT. Instead, RESULT was substituted with the string "Result" as we commanded the preprocessor to do. On to the next compilation step: Compilation! Yes, it is also called compilation.
In compilation, our high level code, in this case c, is translated into assembly pictured below.
run $ gcc -S -masm=intel main.c to generate the .s file
run $ cat main.s or $ vim main.s to view it

It is relatively easy to read because all symbols functions are preserved. Notice, however, that there are not any addresses to the right of the file. This is because the c code was translated into assembly. We still have to assemble it into machine code!
Assembly will generate the machine code needed to run the program, but still require a couple more steps. The files produced here are object files (.o).
run gcc -c main.c to get the object file.
run objdump -M intel -d main.o to view the contents

The above image is the .text section of an assembly file. Notice that calls to add(), sub(), and printf() point to random locations. This is because during the assembly phase, all source files are independently assembled into object files. This means that the compiler doesn't know 1) the base address of the final executable and 2) the addresses of other object files. Likewise, our call to printf() no longer knows where our strings are and is also gibberish. Luckily, the linker will resolve this!
One final thing we can do at this stage before the linker is look at the relocation symbols which are places that our linker need to resolve.
run readelf --relocs main.o

Notice that the relocation symbols's offsets correspond to the places that are gibberish. These offsets are where the linker will resolve the unknown addresses. To learn more about this and why these particular offsets need to be modified, take a look at x86_64 opcodes and machine instructions.
Finally, the last step in the compilation process! The linker will look at all our object files and merge them into one file, resolving addresses as it goes along. Suggested reading includes looking up the difference between static and dynamic libraries.
run gcc -o main.exe main.c to get the executable (the linker is always last)
run objdump -M intel -d main.exe to view it

As seen above in the tiny code snippet, all relocation symbols are fully resolved and the binary can be run.
To make it harder to read, recompile a new binary (mine is called main.exe.stripped), and run $ strip --strip-all main.exe
This will strip all the symbolic information and turn it into a giant glob as seen below!

Above is a small snippet of the functions we wrote in the original main.c file that have been translated into machine code and stripped of its symbols. Since this executable is much harder to read, I will help you out by pointing out several key start addresses. Our original main function begins at 0x40114C. The add function is at 0x401126 and the sub function is at 0x40113A.
That is all folks!!!
This tutorial is not meant to go any deeper and is meant to give a brief introduction to compilation with some sample code and files. For more in depth information, please reference Assembly books and Binary Analysis books.
To run the executables, simply run $ ./main.exe or $ ./main.exe.stripped
Both will produce the same result, 10, and print it to your command line.
Happy Coding!