使用Notepad++运行xelatex文件:
1, 安装Notepad++和SumatraPDF,参考 https://blog.csdn.net/sunbibei/article/details/51443499
所有安装好之后, 新建miktex_to_latex.bat文件,使用notepad++打开该文件, 然后将下述内容复制到该文件中, 保存。存放在notepad++的安装路径下。
:: Called from Notepad++ Run
:: [path_to_bat_file] "$(CURRENT_DIRECTORY)" "$(NAME_PART)"

:: Change Drive and  to File Directory
%~d1
cd %1

:: Run Cleanup
call:cleanup

:: Run pdflatex -> bibtex -> pdflatex -> pdflatex
pdflatex %2
bibtex  %2
:: If you are using multibib the following will run bibtex on all aux files
:: FOR /R . %%G IN (*.aux) DO bibtex %%G
pdflatex %2
pdflatex %2

:: Run Cleanup
call:cleanup

:: Open PDF
START "" "D:\SumatraPDF\SumatraPDF.exe" %3 -reuse-instance

:: Cleanup Function
:cleanup
del *.dvi
del *.out
:: del *.log
:: del *.aux
:: del *.bbl
:: del *.blg
:: del *.brf

goto:eof
2, 安装NppExec插件
32-bit Notepad++
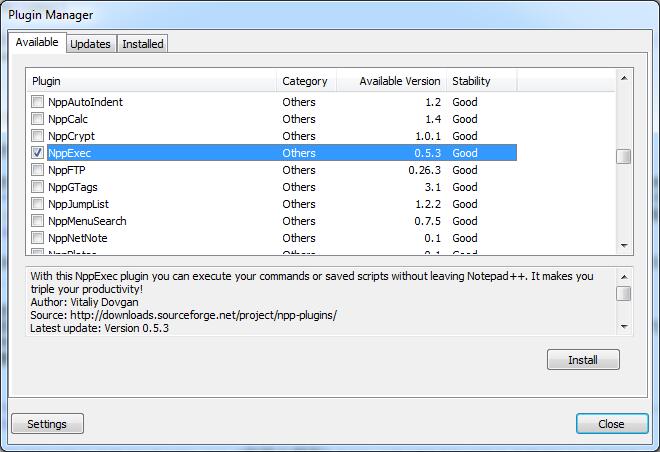
在notepad++界面, 点击 Plugins -> Plugin Manager -> Show Plugin Manager, 打开后如下图所示, 找到图示勾选的插件, 点击 Install. 自动下载安装好后会提示重启。
64-bit Notepad++ https://nchc.dl.sourceforge.net/project/npp-plugins/NppExec/NppExec%20Plugin%20v0.5.9.9%20dev/NppExec20160628_dll_x64-2.zip
点击下载地址,进行下载,下载完成之后,将解压出来的NppExec.dll文件复制到path\to\Notepad++\plugins文件夹下.重启Notepad++,这个时候就能够在Plugin的下拉菜单中找到NppExec插件了。
3, 上述工作完成之后, 打开notepad++,将下述内容复制到你的新文件中。
\documentclass[conference]{IEEEtran}
\begin{document}
\begin{abstract}
	This is test content.
\end{abstract}
\begin{IEEEkeywords}
latex , notepad++, nppexec
\end{IEEEkeywords}
\section{Introduction}
    Nothing
\end{document}
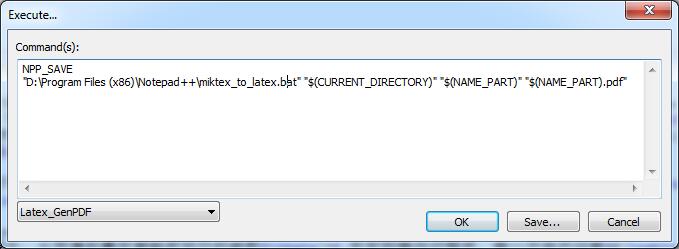
复制好了之后保存. 好, 这个时候可以按一下键盘上面的 F6 按键试试效果了.不出意外, 应该会弹出如下所示的提示框, 然后复制下述内容:
  NPP_SAVE
  "path\to\miktex_to_latex.bat" "$(CURRENT_DIRECTORY)" "$(NAME_PART)" "$(NAME_PART).pdf"
将对话框中path\to\miktex_to_latex.bat改成前一篇中所新建的bat文件的实际路径. 如我的设定如下:
点击 Save, 快捷键名字就自己取了, 单击 OK。
4, 上述版本仅仅可以供pdflatex使用,或者使用下面的语法。 Old version for pdflatex:
  NPP_SAVE                           //save the current file;
  cd $(CURRENT_DIRECTORY)
  pdflatex.exe  $(NAME_PART).tex     //run the pdflatex program;
  gbk2uni.exe $(NAME_PART).out        //编译.out文件
  pdflatex.exe  $(NAME_PART).tex      //再编译一次,避免生成的书签乱码
  NPP_RUN $(NAME_PART).pdf           //show the resulting LaTeX created PDF;
5,但是有不少中文去编辑tex,需要大家去使用xelatex,那么如何去用notepad++执行呢?大家可以修改Plugins -> NppExec -> Execute,改成以下语法: new version for xelatex:
  NPP_SAVE                           //save the current file;
  cd $(CURRENT_DIRECTORY)
  xelatex.exe  $(NAME_PART).tex       //run the xelatex program;
  makeindex $(NAME_PART).idx
  bibtex $(NAME_PART).bib
  gbk2uni.exe $(NAME_PART).out        //编译.out文件
  xelatex.exe  $(NAME_PART).tex       //再编译一次,避免生成的书签乱码
  NPP_RUN $(NAME_PART).pdf           //show the resulting LaTeX created PDF;
6,tex安装技法:
uninstalled adobe reader
install samrtpdf
ran the install wizard and installed to my new folder as single user. (I never got the system install to work.)
After the wizard, immediately run MiKTeX Update Wizard. I selected to update only miktex-texworks-bin. (If I didn't run the updates before trying to TeX a document, nothing worked at all.)
就检查一下包 tex-gyre 是否安装,是否以 User 身份安装。 如果以 Admin 身份安装,卸载掉以 User 身份重新安装。(MikTex Console 里面查看安装即可)\
ps:
1,有趣的表情包
http://tug.ctan.org/info/symbols/comprehensive/symbols-letter.pdf
2, fontawesome package
http://mirrors.ibiblio.org/CTAN/fonts/fontawesome/doc/fontawesome.pdf
3, PDF to Doc
https://convertonlinefree.com/PDFToWORDEN.aspx#
4,情感色彩分析
https://www.cnblogs.com/always-fight/p/10304806.html
5,模板
https://www.overleaf.com/latex/templates/bill-ryans-elegant-latex-resume/xcqmhktmzmsw

