Mass Action Tool
 DEVELOP User Guide - This guide provides MSI Develop Branch/Active Development merchant information on Magento Multi Source Inventory (MSI) features and project.
To properly begin using Multi-Sourcing features, you need to create new Custom Sources, create Custom Stocks with assigned Custom Sources, and assign Custom Sources with inventory data (products with assigned sources and inventory quantities). To quickly and easily assign sources and inventory, use the Mass Action Tools: adding custom sources to products and migrating existing product data assigned to the Default Source to custom Sources.
You can use the use the Mass Action Tools to make quick updates across multiple products. This is helpful for transferring inventory between sources and removing a source without editing each product individually.
- Assign product sources - Add sources to multiple products.
- Transfer Inventory - Move all quantities of products from one source to another for Multi Source merchants.
- Unassign product sources - Remove sources from the products. Any inventory quantity assigned to that source is no longer available.
These bulk actions run asynchronously by default. For details, see MSI Global Settings.
Currently in the MSI Minimal Viable Product (MVP) release, there are limitations for Default Source and Default Stock to remember when using mass actions. The following information provides merchant and technical details.
- The MSI MVP release does not have Bundle products support. MSI supports this product type only when assigned to Default Source/Default Stock (which are pre-created by the system at the time of MSI installation). In future MSI releases, we will expand support for composite products.
- You cannot unassign Default Source from Default Stock.
- You cannot disable the Default Source.
- You cannot assign Default Source to a Custom Stock. Currently when building an index for a custom Stock, the system would not be able to handle Grouped and Bundle products that could be potentially assigned to the Default Source.
- You cannot assign Custom Sources to Default Stock. This is due to how the index for Default Stock is implemented. In the MSI MVP release, the system re-uses the Stock Status legacy index (
cataloginventory_stock_statusMySQL table) built by CatalogInventory module. MSI wraps it with MySQL View to make the index contract look the same as for other Multi Stock indexes created for custom stocks:
         Create View: CREATE ALGORITHM=UNDEFINED DEFINER=`root`@`localhost` SQL SECURITY DEFINER VIEW `inventory_stock_1` AS select distinct `legacy_stock_status`.`product_id` AS `product_id`,
         `legacy_stock_status`.`website_id` AS `website_id`,
         `legacy_stock_status`.`stock_id` AS `stock_id`,
         `legacy_stock_status`.`qty` AS `quantity`,
         `legacy_stock_status`.`stock_status` AS `is_salable`,
         `product`.`sku` AS `sku`
         from
         (
         	`cataloginventory_stock_status` `legacy_stock_status`
         	join
         	`catalog_product_entity` `product`
         	on
         	((`legacy_stock_status`.`product_id` = `product`.`entity_id`))
)Use the Assign Sources tool to add one or more sources to your products. The tool helps when creating and assigning custom sources to your Default Stock or custom stocks and preparing new locations and inventory.
After adding new custom sources, you can add inventory quantities per product or for multiple products through the Admin, using the import feature, and using APIs (doc link coming soon).
-
On the Admin sidebar, tap Catalog. Then choose Products.
-
Select the products you want to modify sources. Browse or search to find the products and select those checkboxes.
-
Tap the Actions drop-down menu, and choose Assign Sources. Tap OK to verify.

Select products and assign sources -
Select checkboxes for all sources you want to add to the products.
-
Tap Assign Sources.

Add sources to selected products
The sources are added to the products with an inventory quantity of 0. You can add inventory amounts as available per source.
Depending on your business needs and status of location, Multi Source merchants may need to transfer product inventory from one source location to another. For example, you may be closing a warehouse location or no longer ship specific products from a location, moving all operations for those products to a new location.
This option allows you to select one or more products, the origin source to transfer inventory, and the destination source to receive quantities:
- Inventory quantities, Source Item Status (In Stock/Out of Stock), and the Notify Quantity for the selected source are moved per product.
- If a product does not have that source, it is skipped.
- All product inventory for the source is moved. You cannot transfer a partial quantity.
IMPORTANT: If the origin and destination sources are in different stocks, this will affect the aggregated Salable Quantity and reservations for in-progress orders.
You have an option to also unassign the source when transferring inventory quantities.
To transfer inventory:
-
On the Admin sidebar, tap Catalog. Then choose Products.
-
Select products you want to transfer inventory. Browse or search to find the products and select those checkboxes.
-
Tap the Actions drop-down menu, and choose Transfer Inventory to Source. Tap OK to verify.

Select products to transfer inventory -
Select the origin source to transfer products to a new destination. Tap Continue.
-
Select the destination source to transfer products to a new destination.
-
To remove the source from the products, select the optional checkbox Unassign from origin source after transfer.

Select sources to transfer inventory -
Tap Inventory Transfer. All product quantities are deducted from the origin source and added to the destination source. The Quantity and Salable Quantity automatically update.
When unassigning a source from a product, you are indicating the product will no longer be stocked at that location. This process will completely clear all inventory data for source currently assigned to the product. If you need to move the existing inventory to a new location, consider using the Transfer inventory option.
Important: When you unassign a source from a product, all source data including inventory amounts is removed from that product. This can affect salable quantities and reservations for unprocessed orders. After checkout and before shipment, all product quantities in the order have associated reservations. If you unassign a source, you can cause issues with reservations and processing orders.
We strongly recommend completing all orders and shipments for those products prior to removing the source.
-
On the Admin sidebar, tap Catalog. Then choose Products.
-
Select the products you want to modify sources. Browse or search to find the products and select those checkboxes.
-
Tap the Actions drop-down menu, and choose Unassign Inventory Source. Tap OK to verify.

Select products and assign sources -
Select the source you want to remove from the products.
-
Tap Unassign Sources. An alert displays that unassigning will remove all specific source and quantity data from the product.
-
To complete, click Unassign Sources.
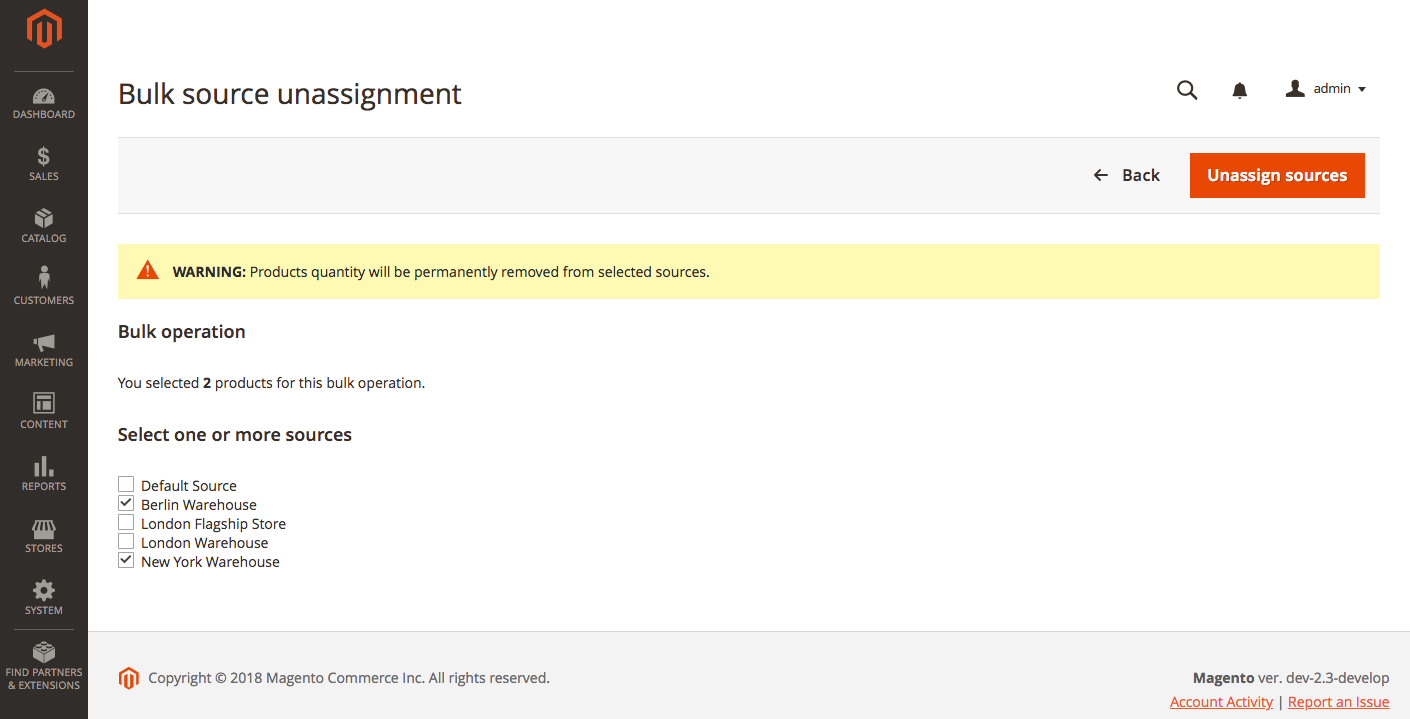
Remove sources from selected products