- DOM is the interface between our js code and our browser.
- DOM allows us to:
-
Make js interact with the browser
-
Create, modify and delete html elements
-
DOM tree is generated from an HTML document, which we can then interact with.
-
DOM is a very complex API that contains lots of methods and properties to interact with the DOM tree.
-
- Every single node in DOM tree is of type node.
- Each node is represented in js by the object which has access to different methods and properties.
- Node type ha child types:
element,text,comment,document
- Each child types has access to each method and properties of the parent node types.
console.log(document.documentElement);
//Selecting the head section
console.log(document.head);
//Selecting the body section
console.log(document.body);

//Using query selectpr
document.querySelector('.header');
const allSections = document.querySelectorAll('.section');
console.log(allSections);

//getElementById()
document.getElementById('section--1');

// getElementsByTagName()
const allButtons = document.getElementsByTagName('button');
console.log(allButtons);

//getElementsByClassName
console.log(document.getElementsByClassName('btn'));
- Both
getElementsByClassName()andgetElementsByTagName()returns a htmlcollection. getElementById()returns a nodelist
// .insertAdjacentHTML
createElement()
const message = document.createElement('div');
message.classList.add('cookie-message');
// message.textContent = 'We use cookies for improved functionality and analytics';
message.innerHTML =
'We use cookies for improved functionality and analytics. <button class="btn btn--close-cookie">Got It</button>';
//prepend adds the element as the first child of the element it is being added to.
header.prepend(message);
// append adds the element as the last child of the element it is being added to.
header.append(message);

// inserting multiple copies of the same element
header.append(message.cloneNode(true));

//inserts element before the select object
header.before(message);
//inserts element after the select object
header.after(message);
- append and prepend can be used to move elements
document
.querySelector('.btn--close-cookie')
.addEventListener('click', function () {
message.remove();
});
- styles set using js are added to html as inline styles.
  message.style.backgroundColor = '#37383d';
  message.style.width = '120%';
console.log(getComputedStyle(message));
console.log(getComputedStyle(message).color);

//getting style properties for an element
console.log(getComputedStyle(message));
console.log(getComputedStyle(message).color);
console.log(getComputedStyle(message).height);

message.style.height =
  Number.parseFloat(getComputedStyle(message).height, 10) + 30 + 'px';

document.documentElement.style.setProperty('--color-primary', 'orangered');
const logo = document.querySelector('.nav__logo');
console.log(logo.alt);
console.log(logo.src); //http://127.0.0.1:8080/img/logo.png
console.log(logo.getAttribute('src')); //img/logo.png
console.log(logo.className);

//Cant see designer since its not a known attribute that is found in images
console.log(logo.designer);
//to fetch attributes which are not starndard use
console.log(logo.getAttribute('designer'));

const link = document.querySelector('.nav__link--btn');
console.log(link.href); //http://127.0.0.1:8080/?#
console.log(link.getAttribute('href')); //#
logo.alt = 'Beautiful Minimalised Logo';
console.log(logo.alt); //Beautiful Minimalised Logo
logo.setAttribute('author', 'makau');
console.log(logo.getAttribute('author')); //makau
 <img
          src="img/logo.png"
          alt="Bankist logo"
          class="nav__logo"
          id="logo"
          designer="Benson"
          data-version-number="3.0"
        />
version-number- transformed toversionNumber
console.log(logo.dataset.versionNumber);
logo.classList.add('c');
logo.classList.remove('c');
logo.classList.toggle('c');
logo.classList.contains('c');
logo.className = 'Benson';- It is bad practice to add classes this way as it overrides all the existing classes and only allows for one class
const btnScrollTo = document.querySelector('.btn--scroll-to');
const section1 = document.querySelector('#section--1');

btnScrollTo.addEventListener('click', function (e) {
e.preventDefault();
//get coordinates of the section you want to scroll to
const s1coords = section1.getBoundingClientRect();
console.log(s1coords);

//get coordinates of the button being clicked
console.log(e.target.getBoundingClientRect());

//get current scroll position
console.log('Current scroll: (X,Y)', window.pageXOffset, window.pageYOffset);

//Height/width of website's viewport
console.log(
'Height/width of viewport:',
document.documentElement.clientHeight,
document.documentElement.clientWidth
);

//scrolling
window.scrollTo(s1coords);
});
//Smooth Scroll :Method 1
const btnScrollTo = document.querySelector('.btn--scroll-to');
const section1 = document.querySelector('#section--1');

btnScrollTo.addEventListener('click', function (e) {
  e.preventDefault();
  //get coordinates of the section you want to scroll to
  const s1coords = section1.getBoundingClientRect();
  console.log(s1coords);

  //get coordinates of the button being clicked
  // console.log(e.target.getBoundingClientRect());

  //get current scroll position
  // console.log('Current scroll: (X,Y)', window.pageXOffset, window.pageYOffset);

  //Height/width of website's viewport
  // console.log(
  //   'Height/width of viewport:',
  //   document.documentElement.clientHeight,
  //   document.documentElement.clientWidth
  // );

  //scrolling (This works though not very smooth)
  // window.scrollTo(
  //   s1coords.left + window.pageXOffset,
  //   s1coords.top + window.pageYOffset
  // );

  //smooth scrolling
  window.scrollTo({
    left: s1coords.left + window.pageXOffset,
    top: s1coords.top + window.pageYOffset,
    behavior: 'smooth',
  });
});
- This method works in modern browsers
const btnScrollTo = document.querySelector('.btn--scroll-to');
const section1 = document.querySelector('#section--1');

btnScrollTo.addEventListener('click', function (e) {
  e.preventDefault();
  //get coordinates of the section you want to scroll to
  const s1coords = section1.getBoundingClientRect();
  console.log(s1coords);

  //Method 2 : Modern way
  //Take Element you want to scroll to
  section1.scrollIntoView({
    behavior: 'smooth',
  });
});
- Event is a signal generated by a DOM Node.
- We the use even listeners to capture those events.
- The captured events are then handled using event handlers.
- mouseenter works similar to hover in css, it fires when mouse enters the specified element or section
const h1 = document.querySelector('h1');

h1.addEventListener('mouseenter', function (e) {
  alert('addEventListener: Great, you are reading the heading :D');
});
-
method 2 of attaching event handlers to elements (old school)h1.onmouseenter = function (e) { alert('onmouseenter: Good, you are reading the heading :D'); };
- addEventListener() allows us to add multiple event listeners to the same event.
- We can remove event handler if we dont need it any more.
const alertH1 = function (e) {
  alert('addEventListener: Great, you are reading the heading :D');
//removing eventListener
  h1.removeEventListener('mouseenter', alertH1);
};
//mouseenter
const h1 = document.querySelector('h1');
// mouseenter works similar to hover in css, it fires when mouse enters the specified element or section
h1.addEventListener('mouseenter', alertH1);
<h4 onclick="alert('You clicked here')">
- This method is however not recommended
-
Js Events have a very important property. The Bubbling Phase and Capturing Phase.


-
When a link is clicked in
<a>element, the event is generated at theroot document, Then thecapturing phasehappens as the event travels from theroot documentdown the tree to thetarget element.html -> body -> section -> p -> a elements -
As the event reaches the target element, the
target phasebegins, where events can be handled right at the target. Event Listeners wait for an event to happen on a certain element, and as soon as it happens, they call thecallbackfunction. -
The event then travels up from the
targetto theroot documentin theBubbling Phase.It is said that events bubble up from to the target to the document root.a-> p-> section -> body -> html -
By the default, events can only be handled in the target or in the bubbling phase, however we can set up event listeners to listen to events while in the capturing phase.
-
NOTE: Not all events have capturing and bubbling phase, some are created right on the target element.
-
When an event is said to have capturing and bubbling phases, it is said to have ability to propagate.
const randomInt = (min, max) =>
  Math.floor(Math.random() * (max - min + 1) + min);
const randomColor = () =>
  `rgb(${randomInt(0, 255)},${randomInt(0, 255)},${randomInt(0, 255)})`;
console.log(randomColor(0, 255));
e.targetmeans where the event originatede.currentTargetmeans where the event handler is attached to.
e.stopPropagation();
- After this, event never reaches the parent elements.
- This is however not a very good idea.
- We need to set the 3rd parameter on the
addEventListener()function to true or false
document.querySelector('.nav').addEventListener('click', function (e) {
  this.style.backgroundColor = randomColor();
  console.log('NAV', e.target, e.currentTarget);
},true);
- When the 3rd param is set to true, the addEventListener stops listening to bubbling phase and begins listening to capturing phase.
- By default the 3rd param is set to
false.
document.querySelectorAll('.nav__link').forEach(function (el) {
  el.addEventListener('click', function (e) {
    e.preventDefault();
    const id = this.getAttribute('href');
    // console.log(id);
    document.querySelector(id).scrollIntoView({
      behavior: 'smooth',
    });
  });
});
- This method works well though it isn't efficient.
-
- Add event listener to common parent element
-
- Determine what element originated the event
document.querySelector('.nav\_\_links').addEventListener('click', function (e) {
e.preventDefault();
// console.log(e.target); // find where the event happened.

//Matching Strategy
if (e.target.classList.contains('nav__link')) {
const id = e.target.getAttribute('href');
// console.log(id);
document.querySelector(id).scrollIntoView({
behavior: 'smooth',
});
}
});
- Event delegation is better and efficient.
- Important use case is when there are elements thats are not there when the page loads. E.g Dynamic Buttons
- Walking through the DOM, meaning we can select an element based on another. E.g direct child or direct parent, or in cases we dont know the DOM structure.
const h1 = document.querySelector('h1');

//Using query selector
console.log(h1.querySelectorAll('.highlight')); //selects all elements that are children of h1 with highlight class
console.log(h1.childNodes); //or
console.log(h1.children); // This works for direct children
console.log(h1.firstChild); //When
console.log(h1.lastChild); //#text

console.log(h1.firstElementChild);
h1.firstElementChild.style.color = 'white';
console.log(h1.lastElementChild);
h1.lastElementChild.style.color = 'orangered';
console.log(h1.parentNode);
console.log(h1.parentElement);

//finding the closest parent element
h1.closest('.header').style.background = 'var(--gradient-secondary)';

h1.closest('h1').style.background = 'var(--gradient-primary)';
- We can think of closest as being the opposite of query selector. querySelector selects child elements no matter how deep they are while closest finds parent elements no matter how up they are.
- For some reason, in js we can only select direct siblings i.e
only the previous and the next one.
console.log(h1.previousElementSibling); //null
console.log(h1.nextElementSibling); // <h4>A simpler banking experience for a simpler life.</h4>

console.log(h1.previousSibling);
console.log(h1.nextSibling);

console.log(h1.parentElement.children);
//HTMLCollection(4) [h1, h4, button.btn--text.btn--scroll-to, img.header__img]

[...h1.parentElement.children].forEach(function (el) {
  if (el !== h1) el.style.transform = 'scale(0.5)';
});
- This API allows our code to basically observe changes to the was a certain element intersects another element or the view port.
const header = document.querySelector('.header');
const navHeight = nav.getBoundingClientRect().height;
// console.log(navHeight);
const stickyNav = function (entries) {
  const [entry] = entries; // entries == entries[0] i.e they are the same
  // console.log(entry);
  if (!entry.isIntersecting) nav.classList.add('sticky');
  else nav.classList.remove('sticky');
};
const headerObserver = new IntersectionObserver(stickyNav, {
  root: null,
  threshold: 0,
  rootMargin: `-${navHeight}px`, //90px before target element : 90 is the height
});
headerObserver.observe(header);
- Images have by far the most effect of perfomance of a website.
- To optimize their perfomance, we can then use a strategy called
lazy Loading images.
- Refers to as from the time a website is accessed till the user leaves it.
- Fired by
documentas soon as the html is fully parsed,also all scripts must have downloaded and executed before the DOMCOntentLoaded is executed. - This event only waits for HTML and scripts to load, the rest of the files such as images are not a determinant here.
document.addEventListener('DOMContentLoaded', function (e) {
  console.log('HTML PARSED AND DOM TREE BUILD', e);
});
- We should only put code here that needs the html and scripts to have loaded before executing, or rather code that is dependent on the 2.
-If we have the script tag at the bottom of the html, right above
</body>we do not need to listen for DOMContentLoaded.
- It is fired by the
windowwhen all the files have loaded e.g images, html,css,scripts and any other external resoource.
window.addEventListener('load', function (e) {
  console.log('PAGE FULLY LOADED', e);
});
- It is fired by
windowjust right before the user is about to leave the page. - e.g after clicking the close button in the browser tab.
- We can use these event to introduce the functionality of
asking users if they are sure they want to reload/close the page.
window.addEventListener('beforeunload', function (e) {
  e.preventDefault();
  console.log(e);
  e.returnValue = '';
});
-
<script src="script.js"></script>- Regular Way -
Use async
-
<script async src="script.js"></script>- Using async -
use defer
-
<script defer src="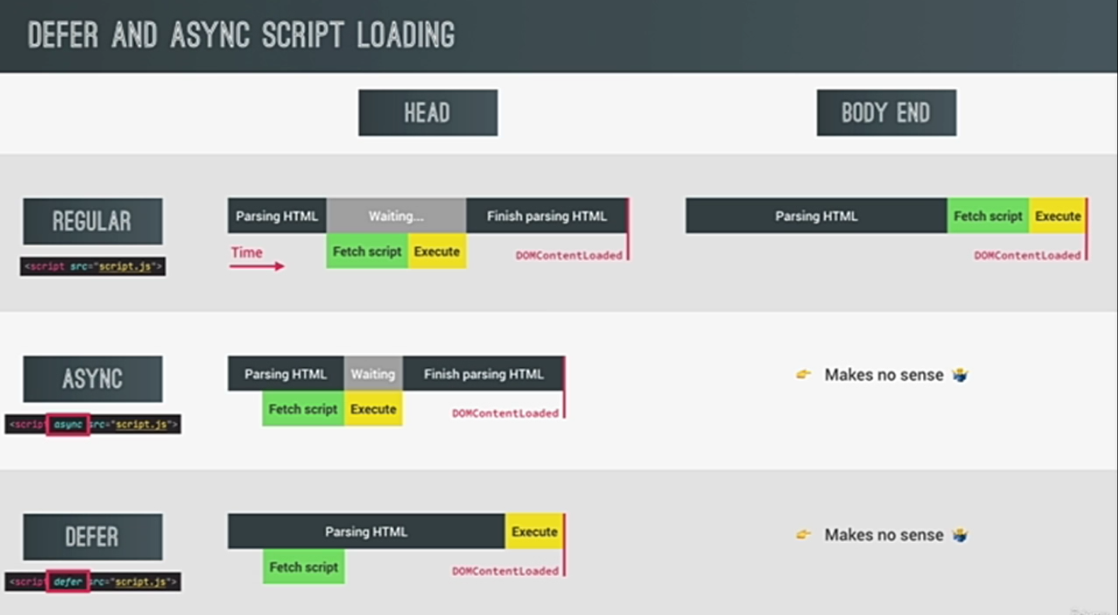 script.js"></script>- Using defer -
In html, we can write js code in the head or body end.

