-
Notifications
You must be signed in to change notification settings - Fork 207
Run Test Suites With Enabling PowerShell Core Remoting Over SSH
- Table of Contents
- Overview
- Prerequisites
- Testing Environment
- Setup PowerShell Core
- Setup SSH Connection
- Run Test Suite on Linux or Windows driver
.NET version of Windows Protocol Test Suites currently can run on Windows and Linux, and we publish .NET FileServer TestSuite, .NET RDPClient TestSuite and .NET RDPServer TestSuite at present.
This guide will show you how to enable PowerShell Core remoting over SSH.
Refer to Prerequisites
- PowerShell Core PowerShell Core only needs to be installed on SUT box, and it needn't to be installed on driver box.
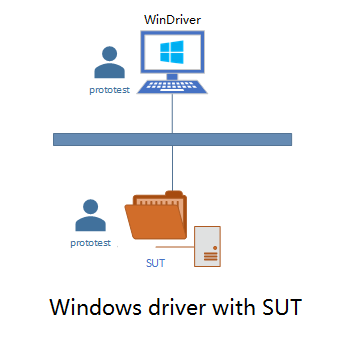
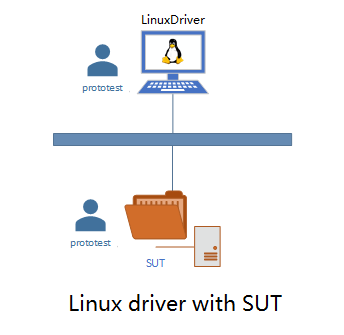
The graph below shows the testing environment used in this guide.


SUT is the machine to be tested against the test suite, and it acts as SSH server and supports PowerShell remoting.
The test suite runs on the Linux machine LinuxDriver or the Windows driver machine WinDriver, and the driver acts as SSH client, and the driver and SUT user we use in this guide called prototest.
Note:
-
In this guide, the users on both driver and SUT are called "prototest". It's fine to use different users on driver machine and SUT. You can use your current users in the driver and SUT.
The only restriction is that, to make sure the SUT user's 'authorized_keys' file under
.sshhome directory is copied from your LinuxDriver or WinDriver user's id_rsa.pub under.sshhome directory.The 'authorized_keys' file and SSH keys are the keys which you will use in Setup SSH keys on driver machine, and they are required for SSH authentication and authorization.
-
If you have many id_rsa.pub from multiple machines or users, append authorized_keys file mentioned in note 1.
In order to establish connection between machines with different operating systems, we leverage PowerShell Core for its cross-platform flexibility.
Download msi installer from PowerShell Core GitHub release page, and install it.
You may refer to the official guide on how to install PowerShell Core in your distribution.
- Windows Server 2012 R2 or later
Since Windows Server 2012 R2, you can download and install OpenSSH-Win64 on Windows.
In native PowerShell, create and run below .\install.ps1 powershell script under the extracted folder from OpenSSH-Win64.zip like C:\OpenSSH-Win64:
# Add C:\OpenSSH-Win64 into 'PATH' environment variable
$mydir = Split-Path $MyInvocation.MyCommand.Path -Parent
$INCLUDE = "$mydir"
$OLDPATH = [System.Environment]::GetEnvironmentVariable('PATH','machine')
$NEWPATH = "$OLDPATH;$INCLUDE"
[Environment]::SetEnvironmentVariable("PATH", "$NEWPATH", "Machine")

# Install sshd
& "$mydir\install-sshd.ps1"

# Fixes user file permisions
& "$mydir\FixUserFilePermissions.ps1"

# Fixes host keys permissions
& "$mydir\FixHostFilePermissions.ps1"

# Start sshd service
Start-Service sshd

# OPTIONAL but recommended:
Set-Service -Name sshd -StartupType 'Automatic'

# Confirm the Firewall rule is configured. It should be created automatically by setup.
Get-NetFirewallRule -Name *ssh*

# There should be a firewall rule named "OpenSSH-Server-In-TCP", which should be enabled
# If the firewall does not exist, create one
New-NetFirewallRule -Name sshd -DisplayName 'OpenSSH Server (sshd)' -Enabled True -Direction Inbound -Protocol TCP -Action Allow -LocalPort 22

# Set OpenSSH as powershell default shell
New-ItemProperty -Path "HKLM:\SOFTWARE\OpenSSH" -Name DefaultShell -Value "C:\Windows\System32\WindowsPowerShell\v1.0\powershell.exe" -PropertyType String -Force

# Restart sshd service
Restart-Service sshdThe sshd configuration file is located at %ProgramData%\ssh\sshd_config, by default, it is C:\ProgramData\ssh\sshd_config.
Edit the file:
Enable key authentication:
PubkeyAuthentication yes
Add a PowerShell subsystem entry:
Subsystem powershell C:/PROGRA~1/PowerShell/7/pwsh.exe -sshs -NoLogo
Please adjust the path of PowerShell binary if you are not using the default one.
Comment below content:
#Match Group administrators
#       AuthorizedKeysFile __PROGRAMDATA__/ssh/administrators_authorized_keys
After editing the SSH server configuration file, restart the sshd service.
-
Generate a new SSH key on Linux or Windows driver machine
Open terminal or command line, and invoke
ssh-keygento generate the key. The generated keys are located in~/.ssh/directory on Linux or under%HOME%\.sshdirectory on Windows.Note:
-
In order to use ssh-keygen.exe and ssh.exe on Windows driver machine, you can just extract OpenSSH-Win64.zip to
C:\and addC:\OpenSSH-Win64into 'PATH' environment variable. -
If you are Linux driver, you need to set permission
chmod 0600 -R ~/.sshto use PowerShell Core remoting. -
In order to automate the PowerShell Core remoting without host key interactive confirmation, you need to create a 'config' file under
~/.ssh/directory on Linux or under%HOME%\.sshdirectory on Windows.Host * StrictHostKeyChecking no UserKnownHostsFile=/dev/null
-
-
Copy the public key to SUT
Linux driver:
Use the following command to copy SSH key:
ssh-copy-id prototest@SUT
Windows driver:
Windows SUT:
Copy SSH key from
%HOME%\.ssh\id_rsa.pubon Windows driver to%HOME%\.ssh\authorized_keyson Windows SUT.This will grant access by adding the public key to the
%HOME%\.ssh\authorized_keysfile on Windows SUT.Linux SUT:
Copy SSH key from
%HOME%\.ssh\id_rsa.pubon Windows driver to~/.ssh/authorized_keyson Linux SUT.This will grant access by adding the public key to the
~/.ssh/authorized_keysfile on Linux SUT.
Once the key has been copied, you can use public key authentication to login to the SUT machine from the Linux driver or Windows driver machine. You can verify the connectivity using SSH.
ssh prototest@SUTThis should succeed and you are now in a Windows shell.
And open a PowerShell Core instance.
Enter-PSSession -HostName SUT -UserName prototestUsing this command, you are able to login to the SUT machine using PowerShell Core from Linux or Windows driver machine.
We can run .NET version of Test Suite like .NET FileServer TestSuite on Windows or Linux driver.