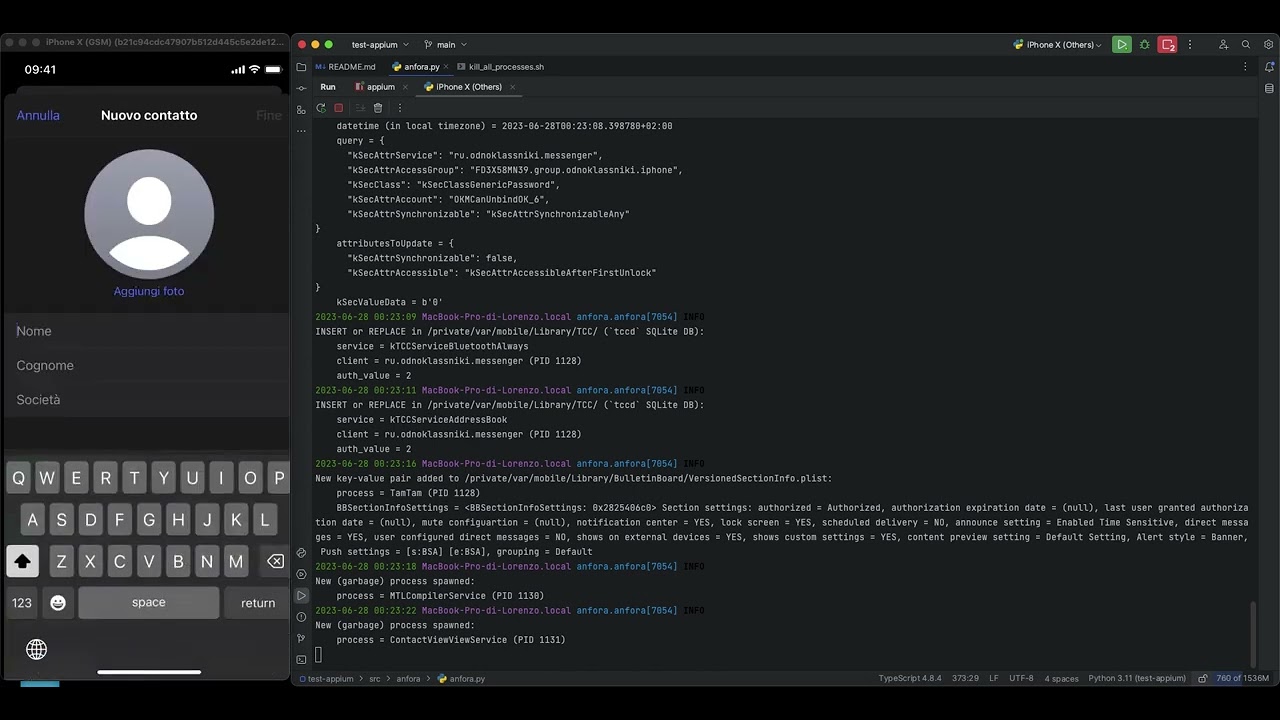
A tool for the Automated Forensic Analysis of iOS Applications. In particular, AnForA automates most of the activities that need to be carried out to forensically analyze iOS applications, and that has been designed in such a way to yield various important properties, namely fidelity, artifact coverage, artifact precision, effectiveness, repeatability, and generality.
- Installing and uninstalling apps
- Changing location
- Dumping files and their metadata before and after each sub-experiment over SSH
- Generating
pcapfiles for each sub-experiment - Attaching to all user-spawned processes
- Detecting all paths (Data and AppGroup containers)
- Using Appium for UI automation
- Partially reverting sub-experiment writings on the file system
- Partially handling third-party writings (e.g., application permissions)
-
Advance Action File Generator (AAFG)
An interactive GUI that mirrors the iPhone screen. During user interaction, it generates the action file with appropriate sleep times,ifstatements and functions. -
Add an option (like
--test) to test the generated (or written) action file without dumping, sniffing, or hooking, only performing FS revert. -
Get paths dynamically
-
Remove all
TODO
This means that IT DOESN'T WORK on other iDevices. Because Appium sometimes taps the screen using coordinates. They are hardcoded to adjust this PoC to your iPhone you can change these coordinates.
- Clone this project
git clone --depth=1 -j8 https://github.com/miticollo/poc-anfora.git cd poc-anfora - Download NodeJS dependencies
npm -ddd install
- Install
pipdependenciesbrew -v install cairo gobject-introspection
- Download Python dependencies
pip -vvv install --upgrade -r requirements.txt
- Choose Xcode version if you want to build WDA app, otherwise skip this step
export DEVELOPER_DIR=/Applications/Xcode.app/Contents/Developer # Adjust path if necessary
- Run Appium server
npx appium server --session-override
-
Open a new terminal window and choose appropriate options to properly run the PoC.
-
If you have already installed the WDA app you can run the Python script without any particular options on all supported OSs:
python ./src/main.py UDID -o DUMP_PATH
To find
<UDID>, you can useidevice_id -l. -
If you have not already installed the WDA app and
- your OS is macOS
The procedure to retrieve your
python ./src/main.py UDID -o DUMP_PATH -b it.uniupo.dsdf.WebDriverAgentRunner --team-id <TEAM_ID>
<TEAM_ID>depends on whether you are enrolled in the Apple Developer program or not. If you are enrolled in the program, you can follow this guide to find your<TEAM_ID>. However, if you have a free account, you must create a blank project with Xcode and then runutility/devteamid.shwith the Apple ID that you used to create the previous project. When you create a new project, Xcode downloads a provisioning file and generates an identity (certificate + private key). TheOrganizational Unit (OU)attribute in this X.509 certificate is set to<TEAM_ID>and it is assigned to you by Apple. Remember that<TEAM_ID>is unique and immutable, so save it for future uses. You can also find this certificate by exploring the Keychain app, in particular looking inlogin.keychain. - your OS is not macOS
- Follow below instructions to prepare a Docker container with macOS.
- Open Xcode
open -a /Applications/Xcode.app # Adjust path if necessary - Add your Apple ID to Xcode.
Go to
Settings>Accounts. - Create a blank project using the Apple ID you have just added to Xcode.
Note
This step is FUNDAMENTALLY because without it, you can't useutility/devteamid.shgiven that there is no identity in Keychain. - Close Xcode.
- Pass through iPhone to container
- Unlock the
login.keychain. Add the following command before Appium server start command.security -v unlock-keychain -p PASSWORD login.keychain && npx appium server --session-overrideWarning
This permits the build over SSH without GUI. - Finally run
to (re)install the WDA app. Find your
python ./src/main.py UDID -b it.uniupo.dsdf.WebDriverAgentRunner --team-id <TEAM_ID> --install-wda-only
TEAM_IDusingutility/devteamid.shwith the Apple ID that you used for Xcode. - Shutdown the container. Now you can use Linux or Windows!
Note
Ifappiumserver fails with error:Failed to register bundle identifier: The app identifier "it.uniupo.dsdf.WebDriverAgentRunner.xctrunner" cannot be registered to your development team because it is not available. Change your bundle identifier to a unique string to try again.You can fix it with the option[-b BUNDLE_ID]. - your OS is macOS
-
To support other operating systems, we will use Docker, specifically this project. Please note that I have only tested this project on Linux. However, the project also provides instructions for Windows.
I'll show what you must do on your host and on macOS separately.
Note
I used Manjaro as Linux Distro.
The information for the project that I linked before is extensive, so here are the main steps with some additions:
- Setup Linux to pass through iPhone to container.
If you want to use an SSH session, you can install
sshpasson your Linux machine using a package manager such asyum,apt-get, orpacman, depending on your distribution. For example, in my case, I used the following command:Then, run the following command to establish an SSH connection:yay -S sshpass
# adjust the values to match your environment
sshpass -p <password> ssh -v user@localhost -p 50922
Warning
You need to enable remote login in the virtual macOS first. - Initial setup
- Choose a macOS release. I chose Ventura.
To increase verbosity, you can pass the global option
-lwith the argumentdebugtodocker. Pass the option--name 'anfora_appium'to correctly identify our container. - In another terminal window start a TCP listener on port 3000 using
socat, a more versatile and powerful networking tool thanncIn this way any incoming connections will be forked into a new process (socat TCP-LISTEN:3000,reuseaddr,fork -
forkoption), so that multiple clients can connect simultaneously. The-at the end specifies that data from the connection should be written to the standard output. We will use it as shared clipboard between host and guest if necessary. - If you have shut down the container, you can restart it by running:
docker -l debug start -ai "$(docker ps -a -f 'name=anfora_appium' -q)"Note
This command lists all containers (running and stopped) and filters the output based on the container name. It then prints only the short UUID identifier using the-qoption, which is used as input for thedocker startcommand.
Now some instruction to set up macOS. These commands will be run inside container, so they are independently of host OS (Windows or Linux).
-
After boot, you are in recovery mode. If necessary change the language otherwise the OS will be installed with the current language: English(US). To do this:
File>Choose Language... -
After installation - when desktop appears - you can run some commands to optimize macOS:
- Disable heavy login screen wallpaper
- Reduce Motion & Transparency
- Disable screen locking
- Show a lighter username/password prompt instead of a list of all the users
If you want you can also choose others optimizations.
-
To connect to the previously started listener, open a terminal and run the command
nc 172.17.0.1 3000. -
In another terminal window and run
gitto install Command Line Tools for Xcode. This doesn't install Xcode. -
To install Xcode, we will use a CLI tool called
xcodesfor two reasons:- this app automatically manages two or more different versions of Xcode and
- another advantage is that
xcodescan usearia2, a CLI tool to speed up the download of Xcode.
Every version of Xcode comes with its own SDK version, which means that you need to install an old version of Xcode to use an old SDK version. For example, if you want to install the latest version of Xcode from the App Store and also need version 11.7 to compile your app for iOS 12+ and arm64e, you can download Xcode 11.7 from here. The file you download is a
.XIParchive that you can extract using Archive Utility. Before moving it to/Applications, make sure to rename the.appfolder to avoid conflicts withXcode.app, which is the latest version.xcodesdoes all of this for you automatically. Furthermore,aria2uses up to 16 connections to download files, making it 3-5x faster than URLSession.brew -v install robotsandpencils/made/xcodes aria2 # Adjust XCODES_USERNAME and XCODES_PASSWORD to use your Apple ID XCODES_USERNAME="20024182@studenti.uniupo.it" XCODES_PASSWORD="..." xcodes install --latest --experimental-unxip --empty-trash
This step takes a long time, so in the meantime, you can continue with the next step.
Note
It is not possible to passXCODES_USERNAMEandXCODES_PASSWORDto the container withdocker runoptions-eand--env-file, because Docker-OSX creates a Docker container based on ArchLinux, then installs in it QEMU. This is necessary because Docker-OSX uses another project called OSX-KVM under the hood.
To prove that an ArchLinux Docker container is used under macOS, we can use the following Bash command inside the container:docker exec -it 'anfora_appium' bash -c 'grep -e vmx -e svm /proc/cpuinfo'
This command checks if a requirement is met.
-
To install Python we will use
pyenva version manager with two important feature:-
it automatically retrieves, compiles and installs a specific Python version and
-
you can choose a specific version per project.
- Install
pyenvand set up the build environmentbrew -v update brew -v install pyenv openssl readline sqlite3 xz zlib tcl-tk
- Show hidden files
defaults write com.apple.Finder AppleShowAllFiles true killall Finder - Add autocompletion and shims to your shell environment
and follow instructions.
pyenv init
- Install the current latest Python 3 version, in my case 3.11.4
To list all supported Python version you can run:
pyenv install -v 3.11.4
pyenv global 3.11.4
pyenv install -l. This list can be updated every time that apyenvupdate is available.
- Install
-
-
We have almost done! We haven't yet install
npmused by frida and Appium indeedappiumserver and its drivers are NodeJS programs. To install and manage it we will use a CLI tool callednvmwhich is a manager likepyenv.- Install it with this bash command.
- Verify installation
command -v nvm - Install the latest NodeJS and
npmversion:nvm install --latest-npm
- To set the latest version of NodeJS as the default one:
nvm alias default node
-
Install
usbfluxdto replaceusbmuxdsocket file to connect iPhone from host to container over network. -
Enable parallel building
echo '' >> ~/.zprofile
echo PATH=\"$(brew --prefix make)/libexec/gnubin:\$PATH\" >> ~/.zprofile
then restart shell.
-
Done! Go to previously section.
I had to add this capability, which was introduced in 2016; otherwise PoC would have failed inside the container during WDA installation.
This is because macOS has fewer resources, which causes xcodebuild to take longer to finish.
During compilation, the appium server continuously pings WDA, but it only sends a response when it is installed and running on iOS.
If the wdaLaunchTimeout (which has a default value of 60000 ms or 1 minute) expires before the app starts up on iOS, the appium server tries to start a session anyway, even if it's unsuccessful.
To avoid this, WebDriverAgent has a capability to change this timeout.
I increased this value to 3 minutes, but if this is not sufficient, you can increase it using the short option -t of src/main.py.
In particular, when using the iOS driver, Appium tries to connect once every 0.5 seconds (500 ms), until wdaLaunchTimeout is up.
More precisely, when wdaLaunchTimeout is 3 minutes (180000 ms), there will be 360 pings because 180000 / 500.
However, every ping times out after 1 second (1000 ms), so there will be at most 180 effective pings.
A possible solution is to plan two different ways to integrate the Docker container:
- Manual mode: The user pulls the Docker container and installs the WDA app using the long option
--install-wda-only. - Automatic mode: The tool pulls the Docker container for the user and installs the WDA app using SSH. This option requires the AnForA team to create a customized container of the Docker-OSX project. The user will need to provide their Apple ID and password for Xcode installation.
The main difference between these two approaches is that the first one can be done at any time, unlike the second one.