api-gateway-serviceproject established by combination of the following services and features
 * api-gateway
 * payment-service
 * student-service
 * swagger-application
 * openai-service
 * service-registry
 * Spring Cloud Gateway
 * SpringDoc Swagger
 * Event Driven Architecture with RabbitMQ
 * micrometer-tracing dependencies to track the logs
 * Postman collection to test by using Postman
 * Keycloak integration is completed under the payment-service
 * Feign Client secure call with Keycloak integration is completed under the student-service
 * MDC was added to improve logging between microservices
 * Google reCAPTCHA was added to secure endpoint calls
 * HCaptcha repo migration is completed under the student-service
 * openai-service repo migration is completed
 * Spring Cloud Eureka Server and Client integrations are completed with service-registry repo
 * KubernetesDeploymentGuide.md is added
- To get a local copy up and running please follow these steps
- Followings should be installed and links for how to install them
- Java 21 or higher How to install Java
- Set
JAVA_HOMEto 21 ->export JAVA_HOME=$(/usr/libexec/java_home -v 21)
- Set
- Maven How to install Maven
- Docker How to install Docker
- Postman can be installed (OPTIONAL), follow how to import postman collection to import files that are under the postman_collection folder
- Create a new secret key via this url, copy the value, and add it
as
YOUR_API_KEY_HEREvalue in the .env
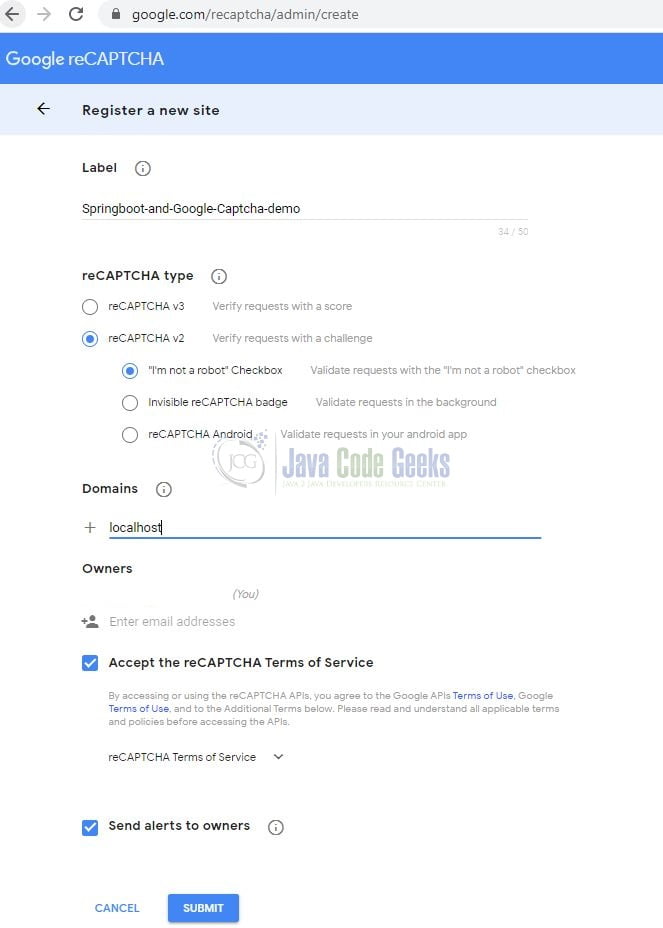
- Google reCAPTCHA installation (OPTIONAL)
- Log in to the https://www.google.com/recaptcha/admin/create
- Fill the necessary fields.
- This url can guide you
- Copy
SITE_KEYandSECRET_KEYand add them into related fields that are in the .env
- HCaptcha integration was implemented in 4 different ways in HCaptchaController.java (OPTIONAL)
- Java 21 or higher How to install Java
- Clone the repo
git clone https://github.com/musabbozkurt/api-gateway-service.git
-
Run all services
- (OPTION 1)
- Run
docker-compose --profile start_application up -d --buildcommand in the docker-compose.yml directory
- Run
- (OPTION 2)
- Enable spring.docker.compose property and just run ApiGatewayApplication.java to install RabbitMQ, PostgreSQL and Keycloak
- Run
mvn clean installormvn clean packagecommand under each service's directory - Run
mvn spring-boot:runcommand under each service's directory
- (OPTION 1)
- Log in to http://localhost:9090/admin with
username:adminandpassword:adminCreate realm--> Import payment-service-realm-export.jsonClients-->payment-service-->Credentials-->Regeneratecopy the value and add it asPAYMENT_CLIENT_SECRET_ENVvalue in the .envUsers-->Add user-->Username-->payment-service-userUsers-->payment-service-user-->Credentials-->Set passwordtotestand turn offTemporarytoggleUsers-->payment-service-user-->Role Mapping-->Assign roleaddadminrole- Restart
student-serviceto fetchPAYMENT_CLIENT_SECRET
-
Additional information to access endpoints, swagger and actuator
- Swagger: http://localhost:8080/swagger-ui.html
- Open
Swagger--> selectPayment Servicedefinition --> ClickAuthorize- Enter the following credentials into the pop-up window
username:payment-service-userpassword:testclient_id:payment-serviceclient_secret:PAYMENT_CLIENT_SECRET_ENVvalue in the .env

- Click
Authorizeto get token - Click
Closeand test the services
- Enter the following credentials into the pop-up window
- Open
- Actuator: http://localhost:8080/actuator
- Eureka: http://localhost:8761/
- Swagger: http://localhost:8080/swagger-ui.html

- Kubernetes Deployment Guide (OPTIONAL)