This project is aimed at giving Robox users the option of using different slicers, apart from the default Cura Engine.
These instructions will allow you to run Slic3r from within AutoMaker.
Mac OS X: You must have a copy of AutoMaker, and a copy of Slic3r.
Windows (experimental): You must have a copy of AutoMaker, and a copy of Slic3r. Slic3r must be installed at "C:\Program Files\Slic3r".
You must also note that using this software may void your Robox warranty.
Download robox-extensions-installer.jar and run it with
java -jar robox-extensions-installer.jar
Download this repository, and double click "Robox-Windows launch Installer here.cmd".
The instructions above will do these steps for you:
- copy CuraEngine to CuraEngine_orig (if not already exist)
- download CuraEngine and slic3r_postprocess.pl to the right paths
- and download Robox_slic3r_config_bundle.ini to /Slic3r/Config for your convenience
You will need to do the following steps manually:
- Open Slic3r, and choose "Load Config Bundle..." from the File menu.
- Choose "Robox_slic3r_config_bundle.ini" from the slic3r/config directory.
You should now see that you have some new presets for Print Settings, Filament Settings, and Printer Settings, all of which have "Robox" in the name.
Now close slic3r. It will reopen when you try to print something in Automaker.
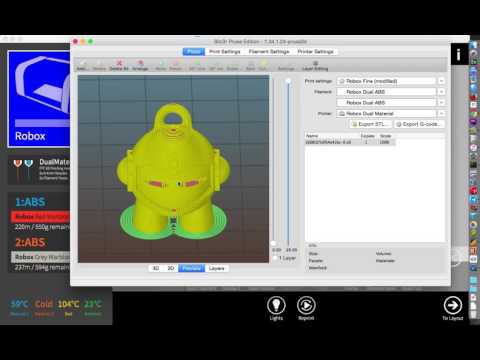
To use the new slicing engine, open AutoMaker, and load an STL to print.
Click "To Settings", and then click "Make".
Slic3r will now open. Ensure that your Robox settings are chosen for Print settings, Filament Settings, and Printer Settings.
Change the slicing parameters, choose Preview to see how it will look once printed, and ensure that you're happy with the layout.
Choose "Export G-code..." from the Plater window, this will automatically export the code to the right place.
Now close Slic3r by pressing the red close button on the top left corner of the window.
Automaker will now postprocess the code, and start the print.
You can see the process here:
This code should be considered beta code, it has been tested a fair bit on Mac OS X, but the Windows port is extremely experimental, and may not work. Use at your own risk.
Get the latest maven (https://maven.apache.org/download.cgi).
From command line go to java/robox-slicer-extension and type:
mvn clean install
When it finishes in java/robox-slicer-extension/robox-slicer-control/target and java/robox-slicer-extension/robox-slicer-flow/target you can find two jar files like:
original-robox-slicer-control-1.0-SNAPSHOT.jar
robox-slicer-control-1.0-SNAPSHOT.jar
The bottom one is 'executable' jar. In IDE's you don't need any of it. Just import it as maven project (from the top: java/robox-slicer-extension) find 'Main' class in both projects (robox-slicer-control and robox-slicer-flow) and run that class. IDE will do the rest of setting up classpath, etc...
- Linux compatibility is not yet completed.
- Windows compatibility is experimental.
- Ben Hitchcock - Initial work
- Daniel Sendula - Installer functionality
- Benraay - Java port of postprocessor script
This project is licensed under the GNU GPL v3.0 License - see the LICENSE.txt file for details