This folder contains several project examples for use with the Onethinx OTX-18 LoRa(WAN) module.
These projects combine the Visual Code setup for code editing with the magnificent PSoC Creator Schematic Editor & Design Wide Resources Editor for chip setup.
- PSoC Creator installation
- Download PSoC Creator from here or from the official Infineon PSoC Creator page
- Download PDL 3.1.7 from here or from the official Infineon PSoC Creator page
- Install PSoC Creator (after installation, check the bottom checkbox to continue without registration information)
- Install PDL 3.1.7
- Run PSoC Creator and set the freshly installed PDL by
TOOLS->OPTIONS->PDL v3 (PSoC6 devices) location:->C:\Program Files (x86)\Cypress\PDL\3.1.7
- Visual Studio Code + OTX Maestro extension installation
- Download and install the Visual Studio Code IDE
- Follow the instructions in the link to install the OTX Maestro Tools & Extension
- Clone
https://github.com/onethinx/Onethinx_Project_Examples.gitor download and unpack the Example Projects to your local machine.
This step is only needed when you need to change the chip configuration.
- Start PSoC Creator
- Open the Onethinx_Creator.cywrk workspace (File >> Open >> Project/Workspace)
- The PSoC Schematic Editor and the Design Wide Resources can be accessed at the left 'Workspace Explorer' pane:
..Onethinx_Project_Examples\Example_X\Onethinx_Creator.cydsn\Onethinx_Creator.cywrk

- After the changes to the chip configuration are done, build the Onethinx Creator project (Build >> Build Onethinx_Creator or Shift + F6)
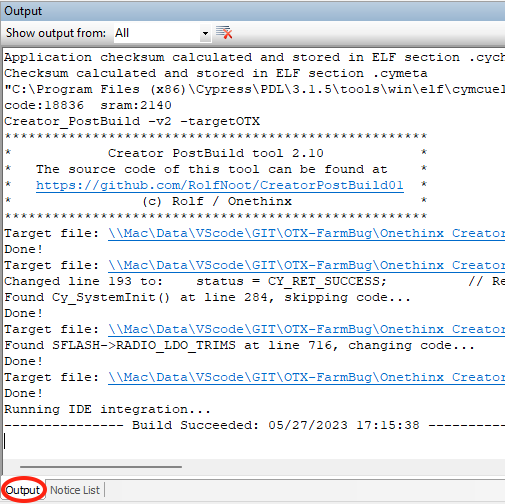
- Make sure the project builds well from the output tab and the Creator_Postbuild has run:
- The chip configuration is done and PSoC Creator may be closed.

- Start Visual Studio Code
- Load the project by selecting the project folder (File >> Open Folder):
For example:....\Onethinx_Project_Examples\Example_HelloWorld - The following buttons in the statusbar can be used to configure, build and debug the project.

- As the project has not run on the PC before, it needs to be Clean-Reconfigured before it can be built. Hit the
Clean-Reconfigurebutton from the status bar at the bottom of VS Code - After successfull configuration (the terminal window will show: "Terminal will be reused by tasks, press..." when ready), the project can be Built and Launched from the debugger.
Make sure the device is connected to the debugger and PC before launching the debug session
Hit theBuild-And-Launchbutton from the status bar at the bottom of VS Code to start programming and debugging the code.
