-
Notifications
You must be signed in to change notification settings - Fork 14
Building OpenFrames on Mac
The OpenFrames build process can be broken down into four main steps:
- Download and configure the dependencies
- Create the build system using CMake
- Build OpenFrames
- Run OpenFrames
The first two steps are generally "one-time" processes that are performed immediately after downloading the OpenFrames repository. They result in a build system (e.g. Visual Studio solution or makefiles) that will intelligently rebuild OpenFrames components as needed when source or configuration files are changed.
Below are step-by-step instructions on how to perform the aforementioned steps along with the background requirements that are needed before beginning.
- used to generate build system
- used 3.12 as tested
- version 2.7.9 or greater
- version 7.2 or greater
(Optional) Winteracter Open Motif
- used if you want to to build the Winteracter demo
- download the latest static library for your architecture (64-bit) and place it in a convenient location
- it is recommended to place it in the Winteracter lib directory (e.g.
lib.ifi64) next to the existing Winteracter libraries
- clone the OpenFrames repository
- when checking out, ensure you have selected the "develop" branch instead of the "Master" branch
- the root OpenFrames folder will be referred to as
[OF_FOLDER]on this page
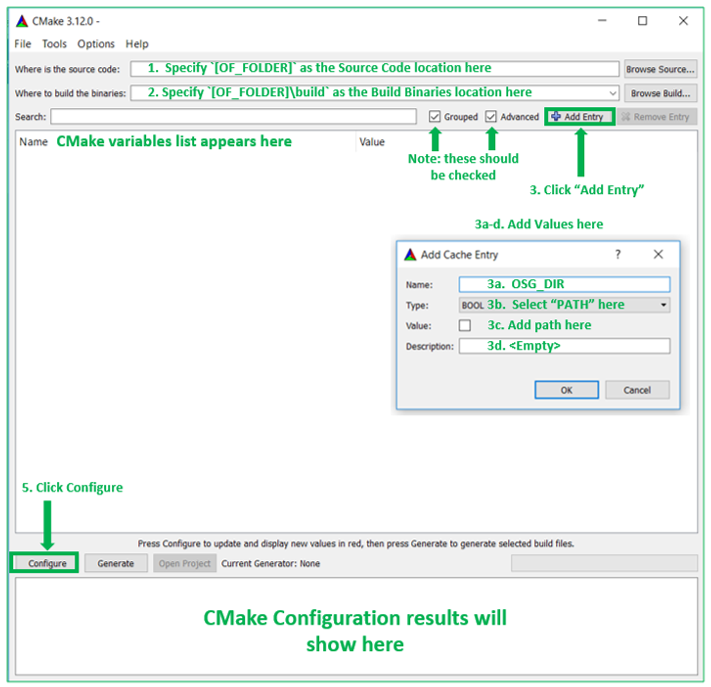
The following steps correspond to the numbered arrows in Figure 1 below.
In CMake:
- Specify
[OF_FOLDER]as the Source Code location. - Specify
[OF_FOLDER]\X11-buildas the Build Binaries location.
- Note: CMake makes slashes forward slashes
- Click Add Entry and specify the following:
-
Name=OSG_DIR -
Type=PATH -
Value= Path to your[OSG_FOLDER]\X11-installdirectory -
Description= empty
- (Optional) If you want to build the Winteracter example, click Add Entry and specify the following:
-
Name=WINTER_ROOT -
Type=PATH -
Value= Path to your Winteracter\wintdirectory, eg:C:\Users\John\Documents\wint -
Description= empty
- Press the Configure button
- say Ok if you are asked to create the
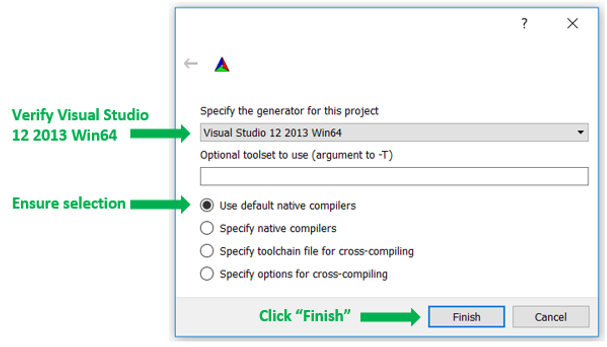
X11-buildfolder - verify the default generator choice or choose a different one
- check Use default native compiler (See Figure 2)
- select unix makefiles as the build system
- click Finish
Figure 1 : CMake GUI

Figure 2 : CMake Specifications

Note: If you get a CMake error OpenSceneGraph NOT FOUND, make sure you specified OSG_DIR correctly (Step 3 above).
Note: If you get a CMake warning Open Motif NOT FOUND, see below to set the path to libXm if you want to build the Winteracter demo.
- Set CMake variables
- the configure process sets up build variables that can be modified before generating the actual build system
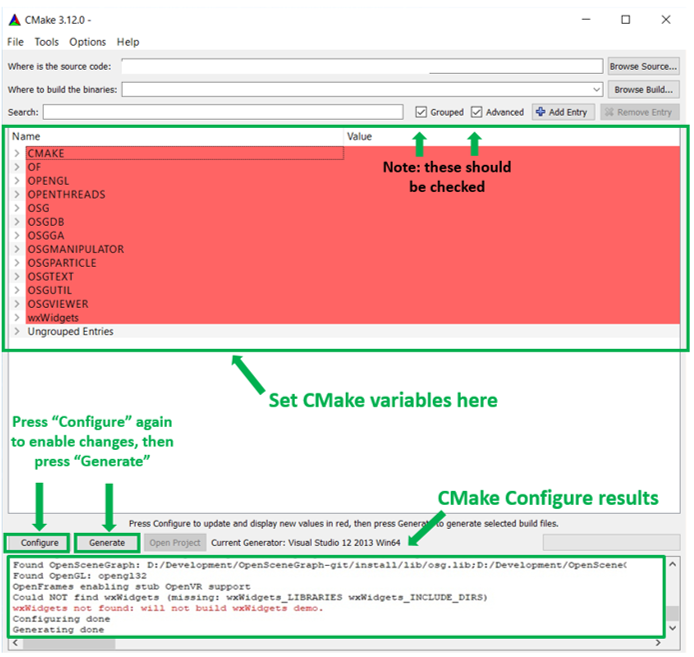
- the variable list can be organized by clicking the Grouped button. Set the following variables: (See Figure 3)
-
CMAKE_INSTALL_PREFIX=[OF_FOLDER]\OpenFrames-Darwin-install - Select
OF_FORTRAN_MODULEto build the Fortran interface and Winteracter example - (Optional) Use
CMAKE_LIBRARY_PATHto specify the directory containing Open Motif (libXm) if you are building the Winteracter example, only needed if you did NOT placelibXmnext to the installed Winteracter libraries
-
- Finally, create the build system
- press the Configure button again to enable the variable changes you just made
- press the Generate button to create the build system
- exit CMake
Figure 3 : CMake Variables

In Terminal:
- Go to the
[OF_FOLDER]\X11-buildfolder. - Type
makeormake -j NwhereNis the number of cores your computer has. - Type
make installto install the compiled OpenFrames into the[OF_FOLDER]\OpenFrames-Darwin-installfolder - Confirm that the
test1executable is in[OF_FOLDER]/X-11-Darwin-install/bin
In Terminal:
- Add the following to your
.bash_profile(or equivalent) login file:
export OF_ROOT=/path/to/OpenFrames-Darwin-install
export DYLD_LIBRARY_PATH=$DYLD_LIBRARY_PATH:$OF_ROOT/lib- Open a new Terminal window (so the above changes take effect).
- Go to the
OpenFrames-Darwin-install/binfolder and type./test1 - XQuartz will launch (if not already running), and an OpenFrames expample should run.
Congratulations, OpenFrames is now built and installed.