Run Another OS on your RPi as a Virtualized QEMU Guest under KVM
Efficiently run a second operating system as a virtualized guest on your RPi4 or RPi3, using QEMU with KVM acceleration!
Because version >=1.2.2 of the gentoo-on-rpi-64bit image ships with KVM enabled in the kernel, you can easily leverage this to efficiently run additional 'guest' operating systems on your RPi3, using QEMU as the virtualizer.
In this tutorial, I'll run through how to start up the following (which you can obviously adapt as required):
- hardware: RPi3 (B or B+) or RPi4 B;
- 'host' OS: >= v1.3.0 of this bootable gentoo-on-rpi-64bit image;
- 'guest' OS: the latest official 64-bit aarch64 cloud image of Ubuntu Server 18.04 LTS ('bionic beaver') (cloud images are deliberately minimal, so well suited for our needs);
- virtualizer:
app-emulation/qemu-3.0.0 - BIOS: tianocore aarch64 EFI;
- cores: 2 out of the 4 available;
- memory: 256 MiB memory allocation (from the RPi3's 1GiB; you can allocate more on higher memory RPi4 models);
- console-only setup, no graphics, SPICE etc. (easy to add if you want);
- pass-through networking enabled (so you can apt-get from the guest, etc.);
-
cloud-init
NoClouddata source set up, to provide the initial machine name, ubuntu user's password etc. - running as the regular user (
demouser), notroot.
Just before we dive in, a brief introduction to terminology may be in order. KVM (here) stands for "Kernel-based Virtual Machine": a virtualization infrastructure for the Linux kernel that turns it into a hypervisor. This technology, together with some userspace "glue" (here, QEMU), allows two (or more) distinct operating systems to efficiently, and securely, share a common SoC. Unlike emulation, both host and guest run almost all instructions natively (without translation). And unlike a chroot, this arrangement allows both host and guest to run distinct kernels (and init systems). A short intro to KVM on ARM may be found here (this is for 32-bit v7, but the 64-bit v8 code is not too different, so the concepts are still relevant).
Begin with your gentoo-on-rpi-64bit system booted to the graphical desktop, with network connectivity established.
Then, open a terminal, and working as the regular user (demouser), issue:
demouser@pi64 ~ $ mkdir -p qemu-test && cd qemu-testNext, collect the various pieces of software needed to boot the guest. The first is an EFI BIOS. Here, we'll use the latest aarch64 (aka arm64) tianocore image from Linaro. Issue:
demouser@pi64 ~/qemu-test $ wget -c http://snapshots.linaro.org/components/kernel/leg-virt-tianocore-edk2-upstream/latest/QEMU-AARCH64/RELEASE_CLANG35/QEMU_EFI.fdThe firmware image is 2MiB so shouldn't take long to download.
Note that for simplicity, we'll not set up the ability for persistent EFI variables in this demo (see here for instructions on how to do so).
Next, download the latest Ubuntu 'bionic' (18.04 LTS server) arm64 cloud image. Issue:
demouser@pi64 ~/qemu-test $ wget -c https://cloud-images.ubuntu.com/bionic/current/bionic-server-cloudimg-arm64.imgFeel free to substitute a different target OS or version if you like!
The exact size of this image will depend upon what is 'current' when you try it, of course, but at the time of writing it was ~300MiB, so the above download may take a little time, depending on the speed of your network connection.
Also note that although the image is already in QEMU QCOW2 format, we won't use it for booting directly, as we may want to start various fresh instances (and the copy we boot will be modified once used, since it encapsulates a writeable root filesystem). Instead, we'll make a copy, using this image as the basis. The gentoo-on-rpi-64bit image already contains app-emulation/qemu pre-installed, so issue:
demouser@pi64 ~/qemu-test $ qemu-img create -f qcow2 -b bionic-server-cloudimg-arm64.img bionic-image-01.imgto create a derivative 'instance' QCOW2 image (bionic-image-01.img), backed by the 'master' copy you just downloaded. (you can do this as many times as you like).
Now, as is now common with such 'cloud' images (not just from Ubuntu), no 'out of the box' login credentials, hostname etc. are configured. The chicken-and-egg problem this obviously creates is solved through the use of the cloud-init service (pre set-up to run on boot). Inter alia, this will look for configuration data stored in a specially named (viz.: 'cidata') iso9660 filesystem, and if found uses it to set up initial passwords and so forth.
Following these notes, we'll just create a bare-minimum NoCloud data source here. Issue:
demouser@pi64 ~/qemu-test $ { echo instance-id: kvm-bionic-01; echo local-hostname: kvm-bionic; } > meta-data
demouser@pi64 ~/qemu-test $ printf "#cloud-config\npassword: passw0rd\nchpasswd: { expire: False }\nssh_pwauth: True\n" > user-data
Double-check the contents of the files just created, as they are essential for boot; issue:
demouser@pi64 ~/qemu-test $ tail -n +1 *-data
==> meta-data <==
instance-id: kvm-bionic-01
local-hostname: kvm-bionic

==> user-data <==
#cloud-config
password: passw0rd
chpasswd: { expire: False }
ssh_pwauth: True
These files (when suitably packaged) will instruct cloud-init to:
- Set up an instance called
kvm-bionic-01, with hostnamekvm-bionic. - Set the password for the
ubuntu(default) user topassw0rd(adapt if desired), ensure it has no expiry, and allow it to be used for login viassh.
More sophisticated configs are possible of course (setting up public keys for
sshlogin etc.) but this isn't a tutorial oncloud-init, so we won't use them ^-^
Next, to be able to package the config data, we need a utility called mkisofs; this is part of the app-cdr/cdrtools package (covered by virtual/cdrtools), which is not shipped with the gentoo-on-rpi-64bit image by default, but is available on the binhost. So to install it, issue:
demouser@pi64 ~/qemu-test $ sudo emerge --verbose --noreplace virtual/cdrtoolsThis shouldn't take long to complete. Once done, you can proceed to build the specially named iso9660 image; issue:
demouser@pi64 ~/qemu-test $ mkisofs -o seed-kvm-bionic-01.iso -V cidata -J -rock user-data meta-dataHint: on some distributions (although not Gentoo, yet)
mkisofshas been replaced bygenisoimage, which has a slightly different invocation syntax.
Your qemu-test directory should now look as follows:
demouser@pi64 ~/qemu-test $ ls
QEMU_EFI.fd          bionic-server-cloudimg-arm64.img  seed-kvm-bionic-01.iso
bionic-image-01.img meta-data user-dataThat's the preparation over, we can now boot the image! Make sure your RPi3/4 isn't too heavily loaded, then run (still as the regular user, in the qemu-test directory):
demouser@pi64 ~/qemu-test $ qemu-system-aarch64 -M virt -cpu host \
  -m 256M -smp 2  -nographic \
  -bios QEMU_EFI.fd \
  -cdrom seed-kvm-bionic-01.iso \
  -drive if=none,file=bionic-image-01.img,id=hd0 -device virtio-blk-device,drive=hd0 \
  -device virtio-net-device,netdev=vmnic -netdev user,id=vmnic \
  -accel kvm 2>/dev/null
Most of these options should be self explanatory (see the QEMU docs for more details), but note in particular that we:
- allocate 256MiB of memory and restrict to two processors, no graphics (second line); and
- turn on KVM acceleration (last line) and specify the
hostcpu type (which requires it; first line).
If you are running on a 2GiB or 4GiB RPi4, feel free to allocate more than 256MiB of memory in the above.
If you see a grub boot screen displayed, just press Enter to continue. A small number of error messages may also be shown, but after a few seconds the bionic image should start booting; you will see its kernel output followed by standard systemd traces, printed to the same console window in which you issued the above qemu-system-aarch64 call.
Shortly thereafter, if all is well, you should be greeted by a login prompt. Log in as user ubuntu, password passw0rd.
Once in, you can then play around with your Ubuntu system! Here's a screenshot from an RPi3B+, running an 18.04 Ubuntu QEMU guest following the instructions just given:
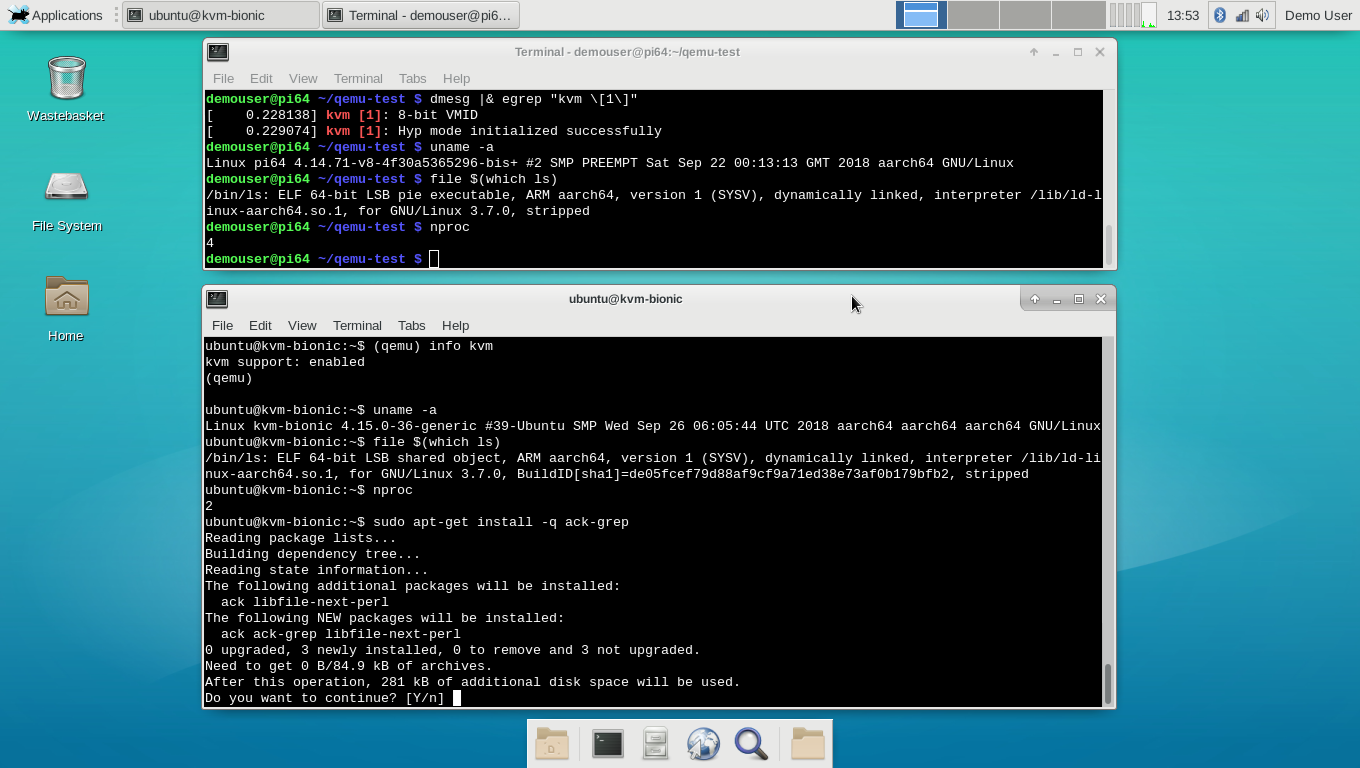
Note how the Gentoo (top console) and Ubuntu (bottom console) instances in the above screenshot are running different kernels - this is not simply a chroot. And also that the system load is very low, due to the efficiency of the KVM virtualization.
The ubuntu user has full sudo rights, so you can easily parlay to a root prompt with sudo su --login root, should you so wish.
One point: with networking set up as here, you can't
pingfrom inside the guest system, but you canwgetetc., and soapt-getworks. This networking issue can easily be resolved, but this isn't a detailed QEMU tutuorial.
On the text console, you can use Ctrla then c to switch between the bash prompt and the QEMU monitor prompt (e.g. see the top of the lower console window in the above screenshot).
The current kernel config may be viewed here, diff against the standard
bcmrpi3_defconfighere.
Have fun ^-^
Now that you have a console-based QEMU guest OS running with KVM virtualization, why not extend it to run a GUI? Please see these instructions for details on how to proceed.
