Scene
A Scene is the main component of Animator. It holds the entities and the animations that you want to display or save. To use Animator, you need to create a scene first.
import animator as am

scene = am.Scene()
# add your code here
scene.play_frames()
The rest of the documentation assumes that you have this code snippet at the beginning and that you add your code where the comment is.
You can set the resolution of your scene by specifying the width: int and height: int of your scene in pixels. The default values are 854 and 480, respectively.
scene = am.Scene(1920, 1080)Alternatively, you can use a predefined resolution string to create your scene. The available resolutions and their corresponding dimensions are:
| Resolution | Width | Height |
|---|---|---|
144p |
256 | 144 |
240p |
426 | 240 |
360p |
640 | 360 |
480p |
854 | 480 |
720p, hd
|
1280 | 720 |
1080p, fhd, fullhd
|
1920 | 1080 |
1440p, 2k
|
2560 | 1440 |
2160p, 4k, uhd, ultrahd
|
3840 | 2160 |
scene = am.Scene('fhd')In addition to the above, you can also swap the width and height of your scene. To do this, simply put a - sign in front of the resolution string. It's a handy trick if you want to change the orientation of your scene.
scene = am.Scene('-fhd') # width=1080, height=1920The width and height of your scene can be accessed as scene.width and scene.height.
Say you want to render the same scene at different resolutions. If you just change the width or height of your scene, the entities in your scene will not be scaled automatically, and they may appear too large or too small. For example:
scene = am.Scene(200, 200)
scene.add(am.Circle(100))
Output

scene = am.Scene(400, 400)
scene.add(am.Circle(100))
Output

The scene is resized, but the circle stays the same size, so it looks smaller. To fix this, you can use the scale argument to scale the scene and its entities by a given factor. You can use a float value to scale your scene proportionally, or a tuple of two integers to scale your scene to width and height separately. You can also use a resolution string to scale your scene to match that resolution. These options are equivalent to the first two arguments of the constructor (width/resolution, height).
scene = am.Scene(200, 200, scale=2)
scene.add(am.Circle(100))
Output

The scene and the circle are both scaled up, so they look the same.
If the aspect ratio of the scale (remember, scale can be a tuple or a string) is different from the aspect ratio of the scene, the scene will be padded with empty space to fit the scale. This may reveal some content that is outside the original scene boundaries. To avoid this, you can call scene.clip() to trim the excess content.
Note that, scaling a scene does not change the width or height of the scene. It only creates a scaled frame.
You can set the frames per second of your animation by specifying the fps: int argument. The default value is 30. This argument affects the duration and quality of your animation when you save it. When you play your animation, the actual fps may vary depending on your system resources.
scene = am.Scene('2k', fps=60)The FPS can be accessed as scene.fps.
You can set the background color of your scene by setting scene.bgcolor to a skia Color4f object. You can use the am.color() function to parse a color string. The default background color is opaque black. Note that, most default colors used across Animator assumes a black background.
scene = am.Scene()
scene.bgcolor = am.color('white')
The scene uses an internal frame to store the pixel values of its content. You can access this frame as scene.frame. The frame is a numpy array with the shape (height, width, 4), where the last dimension represents the RGBA values of each pixel. The frame may contain random values when the scene is created. Ideally, the scene will clear the frame before drawing anything on it.
The scene also uses a skia canvas to draw on the frame. You can access this canvas as scene.canvas.
When a scene is scaled to fit a different aspect ratio, it may have empty space on the sides as padding. However, this does not prevent the scene from drawing anything outside its original boundaries. To avoid this, you can use the scene.clip() method to clip out the extra space. This method will also clear the scene before clipping to remove any random values.
scene = am.Scene(200, 100)
scene.add(am.Circle(100))
Output

scene = am.Scene(200, 100, scale=(200, 200))
scene.add(am.Circle(100))
Output

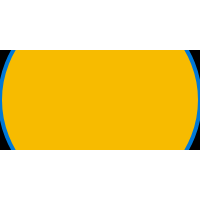
A 200x100 scene is scaled to fit a 200x200 frame, but the original aspect ratio is not preserved. The scene is padded with empty space at the top and bottom. The circle is fully visible in the padded area.
scene = am.Scene(200, 100, scale=(200, 200))
scene.clip()
scene.add(am.Circle(100))
Output
A 200x100 scene is scaled to fit a 200x200 frame, but the original aspect ratio is not preserved. The circle is not visible in the padded area.
Before drawing anything on the scene, it is necessary to clear the scene, either to eliminate any garbage values or the previous drawing. This can be achieved by invoking either scene.clear() or scene.clear_with_bgcolor().
The scene.clear() method erases the scene by setting all the pixels in the frame to 0. Although slightly slower than scene.clear_with_bgcolor(), it functions regardless of the clip status.
On the other hand, the scene.clear_with_bgcolor() method erases the scene by filling it with the background color (bgcolor). It is faster than scene.clear(), but it only affects the clipped area of the scene. This method is used internally by the scene to erase the frame before any drawing occurs.
The scene utilizes a Skia canvas to draw on the frame, which can be accessed through scene.canvas. This allows for drawing on the scene in a primitive manner and supports anything the Skia canvas offers. For further details about the Skia canvas, refer to the Skia documentation. Here's an example:
scene.canvas.drawCircle(
    (scene.width / 2, scene.height / 2), 100, am.skia.Paint(color=am.skia.ColorRED)
)
scene.show_frame()
Output

Context2d serves as a wrapper around a Skia canvas, providing methods similar to the HTML canvas element. It offers a more convenient way to draw using the canvas and can be accessed through scene.context2d. For additional information about Context2d, consult its documentation. Here's an example:
ctx = scene.context2d
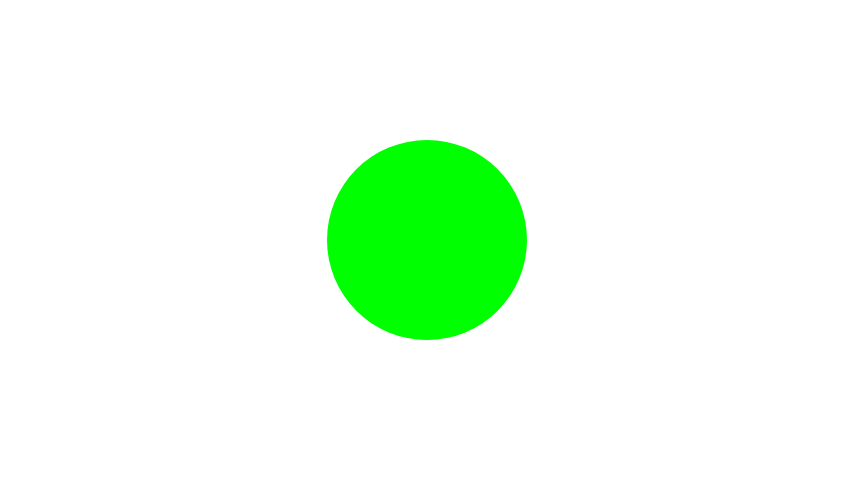
ctx.circle(scene.width / 2, scene.height / 2, 100)
ctx.fillStyle = am.skia.ColorGREEN
ctx.fill()
scene.show_frame()Output
The scene.quickdraw() method offers a quick means to draw and visualize the scene. This method serves as a context manager, returning a Context2d object that can be utilized for drawing on the scene. Once the context is exited, the scene is displayed in a new window or in the Jupyter notebook output, depending on the environment.
import animator as am

scene = am.Scene()
with scene.quickdraw() as ctx:
    ctx.circle(scene.width / 2, scene.height / 2, 100)
    ctx.fill()
The above code will display a circle in the center of the scene.
Entities are the preferred way to draw in Animator. Entities are objects that can draw on the scene and transform their appearance as needed. You can read more about the Entity class and its methods in its documentation. To add an entity to the scene, you can use the scene.add() method, which takes one or more entities as arguments. Animator comes with a number of predefined entities that you can use to create various graphics and animations. You can also create your own custom entities by subclassing the Entity class.
scene.add(am.Circle(100), am.Rect(200, 100, fill_color='red'))  # add two entities
scene.add(
    rect := am.Rect(
        200,
        fill_color=am.Gradient.Linear(0, 0, 200, 200)
        .add_colors('green', 'blue')
        .build(),
    ).rotate(45)
)
rect.set_relative_pos(am.relpos.TL)  # set the relative position of the rectangle to the top left of the scene
Output

While entities can be created by themselves, some of the methods of the Entity class require a scene to work properly. For example, the set_relative_pos() method in the above example needs to know the dimensions of the scene to position the entity correctly. That's why we add the entity to the scene first before calling the method. We use the walrus operator to assign the entity to a variable, so that we can access its methods later.
However, you may not need to add the entity to the scene always. In some cases, you may just want to attach the entity to the scene without adding it to the scene's list of entities. You can do this by using the @ operator, which attaches the entity to the scene and returns the entity itself. This allows you to chain the entity's methods after the operator.
circle = am.Circle(100)
circle.set_relative_pos(am.relpos.TOP)  # This will fail because the circle does not have a scene to refer to.
(circle @ scene).set_relative_pos(am.relpos.TOP) # This will work because the circle is attached to the scene and positioned at the top of the scene.Another way of drawing on the scene is by using the scene.on_draw(func) method, which allows you to add callbacks that are called every time the scene is drawn (draw phase). The on_draw function takes a callback function as an argument, which is called on each frame. You can use this function to control animations manually or run code on each frame. The function may also return one or more entities. These entities will then be temporarily added to the scene, drawn on the frame, and then removed. Internally, this method just adds a FuncEntity to the scene. This method can also be used as a decorator, as shown in the following example:
t = 0

@scene.on_draw
def draw():
    global t
    t += 1
    return am.Circle(100, pos=(t / 60 * scene.width, t / 60 * scene.height))

scene.wait(2)  # wait for 2 seconds to see the animation
Output

Animations is what Animator is made for. You can learn more about animation in its documentation, but here's a gist.
A scene follows these steps to update a frame:
- Go through all animations and update each one that needs updating. This is the update phase.
- Clear the frame using the scene's background color.
- Draw all the entities in the scene. This is the draw phase.
- Display the updated frame.
Internally, all animations reside on a timeline. They start at a point in the timeline and goes on for a certain duration. To add an animation to the timeline, the most primitive method, scene.animation_manager.add(anim, start_time) can be used. The duration for the animation is specified in the animation itself. Everything is in seconds.
scene.animation_manager.add(am.DrawIn(am.Circle(100), 2), 0)Output

An animation which creates a circle in the scene with a duration of 2 seconds. The animation will start at the beginning of the timeline, ie. at time 0.
Instead of adding each animations at a specific time, you can instead use scene.animate(anim) which will add the animations using a internal marker. The marker starts at time 0. Calling scene.wait() will update the marker to the end of all the added animations.
scene.animate(am.SlideIn(circle := am.Circle(100), 2))  # add an animation of 2 seconds at 0th second, marker remains at 0th second
scene.wait(1)  # add a wait of 1 second at 2nd second, the marker is now at 3 seconds
scene.animate(am.SlideOut(circle, 2, dir=am.relpos.BOTTOM))  # add an animation of 2 seconds at 3rd second, marker remains at 3rd second
Output

Animations in Animator are somewhat asynchronous, as demonstrated in the following code:
scene.add(circle := am.Circle(100, pos=(200, 200)))  # add a circle at (200, 200)
scene.animate(am.Move.to(circle, (400, 300), 1))  # add an animation to move the circle to (400, 300)
scene.wait()  # update the marker

scene.add(text := am.Text(str(circle.pos)))  # add text
text.set_relative_pos(am.relpos.TL)  # set the text position to the top left of the scene

scene.wait(1)  # wait for 1 second
Output

While the code might be expected to add a circle at (200, 200), move it to (400, 300), and then display text showing the new position, the reality is different. The text is present throughout the animation and displays the old position. This is because animations only run when the scene is played, specifically when scene.update() is called. In this case, the circle is added, an animation is added (but not played), and then text is added, displaying the old position. The scene is then played, and the position updates.
To address this issue, you can add the text within the animation timeline so that it occurs when the animation reaches that point in time. This is achieved by using the scene.once(func) method, which adds the func function to the timeline at the current time indicated by the internal marker. Internally, this method adds a Once animation to the scene. Additionally, this method can be used as a decorator, as shown in the following example:
scene.add(circle := am.Circle(100, pos=(200, 200)))
scene.animate(am.Move.to(circle, (400, 300), 1))
scene.wait()

@scene.once  # call the function once after the above animation
def func():
    scene.add(text := am.Text(str(circle.pos)))
    text.set_relative_pos(am.relpos.TL)

scene.wait(1)
Output

In this updated code, the text is added only after the move animation is completed, ensuring it reflects the new position of the circle.
A more natural way to handle animations is to expect that each animation finishes before adding the next one to the scene. This ensures that after an animation is done, the next line of code runs with the updated values. Instead of using the somewhat complex scene.once method, you can simplify things by using scene.synced_anim(func). In this case, func is a generator function that yields the animations you want to run. This method internally adds a SyncedAnim animation to the scene. Like other similar methods, you can also use this method as a decorator.
@scene.synced_anim
def func():
    yield (circle := am.Circle(100, pos=(200, 200)))  # yield an entity to be added to the scene
    yield am.Move.to(circle, (400, 300), 1)  # yield an animation to run it
    # no need for a wait here because there's no internal marker to update

    text = am.Text(str(circle.pos)) @ scene  # at this point, the circle's position is updated
    text.set_relative_pos(am.relpos.TL)  # we also attached the text to the scene above, allowing us to position it relative to the scene
    yield text  # now yield the text

    yield am.Wait(1)  # yield a wait of 1 second; can't use scene.wait(1)
Output

Another method to update the scene is to use scene.on_update(func), which runs func on each frame (update phase). If the function returns True, it will stop. Unlike scene.on_draw, which is called during the draw phase after the scene is cleared, scene.on_update runs before the scene is cleared. Avoid drawing anything within this function as it will be cleared. Internally, this method adds a FuncAnim animation to the scene. This method can also be used as a decorator.
scene.add(circle := am.Circle(100))

@scene.on_update
def func():
    circle.pos.offset(6, 3)  # on each frame, move the circle 6 pixels to the right and 3 pixels down
    return circle.pos.fX > scene.width  # stop when the center of the circle reaches the right edge of the scene
Output

A call to the update method moves all animations forward by one frame and draws the updated entities. It returns True if there are pending animations and False when all animations are done. However, you don't need to manually call update; you can use these methods instead.
Use scene.show_frame() to show only the current frame. This action opens a window showing the current frame. Note that this method does not call update.
If you’re using a Jupyter notebook, you can simply run the scene as the only statement, or as the last statement of a cell, and the current frame will be displayed.
Call scene.save_frame(path, quality) to save only the current frame. Supported formats include png, jpg/jpeg, and webp. Set quality as an integer between 1 and 100 (default). You can use {} in the path, and it will be replaced with the frame number.
To play through the animation, call scene.play_frames(delay, keep_open). This opens a window and plays the animations. Optionally, provide a delay between each frame in seconds; otherwise, the scene's fps is used. Use 0 to play animations as fast as possible.
By default, the window stays open after the animations finish, displaying the final frame. Pass keep_open=False to automatically close the window after the animations finish.
Animator provides various display methods, with the choice based on installed modules and speed considerations. The available methods are prioritized, with those at the top taking precedence. Closing the window is as simple as pressing Esc.
- HTML: Exclusive to Jupyter notebooks, this method displays the animation in the output cell.
-
Qt: Requires installation of either
PyQt4orPyQt5. -
Tkinter: Requires
tkinterinstallation and typically works in most cases. This method includes a faster variant (preferred over the traditional one) that directly calls the C library for quicker drawing, inspired by matplotlib. -
OpenCV: Requires installation of
opencv. -
Matplotlib: Requires installation of
matplotlib.
To save the animations as a video, call scene.save_frames(path). Ensure that ffmpeg is installed for this operation. It uses the scene's fps to create the video, and currently, only mp4 format is confirmed to work. The method accepts additional experimental parameters, but you can pass cmd=path to ffmpeg to provide the ffmpeg command. For example, it is cmd='ffmpeg.exe' on Windows. Alternatively, provide the path to the ffmpeg binary. Use force=True to overwrite existing files.
Animator uses an absolute coordinate system, with the top left corner being (0, 0) and the bottom right corner being (width, height). However, you can also use relative coordinates, with (0, 0) being the center, (-1, -1) being the top left corner, (1, 1) being the bottom right corner, and so on.
Code
scene.add(am.Line(scene.width / 2, 0, scene.width / 2, scene.height, stroke_width=1))
scene.add(am.Line(0, scene.height / 2, scene.width, scene.height / 2, stroke_width=1))

def pos_text(rel: am.relpos.RelativePosition) -> am.Entity:
    abs = scene.r2a(rel, padding=0)
    text = (
        am.Text.from_htmlish(
            f'<span color="red300">Abs: ({abs.fX:g}, {abs.fY:g})</span>, <span color="green300">Rel: ({rel[0]:g}, {rel[1]:g})</span>'
        )
        @ scene
    )
    text.set_relative_pos(rel, padding=0)
    return am.Group(pos=(0, 0))[am.Point(10, pos=abs), text]

scene.add(pos_text(am.relpos.TL))
scene.add(pos_text(am.relpos.TR))
scene.add(pos_text(am.relpos.BR))
scene.add(pos_text(am.relpos.BL))
scene.add(pos_text(am.relpos.CENTER))
scene.add(pos_text(am.relpos.TOP))
scene.add(pos_text(am.relpos.RIGHT))
scene.add(pos_text(am.relpos.BOTTOM))
scene.add(pos_text(am.relpos.LEFT))
scene.add(pos_text(am.relpos.TL / 2))
scene.add(pos_text(am.relpos.BOTTOM / 2 + am.relpos.RIGHT / 3))
Output

Some predefined relative positions are available.
am.relpos.LEFT   = [-1,  0]
am.relpos.RIGHT  = [ 1,  0]
am.relpos.TOP    = [ 0, -1]
am.relpos.BOTTOM = [ 0,  1]
am.relpos.CENTER = [ 0,  0]
am.relpos.TL     = [-1, -1]
am.relpos.TR     = [ 1, -1]
am.relpos.BL     = [-1,  1]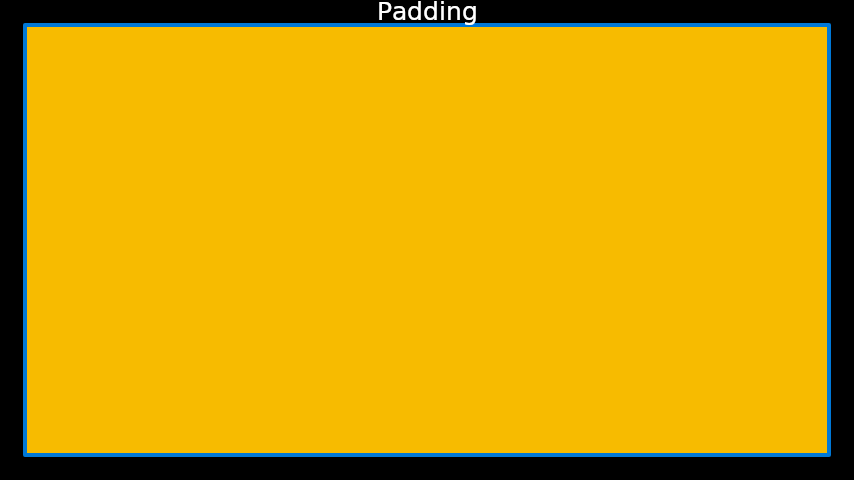
am.relpos.BR = [ 1, 1]You can change a point's relative position to an absolute one for a specific scene using scene.r2a(relative_position, padding=25). Here, padding refers to the extra space at the edges of the scene for better visibility.
Code
padding = 25
scene.add(rect := am.Rect(scene.width - 2 * padding, scene.height - 2 * padding).center())
scene.add(text := am.SimpleText('Padding', font_size=padding).center())
text.set_relative_to_entity(rect, am.relpos.TOP, padding=0)
Output
To convert a rectangle's relative position to an absolute one for a specific scene, use scene.r2a_bounds(bounds: skia.Rect, relative_position, anchor=relative_position, padding=25). Here, anchor refers to the rectangle's relative position that will align with the scene's relative position.
scene.add(am.Line(scene.width / 2, 0, scene.width / 2, scene.height, stroke_width=1))
scene.add(am.Line(0, scene.height / 2, scene.width, scene.height / 2, stroke_width=1))

scene.add(c1 := am.Circle(100, style='stroke', color='red500'))
# align the center of the red circle to the center of the scene
c1.set_relative_pos(pos=am.relpos.CENTER)

scene.add(c2 := am.Circle(100, style='stroke', color='green500'))
# align the center of the green circle to the bottom right corner of the scene with a padding of 25
c2.set_relative_pos(pos=am.relpos.BR, anchor=am.relpos.CENTER)

scene.add(s1 := am.Square(100, style='stroke', color='blue500'))
# align the top left corner of the blue square to the top left corner of the scene with a padding of 25
s1.set_relative_pos(pos=am.relpos.TL)

scene.add(s2 := am.Square(100, style='stroke', color='yellow500'))
# align the bottom left corner of the yellow square to the center of the scene; the padding is only at the edge of the scene
s2.set_relative_pos(pos=am.relpos.CENTER, anchor=am.relpos.BL)

scene.add(rr := am.RoundRect(200, r=25, style='stroke', color='purple500'))
# align the top right corner of the purple round rect to the bottom left corner of the scene with a padding of 25; only the top right corner is visible
rr.set_relative_pos(pos=am.relpos.BL, anchor=am.relpos.TR)
Output
